"Life" of John Conway on Qt
Hi, {{username}}!

Today I want to show you how to implement everyone's favorite game of John Conway's Game Of Life on Qt. We will write on widgets. Using this project as an example, I will show how to work with QPainter, several classes from core, layouts, and generally graphics in Qt Widgets. Anyone who is interested in this game or work with graphics on Qt, please read further. In general, the article is focused on beginners, but advanced guys will also have something to read :).
')
To whom laziness - here lies the source of the project. You can collect immediately, dependencies on core, gui.
We want to implement Conway's Game Of Life with all the rules for Qt GUI. It should be beautiful, scalable. It should be possible to set the size of the field, the interval between generations, the choice of color for the cells. Still need buttons Start, Stop, Clear. You need to be able to save and load the game with all configs.
We will do so. on QPaintEvent, we will recalculate the width of the cell depending on the width of the window, draw a grid and cells. We'll keep everything pretty in the layouts, at the Design stage, we'll figure it out. As part of the settings - all very neatly put in a small socket.
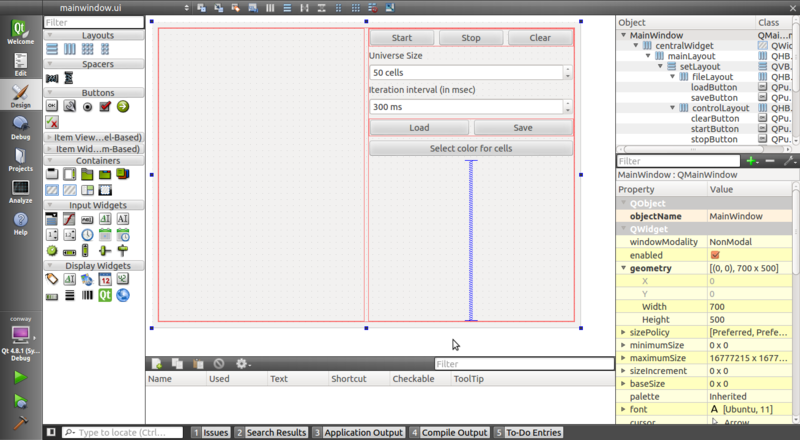
In general, I decided not to particularly dwell on this point. I will not teach anyone how to do trivial things in the UI Designer. Just sign for the architecture. Create a horizontal layout manager. Layout under it centralWidget. Then we insert there (in horizontal) two vertical managers. In the left there will be a window with the game, in the right - the settings. In the designer, they look like the same size, but we will specify the stretch factor (the width factor relative to the neighboring layout) in the code. Insert the QWidget into the game's layout - which, by the way, we will then promote to our game widget, and the settings-layout)). You can talk for a long time, but it is better to show:
Let's start with the algorithm. I apologize, but I was too lazy to think and I decided to implement the simplest algorithm for simulating "Life" - with full calculation. The essence of the algorithm is extremely simple. For each cell, we consider its fate based on the previous generation and its neighbors. Advantages of the algorithm - it is as simple as a mineral water cap. Cons - quite expensive. But, as it happens with everyone - laziness won. I already came up with a few points. We will store two matrices (universe, next) for the current and next generation. We also need the m_masterColor variable to store the color of the cell, the timer for the timer, universeSize is the size of the matrix. We will simply do:
I will not dwell on the implementation of this whole algorithm, but only on a small part of it - drawing. A bit of theory. In Qt, for graphics, QPainter is primarily responsible, it contains methods for working with graphics. You can draw with it on the widget only in paintEvent (). By the way, here's what it looks like:
We will go deeper. Here we have created an instance of QPainter and pass its reference to the paintGrid () and paintUniverse () methods. They are engaged exclusively in drawing the model (matrix universe). Everything is just like a clock. Now consider paintGrid ():
In the comments all the points that may not be clear - painted. Now we will see how our "universe" is drawn:
That's fine. We can assume that we have learned to draw. I'm still not going to particularly dwell on QPainter - it is even very well described in the documentation, but I will say that it is based on three elephants - a pen (pen), a brush (brush) and a figure (QRect, QCircle ...). The pen draws the outline of the shape, the brush draws its fill. In the last listing, we didn’t set the pen, because we don’t want a small square to outline, but we set a brush to fill.
But how do we give the user the ability to mark cells? Obviously, we will re-implement the keyPressEvent () method and will do something about it. Here is the way of its listing:
This functionality is implemented by two buttons - Save / Load. Their task is to open and save files with game cards. The file is stored:
Sample format:
Size maps implement GameWidget :: cellNumber () and GameWidget :: setCellNumber ()
Dump - GameWidget :: dump () and GameWidget :: setDump ().
The color is GameWidget :: masterColor () and GameWidget :: setMasterColor ().
The interval is GameWidget :: interval () and GameWidget :: setInterval ().
On the shoulders of MainWindow, it remains only to write and read correctly. I will list the loadGame () function:
I will not tell much here - it is implemented through QColorDialog and methods (mentioned above) of the GameWidget class. By the way, to the left of the button text there is a square filled with the color that was selected. This is done through QIcon, which receives a QPixmap of 16x16 size - filled with masterColor.
I will not tell you how to start a timer (timer-> start ()) or redraw the widget (update ()) - I hope this is clear, in the end, Qt has, I’m not afraid to say, one of the best documentation in the world.
Please do not write in the comments that the cells turned out to be rectangular, not square. This is really my joint - I should have wrapped it all in QAbstractScrollArea - but it turned out that I did not. In the end, forks and pull requests are welcome - it's not for nothing that I hosted GitHub)).

"Machine gun" gliders on the field 50x50 with blue color.

"Machine gun" gliders on the field 100x100
The same machine gun, only with orange color.
Thank you all for taking the time to read this article.
Once again source on github .
Map with machine gun on github: gist .
Successes to you, and the main thing - the successful maiden,
Ilya.
Today I want to show you how to implement everyone's favorite game of John Conway's Game Of Life on Qt. We will write on widgets. Using this project as an example, I will show how to work with QPainter, several classes from core, layouts, and generally graphics in Qt Widgets. Anyone who is interested in this game or work with graphics on Qt, please read further. In general, the article is focused on beginners, but advanced guys will also have something to read :).
')
To whom laziness - here lies the source of the project. You can collect immediately, dependencies on core, gui.
Idea
We want to implement Conway's Game Of Life with all the rules for Qt GUI. It should be beautiful, scalable. It should be possible to set the size of the field, the interval between generations, the choice of color for the cells. Still need buttons Start, Stop, Clear. You need to be able to save and load the game with all configs.
Architecture
We will do so. on QPaintEvent, we will recalculate the width of the cell depending on the width of the window, draw a grid and cells. We'll keep everything pretty in the layouts, at the Design stage, we'll figure it out. As part of the settings - all very neatly put in a small socket.
Design
In general, I decided not to particularly dwell on this point. I will not teach anyone how to do trivial things in the UI Designer. Just sign for the architecture. Create a horizontal layout manager. Layout under it centralWidget. Then we insert there (in horizontal) two vertical managers. In the left there will be a window with the game, in the right - the settings. In the designer, they look like the same size, but we will specify the stretch factor (the width factor relative to the neighboring layout) in the code. Insert the QWidget into the game's layout - which, by the way, we will then promote to our game widget, and the settings-layout)). You can talk for a long time, but it is better to show:
Start thinking
Let's start with the algorithm. I apologize, but I was too lazy to think and I decided to implement the simplest algorithm for simulating "Life" - with full calculation. The essence of the algorithm is extremely simple. For each cell, we consider its fate based on the previous generation and its neighbors. Advantages of the algorithm - it is as simple as a mineral water cap. Cons - quite expensive. But, as it happens with everyone - laziness won. I already came up with a few points. We will store two matrices (universe, next) for the current and next generation. We also need the m_masterColor variable to store the color of the cell, the timer for the timer, universeSize is the size of the matrix. We will simply do:
- Called startGame ()
- The timer starts spinning at a specified interval.
- On timeout (), run newGeneration ()
- Here we fill the next matrix based on bool isAlive (row, col)
- Redirecting next to universe
- Redraw the widget via update ()
- paintEvent () calls grid and cell drawing methods
- And so long and tedious, while the timer is running.
- And the timer works until the moment when universe == next or stopGame () is not called
I will not dwell on the implementation of this whole algorithm, but only on a small part of it - drawing. A bit of theory. In Qt, for graphics, QPainter is primarily responsible, it contains methods for working with graphics. You can draw with it on the widget only in paintEvent (). By the way, here's what it looks like:
void GameWidget::paintEvent(QPaintEvent *) { QPainter p(this); paintGrid(p); paintUniverse(p); } We will go deeper. Here we have created an instance of QPainter and pass its reference to the paintGrid () and paintUniverse () methods. They are engaged exclusively in drawing the model (matrix universe). Everything is just like a clock. Now consider paintGrid ():
void GameWidget::paintGrid(QPainter &p) { QRect borders(0, 0, width()-1, height()-1); // borders of the universe QColor gridColor = m_masterColor; // color of the grid gridColor.setAlpha(10); // must be lighter than main color p.setPen(gridColor); double cellWidth = (double)width()/universeSize; // width of the widget / number of cells at one row for(double k = cellWidth; k <= width(); k += cellWidth) p.drawLine(k, 0, k, height()); double cellHeight = (double)height()/universeSize; // height of the widget / number of cells at one row for(double k = cellHeight; k <= height(); k += cellHeight) p.drawLine(0, k, width(), k); p.drawRect(borders); } In the comments all the points that may not be clear - painted. Now we will see how our "universe" is drawn:
void GameWidget::paintUniverse(QPainter &p) { double cellWidth = (double)width()/universeSize; double cellHeight = (double)height()/universeSize; for(int k=1; k <= universeSize; k++) { for(int j=1; j <= universeSize; j++) { if(universe[k][j] == true) { // if there is any sense to paint it qreal left = (qreal)(cellWidth*j-cellWidth); // margin from left qreal top = (qreal)(cellHeight*k-cellHeight); // margin from top QRectF r(left, top, (qreal)cellWidth, (qreal)cellHeight); p.fillRect(r, QBrush(m_masterColor)); // fill cell with brush of main color } } } } That's fine. We can assume that we have learned to draw. I'm still not going to particularly dwell on QPainter - it is even very well described in the documentation, but I will say that it is based on three elephants - a pen (pen), a brush (brush) and a figure (QRect, QCircle ...). The pen draws the outline of the shape, the brush draws its fill. In the last listing, we didn’t set the pen, because we don’t want a small square to outline, but we set a brush to fill.
But how do we give the user the ability to mark cells? Obviously, we will re-implement the keyPressEvent () method and will do something about it. Here is the way of its listing:
void GameWidget::mousePressEvent(QMouseEvent *e) { double cellWidth = (double)width()/universeSize; double cellHeight = (double)height()/universeSize; int k = floor(e->y()/cellHeight)+1; int j = floor(e->x()/cellWidth)+1; universe[k][j] = !universe[k][j]; update(); } Save / Open Map
This functionality is implemented by two buttons - Save / Load. Their task is to open and save files with game cards. The file is stored:
- Card size
- Card dump
- Color live cells
- Intergenerational Interval
Sample format:
[size] [dump] [red] [green] [blue] [interval] Size maps implement GameWidget :: cellNumber () and GameWidget :: setCellNumber ()
Dump - GameWidget :: dump () and GameWidget :: setDump ().
The color is GameWidget :: masterColor () and GameWidget :: setMasterColor ().
The interval is GameWidget :: interval () and GameWidget :: setInterval ().
On the shoulders of MainWindow, it remains only to write and read correctly. I will list the loadGame () function:
void MainWindow::loadGame() { QString filename = QFileDialog::getOpenFileName(this, tr("Open saved game"), QDir::homePath(), tr("Conway's Game Of Life File (*.life)")); if(filename.length() < 1) return; QFile file(filename); if(!file.open(QIODevice::ReadOnly)) return; QTextStream in(&file); int sv; in >> sv; ui->cellsControl->setValue(sv); game->setCellNumber(sv); QString dump=""; for(int k=0; k != sv; k++) { QString t; in >> t; dump.append(t+"\n"); } game->setDump(dump); int r,g,b; // RGB color in >> r >> g >> b; currentColor = QColor(r,g,b); game->setMasterColor(currentColor); // sets color of the dots QPixmap icon(16, 16); // icon on the button icon.fill(currentColor); // fill with new color ui->colorButton->setIcon( QIcon(icon) ); // set icon for button in >> r; // r will be interval number ui->iterInterval->setValue(r); game->setInterval(r); } Color selection
I will not tell much here - it is implemented through QColorDialog and methods (mentioned above) of the GameWidget class. By the way, to the left of the button text there is a square filled with the color that was selected. This is done through QIcon, which receives a QPixmap of 16x16 size - filled with masterColor.
What I don't want to pay attention to
I will not tell you how to start a timer (timer-> start ()) or redraw the widget (update ()) - I hope this is clear, in the end, Qt has, I’m not afraid to say, one of the best documentation in the world.
Please do not write in the comments that the cells turned out to be rectangular, not square. This is really my joint - I should have wrapped it all in QAbstractScrollArea - but it turned out that I did not. In the end, forks and pull requests are welcome - it's not for nothing that I hosted GitHub)).
Photos and examples
"Machine gun" gliders on the field 50x50 with blue color.
"Machine gun" gliders on the field 100x100
The same machine gun, only with orange color.
Thanks for reading
Thank you all for taking the time to read this article.
Once again source on github .
Map with machine gun on github: gist .
Successes to you, and the main thing - the successful maiden,
Ilya.
Source: https://habr.com/ru/post/147208/
All Articles