Publishing an ASP.NET MVC site to updated Windows Azure

It's no secret to anyone that on July 6th, Microsoft expanded Russian capabilities to work with Windows Azure and provided access to preview technologies. I want to tell about one of these technologies in this post.
Just want to say that most of the information is taken from the official manual and adapted to the perception by example. The original is written in English, so the Russian version does not hurt.
Step 1. Getting access
In order to use the new features of Windows Azure, you must first subscribe to a regular subscription. Now there is an opportunity to get a free subscription for 90 days, which includes some amount of computing power and functions.
After receiving a subscription, you need to add new features to it. This is done on your account page in the Preview Components section. At the moment we are interested in the possibility of using websites, so feel free to click the Try It Now button in the appropriate section, after which you will be asked to choose a subscription to which you want to add this feature. We choose our subscription, click on the check mark and this is done - you will receive a confirmation email, and a new section will appear in the cloud control panel.
Here it is worth making retreats and say a little about the updated interface of the Windows Azure subscription control panel. If you used it before, then you must have been unhappy that it was written in Silverlight, which slowed down, was tangled, ugly, etc. (well, at least I was unhappy). Now it's all in the past. The new subscription management portal is written using modern web technologies and does not require any plug-ins. One word - HTML5 to the masses :)

')
Step 2. Creating a website
So, after we entered the subscription management portal, we can now select the Web Sites section in the left pane. Now there will be empty, that we will try to fix it. At the bottom of the page there is a large + New button, when clicked, a menu opens with a selection of resources available for creation. Go to the section WEB SITE and select the item CREATE WITH DATABASE :
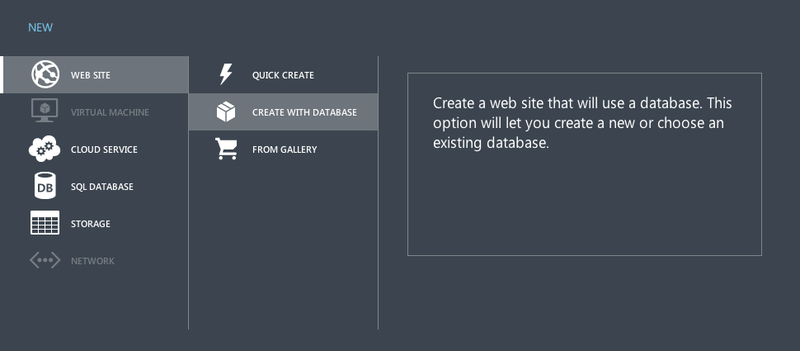
A wizard window will open to us, which will prompt us to choose the name of the future site, as well as the database settings - use an existing one or create a new one (SQL Server or MySQL):

In the second and third steps, we will have to specify the parameters of our future database, the default encoding, the login and password, and the geographical area where our virtual machine will be located. I chose Western Europe, more options are available from North Europe and US.
After you finish entering the settings for the new site and database and click the tick in the last step of the wizard, you will return to the subscription control panel, which will now contain information about your new resources:
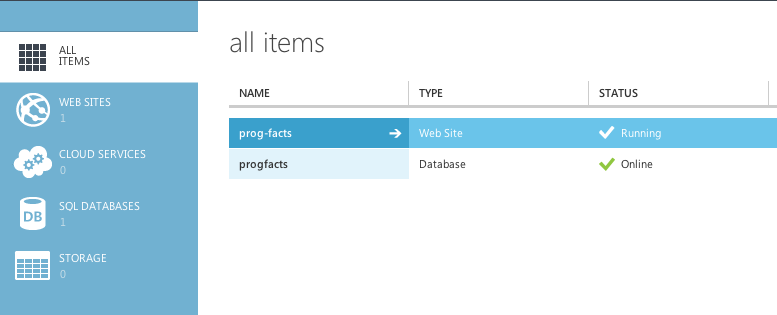
Pay attention to the Status column. If everything went well, then after some time (I had a couple of minutes) the web site will be in the Running state, and the database will be in the Online state. This means that now you can safely publish your application to the cloud.
Step 3. Publishing the site
In the official documentation for publishing sites in Windows Azure Web Sites, before this section there is still a rather extensive instruction for creating ASP.NET MVC 4 applications, which takes up almost half of the entire text. I will not describe in detail the process of creating a web application in Visual Studio, and I will confine myself to a simple spell:
File -> New -> Project -> Web -> ASP.NET MVC 4 Web Application -> Internet Application
Who understood, he understood, and who did not understand, at the end of the article there will be links to original materials, where all this is described in pictures.
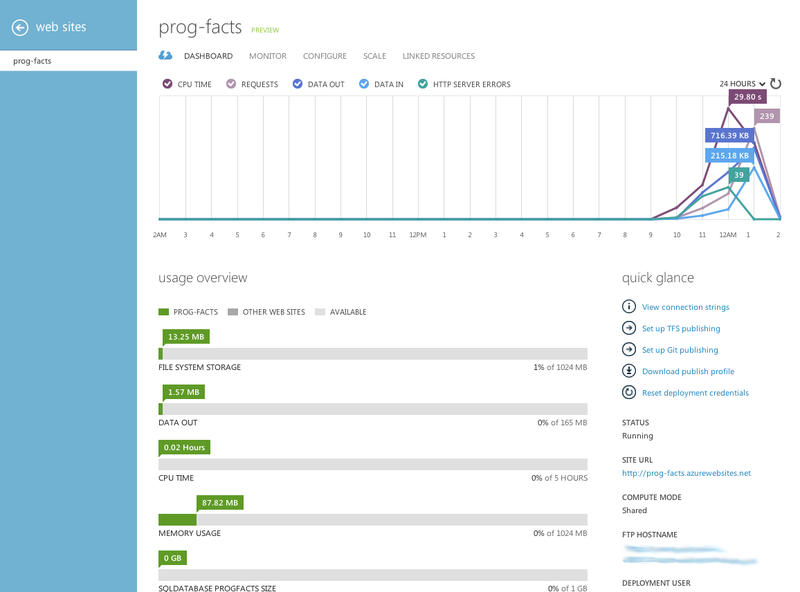
After we created the site, we can start publishing it in Azure. First we need to get information about which connection parameters to use in our project. Windows Azure carefully provides us with the ability to import all the necessary settings into our application in a couple of clicks. Go to the subscription control panel in the Web Sites section and select our new site in the list. You will see a control panel similar to this:
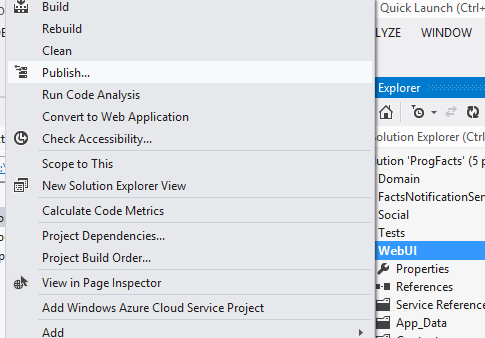
On the right side, where Quick Glance is written, there is the Download publish profile item. After clicking on it, we will be prompted to save the file with the .PublishSettings extension, which we will do. Go back to Visual Studio and right click on the web application project, Publish item:
In the window that appears, click the Import button and select the freshly downloaded file. Go ahead. In the next step, you do not need to change the settings, but you should click the Validate Connection button to make sure that everything is connected correctly:

In the next step of the wizard, select the configuration that we want to upload to the server. This is usually Release, although some prefer to use Debug. If you belong to such people, do not forget to change the setting. We will not touch the connection string to the database, as our application does not use the database yet.
Go to the next and last step of the wizard:

If you click on the Start Preview button, you can see a list of all the files that will go on publication at this moment. For example, the screenshot below shows that only one file was changed and only one file will be sent to the server:

We press the Publish button, after which Visual Studio forms the necessary package and sends it to our server in Azure. When the process is complete, the website with your application should automatically open.
Step 4. Adding DB
And again in the official manual a large number of pictures and descriptions are devoted to this section. I hope that most of you know how to work with databases in .NET and are familiar with the Entity Framework (because I used it and Windows Azure also implies it).
We assume that you have added EF-based database functionality to your application. We must somehow start it now. Remember when publishing a site, we missed the section responsible for working with the database? It's time to return to it and consider in more detail:

In the Databases section, you can see all your connection strings that are declared in the Web.config file. I have two lines here. The first is the connection string for EntityFramework. And there is an interesting option called Apply Code First Migrations. Who is following the EF update knows that the migration function has been added to the new version of EF, which allows the code to determine the difference between the two versions of the database and apply the necessary changes to an existing database without recreating it. So, when publishing to Windows Azure, you have the opportunity to use migrations and create a database in the same way as you publish your application. To do this, you just need to allow migration in your application and check the box (I’m not enabled, so the daw is inactive).
In the connection string field, you can select the required string that will appear in the published application. Windows Azure itself has already formed the necessary string in the publication profile, so you just have to select it from the list of available connection strings and use it. However, you have the right to modify it in any way you like or to choose any other row if you decide to use a database outside Azure.
Conclusion
Here are all the simple and few steps that you need to take in order to publish your ASP.NET MVC application to the new Windows Azure Web Sites. Absolutely nothing complicated, the whole procedure takes no more than 10-20 minutes (if everything went smoothly and without bugs).
It is worth saying about some limitations that currently exist in Windows Azure (translated from the documentation):
- The application should use only .NET 4. Unfortunately, .NET 4.5 is not supported yet, which is a pity (I ran into this item personally and caught the error while publishing)
- The application will work in integrated mode (not classic)
- Application should not use Windows authentication
- If you want to use various provider-based capabilities, then use ASP.NET Universal Providers (System.Web.Providers package from NuGet).
- If the application writes to files, then these files should be located in the application's content folder.
That's probably all that is worth saying. I hope the article will be useful and you will publish your site in the Windows Azure cloud as easily as I did.
You can see how the application works in the cloud at http://prog-facts.azurewebsites.net/ . I would be glad to habra testing and using the site (I wrote for training, but it would be nice if the idea developed further).
useful links
Windows Azure official website
Free subscription info
Component preview
Windows Azure Subscription Management Portal
Materials for .NET developers for Windows Azure
Instructions for publishing web applications in Azure
Source: https://habr.com/ru/post/147162/
All Articles