Android, NXT and Bluetooth
Many have already unpacked , described and programmed for Mindstorms NXT, so the circle of fans of this series is quite wide. Today it's time to expand this circle by describing the features of this constructor - bluetooth, thanks to which the constructor can be easily controlled from the phone.
The article will be useful to those who want to just play with something mechanical in their free time.
Since childhood, I like various designers, so this summer I decided to buy Mindstorms 8547, since the price was good enough and bluetooth was mentioned in the description. To my great disappointment, it turned out that it was absolutely not interesting to sit and put the cubes together - you feel a waste of time. But the program side of the issue beckoned. Reading the User Guide showed that it should be possible to control the robot using bluetooth, at least by trivial movements - forward / backward / left / right. There are already enough management programs on Google Play , but the challenge is to make one yourself.
Given:
1. Android phone (LG P970)
2. Machine from Mindstorms NXT 2.0
')
After several nights in google it turned out that the Lego site contains all the necessary information (I did not hope for such a gift). There is a description of the entire internal contents of the blocks, sensors and data transfer protocols. We are only interested in the “Bluetooth Developer Kit”. Inside 4 files:
• LEGO MINDSTORMS NXT Bluetooth Developer Kit.pdf
• Appendix 1-LEGO MINDSTORMS NXT Communication protocol.pdf
• Appendix 2-LEGO MINDSTORMS NXT Direct commands.pdf
• Appendix 3-LEGO MINDSTORMS NXT ARM7 Bluetooth Interface specification.pdf
So, the whole task is to:
1. to pair the phone and the NXT control unit
2. connect to the NXT unit
3. pass the correct command.
4. get an answer
byte 0: lower part of the command length
byte 1: the oldest part of the command length
byte 2: command type
byte 3: team
byte ...: arguments, depend on the command.
GETBATTERYLEVEL
Byte 0: 0x00 or 0x80
Byte 1: 0x0B
Return package:
Byte 0: 0x02
Byte 1: 0x0B
Byte 2: Status Byte
Byte 3-4: Voltage in millivolts (UWORD)
Knowing the exchange protocol, the implementation is no longer a problem. The task of connecting to the control unit is trivial and described on the Android site , the only interesting point is the creation of a socket. Create it turned out using the following code:
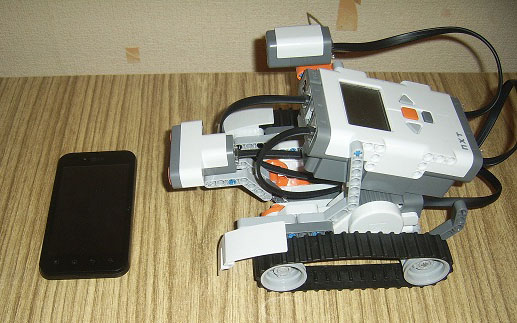
Illustrative example:
The article will be useful to those who want to just play with something mechanical in their free time.
Introduction
Since childhood, I like various designers, so this summer I decided to buy Mindstorms 8547, since the price was good enough and bluetooth was mentioned in the description. To my great disappointment, it turned out that it was absolutely not interesting to sit and put the cubes together - you feel a waste of time. But the program side of the issue beckoned. Reading the User Guide showed that it should be possible to control the robot using bluetooth, at least by trivial movements - forward / backward / left / right. There are already enough management programs on Google Play , but the challenge is to make one yourself.
Given:
1. Android phone (LG P970)
2. Machine from Mindstorms NXT 2.0
')
Implementation
After several nights in google it turned out that the Lego site contains all the necessary information (I did not hope for such a gift). There is a description of the entire internal contents of the blocks, sensors and data transfer protocols. We are only interested in the “Bluetooth Developer Kit”. Inside 4 files:
• LEGO MINDSTORMS NXT Bluetooth Developer Kit.pdf
• Appendix 1-LEGO MINDSTORMS NXT Communication protocol.pdf
• Appendix 2-LEGO MINDSTORMS NXT Direct commands.pdf
• Appendix 3-LEGO MINDSTORMS NXT ARM7 Bluetooth Interface specification.pdf
So, the whole task is to:
1. to pair the phone and the NXT control unit
2. connect to the NXT unit
3. pass the correct command.
4. get an answer
Command format:
byte 0: lower part of the command length
byte 1: the oldest part of the command length
byte 2: command type
byte 3: team
byte ...: arguments, depend on the command.
Examples:
Receiving battery charge:
GETBATTERYLEVEL
Byte 0: 0x00 or 0x80
Byte 1: 0x0B
Return package:
Byte 0: 0x02
Byte 1: 0x0B
Byte 2: Status Byte
Byte 3-4: Voltage in millivolts (UWORD)
code:
byte[]command = new byte[] {
0x02, 0x00, 0x00, 0x0b
};
mmOutStream.write(command);
mmOutStream.flush();
Forward movement:
byte[]command = new byte[] {
0x0C,
0x00,

0x00,
0x04,
(byte)0xFF,
100,
0x01,
0x00,
0x00,
0x20,
(byte)0x80,
0x00,
0x00,
0x00
};
Run the flooded program:
byte[]command = new byte[] {
0x0E,
0x00,
0x00,
0x00,
'M',
'i',
'n',
'd',
'e',
'r',
'1',
'.',
'r',
'x',
'e',
0x00
};
Knowing the exchange protocol, the implementation is no longer a problem. The task of connecting to the control unit is trivial and described on the Android site , the only interesting point is the creation of a socket. Create it turned out using the following code:
Method m = device.getClass().getMethod("createRfcommSocket", new Class[] { int.class });
BluetoothSocket sendSocket = (BluetoothSocket) m.invoke(device, 1);
Illustrative example:
Source: https://habr.com/ru/post/147120/
All Articles