Writing a plugin for Netbeans. Part one
Imagine the situation: you are programming in the development environment and you need someone to send a small piece of code from the editor. You select the desired piece, copy it, open the browser, go to pastebin, paste the code, copy the link, and then send it to the addressee. What about halving these steps?
For Netbeans, there is a PB4NB plugin, but it doesn’t work because of the API change in pastebin. Therefore, we will write our own plugin, which we will customize to our liking, and at the same time we will deal with the Netbeans platform a little. Interested? Welcome under cat.
To write plugins for Netbeans, we first need to activate the development module. To do this, go to the menu "Tools -> Plugins" and on the tab "Installed" activate "Developing Netbeans". Next, we will need documentation on the Netbeans platform. It is available as a plugin on the “Available Plugins” tab and is called “Netbeans API Documentation”. On this, perhaps, everything.
Create a new project (“File-> New Project-> Netbeans Module-> Module”) and click “Next”.
Enter the required name in the “Project Name” field, let it be “Pastebin”, click “Next”.
Fill in the “Code Name Base” field, for example, “com.pastebin.pastebinplugin” - this will be both the plugin's codename and the path to resources and classes. The “Module Display Name” field configures the visible name of the plug-in in the projects, we fill it in as “Send to Pastebin.com”, but you can enter something of your own there. Do not touch the rest of the fields, click "Finish".
A new project has been created, the structure of which looks like this.
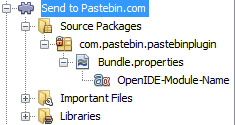
')
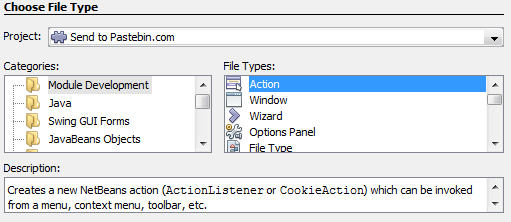
Now we turn directly to the creation of the plugin itself, namely to the class of its action. Select “Action” in “New-> Other-> Module Development” and click “Next”.
We are offered to choose the type of action: "Enabled all the time" or "Enabled if provided". Since we want to take a selected piece of code from the editor, that is, our plugin should be active only when the code editor is open, we will select the second type of “Conditionally Enabled”. In “Cookie Class” we put “EditorCookie”, because we need access to the editor, and not to the whole project. “User Selects One Node” is left selected, because we need the plug-in to be available when opening at least one node that supports EditorCookie. Click "Next".
In the next step, we will register the GUI for the plugin. That is, its location in the Netbeans window. Available location in any of the menus, on the toolbar, as well as in the context menu. To begin, set the category. “Edit” and “Source” are the most suitable for us from the list, we choose what we like the most, I chose the first one. Then you need to think about the easiest way for us to call the plugin. Personally, I did not want the icon to loom on the panel before my eyes all the time, so I added an item to the “Edit” menu, immediately after the “Paste” item. If it will be more convenient for you to launch the plugin by clicking the icon on the panel, then tick the “Global Toolbar Button” and choose a convenient place. After adjusting everything to taste, we move on to the next step.
The class name is filled with “PastebinAction”. “Display Name” is best filled as clearly as possible, for example, “Send to pastebin.com” because this is the display name of the menu item. Then select the 16x16 icon. If you chose a place on the toolbar in the previous step, you will have to add an icon with a size of 24x24. After that click "Finish".
All the settings we made will be visible in the generated code:
Although we haven’t really written anything yet, we can already run the plugin for review. Click "Run" and wait for the appearance of a new Netbeans window. After that, open an arbitrary text file and see a similar picture:
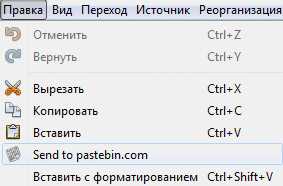
For unknown reasons, a new Netbeans window has been launched with Russian localization, but it doesn’t matter, we will soon teach our plugin the Russian language, but for now close the window and start to finally write the code.
It is not difficult to guess that the execution of the plugin will begin with the actionPerformed method, so we will write code in the body of this method. To begin, let's play with EditorCookie, which the IDE itself has offered us. But before that we add the necessary libraries, otherwise the following code simply does not compile.
In the project properties, select the tab “Libraries” and click “Add”.
Add “Nodes API”, and “Editor”.
Now let's write this code:
This code adds a couple of lines to the open source text when invoking the plugin. This is done in two different ways - through JEditorPane and through StyledDocument.
By running the project for execution, opening any file and calling the plugin, we will see how two lines were added:
// Hello, document!
// Hello, editor pane!
Well, let's continue writing the plugin itself. We need to get the selected part of the text, as well as the format of the source code being edited, so that we can properly configure the syntax highlighting in pastebin. We will use the first method - JEditorPane, since it has all the necessary methods for us. We will get the syntax highlighting format based on the MIME type of the document being edited.
Run the project, select a piece of code, run the plugin and see the result in the console. Then try not to select anything, run the plugin - the entire source will be displayed on the console. The last function seemed convenient to me, because sometimes you have to send the code completely.
So, having the code and its MIME type in hand, we can start writing the client. Here you can get help on the Pastebin API and find out your developer key.
Code: PastebinRequest , PastebinSender .
Add a field:
private final PastebinRequest request;
And initialize it in the constructor:
request = new PastebinRequest ();
Then we update the actionPerformed method:
I set up the setupRequest method to fit my needs, but you can change the parameters for you:
Before launching, let's simplify the call to our plugin by adding a hot key to activate it.
Replace the line:
@ActionReference (path = "Menu / Edit", position = 1250)
on:
@ActionReferences ({
@ActionReference (path = "Menu / Edit", position = 1250),
@ActionReference (path = "Shortcuts", name = "OS-P")
})
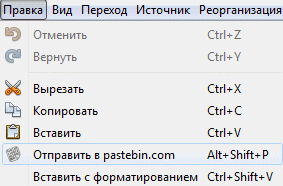
"OS-P", in this case, means "Alt + Shift + P". If there is no conflict with the existing hot keys, then launching the project, we will see:
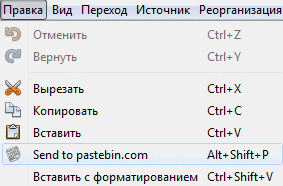
Select the text, click the specified combination and see a link to the placed code on the console. Hurray, comrades, we did it! It remains only to display a dialog box with this link. Let's get started
Let's create a new class and call it “UrlDialog”. The source code for this class is here . Add a method to the PastebinAction class:
In the actionPerformed method, replace the string:
System.out.println (pastedUrl);
on:
showUrlDialog (pastedUrl);
You will also have to add another library. To do this, in the project properties, re-open the “Libraries” tab and add the “Window System API”.
And finally, you need to open the localization file Bundle.properties and add a couple of lines there:
UrlDialog.title = Pasted url
UrlDialog.copyButton.text = Copy
Now you can run the project. Select the code, activate the plugin and see the window:
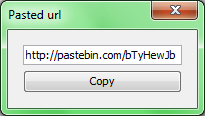
When you click on the “Copy” button, the link will be copied to the clipboard. You can make this window immediately close after copying; you can not show the window at all, but copy it to the clipboard immediately. Show your imagination and do as you please.
In the middle of the article, I promised that we would teach the Russian plugin. It is not difficult. Take a look at the latest annotation before the PastebinAction class. There is a line:
@Messages ("CTL_PastebinAction = Send to pastebin.com")
Feel free to delete it, then open Bundle.properties and add a line there:
CTL_PastebinAction = Send to pastebin.com
Now, in the Project Explorer window, right-click on the Bundle.properties file and select “Add-> Locale”. From the list of predefined localizations, select Russian and click OK.

A new file will be added, which should be opened and modified. The first line can be not translated, otherwise in the project browser window it will also be translated and will look bad:
OpenIDE-Module-Name = Send to Pastebin.com
UrlDialog.title = Link
UrlDialog.copyButton.text = Copy
CTL_PastebinAction = Send to pastebin.com
Well, it's time to check the work. Run and see:
So the last thing we have to do is connect the plugin to Netbeans. Right click on the project title and select “Create NBM”. Netbeans will kindly assemble the product of our activity into a file that is understandable for him, which will only be connected to “Tools-> Plugins-> Downloaded” by clicking “Add plugins” and selecting our nbm-file.
We created our own custom plugin for Netbeans, and also got a little familiar with the Netbeans platform.
The whole project can be downloaded here .
Information on the Netbeans platform is rather small, but here’s a link where you can find out at least something.
For Netbeans, there is a PB4NB plugin, but it doesn’t work because of the API change in pastebin. Therefore, we will write our own plugin, which we will customize to our liking, and at the same time we will deal with the Netbeans platform a little. Interested? Welcome under cat.
Training
To write plugins for Netbeans, we first need to activate the development module. To do this, go to the menu "Tools -> Plugins" and on the tab "Installed" activate "Developing Netbeans". Next, we will need documentation on the Netbeans platform. It is available as a plugin on the “Available Plugins” tab and is called “Netbeans API Documentation”. On this, perhaps, everything.
Creating a project
Create a new project (“File-> New Project-> Netbeans Module-> Module”) and click “Next”.
Enter the required name in the “Project Name” field, let it be “Pastebin”, click “Next”.
Fill in the “Code Name Base” field, for example, “com.pastebin.pastebinplugin” - this will be both the plugin's codename and the path to resources and classes. The “Module Display Name” field configures the visible name of the plug-in in the projects, we fill it in as “Send to Pastebin.com”, but you can enter something of your own there. Do not touch the rest of the fields, click "Finish".
A new project has been created, the structure of which looks like this.
')
Creating action
Now we turn directly to the creation of the plugin itself, namely to the class of its action. Select “Action” in “New-> Other-> Module Development” and click “Next”.
We are offered to choose the type of action: "Enabled all the time" or "Enabled if provided". Since we want to take a selected piece of code from the editor, that is, our plugin should be active only when the code editor is open, we will select the second type of “Conditionally Enabled”. In “Cookie Class” we put “EditorCookie”, because we need access to the editor, and not to the whole project. “User Selects One Node” is left selected, because we need the plug-in to be available when opening at least one node that supports EditorCookie. Click "Next".
In the next step, we will register the GUI for the plugin. That is, its location in the Netbeans window. Available location in any of the menus, on the toolbar, as well as in the context menu. To begin, set the category. “Edit” and “Source” are the most suitable for us from the list, we choose what we like the most, I chose the first one. Then you need to think about the easiest way for us to call the plugin. Personally, I did not want the icon to loom on the panel before my eyes all the time, so I added an item to the “Edit” menu, immediately after the “Paste” item. If it will be more convenient for you to launch the plugin by clicking the icon on the panel, then tick the “Global Toolbar Button” and choose a convenient place. After adjusting everything to taste, we move on to the next step.
The class name is filled with “PastebinAction”. “Display Name” is best filled as clearly as possible, for example, “Send to pastebin.com” because this is the display name of the menu item. Then select the 16x16 icon. If you chose a place on the toolbar in the previous step, you will have to add an icon with a size of 24x24. After that click "Finish".
All the settings we made will be visible in the generated code:
@ActionID( category = "Edit", id = "com.pastebin.pastebinplugin.PastebinAction") @ActionRegistration( iconBase = "com/pastebin/pastebinplugin/pastebin.png", displayName = "#CTL_PastebinAction") @ActionReference(path = "Menu/Edit", position = 1250) @Messages("CTL_PastebinAction=Send to pastebin.com") First start
Although we haven’t really written anything yet, we can already run the plugin for review. Click "Run" and wait for the appearance of a new Netbeans window. After that, open an arbitrary text file and see a similar picture:
For unknown reasons, a new Netbeans window has been launched with Russian localization, but it doesn’t matter, we will soon teach our plugin the Russian language, but for now close the window and start to finally write the code.
Routine
It is not difficult to guess that the execution of the plugin will begin with the actionPerformed method, so we will write code in the body of this method. To begin, let's play with EditorCookie, which the IDE itself has offered us. But before that we add the necessary libraries, otherwise the following code simply does not compile.
In the project properties, select the tab “Libraries” and click “Add”.
Add “Nodes API”, and “Editor”.
Now let's write this code:
public void actionPerformed(ActionEvent ev) { try { JEditorPane pane = context.getOpenedPanes()[0]; pane.setText("// Hello, editor pane!\n"+pane.getText()); context.openDocument().insertString(0, "// Hello, document!\n", null); } catch (Exception ex) { Exceptions.printStackTrace(ex); } } This code adds a couple of lines to the open source text when invoking the plugin. This is done in two different ways - through JEditorPane and through StyledDocument.
By running the project for execution, opening any file and calling the plugin, we will see how two lines were added:
// Hello, document!
// Hello, editor pane!
Well, let's continue writing the plugin itself. We need to get the selected part of the text, as well as the format of the source code being edited, so that we can properly configure the syntax highlighting in pastebin. We will use the first method - JEditorPane, since it has all the necessary methods for us. We will get the syntax highlighting format based on the MIME type of the document being edited.
public void actionPerformed(ActionEvent ev) { JEditorPane currentPane = context.getOpenedPanes()[0]; final String mimeType = NbEditorUtilities.getMimeType(currentPane); final String code = getSelectedText(currentPane); System.out.println(mimeType + "\n" + code); } private String getSelectedText(JEditorPane currentPane) { String text = currentPane.getSelectedText(); if (text == null) return currentPane.getText(); return text; } Run the project, select a piece of code, run the plugin and see the result in the console. Then try not to select anything, run the plugin - the entire source will be displayed on the console. The last function seemed convenient to me, because sometimes you have to send the code completely.
So, having the code and its MIME type in hand, we can start writing the client. Here you can get help on the Pastebin API and find out your developer key.
Code: PastebinRequest , PastebinSender .
Add a field:
private final PastebinRequest request;
And initialize it in the constructor:
request = new PastebinRequest ();
Then we update the actionPerformed method:
JEditorPane currentPane = context.getOpenedPanes()[0]; final String mimeType = NbEditorUtilities.getMimeType(currentPane); final String code = getSelectedText(currentPane); if (code != null) { RequestProcessor.getDefault().execute(new Runnable() { @Override public void run() { setupRequest(code, mimeType); String pastedUrl = PastebinSender.sendRequest(request.getRequestMessage()); System.out.println(pastedUrl); } }); } I set up the setupRequest method to fit my needs, but you can change the parameters for you:
private void setupRequest(String code, String mimeType) { request.initRequest(); request.setSourceCode(code); request.setFormat(mimeType); request.setExpireDate(PastebinRequest.EXPIRE_DATE.ONE_DAY); request.setUnlisted(true); request.setName(""); } Before launching, let's simplify the call to our plugin by adding a hot key to activate it.
Replace the line:
@ActionReference (path = "Menu / Edit", position = 1250)
on:
@ActionReferences ({
@ActionReference (path = "Menu / Edit", position = 1250),
@ActionReference (path = "Shortcuts", name = "OS-P")
})
"OS-P", in this case, means "Alt + Shift + P". If there is no conflict with the existing hot keys, then launching the project, we will see:
Select the text, click the specified combination and see a link to the placed code on the console. Hurray, comrades, we did it! It remains only to display a dialog box with this link. Let's get started
Let's create a new class and call it “UrlDialog”. The source code for this class is here . Add a method to the PastebinAction class:
private void showUrlDialog(final String pastedUrl) { SwingUtilities.invokeLater(new Runnable() { @Override public void run() { Frame frame = WindowManager.getDefault().getMainWindow(); UrlDialog dialog = new UrlDialog(frame, pastedUrl); dialog.setLocation(frame.getWidth() / 2, frame.getHeight()/2); dialog.setVisible(true); } }); } In the actionPerformed method, replace the string:
System.out.println (pastedUrl);
on:
showUrlDialog (pastedUrl);
You will also have to add another library. To do this, in the project properties, re-open the “Libraries” tab and add the “Window System API”.
And finally, you need to open the localization file Bundle.properties and add a couple of lines there:
UrlDialog.title = Pasted url
UrlDialog.copyButton.text = Copy
Now you can run the project. Select the code, activate the plugin and see the window:
When you click on the “Copy” button, the link will be copied to the clipboard. You can make this window immediately close after copying; you can not show the window at all, but copy it to the clipboard immediately. Show your imagination and do as you please.
Localization
In the middle of the article, I promised that we would teach the Russian plugin. It is not difficult. Take a look at the latest annotation before the PastebinAction class. There is a line:
@Messages ("CTL_PastebinAction = Send to pastebin.com")
Feel free to delete it, then open Bundle.properties and add a line there:
CTL_PastebinAction = Send to pastebin.com
Now, in the Project Explorer window, right-click on the Bundle.properties file and select “Add-> Locale”. From the list of predefined localizations, select Russian and click OK.
A new file will be added, which should be opened and modified. The first line can be not translated, otherwise in the project browser window it will also be translated and will look bad:
OpenIDE-Module-Name = Send to Pastebin.com
UrlDialog.title = Link
UrlDialog.copyButton.text = Copy
CTL_PastebinAction = Send to pastebin.com
Well, it's time to check the work. Run and see:
Create NBM module
So the last thing we have to do is connect the plugin to Netbeans. Right click on the project title and select “Create NBM”. Netbeans will kindly assemble the product of our activity into a file that is understandable for him, which will only be connected to “Tools-> Plugins-> Downloaded” by clicking “Add plugins” and selecting our nbm-file.
Results
We created our own custom plugin for Netbeans, and also got a little familiar with the Netbeans platform.
The whole project can be downloaded here .
Information on the Netbeans platform is rather small, but here’s a link where you can find out at least something.
Source: https://habr.com/ru/post/146788/
All Articles