Latex calculations? Yes, easily!
Those who have to make up the texts more difficult than the helpers know that the latex - a convenient superstructure above the tech - at the moment is almost the only way to quickly make up quality texts of any complexity. But not a single text ... Latech can be used for other purposes, about which the creator of Tech, Donald Knut, probably did not think.
I already wrote how you can typeset in the late presentation. Now I want to talk about how you can carry out simple calculations directly by the forces of latex.
For latek different people wrote a lot of all kinds of packages that extend its functionality and facilitate the work of the coder. Not forgotten and tools to help work with numerical data. Simple calculations using floating point numbers (single precision) can be performed directly by Tech. This is what the fp package is for. I just want to note that due to the latek's ability to execute external commands, you can even perform more complex actions at the compilation stage (for example, calculate something in Octave, then build graphs in MathGL and insert them into the text), but I probably I'll tell you another time.
I don’t set myself the goal of copying the manual on the fp package (especially since it is quite small), but I want to tell you how I use this package for simple calculations when making all sorts of technical tasks, reports, etc. And I will show how to use it to implement the elementary functionality of the “spreadsheet”.
To begin with, we will create a command that allows you to insert various variable information (that is, some parameters that you can change later) by marking these inserts with a red superscript index and a margin in the rough printing mode. Color in the document will provide us with the colorx package.
This team will work in three ways:
I will explain it. First, we declare a new counter, which we will use to number the indices of inserts. Further, various auxiliary commands for the main command
The commands
Next, we define our own
The
To make it easier to output the results of the calculations, we create a command
')
To store some common data for the entire text (say, the value that is calculated over several sections of the document, and in each section some part of it is calculated, and the amount we need to display at the end of the text) we define the commands
Due to the fact that the cntr prefix is added to the name of a user-defined variable, the probability of accidentally overriding any Latech macros almost disappears.
Next, go to the "spreadsheet". To get started, we’ll get automatic numbering:
The initialization of the counter must be done manually, placing the
We now turn to determining the types of columns that allow addition, subtraction, multiplication, and division with numeric variables. Since the code of all these commands hardly differs from each other (except for the arithmetic operation performed in
I will warn you in advance: to uniquely determine the end of a number in a table cell, I would have to scan it character by character (which would greatly increase the compilation time of the text), I went a different way. At the end of each cell, before the ampersand, it is necessary to insert a space, which unambiguously symbolizes the end of data inside the cell. If you forget this space, “strange errors” may appear.
I will not explain in detail the following macro, I will confine myself to a superficial description. The
Now that we have done the dirty work, we can identify the main commands:
We now have the following new column types that take two arguments (the name of a variable and the standard type of cell alignment). The + , - , *, and / types perform the corresponding operations between the variable from the first argument of the cell type and the number contained in the cell. Type X sets the variable to the value contained in the cell. If a variable should be used without being initialized by column X , it should be initialized before the table using the
It now remains for us to declare another type of column, which will allow us to display the results of the calculation (and, if necessary, count their sum).
We create a new column type - S , which has three parameters: the name of the displayed variable, the name of the battery variable and the type of alignment.
And finally - a bit of entertainment. We will enable the ifthen package to implement complex conditional instructions (it does not allow nested if ones) and make the implementation of loops and stack.
The simplest for loop (without nested) can be defined as:
There are four teams here.
To work with the stack, we define the commands
The stack is implemented through a simple list of tokens. Placing the stack simply adds a new token to the top of the list, and selecting from the stack splits the list by the first token and returns it.
An example of working with initialized variables and calculations:
Example of working with cycles and stack:

Example text
The resulting pdf
I already wrote how you can typeset in the late presentation. Now I want to talk about how you can carry out simple calculations directly by the forces of latex.
For latek different people wrote a lot of all kinds of packages that extend its functionality and facilitate the work of the coder. Not forgotten and tools to help work with numerical data. Simple calculations using floating point numbers (single precision) can be performed directly by Tech. This is what the fp package is for. I just want to note that due to the latek's ability to execute external commands, you can even perform more complex actions at the compilation stage (for example, calculate something in Octave, then build graphs in MathGL and insert them into the text), but I probably I'll tell you another time.
I don’t set myself the goal of copying the manual on the fp package (especially since it is quite small), but I want to tell you how I use this package for simple calculations when making all sorts of technical tasks, reports, etc. And I will show how to use it to implement the elementary functionality of the “spreadsheet”.
To begin with, we will create a command that allows you to insert various variable information (that is, some parameters that you can change later) by marking these inserts with a red superscript index and a margin in the rough printing mode. Color in the document will provide us with the colorx package.
This team will work in three ways:
- without parameters (i.e., if we need to mark a place in the text where something is missing that needs to be inserted in the future), in this case we will simply mark the empty space in the text with a red square with a superscript index and put the label on the fields with a question mark;
- with one parameter (i.e., we inserted some data that will not be used in the future), in this case the inserted text is displayed with a superscript index and the corresponding empty field label;
- with two parameters (i.e., our data will be used further and we want to initialize some variable), the initialization text with the index is also displayed here, but in the fields opposite this index is placed the name of the variable in which this number is entered, plus initialization of this variable.
\newcounter{InsC@unt@r} \def\Ind@x{\stepcounter{InsC@unt@r}% \hbox to 0pt{\raisebox{1ex}{\tiny\red{\arabic{InsC@unt@r}}}}} \def\Insm@rgimp@r#1{\marginpar{\red{\tiny\arabic{InsC@unt@r}:#1}}} \ifx\TextOut\undefined \def\InsTxt@#1#2{#1\Ind@x\Insm@rgimp@r{#2}} \else \def\InsTxt@#1#2{#1} \fi \def\Ins{\futurelet\next\Ins@i} \def\Ins@i{\ifx\next\bgroup\expandafter\Ins@ii\else\expandafter\Ins@end\fi} \def\Ins@ii#1{\def\temp@rg{#1}\futurelet\next\Ins@iii} \def\Ins@iii{\ifx\next\bgroup\expandafter\Ins@two@rgs% \else\expandafter\Ins@one@rg\fi} \def\Ins@two@rgs#1{\InsWFP{\temp@rg}{#1}} % \def\InsWFP#1#2{\expandafter\FPset\csname #1\endcsname{#2}\InsTxt@{#2}{#1}} \def\Ins@one@rg{\InsTxt@{\temp@rg}{}} % \def\Ins@end{\red{\Square\Ind@x}\Insm@rgimp@r{?}\xspace} % I will explain it. First, we declare a new counter, which we will use to number the indices of inserts. Further, various auxiliary commands for the main command
\Ins defined, with which we will insert our data into the text.The commands
\Ind@x and \Insm@rgimp@r are needed to mark our inserts in draft mode. The first command increments the insert counter, creates a non-width box and places a red superscript with the insert number in it. The second command places a mark on the field. The draft mode itself is governed by the \TextOut : if we define it ( \def\TextOut{} ) before this piece of code, no marks will be placed on the \def\InsTxt (“white” layout mode), otherwise they will be stamped.Next, we define our own
\Ins command, which takes a variable number of arguments. It performs only one thing: reads the token following it ( \futurelet ) into the macro \next , discards it back and executes the command \Ins@i . That, in turn, checks what the token followed our \Ins : if it is an opening brace ( \bgroup ), then the \Ins@ii command is executed with preliminary reading of the next parameter after it (otherwise this command has its own parameter will see "). If the token is not a bracket, then the \Ins command had no arguments and \Ins@end is called, placing an empty box in the text and a note in the margins.The
\Ins@ii command places the first argument of the \Ins command in the \temp@rg macro and again checks for the presence of the following argument ( \Ins@iii ): if it is, the \Ins@two@rgs , initializing the variable and inserting its value and text labels; if not, the \Ins@one@rg command is executed, which simply inserts data into the text and makes a mark.To make it easier to output the results of the calculations, we create a command
\FPrint , similar in writing to \FPprint from the fp package, but doing a few things different: its argument is : which need to round the result. A rounded number is displayed on the screen. Here everything is quite simply implemented, so I will not make excessive comments.')
\def\FPrint#1{\@@print@@#1} \def\@@print@@#1:#2{\FPeval{\res@lt}{round(#1:#2)}\res@lt} To store some common data for the entire text (say, the value that is calculated over several sections of the document, and in each section some part of it is calculated, and the amount we need to display at the end of the text) we define the commands
\Ini (initializes a user variable, has one mandatory argument — the name of the variable, and one optional — the value with which the variable is initialized), \Add (adds an expression from the second parameter to the second parameter), \Sub (subtracts a number from the variable), and \Show ( displays a variable in the text, rounding it to two digits after the decimal point or to the number of digits specified in the optional parameter). \newcommand{\Ini}[2][0]{\expandafter\gdef\csname cntr#2\endcsname{#1}} \def\Add#1#2{\expandafter\FPeval\csname cntr#1\endcsname{cntr#1+(#2)}} \def\Sub#1#2{\expandafter\FPeval\csname cntr#1\endcsname{cntr#1-(#2)}} \newcommand{\Show}[2][2]{\FPrint{cntr#2:#1}} Due to the fact that the cntr prefix is added to the name of a user-defined variable, the probability of accidentally overriding any Latech macros almost disappears.
Next, go to the "spreadsheet". To get started, we’ll get automatic numbering:
\newcount\@row@num\@row@num=15 \def\@@nonum{} \def\@shownum{\ifx\@@nonum\empty\global\advance\@row@num1 \the\@row@num\else \gdef\@@nonum{}\fi} \def\NumIni{\global\@row@num=0\gdef\@@nonum{1}} \def\NoNum{\gdef\@@nonum{1}} \newcolumntype{N}[1]{>{\strut}#1<{\@shownum}} The initialization of the counter must be done manually, placing the
\NumIni command at the beginning of the table (or invent something like \everypage , but for tables). Using the array package, we will execute commands defined by us for each cell of the required column. The same package allows you to define new types of columns: the column in the table into which we want to insert autonumbering will have to be marked with type N. If we do not need to insert a number into some cell, we will mark it with a macro \NoNum .We now turn to determining the types of columns that allow addition, subtraction, multiplication, and division with numeric variables. Since the code of all these commands hardly differs from each other (except for the arithmetic operation performed in
\FPeval ), we first define a macro that facilitates the definition of new commands.I will warn you in advance: to uniquely determine the end of a number in a table cell, I would have to scan it character by character (which would greatly increase the compilation time of the text), I went a different way. At the end of each cell, before the ampersand, it is necessary to insert a space, which unambiguously symbolizes the end of data inside the cell. If you forget this space, “strange errors” may appear.
I will not explain in detail the following macro, I will confine myself to a superficial description. The
\@@def@cmd command allows you to define a new macro (whose name is specified in the first parameter), which performs an arithmetic operation from the second parameter, and also to create a new type of table column (the third parameter). Since this command is used to initialize other commands, and also determines a new command by name from a parameter, technical constructions such as \expandafter (suppressing the opening of the next token until the next one \xdef through one), \xdef (it is identical to \global\edef and defines a new macro, pre-opening macros from its body), \noexpand (prohibition of disclosure of the token "in the first reading"), \csname (conversion of text to the name of the macro). \def\@@def@cmd#1#2#3{% \expandafter\xdef\csname #1\endcsname##1\ignorespaces{% \xdef\noexpand\@fst@rg{##1}\futurelet\noexpand\next\expandafter\noexpand\csname @@#1@\endcsname} \expandafter\xdef\csname @@#1@\endcsname{% \noexpand\ifx\noexpand\next\unskip\relax \noexpand\else\noexpand\expandafter\expandafter\noexpand\csname @testminus@#1\endcsname\noexpand\fi} \expandafter\xdef\csname @testminus@#1\endcsname{% \noexpand\ifx\noexpand\next-\noexpand\expandafter\expandafter\noexpand \csname @@m@#1\endcsname\noexpand\else \noexpand\expandafter\expandafter\noexpand \csname @@@#1\endcsname\noexpand\fi} \expandafter\xdef\csname @@@#1\endcsname##1 {% \noexpand\ifnum1=1##1{}\noexpand\else##1 \noexpand#2{##1}\noexpand\fi} \expandafter\xdef\csname @@m@#1\endcsname##1 {##1 \noexpand#2{##1}} \newcolumntype{#3}[2]{>{\csname #1\endcsname{##1}}##2} } Now that we have done the dirty work, we can identify the main commands:
\def\@SET#1{\expandafter\xdef\csname cntr\@fst@rg\endcsname{#1}} \def\@ADD#1{\FPeval{\res@lt}{cntr\@fst@rg+(#1)}\@SET{\res@lt}} \def\@SUB#1{\FPeval{\res@lt}{cntr\@fst@rg-(#1)}\@SET{\res@lt}} \def\@MUL#1{\FPeval{\res@lt}{cntr\@fst@rg*(#1)}\@SET{\res@lt}} \def\@DIV#1{\FPeval{\res@lt}{cntr\@fst@rg/(#1)}\@SET{\res@lt}} \@@def@cmd{TAdd}{\@ADD}{+} \@@def@cmd{TSub}{\@SUB}{-} \@@def@cmd{TMul}{\@MUL}{*} \@@def@cmd{TDiv}{\@DIV}{/} \@@def@cmd{TSet}{\@SET}{X} We now have the following new column types that take two arguments (the name of a variable and the standard type of cell alignment). The + , - , *, and / types perform the corresponding operations between the variable from the first argument of the cell type and the number contained in the cell. Type X sets the variable to the value contained in the cell. If a variable should be used without being initialized by column X , it should be initialized before the table using the
\Ini command. The contents of the cell is checked: if there is not a number, then the actions are not performed.It now remains for us to declare another type of column, which will allow us to display the results of the calculation (and, if necessary, count their sum).
\def\@@plus#1#2{\gdef\@fst@rg{#1}\@ADD{cntr#2}} \def\@Sho@@#1{\ifx\@@nonum\empty\@@plus{#1}{\temp@rg}\else\gdef\@@nonum{}\fi} \def\@Sh@{\ifx\next\bgroup\expandafter\@Sho@@\else\gdef\@@nonum{}\fi} \def\Sho#1{\ifx\@@nonum\empty\Show{#1}\fi\def\temp@rg{#1}\futurelet\next\@Sh@} \newcolumntype{S}[3]{>{\strut}#3<{\Sho{#1}{#2}}} We create a new column type - S , which has three parameters: the name of the displayed variable, the name of the battery variable and the type of alignment.
\NoNum also acts on this command. The \Sho command, which implements type S , can be executed by itself. In this case, if we don’t need to accumulate the results in any variable, we simply give this command only one argument.And finally - a bit of entertainment. We will enable the ifthen package to implement complex conditional instructions (it does not allow nested if ones) and make the implementation of loops and stack.
The simplest for loop (without nested) can be defined as:
\newcounter{f@rc@unter} \newcommand{\forplus}[4][1]{% \setcounter{f@rc@unter}{#2}\ifthenelse{\value{f@rc@unter} < #3}{#4% \addtocounter{f@rc@unter}{#1}% \forplus[#1]{\value{f@rc@unter}}{#3}{#4}}{}} \newcommand{\forminus}[4][-1]{% \setcounter{f@rc@unter}{#2}\ifthenelse{\value{f@rc@unter} > #3}{#4% \addtocounter{f@rc@unter}{#1}% \forminus[#1]{\value{f@rc@unter}}{#3}{#4}}{}} \def\iterator{\arabic{f@rc@unter}} \def\Loop#1#2{\forplus{0}{#1}{#2}} There are four teams here.
\forplus allows \forplus to perform a cycle with an increment from the number specified in the first parameter to the number in the second, each time performing the contents of the third parameter. An optional macro argument is a loop step. The \forminus implements a decrement loop. \iterator allows you to output the contents of the loop iterator, and \Loop - to execute the contents of the second argument N times (where N is the first argument).To work with the stack, we define the commands
\push and \pop , as well as \stacklen (the number of elements in the stack), \popall (output the entire contents of the stack) and \popalldel (output the contents with a separator). \newcount\@buflen\@buflen=0 \newtoks\@@stack \@@stack={\empty} \def\push#1{\advance\@buflen1\begingroup\toks0={{#1}}% \edef\act{\endgroup\global\@@stack={\the\toks0 \the\@@stack}}\act} \def\pop{\ifnum\@buflen>0\advance\@buflen-1\fi\begingroup% \edef\act{\endgroup\noexpand\splitList\the\@@stack(tail)\@@stack}\act} \def\splitList#1#2(tail)#3{\ifx#1\empty\red{ !}\else{#1}\global#3={#2}\fi} \def\stacklen{\the\@buflen\xspace} \def\popalldel#1{\ifthenelse{\the\@buflen > 1}{\pop#1\popalldel{#1}}% {\ifnum\@buflen=1\pop\fi}} \def\popall{\popalldel{}} The stack is implemented through a simple list of tokens. Placing the stack simply adds a new token to the top of the list, and selecting from the stack splits the list by the first token and returns it.
Examples
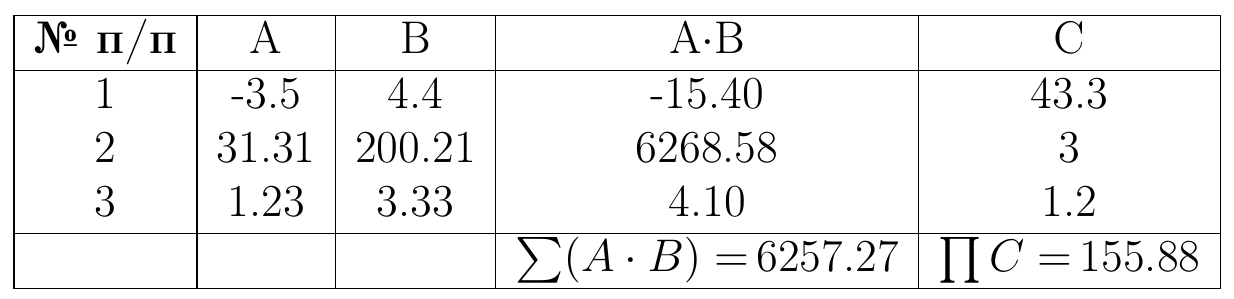
Example of working with tables: \Ini[1]{yy} \Ini{zz} \begin{table}[!th] \begin{tabular}{|N{c}|X{xx}{c}|*{xx}{c}|S{xx}{zz}{c}|*{yy}{c}|} \hline \bf \NumIni \No{} / & A & B & A$\cdot$B\NoNum& C \\ \hline & -3.5 & 4.4 &&43.3 \\ & 31.31 &200.21 &&3 \\ & 1.23 &3.33 &&1.2 \\ \hline \NoNum&&&\NoNum $\sum(A\cdot B)=\,$\Show{zz}&$\prod C=\,$\Show{yy} \\ \hline \end{tabular} \end{table} An example of working with initialized variables and calculations:
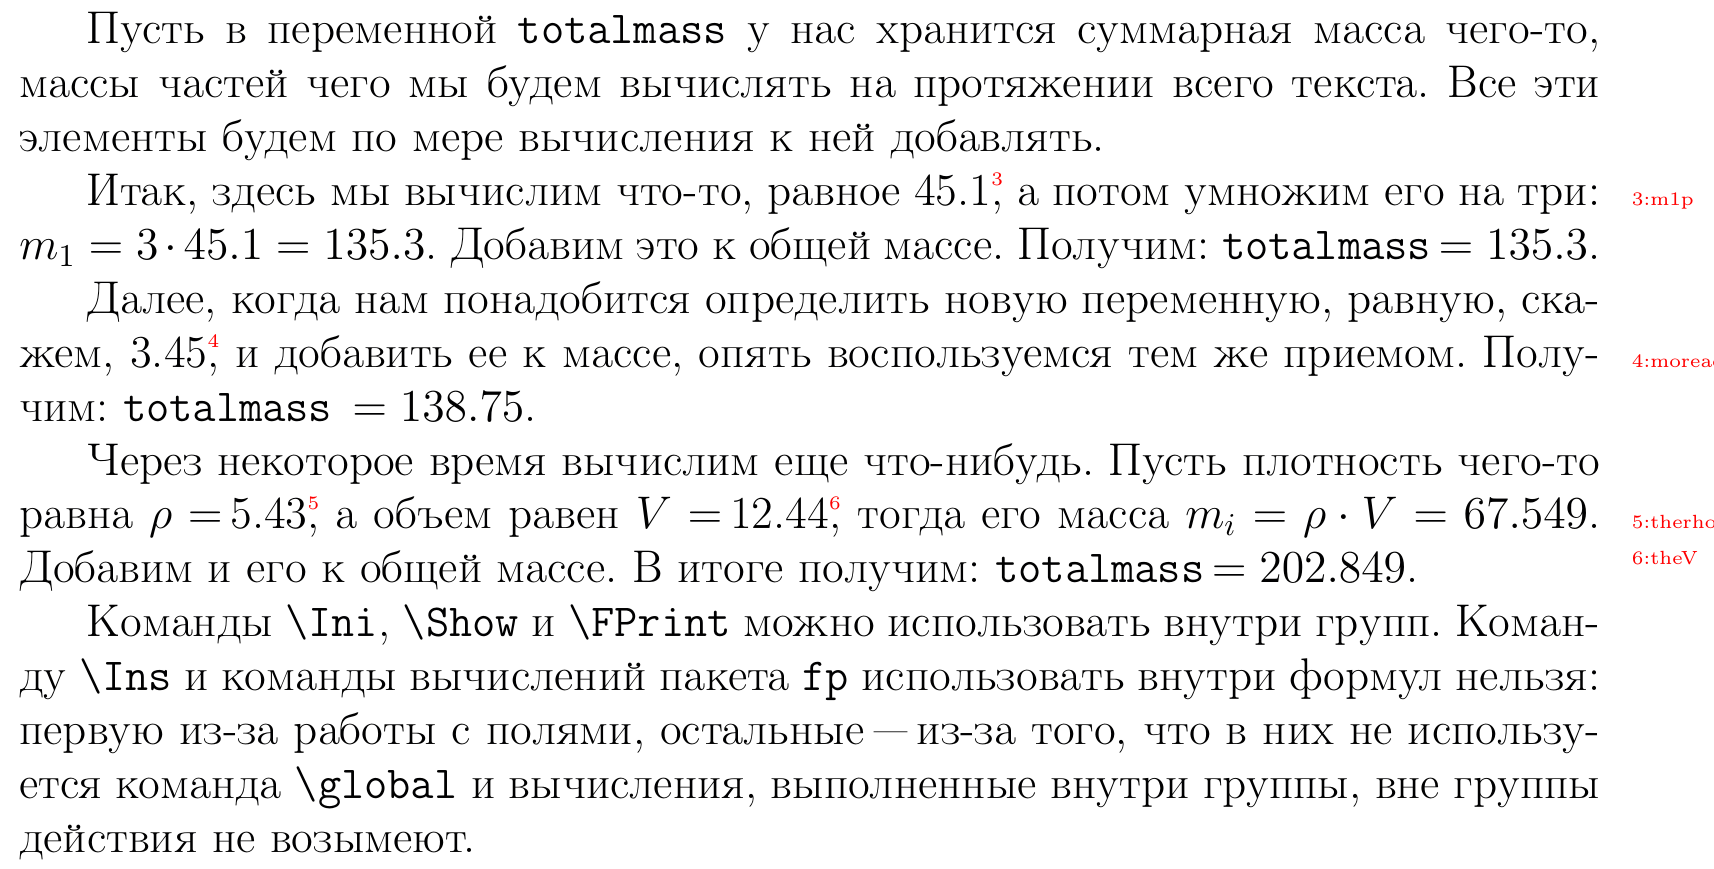
\Ini{totalmass} {\tt totalmass} -, . . , -, \Ins{m1p}{45.1},\FPeval{m1}{3*m1p} : $m_1=3\cdot\FPrint{m1p:1}=\FPrint{m1:1}$. .\Add{totalmass}{m1} : {\tt totalmass}$\,=\Show[1]{totalmass}$. , , , , \Ins{moreaddtoa}{3.45}, , . : {\tt totalmass}$\,\Add{totalmass}{moreaddtoa}=\Show[2]{totalmass}$. -. - $\rho=\,$\Ins{therho}{5.43}, $V=\,$\Ins{theV}{12.44}, \FPeval{mi}{therho*theV}$m_i=\rho\cdot V=\FPrint{mi:3}$. .\Add{totalmass}{mi} : {\tt totalmass}$\,=\Show[3]{totalmass}$. \verb'\Ini', \verb'\Show' \verb'\FPrint' . \verb'\Ins' {\tt fp} : - , "--- - , \verb'\global' , , . Example of working with cycles and stack:
a=\Ins{a}{2.5}, b=\Ins{b}{3}, $c=\sqrt{a^2+b^2}=\FPrint{root(2, (a^2 + b^2)):2}$ 1 4: \forplus{1}{5}{\iterator~} 1 10 3: \forplus[3]{1}{11}{\iterator~} 4 1: \forminus{4}{0}{\iterator~} 10 1 -3: \forminus[-3]{10}{0}{\iterator~} \Loop5{ ! } \push{}\push{}\push{}\push{} : \popalldel{, }. : \stacklen . Example text
The resulting pdf
Source: https://habr.com/ru/post/146742/
All Articles