Export MoCap Data to Unity3d
In this article I will tell you how to animate a character using MoCap data obtained using ipi mocap studio and 2 Kinect sensors.
For this you will need:
1-2 Kinect sensors
iPi Studio, iPi Recorder
Autodesk Motionbuilder 2013 is better, but I use 2012 because 2013 does not work for me
Install iPi Studio and iPi Recorder, connect Kinect. You can read more about this in the ipisoft wiki for instructions for the old version of the program; in the latest version, the configuration is a little different.
In order to receive MoCap data from 2 sensors, you need to record a video for calibration .
')
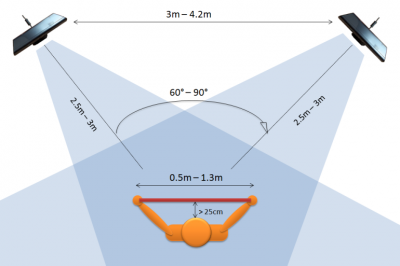
Sensors can be located in 2 configurations:
For calibration, a cardboard / board with a size of 0.5 m is used. in width (recommended 1.m. - 1.3m.) and from 0.7m. in length (1–1.5 m is recommended.) The calibration surface should be clearly visible from each sensor. So wrong:
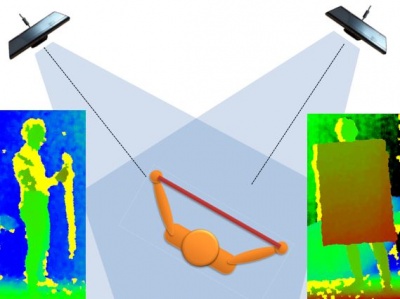
Important: the yellow color on the depth map means that the sensor cannot distinguish the depth at these points. It is necessary that they were as small as possible.
Important: if you change the position of the sensors, they will need to be re-calibrated.
For this you will need:
1-2 Kinect sensors
iPi Studio, iPi Recorder
Autodesk Motionbuilder 2013 is better, but I use 2012 because 2013 does not work for me
Part 1. Getting MoCap data
Calibration
Install iPi Studio and iPi Recorder, connect Kinect. You can read more about this in the ipisoft wiki for instructions for the old version of the program; in the latest version, the configuration is a little different.
In order to receive MoCap data from 2 sensors, you need to record a video for calibration .
')
Sensors can be located in 2 configurations:
- The angle between the sensors is 30-90 degrees:

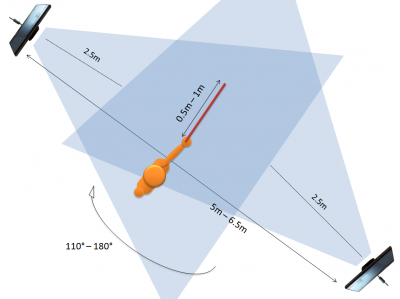
- The angle between the sensors 110-180 degrees:

For calibration, a cardboard / board with a size of 0.5 m is used. in width (recommended 1.m. - 1.3m.) and from 0.7m. in length (1–1.5 m is recommended.) The calibration surface should be clearly visible from each sensor. So wrong:
Important: the yellow color on the depth map means that the sensor cannot distinguish the depth at these points. It is necessary that they were as small as possible.
Important: if you change the position of the sensors, they will need to be re-calibrated.
- Launch iPi Recorder, choose 1-2 kinekta as a device for recording
- Next, the program analyzes the background, in the field of visibility of the sensors there should be only fixed objects
- Click on Start, get up and hold the box so that it is visible from each sensor. It is necessary to move the cardboard in different directions, and its surface should be visible from both sensors. Uh
- Click Stop
- Open iPi Studio -> New project -> select the video you just recorded -> Calibration project -> calibrate based on 3d plane -> We are waiting -> Scene -> Save Scene
Record movements and import animations
- Launch iPi Recorder
- Next, the program analyzes the background, in the field of visibility of the sensors there should be only fixed objects
- We press on Start, get up in the T-pose for 2-3 seconds, reproduce the movement that we want to record
- Click Stop
- Open iPi Studio -> New project -> choose the video you just recorded -> Action project -> if the video was recorded from several cameras, you will need to open the scene you received earlier -> Select a frame with a good T-pose -> see how to start MoCap convenient when the video is turned off and the background is removed (in view)
- Click Export -> import target character -> import biped from 3dmax Now when watching a video next to the little man who repeats your movements, you will see a skeleton
- Click Export animation and save the file in fbx format
Part 2. Animation character
- Launch Motionbuilder -> Window -> Actor / Character controls - I open this window at the very beginning, because if I open after importing a character, I’m dropped motionbuilder
- Open the file with fbx animation (File -> Open)
- Next, we need to do characterization, more details about this can be found here , there is also in motionbuilder there is learning movies (adding animation)
- Window-> Asset Browser -> Templates -> Drag Character to Skeleton -> characterize -> biped
- Drag and drop into your character’s workspace either from Asset Browser -> Merge -> No animations or File -> Merge -> in the column on the right we remove all the checkboxes.
- In Character Controls, select your person, see how to do next. Click Animation -> Plot All -> Plot.
Save
We can import the character in unity
ipistudio even recognizes a person lying down, the developers comment: “tracking in positions close to the floor is not the strength of the iPi Mocap - even in the 6-chamber system, there are failures and recognition errors. But on the whole, movements like push-ups, emphasis-sitting-emphasis-lying and even somersaults work tolerably (occasionally losing one arm or mistaken with the position of the leg). It is advisable to put one of the chambers (or even both - experiment) higher: about a meter and a half from the floor. ”
Successes.
Source: https://habr.com/ru/post/146697/
All Articles