Swarp SDK or how to quickly create an AR-application. Part 2
Good afternoon, dear readers.
Today I will continue the story of how to create applications using the Swarp SDK. This post is a continuation of the Swarp SDK review . In the first part, we looked at an example from the standard delivery of Swarp and the general principles of working with it. And now we will write our AR-application, which will change the animation of the 3D-model depending on the presence of markers in front of the camera. Who cares - I ask under the cat.
')
About the application
So, here are the basic requirements for our project.
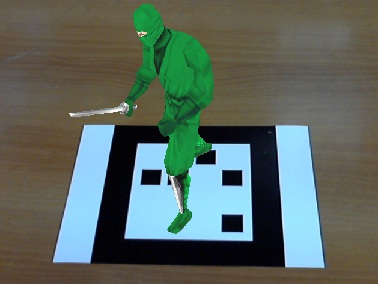
The application will use the standard Mogre'32 3D model of ninjas (all models and source codes are attached to the post). If there is a certain marker in the camera’s field of view, it is necessary to display the model in the appropriate orientation. And now the most interesting is animation. In the ninja model there are 16 (if my memory serves me) animations. I chose 3 of them: Crouch , Attack1 , Backflip . A marker will be attached to each of these animations. If the animation marker is not on the scene, then the corresponding animation must be performed. If all the markers are present, then Idle1 is animated. That 's all. We start implementation.
Implementation
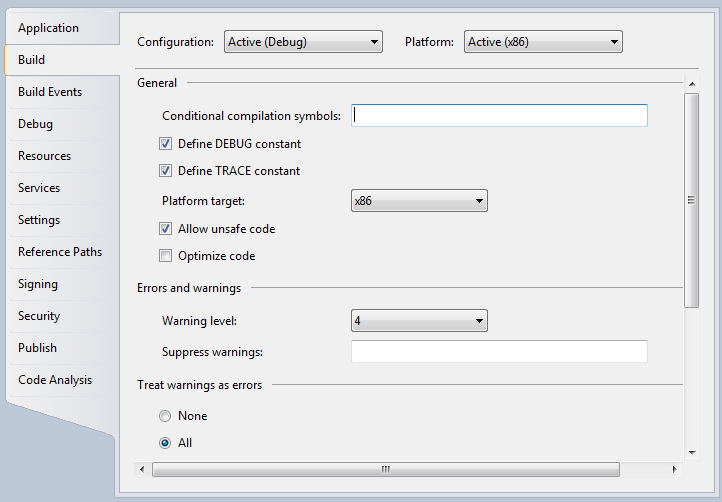
To create a project, I will use Visual Studio 2010. First, I create a Win32 console application and call it HabrDemo2. By the way, in order for the studio not to die in the process of debugging applications, you need to enable debugging of unmanaged code and enable unsafe code in the “Debug” and “Build” tabs, respectively:

The project will have a Program.cs file containing the entry point to the application:
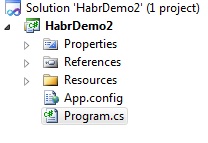
Actually, we will work with him.
Now you need to include links to the used assembly. I will need the following:

Small feature: Swarp SDK adds its assemblies to the .NET tab of adding assemblies to save developer time:

Really convenient - no need to climb folders looking for the installed SDK.
This training is over - we begin to write the program.
Write the code
Fields
We will need several private fields:
/// <summary> /// . /// </summary> private static AugmentedRealityManager _arManager; /// <summary> /// . /// </summary> private static ITrackable _ninjaTrackable; /// <summary> /// . /// </summary> private static List<ITrackable> _animationTrackables=new List<ITrackable>(); /// <summary> /// C . /// </summary> private static AnimationState _animationState; /// <summary> /// C . /// </summary> private static float _animTime = 0.1f; The _arManager field is an instance of the main Swarp class that implements the augmented reality process. By calling its Start () and Stop () methods, we start or stop the process. The ITrackable interface describes the markers used in Swarp. I use the _ninjaTrackable instance to describe the marker that is responsible for displaying the 3D model and the _animationTrackables list, which contains information about the animation markers. I also use the _animationState field. It is necessary in order to describe the animation model. The AnimationState class is described in the Mogre assembly. Well, the last field is _animTime . This is a time slice that determines how much the animation “moves” in each frame.
With the fields finished. The next step is initialization.
Application Initialization
About the initialization of augmented reality described in more detail in the first part, here I briefly run through the algorithm of initialization and the distinctive places of the code.
The initialization algorithm itself is fairly simple and consists of the following steps:
- camera;
- tracker;
- renderer.
Initialization of the camera in our application will be extremely simple and taken from the standard Swarp SDK example "OgreSimpleSceneExample":
// var camera = CameraManager.Instance.GetFirstWorkedCamera(); if (camera == null) { MessageBox.Show(Resources.CameraNotFoundString, Resources.WarningString, MessageBoxButtons.OK, MessageBoxIcon.Warning); return; } // 64048030FPS , var displayParameters = new DisplayParameters(30, new Size(640, 480)); camera.DisplayParameters = camera.IsSupportedDisplayParameters(displayParameters) ? displayParameters : camera.GetSupportedDisplayParameters()[0]; The tracker deserves special attention.
Here I initialize the tracker and load the markers used:
// , // - 4 var tracker = new SquareMarkerTracker(4); // _ninjaTrackable = new SquareMarker("Ninja Marker", "Trackable\\1.trackable"); var animationAttackTrackable = new SquareMarker("Attack3", "Trackable\\5.trackable"); var animationCrouchTrackable = new SquareMarker("Crouch", "Trackable\\6.trackable"); var animationBackflipTrackable = new SquareMarker("Backflip", "Trackable\\7.trackable"); _animationTrackables.Add(animationCrouchTrackable); _animationTrackables.Add(animationBackflipTrackable); _animationTrackables.Add(animationAttackTrackable); // tracker.TrackableObjects.Add(_ninjaTrackable); tracker.TrackableObjects.AddRange(_animationTrackables); Note that the SquareMarker constructor accepts two parameters as input: the name of the marker and the path to the file. In fact, there are 2 more overloads there, but we will not need them now. I call each animation marker by the name of its associated animation. Looking ahead, I will say that I do this in order to load the animation by the name of the missing marker.
And now the renderer initialization:
// , var ogreSimpleSceneForm = new Form { Size = new Size(640, 480), Text = Resources.SwarpSDKExampleString, }; // var renderer = new Ogre3DRenderSystem(ogreSimpleSceneForm.Handle, "OgreConfig\\plugins.cfg", "OgreConfig\\ogre.cfg", "OgreConfig\\ogre.log") { SizeMode = SizeMode.Autosize }; // renderer.LoadResources("OgreConfig\\resources.cfg"); // . . var ninjaScene = new Ogre3DScene(renderer.Root, "Ninja Scene"); renderer.Scenes.Add(ninjaScene); LoadScene(ninjaScene.SceneManager); Everything seems to be clear, but at the very end, the LoadScene () method hid . Its task is to load the model, add it to the scene, stretch the texture and start the Idle animation:
private static void LoadScene(SceneManager sceneManager) { // , . var ninjaNode = sceneManager.RootSceneNode.CreateChildSceneNode("NinjaNode"); // ( ). var ninjaEntity = sceneManager.CreateEntity("Ninja", "ninja.mesh"); _animationState = ninjaEntity.GetAnimationState("Idle1"); _animationState.Loop = true; _animationState.Enabled = true; // MaterialPtr material = MaterialManager.Singleton.Create("NinjaMaterial", ResourceGroupManager.DEFAULT_RESOURCE_GROUP_NAME); material.GetTechnique(0).GetPass(0).CreateTextureUnitState("nskingr.jpg"); material.GetTechnique(0).GetPass(0).SetSceneBlending(SceneBlendType.SBT_TRANSPARENT_ALPHA); material.GetTechnique(0).GetPass(0).DepthCheckEnabled = true; material.GetTechnique(0).GetPass(0).DepthWriteEnabled = true; material.GetTechnique(0).GetPass(0).LightingEnabled = false; ninjaEntity.SetMaterial(material); // 3 , ninjaNode.Scale(3f,3f,3f); ninjaNode.AttachObject(ninjaEntity); ninjaNode.SetVisible(true); } Now everything is initialized.
The main cycle of the program
Now is the time to launch the camera, launch the Augmented Reality Manager and enjoy the process. The question arises - “how?”. Those who carefully read the first article probably already know the answer: it’s not for nothing that we have the _arManager field and the variable camera .
// . _arManager = new AugmentedRealityManager(camera, tracker, renderer); // . camera.Start(); // . _arManager.Start(); ogreSimpleSceneForm.Show(); while (ogreSimpleSceneForm.Created) { // , UpdateScenes(ninjaScene.SceneManager); // . // , , // . _arManager.Renderer.RenderFrame(); // . Application.DoEvents(); } // . _arManager.Dispose(); renderer.Dispose(); camera.Dispose(); In this part of the code, markers are detected, the appropriate animation is activated, and the frame is drawn while the rendering form exists. It seems also no problem. Moving on to the “heart” of the program: the UpdateScenes method.
Here, too, nothing complicated. The main idea is to receive a list of the found markers from the tracker on each call, and then, based on this list, start the corresponding animation. What, in fact, is implemented in the code below:
private static void UpdateScenes(SceneManager ninjaSceneManager) { foreach (var tracker in _arManager.Trackers) { // , // , . var foundTrackableObjects = new List<ITrackable>(tracker.LastDetectedObjects); // . foreach (var scene in _arManager.Renderer.Scenes) { // , . if (foundTrackableObjects.Contains(_ninjaTrackable)) { // , . scene.Visible = true; // . var trackablePose = tracker.GetPose(_ninjaTrackable); // . scene.OrientScene(trackablePose); // ( =)) var ninjaEntity = ninjaSceneManager.GetEntity("Ninja"); // var newAnimationState = ninjaEntity.GetAnimationState(SelectAnimation(foundTrackableObjects, _animationTrackables)); // , if (newAnimationState.AnimationName != _animationState.AnimationName) { _animationState.Enabled = false; _animationState = newAnimationState; _animationState.Loop = true; _animationState.Enabled = true; } // , _animationState.AddTime(_animTime); } else { scene.Visible = false; } } } } private static string SelectAnimation(ICollection<ITrackable> found, IEnumerable<ITrackable> target) { foreach (var trackable in target.Where(trackable => !found.Contains(trackable))) { return trackable.Name; } return "Idle1"; } Pay attention to the SelectAnimation method. It has 2 parameters: the list of found markers and the list of registered animation markers. This method returns the name of the first animation marker not found. In the case when all animation markers are present, it returns “Idle1” string. That is why I called the markers the name of the associated animation.
Reef: pay attention to this piece of code:
// var newAnimationState = ninjaEntity.GetAnimationState(SelectAnimation(foundTrackableObjects, _animationTrackables)); // , if (newAnimationState.AnimationName != _animationState.AnimationName) { _animationState.Enabled = false; _animationState = newAnimationState; _animationState.Loop = true; _animationState.Enabled = true; } If you change the animation, you must disable the previous animation, otherwise it will not work correctly. I spent a lot of time trying to understand what the joint was.
Well, it's time to see what we got?
results
Below is a video that I recorded. It seems to me that it is more eloquent than any text will show what we did.
Pretty funny. By the way, Swarp detects a marker, even if it is partially blocked.
Links
Sources: HabrDemo2.rar
Developer site: www.sectar.com
Download link SDK: Swarp SDK
Managed Ogre: Mogre wiki
UPD : By the way, just yesterday, Sectar announced a contest. For participation, you can get a free key until August 31, and the winners are given a free development license for six months and a year. Read more: competition .
Source: https://habr.com/ru/post/146604/
All Articles