Installing the Nvidia CUDA toolkit on Ubuntu 12.04 x86_64
Good day, habrovchane, in this post, I will try to visually explain about installing Nvidia CUDA toolkit on Ubuntu 12.04 x86_64. To begin with, it made me write this post. Most recently, I needed to install the Nvidia CUDA toolkit on my home computer.  After reading a good part of the installation manuals, not only in Russian, I decided that it would be easier to install a package from Nvidia, but here I was mistaken. Most of the manuals are sharpened for the old versions of ubunt, moreover, they often lack certain features of the installation, which sooner or later leads the reader to a dead end. And so who is interested - you are welcome under the cat ...
We divide the installation into several stages:
1) Download the necessary software components.
2) Preparing for installation.
3) Install the driver, toolkit and sdk.
4) System setup after installation.
5) Compile and run examples to test performance.
Stage 1 - Download the necessary software components.
I think it's silly to tell people reading this post why CUDA technology is needed, because if you are reading it, then you have decided what you need it for. Because CUDA technology exists only on Nvidia graphic cards, you need a card from this manufacturer. A list of cards supporting CUDA technology can be found on the official Nvidia website - developer.nvidia.com/cuda-gpus . The benchmark in the desktop segment can be considered the GeForce 8100 mGPU, and accordingly in the notebook - the GeForce 8400M GT. So dealt with the card. Now you need to go to the site developer.nvidia.com and select the column "Cuda Download" (Figure 1).
')
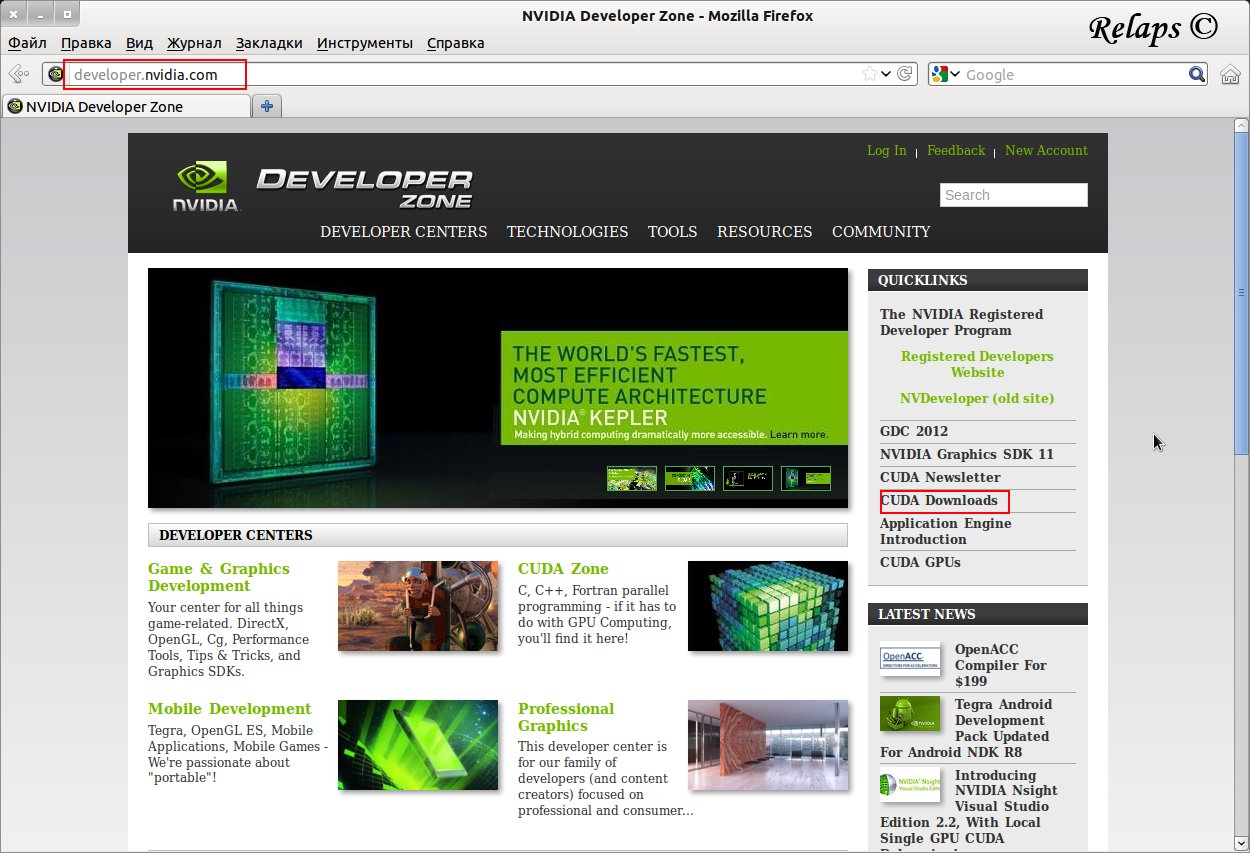 Fig. 1. Developer.nvidia.com home page.
Immediately after clicking on the link "Cuda Download", we get to the software download page. Because Ubuntu 12.04 was released relatively recently, the site still has software for previous stable versions, namely 11.04 and 10.04. When installing on my PC, I selected 11.04 x64. With the rest of the components, it is intuitively clear - depending on the version of the distribution kit, we select the correct product and download it (Figure 2).
 Fig. 2. software for installation.
As a result, in the selected folder (I have this Downloads) there should be 3 files (Figure 3):
1) cudatoolkit_4.2.9_linux_64_ubuntu11.04.run
2) devdriver_4.2_linux_64_295.41.run
3) gpucomputingsdk_4.2.9_linux.run
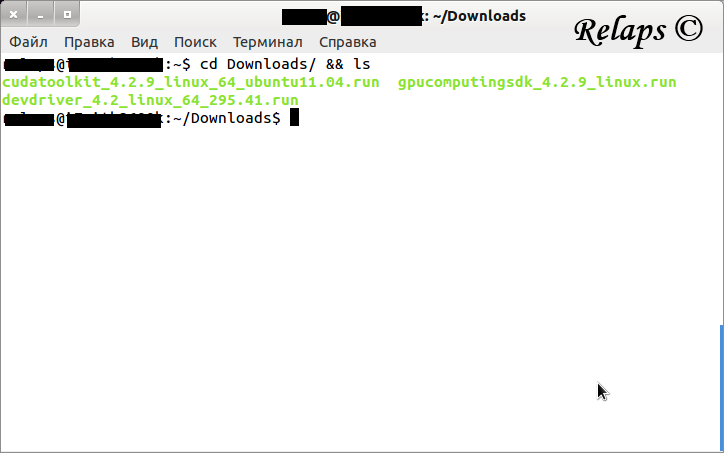 Fig. 3. View the folder with the downloaded files.
Stage 2 - Preparation for installation
Actually the whole problem with the installation is in the Nvidia developer driver that needs to be installed, and we will install it first. First you need to add free drivers to the blacklist. Open any blacklist text editor (in my case, gedit), in the terminal (Figure 4):
and add the following lines to the very end of the blacklist:
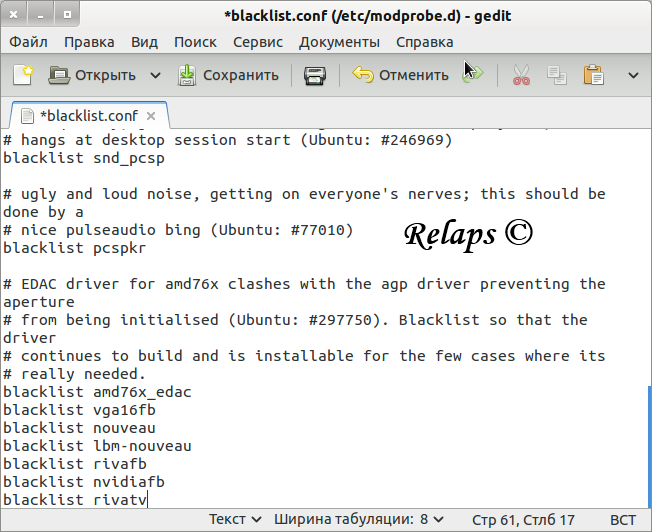
Fig. 4. Edit the blacklist.
Save it and close until better times. After that you can try to install the driver. But before it is necessary to get rid of all sorts of garbage that the old drivers leave, in the terminal we enter:
After the operation is completed, you need to restart the PC:
But here it is worth noting an interesting thing that the above manipulations do not disable the nouveau driver, and on the clean system it is he who prevents to put the CUDA driver, accordingly we need to arm ourselves again with a text editor and do the following (Figure 5):
open this file and add the following to it:
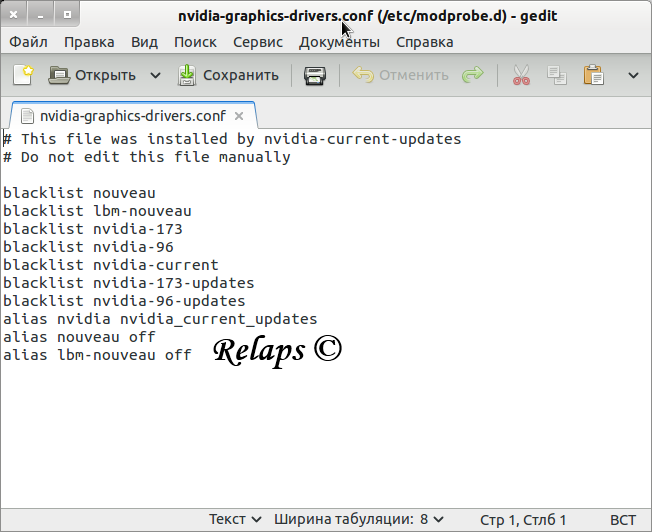
Fig. 5. Edit nvidia-graphics-drivers.conf.
Step 3 - Install the driver, toolkit and sdk.
This step will show how correctly you did everything. And so, we loaded up to the moment of choosing a user and entering a password (the so-called login screen). It is on the login screen'e press the key combination:
We fall into the console mode. You need to log in and go to the folder with previously downloaded Nvidia software products, and also disable gdm or lightdm to install the CUDA driver, then you need to change the access rights for our driver and install it directly:
Then everything is simple, click "Accept" and the installation has begun. In the course of the installation, they will ask you whether it is necessary to install the OpenGL libraries - this is the case, as they say. Then the system will inform you about the successful installation of the CUDA driver. You must restart the system again. After the reboot, install the remaining components, namely cudatoolkit_4.2.9_linux_64_ubuntu11.04.run and gpucomputingsdk_4.2.9_linux.run, go to the folder with the downloaded files and install the necessary components:
Here it can be noted that during installation, the program will ask you to specify different types of paths, you should not really bother - if this situation occurs, simply press “Enter”.
Stage 4 - System setup after installation.
Next, you need to configure the system, for this we enter in the terminal:
Well, like, everything, the system is set up. The case is left for small, go to the fifth stage.
Step 5 - Compile and run the runtime examples.
Now you only need to compile the examples and finally test the performance. To do this, enter in the terminal:
When building examples, errors may occur, well, actually, then you need to run the “make” utility under the root and try building or running the utility again with the -k flag:
And so the climax, it remains to run any of the compiled examples, enter in the terminal (Figure 6):
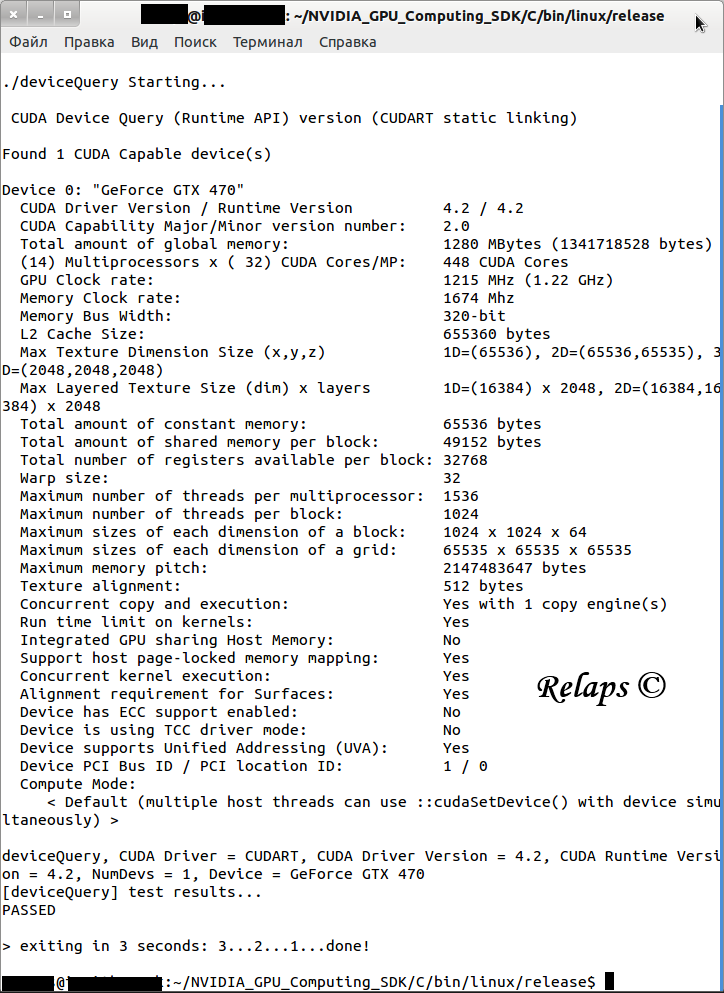
Fig. 6. The result of launching the deviceQuery program.
Well, in general, that's all I wanted to tell you about setting up the CUDA toolkit. Please do not judge strictly, because This is my first post on Habré, I tried to do everything thoroughly. I hope this post will help someone in setting up the CUDA toolkit. Thanks for attention.
After reading a good part of the installation manuals, not only in Russian, I decided that it would be easier to install a package from Nvidia, but here I was mistaken. Most of the manuals are sharpened for the old versions of ubunt, moreover, they often lack certain features of the installation, which sooner or later leads the reader to a dead end. And so who is interested - you are welcome under the cat ...We divide the installation into several stages:
1) Download the necessary software components.
2) Preparing for installation.
3) Install the driver, toolkit and sdk.
4) System setup after installation.
5) Compile and run examples to test performance.
Stage 1 - Download the necessary software components.
I think it's silly to tell people reading this post why CUDA technology is needed, because if you are reading it, then you have decided what you need it for. Because CUDA technology exists only on Nvidia graphic cards, you need a card from this manufacturer. A list of cards supporting CUDA technology can be found on the official Nvidia website - developer.nvidia.com/cuda-gpus . The benchmark in the desktop segment can be considered the GeForce 8100 mGPU, and accordingly in the notebook - the GeForce 8400M GT. So dealt with the card. Now you need to go to the site developer.nvidia.com and select the column "Cuda Download" (Figure 1).
')
Fig. 1. Developer.nvidia.com home page.Immediately after clicking on the link "Cuda Download", we get to the software download page. Because Ubuntu 12.04 was released relatively recently, the site still has software for previous stable versions, namely 11.04 and 10.04. When installing on my PC, I selected 11.04 x64. With the rest of the components, it is intuitively clear - depending on the version of the distribution kit, we select the correct product and download it (Figure 2).
Fig. 2. software for installation. As a result, in the selected folder (I have this Downloads) there should be 3 files (Figure 3):
1) cudatoolkit_4.2.9_linux_64_ubuntu11.04.run
2) devdriver_4.2_linux_64_295.41.run
3) gpucomputingsdk_4.2.9_linux.run
Fig. 3. View the folder with the downloaded files.Stage 2 - Preparation for installation
Actually the whole problem with the installation is in the Nvidia developer driver that needs to be installed, and we will install it first. First you need to add free drivers to the blacklist. Open any blacklist text editor (in my case, gedit), in the terminal (Figure 4):
sudo gedit /etc/modprobe.d/blacklist.conf and add the following lines to the very end of the blacklist:
blacklist amd76x_edac # , . blacklist vga16fb blacklist nouveau blacklist lbm-nouveau blacklist rivafb blacklist nvidiafb blacklist rivatv Fig. 4. Edit the blacklist.
Save it and close until better times. After that you can try to install the driver. But before it is necessary to get rid of all sorts of garbage that the old drivers leave, in the terminal we enter:
sudo apt-get remove --purge nvidia* After the operation is completed, you need to restart the PC:
sudo reboot But here it is worth noting an interesting thing that the above manipulations do not disable the nouveau driver, and on the clean system it is he who prevents to put the CUDA driver, accordingly we need to arm ourselves again with a text editor and do the following (Figure 5):
sudo gedit /etc/modprobe.d/nvidia-graphics-drivers.conf open this file and add the following to it:
blacklist nouveau blacklist lbm-nouveau blacklist nvidia-173 blacklist nvidia-96 blacklist nvidia-current blacklist nvidia-173-updates blacklist nvidia-96-updates alias nvidia nvidia_current_updates alias nouveau off alias lbm-nouveau off Fig. 5. Edit nvidia-graphics-drivers.conf.
Step 3 - Install the driver, toolkit and sdk.
This step will show how correctly you did everything. And so, we loaded up to the moment of choosing a user and entering a password (the so-called login screen). It is on the login screen'e press the key combination:
ctrl + alt + F1 We fall into the console mode. You need to log in and go to the folder with previously downloaded Nvidia software products, and also disable gdm or lightdm to install the CUDA driver, then you need to change the access rights for our driver and install it directly:
cd Downloads sudo service lightdm stop # sudo service gdm stop chmod +x devdriver_4.2_linux_64_295.41.run sudo ./devdriver_4.2_linux_64_295.41.run Then everything is simple, click "Accept" and the installation has begun. In the course of the installation, they will ask you whether it is necessary to install the OpenGL libraries - this is the case, as they say. Then the system will inform you about the successful installation of the CUDA driver. You must restart the system again. After the reboot, install the remaining components, namely cudatoolkit_4.2.9_linux_64_ubuntu11.04.run and gpucomputingsdk_4.2.9_linux.run, go to the folder with the downloaded files and install the necessary components:
cd Downloads sudo ./cudatoolkit_4.2.9_linux_64_ubuntu11.04.run sudo ./gpucomputingsdk_4.2.9_linux.run Here it can be noted that during installation, the program will ask you to specify different types of paths, you should not really bother - if this situation occurs, simply press “Enter”.
Stage 4 - System setup after installation.
Next, you need to configure the system, for this we enter in the terminal:
export PATH=/usr/local/cuda/bin:$PATH &&export LD_LIBRARY_PATH=/usr/local/cuda/lib64:$LD_LIBRARY_PATH echo 'export PATH=/usr/local/cuda/bin:$PATH' >> ~/.bashrc && echo 'export LD_LIBRARY_PATH=/usr/local/cuda/lib64:$LD_LIBRARY_PATH' >> ~/.bashrc Well, like, everything, the system is set up. The case is left for small, go to the fifth stage.
Step 5 - Compile and run the runtime examples.
Now you only need to compile the examples and finally test the performance. To do this, enter in the terminal:
cd ~/NVIDIA_GPU_Computing_SDK/C make When building examples, errors may occur, well, actually, then you need to run the “make” utility under the root and try building or running the utility again with the -k flag:
make -k And so the climax, it remains to run any of the compiled examples, enter in the terminal (Figure 6):
cd ~/NVIDIA_GPU_Computing_SDK/C/bin/linux/release ./deviceQuery Fig. 6. The result of launching the deviceQuery program.
Well, in general, that's all I wanted to tell you about setting up the CUDA toolkit. Please do not judge strictly, because This is my first post on Habré, I tried to do everything thoroughly. I hope this post will help someone in setting up the CUDA toolkit. Thanks for attention.
Source: https://habr.com/ru/post/146541/
All Articles