Launch Ubuntu x86 + Wine for Android x86 (chroot + VNC)
Foreword
The theme of launching Ubuntu on Android devices is already pretty trite, you can find a large number of manuals on the network. But there is one BUT! We are talking about ARM architecture.
However, Intel has already announced its plans to promote Medfield (x86) processors to the mobile market. As well as steel, ready-to-use smartphones will appear.
In India, this is the Lava XOLO X900 . As well as a copy of it under the brand name of the operator Orange for Europe.

Lava xolo x900

Orange version
For China, Lenovo has released a model LePhone K800
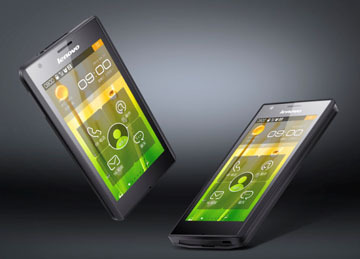
Lenovo LePhone K800
At the end of June 2012, these devices are already commercially available.
Lava XOLO X900 with of. The site www.xolo.in , as I understand it is available within India. Although it can already be ordered from ebay . The current price for Russia through intermediaries can be viewed at www.bay.ru
Lenovo LePhone K800 is also available, but so far it seems only in Chinese stores www.360buy.com
')
Introduction
While the model is happy small, and not very affordable. I was interested in technical issues.
And so what we have. In these devices is a processor with x86 architecture. I do not know who was thinking about.
Probably about its low energy efficiency, low productivity. Although the reviews suggest otherwise.
I immediately thought, it would not be bad to finally run Windows applications without emulation. I think many have already tried to run old versions of Windows under emulators (Qemu, Bochs, aDOSBox, etc.) Deje on powerful modern Android smartphones, the brakes are tangible.
It’s too early to talk about the possibility of Dual Boot. It is not even clear whether there is a BIOS / UEFI.
I thought that it would be nice to try running Wine under Ubuntu x86 . Under ubuntu
ARM such a miracle for obvious reasons is not available.
Well, since the device in my hands is not. All that remained was to test the idea under the Android x86 emulator.
Getting Started
First of all, I added the Intel x86 Atom System Image to the Android SDK. Running it, I ran into incredible brakes, the inclusion of the GPU also did not solve the problem. So slow work, discouraged me from even wanting to rant Android.
Therefore, I immediately installed Android x86 under VirtualBox. When setting up a VM for the first time, specify a large HDD size of at least 7 GB. At the last stage of Android installation, refuse to create a fake SD card.
The next problem was to find an image with Ubuntu installed in * .img
At hand I had the image of Ubuntu 12 under VirtualBox * .vdi
The first thing that came to mind was to convert * .vdi to * .img with commands like
VBoxManage clonehd --format RAW ubuntu.vdi ubuntu.imgBut this was not the right way. In this way, an image of the entire disk with a partition table will be created, it is not so easy to mount it.
After consulting it was found the right solution. You need to boot the virtual machine from livecd, pre-connect in the settings of the VM images of the HDD * .vdi Android and Ubuntu.
In the console, boot from livecd run
sudo parted -lWe look at the name of the connected image of Ubuntu x86. This is usually sda1
Further from myself I will recommend to set the right 777 on all directories and files in the image. Despite the fact that it will take a lot of time for these operations. If you do not do this, you may experience unsolved problems when mounting the image to Android. I have them.
So we use the commands:
# find /media/ -type d -exec chmod 777 {} \;# find /media/ -type f -exec chmod 777 {} \;or
chmod -R 0777 /media/Further, in the console to enter the input unit feed the mounted image of Ubuntu. For output, we write the file image ubuntu.img For convenience, we write directly to the Android image, to the sdcard / ubuntu directory.
To do this, perform:
dd if=/dev/sda1 of=/media/Android-x86/android-4.0-RC1/data/media/ubuntu/ubuntu.img bs=1MWe are waiting for the operation is not fast. Make sure that there is enough space in the Android image.
Again, on the resulting image file ubuntu.img we set permissions 777
Well, sort of an image prepared. Moving on.
Mounting
Mounting is probably the most stressful stage.
After all done, finally boot into Android.
To begin with, we should have:
1. Ubuntu x86 image in the /sdcard/ubuntu/ubuntu.img directory
2. Ruled Android x86 build. Usually they are immediately rectified.
3. Android Terminal
4. android-vnc-viewer
5. Root Explorer
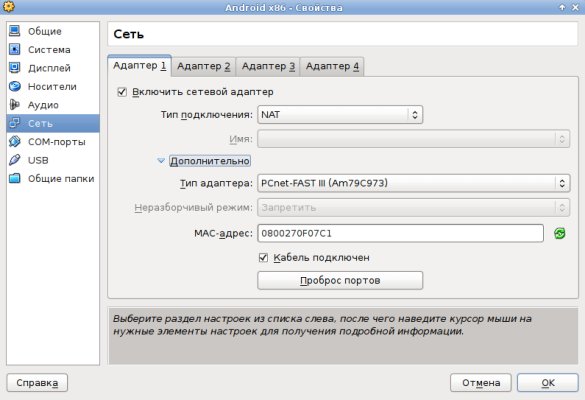
For a start, raise the network in Android.
As a network adapter, select PCNET Fast III in NAT mode (or in bridge mode, if you have a DHCP server in your environment)
Correct work of the Internet can be configured through the terminal:
display a list of network interfaces. Among them should be for example eth0
ip a
get root rights:
su
get network settings via DHCP
dhcpcd eth0
configure DNS server
setprop net.dns1 8.8.8.8
After these actions, the Internet should appear on the virtual machine.
configure adb. In VirtualBox options, forward port 5555 for example to port 5556 of the host.
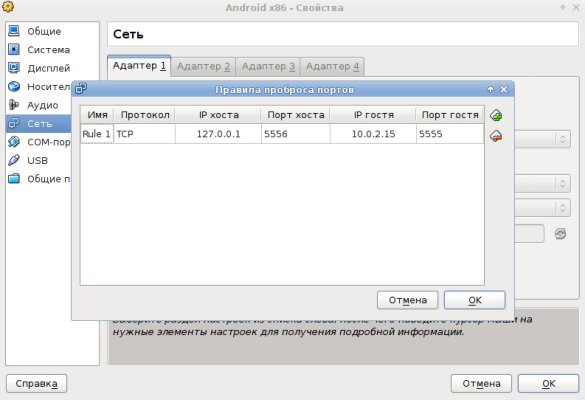
Now you can connect to virtual Android with adb
adb connect 127.0.0.1 Lower556
If you need to get rooted
adb shell
File sharing and application installation is done by commands.
adb push or adb install
For Market, the Internet did not work for me. However, in the browser and in the system it is.
The next step is to directly mount the image and chroot in Ubuntu.
Create a file b in and save it to the directory / sdcard / ubuntu with the following content
Script to mount and login to Ubuntu
mount -o remount, rw -t yaffs2 / dev / block / mtdblock3 / system
echo "SET VARIABLES"
export bin = / system / bin
export mnt = / data / local / ubuntu
export PATH = $ bin: / usr / bin: / usr / sbin: / bin: $ PATH
export TERM = linux
export HOME = / root
if [! -d / data / local / ubuntu]
then
mkdir / data / local / ubuntu
chmod 777 / data / local / ubuntu
fi
echo "SET UP LOOP DEVICE"
losetup / dev / block / loop1 /sdcard/ubuntu/ubuntu.img
echo "MOUNT"
mount -t ext4 / dev / block / loop1 / data / local / ubuntu
mount -t devpts devpts $ mnt / dev / pts
mount -t proc proc $ mnt / proc
mount -t sysfs sysfs $ mnt / sys
echo "SET UP NETWORK"
sysctl -w net.ipv4.ip_forward = 1
echo "nameserver 208.67.222.222"> $ mnt / etc / resolv.conf
echo "nameserver 208.67.220.220" >> $ mnt / etc / resolv.conf
echo "127.0.0.1 localhost"> $ mnt / etc / hosts
echo "ENTER UBUNTU"
chroot $ mnt / bin / bash
echo "UMOUNTING"
umount -lfr $ mnt / dev / pts
umount -lfr $ mnt / proc
umount -lfr $ mnt / sys
umount -lfr $ mnt
losetup -d / dev / block / loop1
Especially be careful in the line.
mount -t ext4 / dev / block / loop1 / data / local / ubuntu
It is important to correctly specify the type of file system on the mounted image.
Run a terminal application
Enter the command in the terminal and press "Enter":
su
Enter the command in the terminal and press "Enter":
cd / sdcard / ubuntu
Enter the command in the terminal and press "Enter":
sh b
If you see "root @ localhost: / #" - congratulations! Now you are working in Ubuntu x86
Every time you want to sign in to Ubuntu, you just need to type su and then sh b in your Android terminal.
To exit Ubuntu properly, you must enter exit in the Ubuntu terminal.
Configure VNC
Make sure there is a network connection.
Enter the command in the terminal and press "Enter", wait until the end:
apt-get updateEnter the command in the terminal and press "Enter", answer the question y:
apt-get install tightvncserverWe continue to work under chroot.
Go to / bin
There we create a file x with the content:
rm -r -f / tmp
mkdir / tmp
chmod 777 / tmp
export USER = root
export XKL_XMODMAP_DISABLE = 1
vncserver -geometry 800x550
800x550 replace resolution of your emulator / device
Note that in Android 4, the bottom panel occupies a certain number of pixels. In my case it is 50 pixels. Therefore, what would have to scroll in the VNC client indicated not 600 as in the emulator, but 550.
The easiest way to find out permission is to take a screen.
Make chmod 777 x
Using the previous step, we created a script x. When you want to start working in graphical mode, type x in the Ubuntu terminal and press Enter. Please note that the first time you run the x script (Only for the first time) you will be asked to create a password for the VNC connection. Enter the password you need (Considers only the first 8 characters). Also, you will be asked to create a “view-only” password (view-only) - refuse by entering the answer to question n
Launch the android-vnc-viewer. Create a new connection with the following parameters:
Nickname: anything
Password: VNC connection password you set
Address: localhost
Port: 5901
Color format: 24-bit color (4 bpp)
Click the "Connect" button. After a few minutes, Ubuntu will launch in graphical mode.
We still need to create a final script called s
Go back to / bin
There we create a file x with the content:
export USER = root
vncserver -kill: 1
vncserver -kill: 2
sudo reboot
sudo halt
Making chmod 777 s
If you are running a graphical interface and want to exit Ubuntu, then you MUST execute s in the Ubuntu terminal to stop the VNC server.
Well, the final part
We put Wine
Well, everything is trivial
sudo apt-get install wineNot a lot of pitfalls
I had to work under an emulator, in which there is probably no miraculous binary binary translator from Intel.
On this software written using NDK just did not start, falling out with errors.
That is why the android-vnc-viewer is used, as it is written without the NDK. But note that the android-vnc-viewer does not fully support the hardware keyboard. And full-fledged analogues do not work
Check whether NDK was used is simple enough. Open * .apk, for example in WinRAR if there is a lib directory, it means that NDK was used. In this directory you can see under which architecture the application was built. I think soon developers besides ARMv6, v7 will add x86.
Consider the speed under the emulator speed is not very high. I also used a fairly heavy shell in Ubuntu.
In the android-vnc-viewer, the right mouse button, in a certain mode, works as a double click with the left.
I want to see how productive the binary translator in games will be at first.

Victory
Thanks to friends with w3bsit3-dns.com, and also bit_imp for help and articles.
Link for those who want to try to launch a ready-made Android image with Ubuntu under VirtualBox
narod.ru/disk/53940773001.7d8f3a1e5cbcdf6499737ecdb1c83337/Android%204%20x86.7z.html
Source: https://habr.com/ru/post/146480/
All Articles