Install and configure a hyper-v server for those who see it for the first time
Introduction
Today I will talk about how to install and configure the hyper-v server hypervisor from Microsoft, as well as about some of the pitfalls and ways to avoid them.
The reason for writing this article was the material of this post . This post is more suitable as a cheat sheet if you have already worked with this hypervisor. The newcomer will have to face a bunch of nuances and dig up a lot of forums, looking for answers to non-standard questions.
This was written from the calculation - as I myself would like to see a similar installation manual. For newbies, I tried to spell out as much as possible all the actions and their meaning, so that they had the opportunity to start experimenting and inventing something of their own. For the more savvy, I divided the article into logical blocks and sub-blocks so that you can quickly find the necessary information.
Under the cut a lot of text and screenshots
')
Description
The MS hyper-v server is a stripped-down version of MS server 2008 R2 in Core mode (that is, in fact, there is no graphical interface) with the hyper-v role installed and nothing more. According to Wikipedia, hyper-v server is distributed for free, which, coupled with convenient management and integration with products from MS, makes it a very attractive hypervisor. In addition, it has a fairly high performance indicators, which means that the resources of the host machine will be spent on the work of the services we need.
Installation
Before starting the installation, you need to make sure that your processor supports Intel VT-x or AMD-V hardware virtualization technologies.
First you need to download the hyper-v server 2008 R2 distribution from the Microsoft website (no need to register). Next, cut the image to a DVD or make an installation flash drive .
Insert the disk / flash drive and boot from it.

Hyper-v server - choose installation wizard language
The installation window prompts us to choose the language of the operating system. We choose English, then I will explain why it is him.
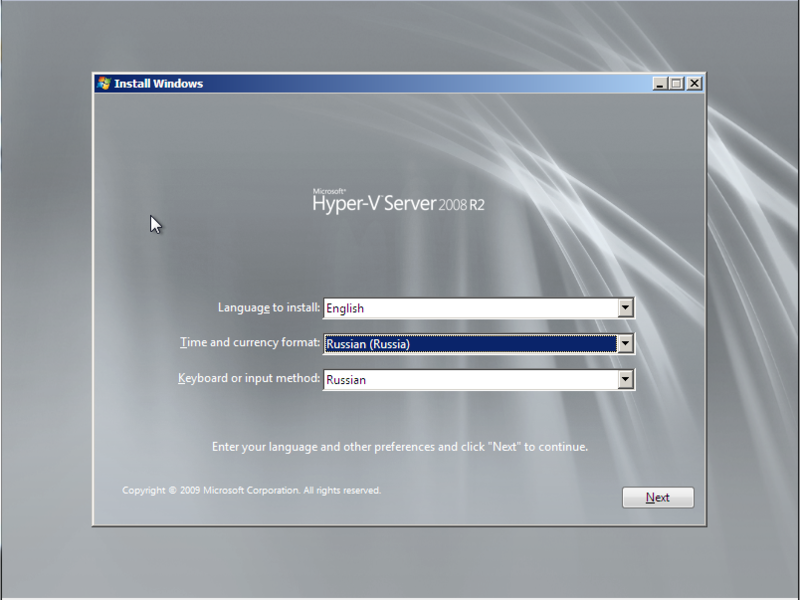
Hyper-v server - select OS language and keyboard layout
The language we chose is English, and the time format is better to choose Russian, so that you don’t have to worry about setting up the command line.
Next, click the button "Install now". We read and accept with the license agreement.
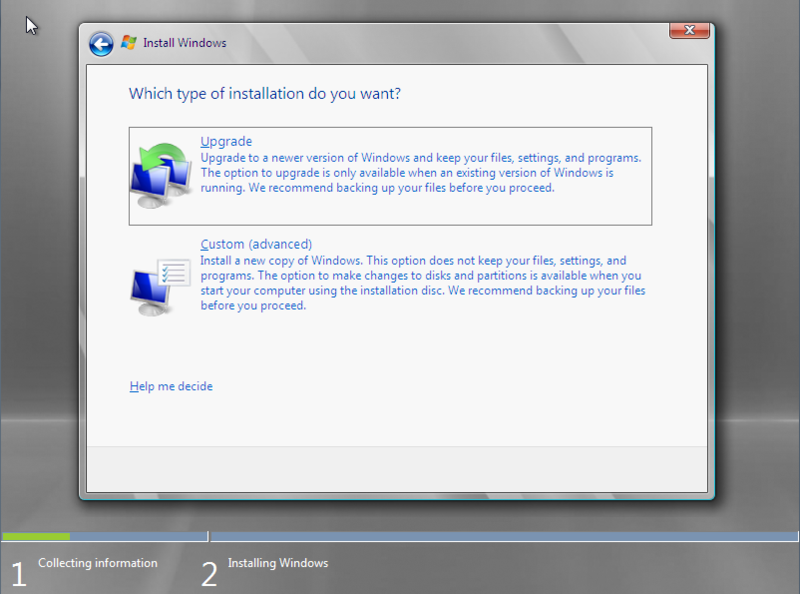
Hyper-v server - select the type of installation
Select the full installation (Custom).
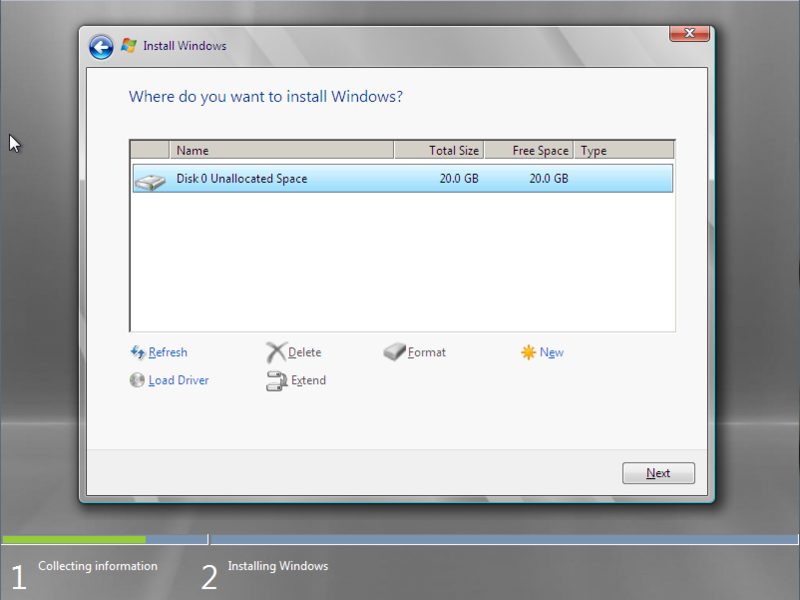
Hyper-v server - setting hard disk parameters
At this stage the wizard offers to configure the parameters of the hard disk partitions. It is best to create 2 logical drive. The first is to install the hypervisor itself, 15 GB is enough for it. The second is for storing virtual machine containers (VMs). Thus, it will be much easier to manage, import and migrate VMs.
Click "Next" and go to drink tea. During installation, the computer will reboot several times.
Customization
Basic setup and remote access
After rebooting, the hyper-v server will prompt us to set an administrator password. Since the default ms windows 2008 server r2 group policy is to require a password complexity, you will have to create a password that is 6 characters or less, necessarily containing a capital letter and a special character or number (for example, “Password1”).
As you can see in the screenshots below, I have the management console in Russian, although English was selected during installation, most likely this is because I downloaded the Russian distribution from the official Microsoft website. This will not adversely affect the operation and configuration of the server. If you have a console in English - you can do it by analogy, all settings will be easy to understand.

Hyper-v server - management interface
After loading the working environment, the OS offers us 2 management consoles. Standard cmd console and console with preset options. First of all, we need to set a static ip-address and configure remote server management. In the management console, select item 8.
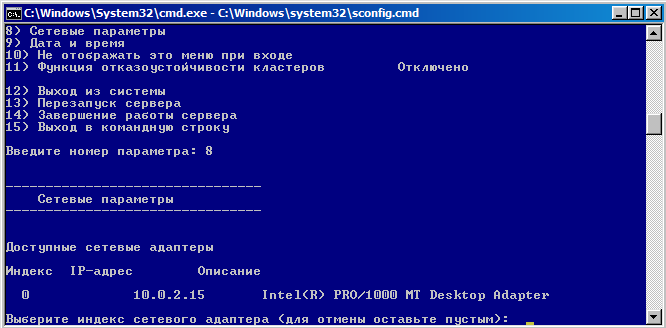
Hyper-v server - network adapters
The list will list the network adapters. Select the desired and enter its index. Next, select "1 - set the ip-address of the network adapter." We enter "S" - which means a static ip-address. For example, let's set the parameters:
ip address is 192.168.1.100
subnet mask - 255.255.255.0
default gateway 192.168.1.1
After applying the parameters, we will return to the submenu, where the settings previously listed will be listed. If everything is correct, return to the main menu.
Now we will configure remote access. Select item 7, then turn on the remote desktop by typing the English "E". On the question of restricting connections from rdp-clients of old versions, choose “2” - connect from any clients.
In the main menu, select item 9, and set the current date and time on the server.
Network server name and workgroup
Now we set up a working group. For the hyper-v server to work, I didn’t include it in the domain, which somewhat complicates the configuration, but for experiments it is an ideal option. During tests and testing of various configurations, it is better to isolate test machines from the target network.
Choose item 1, then “join the working group” by typing “W”. Next, set the name of the working group, for example “test”. It is very important that the name of the working group on the hyper-v server and the PC from which we plan to manage it coincide. After that we return to the main menu.
It is advisable to set the network name of the server, select item 2 and enter the name, for example, “hyper-srv”. To use the parameters you need to reboot, agree with the proposal of the OS.
Further, all the settings (such as computer name, workgroup, users, ip-address, etc.) I will give those that described during the installation process. If you set your parameters, do not forget to use them.
After the reboot, we can connect to the server using a remote desktop client. We select start -> execute, enter
mstsc . In the first field we set the ip-address (in my case 192.168.1.100), we connect. The server will request authorization data, enter the username “hyper-srv \ Administrator” and the password “Password1”.So, we are connected, now you need to configure additional remote control settings. Go to paragraph 4. Now, in order, select the subparagraphs 1, 2 and wait until the end of the settings. Upon completion, the OS again asks for a reboot. Upon completion of these settings, we will be able to connect to the server using the mmc console and the hyper-v server manager from the Remote Server Administration Tools (RSAT) package. In more detail about it I will describe further in the text.
Installing RSAT and hyper-v controller
For comfortable remote server management (creating / deleting / importing / setting up a VM, adding / deleting equipment, managing users / group policies, etc.) we need to install RSAT on our PC. We will install on windows 7. First of all, download it from here . In this package, we need the “hyper-v dispatcher” component for the mmc console - this is actually the main tool for managing future VMs.
Subsequent settings will need to be made both on the server (for short SRV) and on our control PC (CM).
Customize users
The first step is to create a user on whose behalf we will manage. Usernames and passwords must match for the CC and NRW!
On SRV - in the management console, select item 3 (add local administrator). Set the name "admin" and the password for it "Qwerty1". Check whether the add was successfully, in the cmd console, enter the
net user admin . This command will show us that he is in the “Administrators” and “Users” groups.On the
net user admin Qwerty1 /add , we start the cmd console as an administrator and enter the net user admin Qwerty1 /add , add it to the net localgroup admin /add group Admin net localgroup admin /add (for the English version of net localgroup Administrators admin /add ). Check the results again with net user admin .To set up users and security groups there is a wonderful utility “HVRemote” , written by one of Microsoft employees.
Download the utility and copy the file "HVremote.wsf" to the server. Remember at the very beginning, I wrote that you need to choose English for the OS? So, for the correct operation of the “HVremote.wsf” script, it is necessary that the security groups and users be named in English.
A small digression: as I wrote before - there is no graphical interface in the hyper-v server. This is not entirely true; Microsoft simply cut out everything connected with Explorer, but this does not prevent us from running applications that have graphical windows. For example, you can copy the total commander program to the server disk and run it from the console.
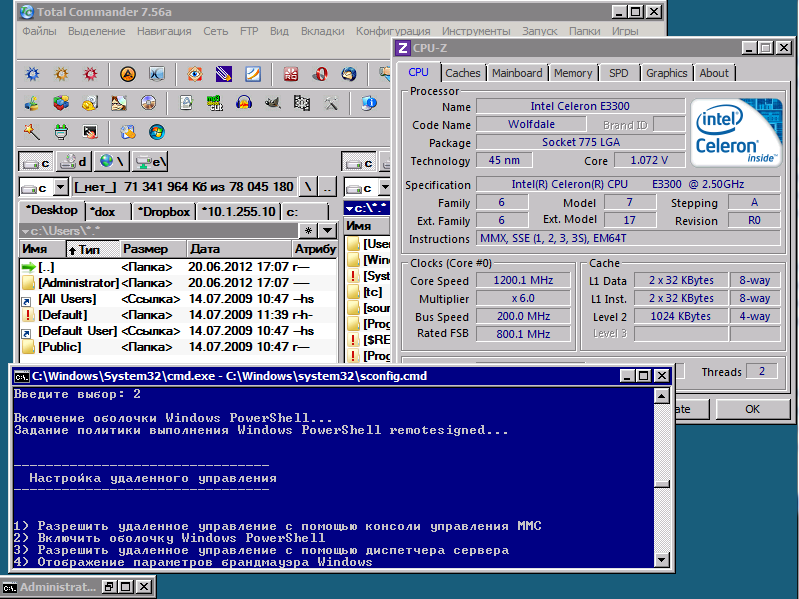
Hyper-v server - application launch
Let's continue, on the SRV - open the cmd console, go to the folder with the script file (I saved it to the root of the C: drive).
cscript hvremote.wsf /add:domain\account command cscript hvremote.wsf /add:domain\account , where domain is the name of your server (domain), account is the name of the account to manage. In my case, the command will look like this cscript hvremote.wsf /add:hyper-srv\admin .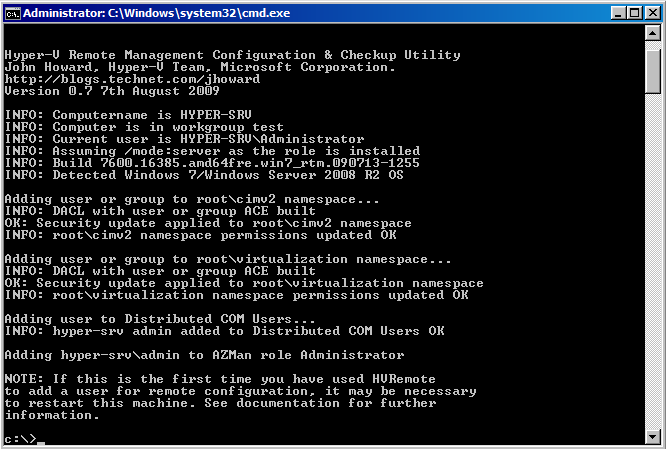
Hyper-v server - script execution
As a result, you should get the same as in the screenshot. The script added the user to the necessary groups and assigned rights to it.
On the CC side, the following
cscript hvremote.wsf /anondcom:grant command cscript hvremote.wsf /anondcom:grant and cscript hvremote.wsf /mmc:enable .To use the snap-ins of the Remote Computer Management Console, you must create exception rules in the server's firewall. First of all, create a rule that allows you to manage logical drives:
Netsh advfirewall firewall set rule group="Remote Volume Management" new enable=yes .If you get an error like "Group cannot be specified with other identification conditions" - try to reprint the command manually, rather than copy / paste.
The result of the successful execution of the command:
Updated 3 rule(s). Ok. Next, allow remote management of the firewall
Netsh advfirewall firewall set rule group="Windows Firewall Remote Management" new enable=yes . Updated 2 rule(s). Ok. Enable access for any snap-ins mmc
netsh advfirewall firewall set rule group="Remote Administration" new enable=yes . Updated 3 rule(s). Ok. Let us use "Windows Management Instrumentation (WMI)" with the following command
netsh advfirewall firewall set rule group="windows management instrumentation (wmi)" new enable=yes . Updated 4 rule(s). Ok. Enable the icmp protocol -
netsh firewall set icmpsetting 8 .Enable access to shared files and folders
netsh firewall set service type=fileandprint scope=subnet .If for some reason you cannot connect to the server, try disabling the firewall with the
netsh firewall set opmode disable . You may need to create additional access rules.Now we can use mmc snap-ins to manage the server (manage services, users, policies, etc.) and, most importantly, hyper-v dispatcher. Let's open it: launch the mmc console -> file -> add or remove a snap -> hyper-v dispatcher. Select the Action menu -> connect to server -> another computer. Enter your server's network name (hyper-srv) in the field and connect.
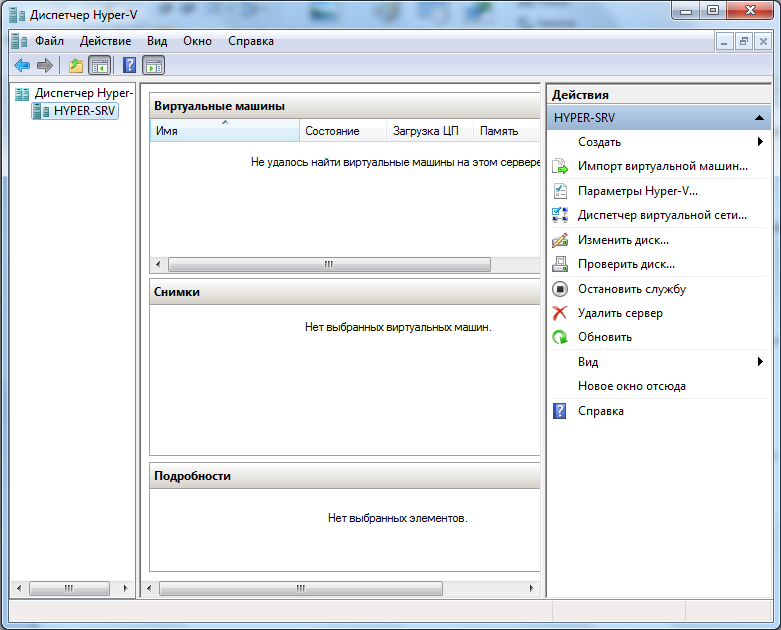
Hyper-v server - VM control manager
That's all, we successfully installed and configured our hyper-v server. Now you can safely deploy virtual machines and various services.
This is my first article on Habré, so I’m waiting for advice and constructive criticism
Links to information resources:
Wikipedia - Hyper-v server
Useful console commands
Source: https://habr.com/ru/post/146303/
All Articles