Third practical task from unity3dstudent.com
We continue to parse practical tasks with unity3dstudent.com . The last task at the moment is next. The article was slightly delayed, but I hope it will be useful to someone.
Here is a link to the original task: www.unity3dstudent.com/2010/07/challenge-c03-beginner

The bottom line: the player must be able to move right / left and shoot at three targets. Targets must fall upon entry, and a player is awarded a point for each downed target. Upon reaching three points, the end game screen is displayed.
The first task.
The second task.
')
Add a plane to the scene — the floor on which target cubes will fall; we will not change its size for now. Suppose that a player will shoot from the position of the camera in the same direction that she is looking. For simplicity, we assume that we will shoot along the OX axis (recall, the directions of the axes are shown in the upper right corner of the Scene tab).
It is necessary in accordance with this position the camera. Choose a plane on the stage. If you click on the OX axis (on the cone-button responding to it in the first screenshot below), we will “look” at the selected object (that is, the plane) in a direction parallel to the OX axis (see the second screenshot).
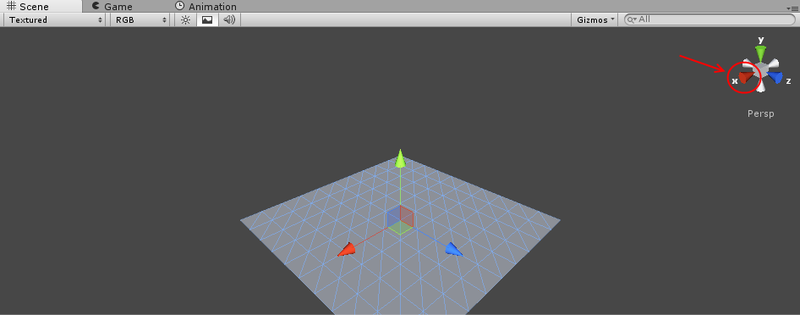
Screenshot 1
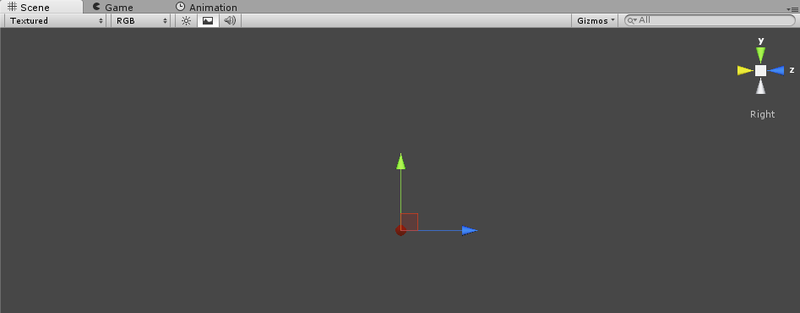
Screenshot 2
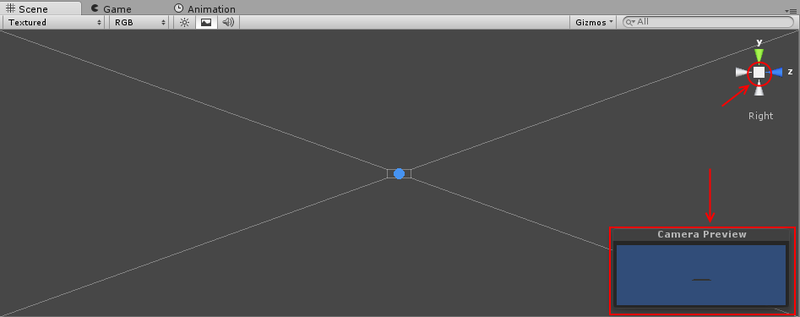
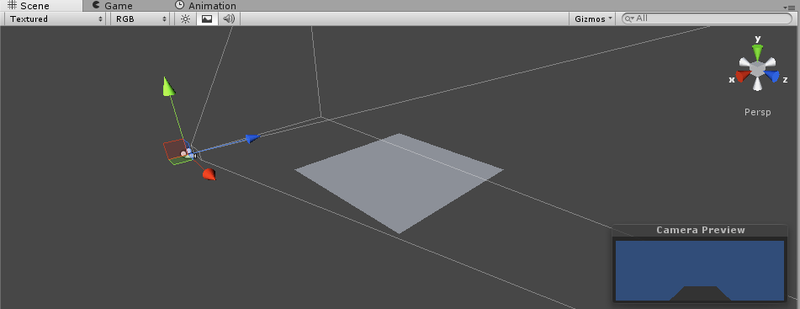
Do not be surprised that the plane itself is no longer visible, as it should be. Now we will put the camera at the same point from which we are looking: select the Main Camera object in the hierarchy pane, click GameObject -> Align With View (or press Ctrl + Shift + F). Now you can see a plane from the camera in the right angle, but far away, and the camera is too low (with the camera object selected, in the lower right corner of the Scene tab - a preview of the camera view). Do not pay attention to the circled one yet.
Let us return to the “normal” view of the scene: to do this, select a plane on the stage and click on the cube between the arrows of the axes in the upper right corner (now it is visible as a square) - it is circled in red in the screenshot above. We will get something like this (it may be necessary to move away from the plane by twisting the mouse wheel so that the camera will come into view):
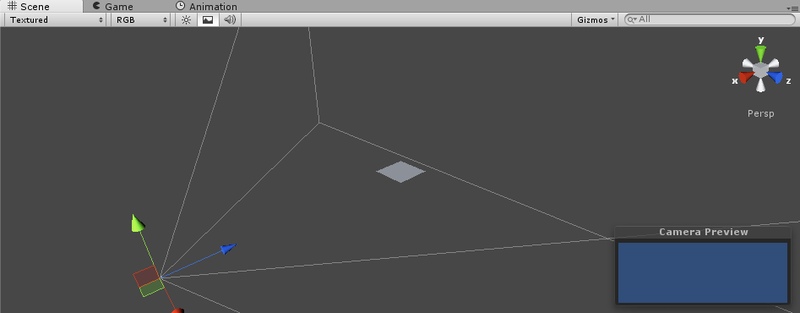
In the screenshot, the camera is highlighted.
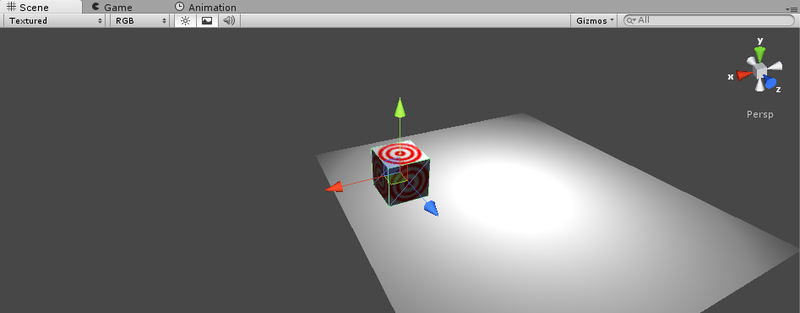
Now we will raise the camera higher and move it to the plane (it can even be so that the near edge of the plane will not be visible):
With the camera for now. Add lighting to the scene - a point light source (any other is possible, here the purpose of adding lighting is to simply make the scene "brighter", nothing more; for beautiful lighting, you may have to use other light sources) and raise it:

I note that point light sources have several editable parameters. In particular, we are interested in Intensity and Range. The first - the intensity of light - is responsible for how brightly the source shines. The second is the range. That is, the light source can shine very brightly, but only in a small volume. And no matter how much we change the Intensity parameter, the light from the source will not propagate further than a given radius.
By default, the parameters Range = 10 and Intensity = 1 are set. If you select a light source object, a ball appears on the stage around it - this is the volume in which the source “shines”. In my case, the plane lay inside this volume, so the Range can not be changed, but the plane was somehow dullly lit, so I increased the Intensity to 4 (in the screenshot above, this has already been done).
We will now create a prefab for the target in the Project panel, let's call it target (of course, you can do with three separate objects, but this is inconvenient, and suddenly you need not three, but a hundred of such targets?). Add a cube to the scene. Slightly decorate it by adding texture. In the last analysis, we created a material with some texture, why not use it again? If you do not remember how to create material - take a look at the analysis of the previous problem.
Now from the hierarchy panel drag this cube to the prefab in the Project panel, and delete the cube itself. We will create three copies (or “sample”; in English, as I understand it, this is called an instance) prefab. Place them all at about the same height as the camera:
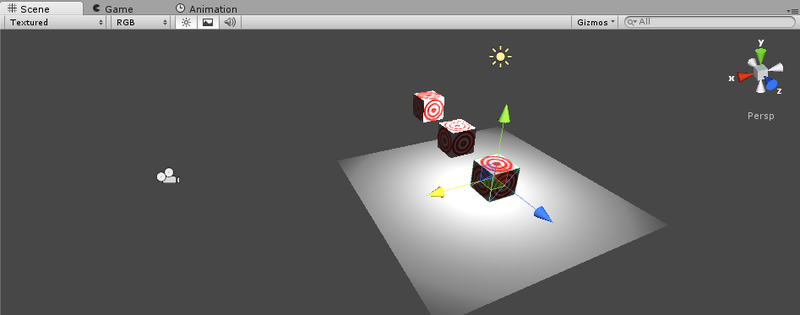
The position of the targets can (and, perhaps, have to) be corrected even after the player learns to shoot (if it is impossible to hit the targets).
It was possible to notice that we have targets so far without the Rigidbody component, they should not fall before they hit them. And as needed - we will immediately add this component to them and they will fall down (in the lessons from the same www.unity3dstudent.com , this option is implicitly suggested, about a different way - towards the end of the article, in the third part).
The main stage is ready, the screen for completing the game will be again later.
First, we define what scripts we need.
First, you need to shoot at targets from the point of location of the camera, in the same script (it will be “hung” on the camera itself) we will move it to the right / left. This script is called Playerscript.
You also need to attach a script to the prefab of the target, which will add the Rigidbody component during the collision and credit the player with a point. This will be the Rigidbodytizer.
But who will keep score? It would be possible to do this in a script for the camera, but somehow it turns ugly. Add an empty object to the scene (GameObject-> Create Empty) and call it GameManager - it will count the points scored and move to another scene with the required number - the game end screen. This object also needs its own script, let it be called the same: GameManager.
First, let's figure out what you need first: the GameManager script. In essence, we only need the Update method for checking the score and a couple of variables for storing the current account and the number of points that need to be accumulated to win (of course, you can do with the number 3, but if you want to modify the game, some inconveniences will appear)
The score variable is described as public static, since in this case it can be accessed from any script as GameManager.score. Of course, it is not very good that the variable in which the value of the account is stored is a public member, but to simplify the script logic, let’s leave as follows. Don't forget to attach the script you just wrote to the GameManager object.
Now let's do the Rigidbodytizer script. We will not need the Update or Start methods, we will add the OnCollisionEnter () method:
The condition checks whether the Rigidbody component has already been added to the object, and if not, adds it and increases the number of points scored. Please note that an increase in the number of points is also within the conditions! Otherwise, a point is even counted for hitting the target with the floor. Now attach the Rigidbodytizer to the target prefab.
It remains to add an arrow - the Playerscript script. But first we need a prefab "bullet" - and we will shoot them. We add to the project a prefpub “bullet”, and to the scene - a sphere. The last one is compressed to the size, for example, 0.4 in all dimensions: in the Inspector at the Transform component we change all the values of the Scale field to 0.4.
You can add material and sphere, this is optional. Drag the sphere from the Hierarchy panel to the bullet prefab in the Project panel and remove the sphere from the stage.
How are we going to move the camera? Rather, the question is not “how” (changing transform.Position is not a problem), but “according to what?”. The Input class has a great static GetAxis method, which by the name of the axis yields a kind of float value. Including for the lines “Horizontal” and “Vertical” we get a value from -1 to 1, indicating the degree of deviation from, respectively, the vertical and horizontal axes. This will work for arrows and WASD on the keyboard and for the joystick. Moreover, if for a joystick the phrase about “deviation from the axis” has been washed away, then for the keyboard, as I understand it, most of the time when the key is pressed, +1 or -1 returns (depending on the direction), although there is some inertia when you press and releasing the key (the value returned by the Input.GetAxis method passes through the intermediate value). In more detail about this method - here .
Using the information received, let the camera move:
Public variable speed is responsible for the maximum speed of the camera. The value returned by Input.GetAxis is multiplied by Time.deltaTime so that the camera moves no faster than speed meters per second, and not “meters per frame”. And bulletPrefab - prefeb bullets, which we will shoot. force - the module of the force with which we will throw this bullet.
Attach the script to the camera, launch the scene and try to press the arrows to the right / left. Everything is fine, it's time to shoot!
Add a shot when you press the jump key (space by default) in the Update method:
Do not forget to select the MainCamera object and in the Inspector panel in the Bullet Prefab field of the Palyerscript (Script) component drag the bullet prefab from the Project panel.
You can run the scene - the game is almost ready. It remains to make a transition to another scene at the end of the game. To do this, you must first create a new scene and be sure to include it in the list of scenes for assembly.
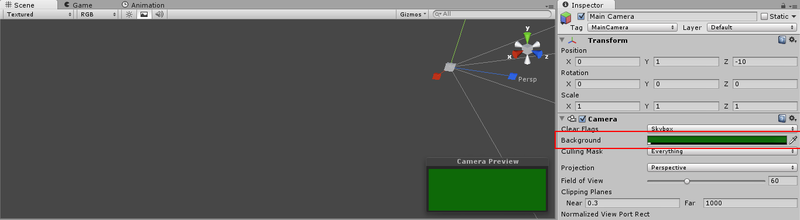
Add a new scene to the project, immediately save it under the name “win”. Choose File -> Build Settings. Then you need to click the Add Current button in the window that appears (you can drag the scene from the Project panel to the Scenes In Build list). Change the background color of the Main Camera object to something more optimistic:
Now you need to add text (for example, “You win!”). Click GameObject -> Create Other -> GUI Text. A new object will appear with the default text “Gui Text”. Change the Text field of the GUIText component to the one you need, and also change the font size (the Font Size field). But the text is not in the center of the screen:
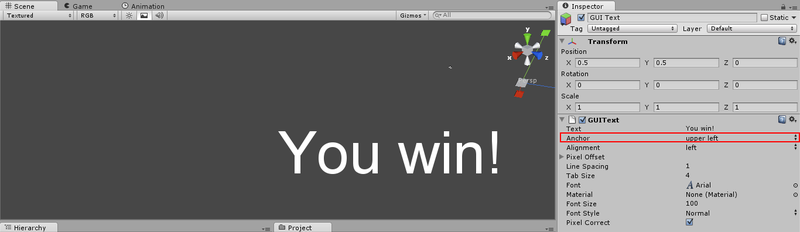
The picture highlights the reason for this behavior of the text. The Anchor property shows where the text is “center”. Not the physical center, but the center that determines the position of the text. Now the value “Upper left” is selected, that is, the text is “suspended” at the top left corner. As you can see, this angle really is in the center of the screen. Select the “Middle center” value, and the text will move to the right place in the middle of the screen.
Why exactly the middle of the screen, and what to do if you need to shift the text? At GUIText there is also a group of Pixel Offset fields with fields X and Y. By setting the desired values, you can shift the text by a specified number of pixels relative to the center of the screen (more precisely, the center of the game window).
Add a transition to this scene at the right time. Let's go back to the main scene and correct the Update method in the GameManager script:
This will load the newly created scene when the desired score is reached.
The main part ends there, it turned out quite playable. It would be worthwhile, of course, to add an inscription with the current result to the main scene, but let it be a small task :) I note that access to the text of an object that has a GUIText component is as follows:
And again the feeling that something is wrong in the scene! What will a decent cube make if a decent bullet crashes into it (although this is rather the core)? That's right, fly away! But why not fly away now? The answer is quite logical.
When in the OnCollisionEnter method we add the target component Rigidbody, the kernel has already faced the target without the Rigidbody. But there is no method that is caused when “a little bit more and there will be a collision”! Therefore, the problem is solved easier.
What essentially should happen? The target is hanging in the air. How is this possible? If she has no mass? Let's start with the fact that this does not happen. And why do we need a lack of mass? So that the body is not acted upon by the force of attraction to the earth. So maybe it turns off?
The last paragraph - from the beginning to the end of the lyrical digression, in fact, there was no such reasoning. I just added the Rigidbody component to the target prefab and accidentally noticed the Use Gravity field there. Here is the same switch of gravity.
By the way, if you start the game now (having done only the paragraph described above), you get a funny effect: the targets fly away, but do not fall down under the action of gravity.
It is time to change the Rigidbodytizer script (now, however, it does not justify its name).
Well, another thing. Now the game looks something like this:
The second point that I would like to touch upon: camera control. The camera movement only along one straight line imposes significant restrictions on the position of the cubes (so that they could be knocked down as well). Similar to the left / right movement, add an up / down movement (you will have to use
Finally, I note that if you place targets only above the plane, it would be logical to limit the movement to the right / left by the boundaries of the plane, making small changes in the Playerscript. Add a couple of variables and the Start method (explained in the code):
Of course, you can recalculate the constraints on the Z coordinate every frame, but this is inefficient, and in the case of a fixed plane it is also meaningless.
Now let's change the Update method: after changing the transform.position vector, add another line:
Unfortunately, it is impossible to change the Z coordinate of the transform.position vector separately. The Mathf.Clamp (x, a, b) function returns the value of x, if you clamp it between the values of a and b (that is, if, for example, x is less than a, the function will return the value of a)
If you added an up / down move, make sure in a similar way that the camera does not go below the plane and does not rise too high.
Similar reasoning “what if I added XYZ here?” And using the ideas of friends testing the game, I modified the game to something like this:
If there is interest, I can describe,I have come to life, such as turning the sketch of a game from this article into a sketch of a game from a video.
This ends the currently existing tasks formulated here , and with them this series of articles.
Until new meetings.
Here is a link to the original task: www.unity3dstudent.com/2010/07/challenge-c03-beginner
The bottom line: the player must be able to move right / left and shoot at three targets. Targets must fall upon entry, and a player is awarded a point for each downed target. Upon reaching three points, the end game screen is displayed.
The first task.
The second task.
')
Part 1: Scene.
Add a plane to the scene — the floor on which target cubes will fall; we will not change its size for now. Suppose that a player will shoot from the position of the camera in the same direction that she is looking. For simplicity, we assume that we will shoot along the OX axis (recall, the directions of the axes are shown in the upper right corner of the Scene tab).
It is necessary in accordance with this position the camera. Choose a plane on the stage. If you click on the OX axis (on the cone-button responding to it in the first screenshot below), we will “look” at the selected object (that is, the plane) in a direction parallel to the OX axis (see the second screenshot).
Screenshot 1
Screenshot 2
Do not be surprised that the plane itself is no longer visible, as it should be. Now we will put the camera at the same point from which we are looking: select the Main Camera object in the hierarchy pane, click GameObject -> Align With View (or press Ctrl + Shift + F). Now you can see a plane from the camera in the right angle, but far away, and the camera is too low (with the camera object selected, in the lower right corner of the Scene tab - a preview of the camera view). Do not pay attention to the circled one yet.
Let us return to the “normal” view of the scene: to do this, select a plane on the stage and click on the cube between the arrows of the axes in the upper right corner (now it is visible as a square) - it is circled in red in the screenshot above. We will get something like this (it may be necessary to move away from the plane by twisting the mouse wheel so that the camera will come into view):
In the screenshot, the camera is highlighted.
Now we will raise the camera higher and move it to the plane (it can even be so that the near edge of the plane will not be visible):
With the camera for now. Add lighting to the scene - a point light source (any other is possible, here the purpose of adding lighting is to simply make the scene "brighter", nothing more; for beautiful lighting, you may have to use other light sources) and raise it:
I note that point light sources have several editable parameters. In particular, we are interested in Intensity and Range. The first - the intensity of light - is responsible for how brightly the source shines. The second is the range. That is, the light source can shine very brightly, but only in a small volume. And no matter how much we change the Intensity parameter, the light from the source will not propagate further than a given radius.
By default, the parameters Range = 10 and Intensity = 1 are set. If you select a light source object, a ball appears on the stage around it - this is the volume in which the source “shines”. In my case, the plane lay inside this volume, so the Range can not be changed, but the plane was somehow dullly lit, so I increased the Intensity to 4 (in the screenshot above, this has already been done).
We will now create a prefab for the target in the Project panel, let's call it target (of course, you can do with three separate objects, but this is inconvenient, and suddenly you need not three, but a hundred of such targets?). Add a cube to the scene. Slightly decorate it by adding texture. In the last analysis, we created a material with some texture, why not use it again? If you do not remember how to create material - take a look at the analysis of the previous problem.
Now from the hierarchy panel drag this cube to the prefab in the Project panel, and delete the cube itself. We will create three copies (or “sample”; in English, as I understand it, this is called an instance) prefab. Place them all at about the same height as the camera:
The position of the targets can (and, perhaps, have to) be corrected even after the player learns to shoot (if it is impossible to hit the targets).
It was possible to notice that we have targets so far without the Rigidbody component, they should not fall before they hit them. And as needed - we will immediately add this component to them and they will fall down (in the lessons from the same www.unity3dstudent.com , this option is implicitly suggested, about a different way - towards the end of the article, in the third part).
The main stage is ready, the screen for completing the game will be again later.
Part 2: Scripts.
First, we define what scripts we need.
First, you need to shoot at targets from the point of location of the camera, in the same script (it will be “hung” on the camera itself) we will move it to the right / left. This script is called Playerscript.
You also need to attach a script to the prefab of the target, which will add the Rigidbody component during the collision and credit the player with a point. This will be the Rigidbodytizer.
But who will keep score? It would be possible to do this in a script for the camera, but somehow it turns ugly. Add an empty object to the scene (GameObject-> Create Empty) and call it GameManager - it will count the points scored and move to another scene with the required number - the game end screen. This object also needs its own script, let it be called the same: GameManager.
First, let's figure out what you need first: the GameManager script. In essence, we only need the Update method for checking the score and a couple of variables for storing the current account and the number of points that need to be accumulated to win (of course, you can do with the number 3, but if you want to modify the game, some inconveniences will appear)
using UnityEngine; using System.Collections; public class GameManager : MonoBehaviour { public uint neededScore = 3; public static uint score = 0; // Update is called once per frame void Update () { if (score == neededScore) { // } } } The score variable is described as public static, since in this case it can be accessed from any script as GameManager.score. Of course, it is not very good that the variable in which the value of the account is stored is a public member, but to simplify the script logic, let’s leave as follows. Don't forget to attach the script you just wrote to the GameManager object.
Now let's do the Rigidbodytizer script. We will not need the Update or Start methods, we will add the OnCollisionEnter () method:
void OnCollisionEnter() { if (rigidbody == null) { gameObject.AddComponent("Rigidbody"); GameManager.score++; } } The condition checks whether the Rigidbody component has already been added to the object, and if not, adds it and increases the number of points scored. Please note that an increase in the number of points is also within the conditions! Otherwise, a point is even counted for hitting the target with the floor. Now attach the Rigidbodytizer to the target prefab.
It remains to add an arrow - the Playerscript script. But first we need a prefab "bullet" - and we will shoot them. We add to the project a prefpub “bullet”, and to the scene - a sphere. The last one is compressed to the size, for example, 0.4 in all dimensions: in the Inspector at the Transform component we change all the values of the Scale field to 0.4.
You can add material and sphere, this is optional. Drag the sphere from the Hierarchy panel to the bullet prefab in the Project panel and remove the sphere from the stage.
How are we going to move the camera? Rather, the question is not “how” (changing transform.Position is not a problem), but “according to what?”. The Input class has a great static GetAxis method, which by the name of the axis yields a kind of float value. Including for the lines “Horizontal” and “Vertical” we get a value from -1 to 1, indicating the degree of deviation from, respectively, the vertical and horizontal axes. This will work for arrows and WASD on the keyboard and for the joystick. Moreover, if for a joystick the phrase about “deviation from the axis” has been washed away, then for the keyboard, as I understand it, most of the time when the key is pressed, +1 or -1 returns (depending on the direction), although there is some inertia when you press and releasing the key (the value returned by the Input.GetAxis method passes through the intermediate value). In more detail about this method - here .
Using the information received, let the camera move:
public class Playerscript : MonoBehaviour { public const float speed = 7; public GameObject bulletPrefab; public float force = 1500; // Update is called once per frame void Update () { float translation = Input.GetAxis("Horizontal") * Time.deltaTime * speed; transform.position += new Vector3(0, 0, translation); } } Public variable speed is responsible for the maximum speed of the camera. The value returned by Input.GetAxis is multiplied by Time.deltaTime so that the camera moves no faster than speed meters per second, and not “meters per frame”. And bulletPrefab - prefeb bullets, which we will shoot. force - the module of the force with which we will throw this bullet.
Attach the script to the camera, launch the scene and try to press the arrows to the right / left. Everything is fine, it's time to shoot!
Add a shot when you press the jump key (space by default) in the Update method:
if (Input.GetButtonDown("Jump")) { GameObject bullet = GameObject.Instantiate(bulletPrefab, transform.position, transform.rotation) as GameObject; bullet.rigidbody.AddForce(transform.forward * force); } Do not forget to select the MainCamera object and in the Inspector panel in the Bullet Prefab field of the Palyerscript (Script) component drag the bullet prefab from the Project panel.
You can run the scene - the game is almost ready. It remains to make a transition to another scene at the end of the game. To do this, you must first create a new scene and be sure to include it in the list of scenes for assembly.
Add a new scene to the project, immediately save it under the name “win”. Choose File -> Build Settings. Then you need to click the Add Current button in the window that appears (you can drag the scene from the Project panel to the Scenes In Build list). Change the background color of the Main Camera object to something more optimistic:
Now you need to add text (for example, “You win!”). Click GameObject -> Create Other -> GUI Text. A new object will appear with the default text “Gui Text”. Change the Text field of the GUIText component to the one you need, and also change the font size (the Font Size field). But the text is not in the center of the screen:
The picture highlights the reason for this behavior of the text. The Anchor property shows where the text is “center”. Not the physical center, but the center that determines the position of the text. Now the value “Upper left” is selected, that is, the text is “suspended” at the top left corner. As you can see, this angle really is in the center of the screen. Select the “Middle center” value, and the text will move to the right place in the middle of the screen.
Why exactly the middle of the screen, and what to do if you need to shift the text? At GUIText there is also a group of Pixel Offset fields with fields X and Y. By setting the desired values, you can shift the text by a specified number of pixels relative to the center of the screen (more precisely, the center of the game window).
Add a transition to this scene at the right time. Let's go back to the main scene and correct the Update method in the GameManager script:
void Update () { if (score == neededScore) { Application.LoadLevel("win"); } } This will load the newly created scene when the desired score is reached.
The main part ends there, it turned out quite playable. It would be worthwhile, of course, to add an inscription with the current result to the main scene, but let it be a small task :) I note that access to the text of an object that has a GUIText component is as follows:
guiText.text = "Hello world!"; Part 3: Aesthetic.
And again the feeling that something is wrong in the scene! What will a decent cube make if a decent bullet crashes into it (although this is rather the core)? That's right, fly away! But why not fly away now? The answer is quite logical.
When in the OnCollisionEnter method we add the target component Rigidbody, the kernel has already faced the target without the Rigidbody. But there is no method that is caused when “a little bit more and there will be a collision”! Therefore, the problem is solved easier.
What essentially should happen? The target is hanging in the air. How is this possible? If she has no mass? Let's start with the fact that this does not happen. And why do we need a lack of mass? So that the body is not acted upon by the force of attraction to the earth. So maybe it turns off?
The last paragraph - from the beginning to the end of the lyrical digression, in fact, there was no such reasoning. I just added the Rigidbody component to the target prefab and accidentally noticed the Use Gravity field there. Here is the same switch of gravity.
By the way, if you start the game now (having done only the paragraph described above), you get a funny effect: the targets fly away, but do not fall down under the action of gravity.
It is time to change the Rigidbodytizer script (now, however, it does not justify its name).
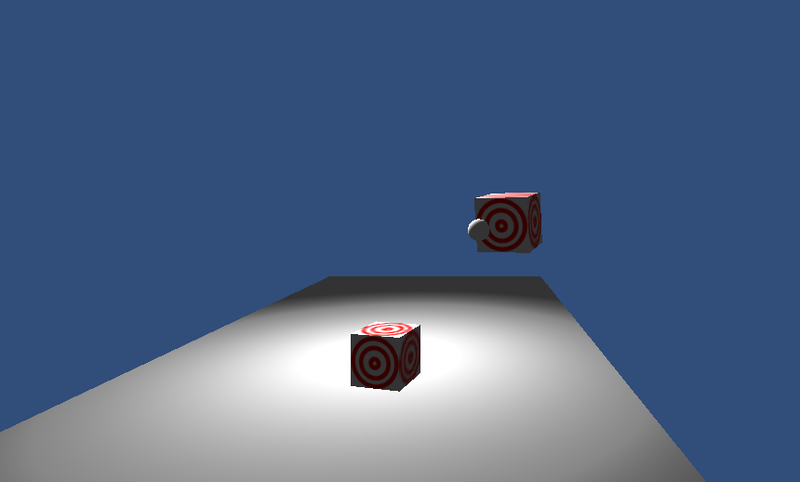
void OnCollisionEnter() { if (!rigidbody.useGravity) { rigidbody.useGravity = true; GameManager.score++; } } Well, another thing. Now the game looks something like this:
The second point that I would like to touch upon: camera control. The camera movement only along one straight line imposes significant restrictions on the position of the cubes (so that they could be knocked down as well). Similar to the left / right movement, add an up / down movement (you will have to use
Input.GetAxis("Vertical") ). Then it will be possible to place the target cubes anywhere within sight, and you can get into them.Finally, I note that if you place targets only above the plane, it would be logical to limit the movement to the right / left by the boundaries of the plane, making small changes in the Playerscript. Add a couple of variables and the Start method (explained in the code):
float zBoundMin, zBoundMax; // Z void Start() { // "Plane" Bounds planeBounds = GameObject.Find("Plane").collider.bounds; zBoundMin = planeBounds.min.z; // Z zBoundMax = planeBounds.max.z; // Z } Of course, you can recalculate the constraints on the Z coordinate every frame, but this is inefficient, and in the case of a fixed plane it is also meaningless.
Now let's change the Update method: after changing the transform.position vector, add another line:
transform.position = new Vector3(transform.position.x,transform.position.y, Mathf.Clamp(transform.position.z, zBoundMin, zBoundMax)); Unfortunately, it is impossible to change the Z coordinate of the transform.position vector separately. The Mathf.Clamp (x, a, b) function returns the value of x, if you clamp it between the values of a and b (that is, if, for example, x is less than a, the function will return the value of a)
If you added an up / down move, make sure in a similar way that the camera does not go below the plane and does not rise too high.
Part 4: Final.
Similar reasoning “what if I added XYZ here?” And using the ideas of friends testing the game, I modified the game to something like this:
If there is interest, I can describe,
This ends the currently existing tasks formulated here , and with them this series of articles.
Until new meetings.
Source: https://habr.com/ru/post/146301/
All Articles