SQL Server Reporting Services in the Cloud
The Windows Azure cloud platform as a PaaS model includes not only the Windows Azure SQL Databases DBMS service (known as SQL Azure) , but also the Windows Azure SQL Reporting service. As you know, one of the advantages of the cloud approach (regardless of the cloud service provider) is elasticity and pay-for-play, i.e. attracting resources as needed and paying for the resources actually consumed, which saves the organization from having to purchase a sophisticated expensive server that will be idle most of the time only when the reporting period is closed. Heavyweight reports are good candidates for transferring to Cloud. The technological advantage of cloud reporting is its interoperability with on-premise technology. For a developer familiar with SQL Server Reporting Services, the process of creating reports for the Cloud will not be different from traditional reports.
The report made in the previous article is fairly straightforward, but it can be used to sort out in general terms the process of migrating a report to the Cloud. First, create a cloud reporting server. We go into the portal of management of Windows Azure of the old sample. In what came out in the form of a preview at the beginning of June 2012, neither Reporting nor Data Sync have yet been implemented. If you are quick to agree to a proposal to try a new portal, click on the green Preview button at the top and select Take me to the previous portal. Click Reporting bottom left:
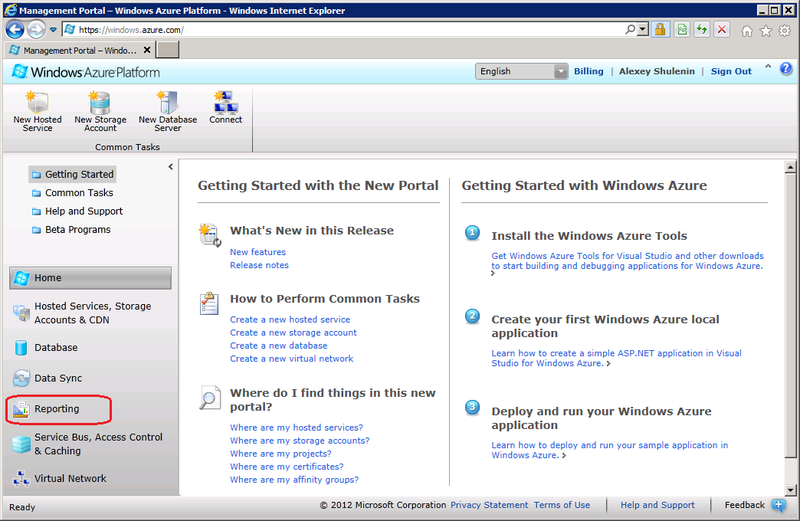
Pic.1
Since there are no cloud reporting servers in the current subscription, you will be offered to create a new SQL Azure Reporting Server:
')
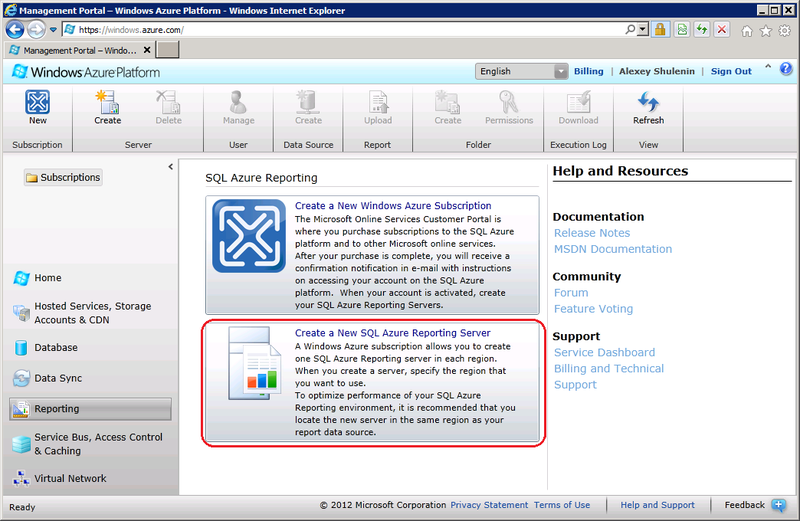
Pic2
Reporting services are available in all existing Microsoft cloud data centers. I will create it in the West European Center (Amsterdam), because there is also a cloud SQL Server where the data on which the report is based is stored, and the traffic within the data center is free. As in the case of creating SQL Server, the name is automatically generated and cannot be changed.
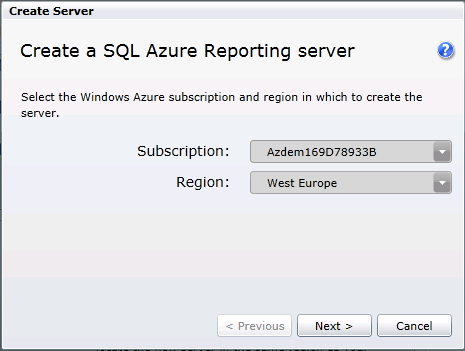
Pic.3
You will also be prompted to specify the name and password of the server administrator:

Pic.4
after which the server is ready to accept and execute reports.

Pic.5
Cloud reports are created by the same tools (Report Designer as part of SSDT , Report Builder ) as local ones. The main feature is that the data source for it should be the Windows Azure SQL Database (SQL Azure), while the local report supports a lot of embedded and configurable data sources:
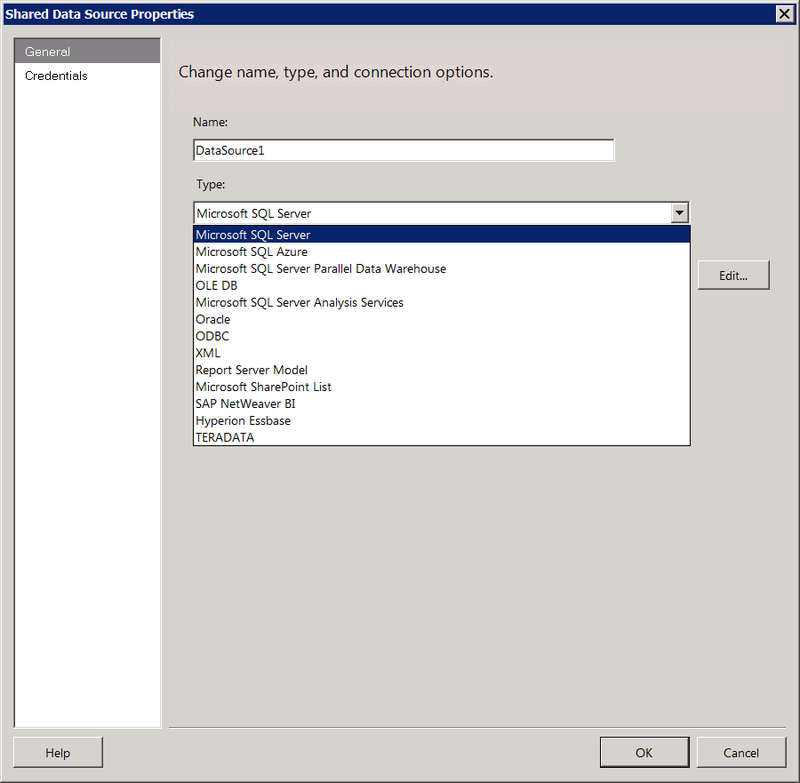
Pic.6
As we can see, among them is SQL Azure, which allows you to implement a hybrid, or, if you like, intermediate scenario, when the report is run on a local reporting server, using data from the Cloud.
Despite the significant intersection of cloud and on-premise SQL Server functionality, if the data is taken from SQL Azure, the source should be SQL Azure, not SQL Server. Otherwise, the deployment will fail
An error has occurred during report processing. Tracing ID is: f8806086-edd3-4a68-89b6-26bd33504f82. (rsProcessingAborted)
The data set 'DataSet1' failed for the shared data set. (rsDataSetExecutionError)
This is a version of the Reporting Services. (rsDataExtensionNotFound)
To begin with, the data on the basis of which the report is based, should be transferred from the local database to SQL Azure. This can be done using a lot of ways, from which we have analyzed five: bcp , SSIS , DACPAC , BACPAC , SQL Azure Data Sync , and their combinations.
For simplicity, I choose the Deploy Database to SQL Azure method, which exports the local database to BACPAC and immediately imports it to the specified SQL Azure server:

Pic.7
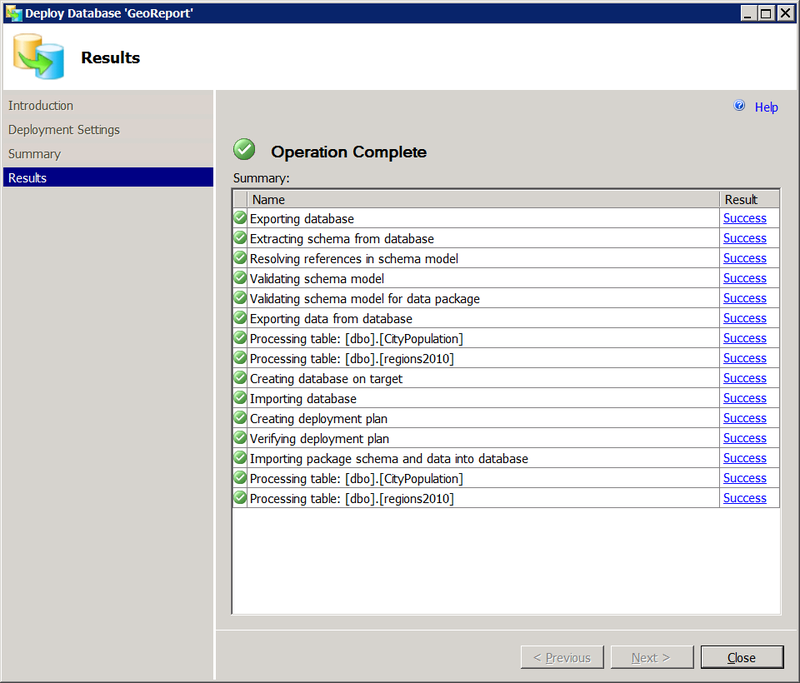
Fig.8
After the data has moved to the Cloud, the DataSource1 connection in the report needs to be redone from the local SQL Server to the cloud:
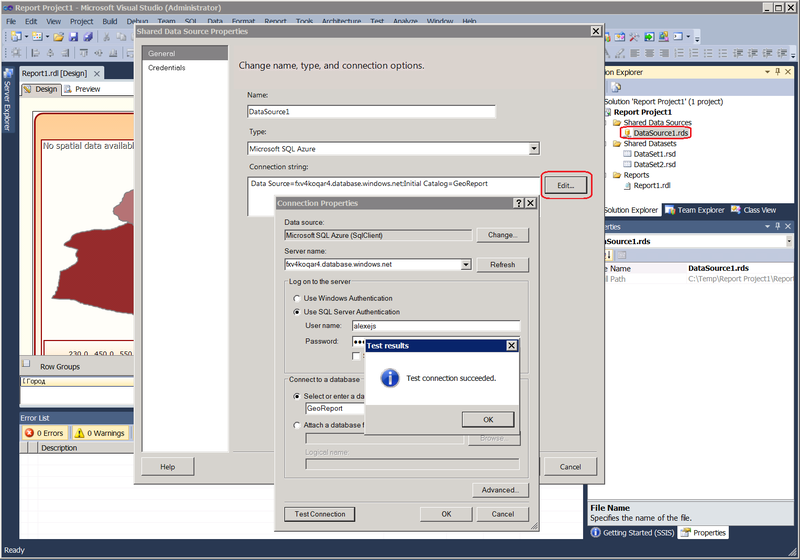
Fig.9
Now a local report will be performed on cloud data, as previously on local data. If an error suddenly pops up that the connection to the server was successfully established, but the certificate’s CN name does not match the passed value, add to the connection string Fig.9; TrustServerCertificate = True.
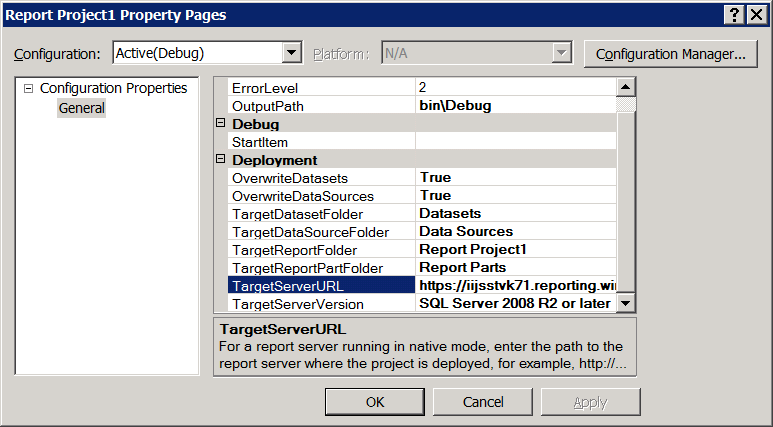
Transfer the report from the local Report Server to the Cloud. The easiest way to do this is to warm it directly from the development tool, in this case, SSDT. In the project properties (Project -> <project name> Properties), as the Target Server Url, we indicate the name of the cloud reporting server that we saw in the Azure Management Portal (Figure 5). As usual, we set the names of the folders where the common data sources and datasets will be placed. Change the OverwriteDatasets and OverwriteDatasources properties to true. Otherwise, if a dataset / data source with the same name already exists in this folder, it will not be replicated:
- Deploy started: Project: Report Project1, Configuration: Debug - Deploying to iijsstvk71.reporting.windows.net/ReportServer
Deploying data source '/ Data Sources / DataSource1'.
Warning: Cannot be deployed to the server because of the data source because it does not exist and OverwriteDataSources is not specified.
Deploying data set '/ Datasets / DataSet1'.
Warning: Cannot be deployed dataset DataSet1 to the server because it already exists and OverwriteDatasets is not specified.
Pic.10
In the SSDT menu bar, move to the Build item and select Deploy <project name>.
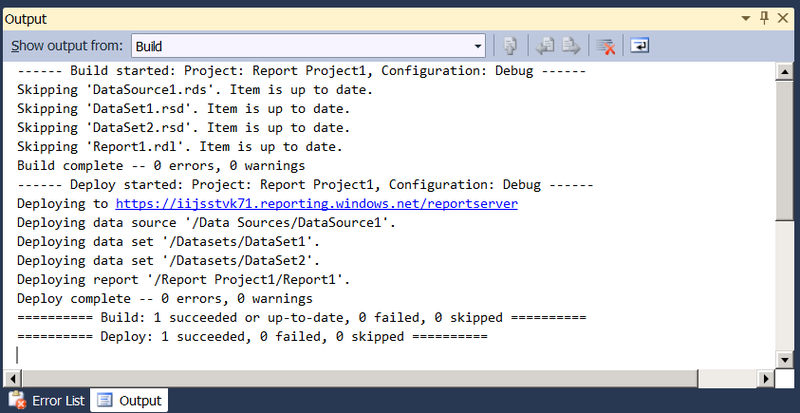
Figure 11
Go to the Azure Portal -> Reporting and notice that, compared to Figure 5, the Data Sources, Datasets and Report Project1 folders were formed on the reporting server, as was ordered in Figure 10.
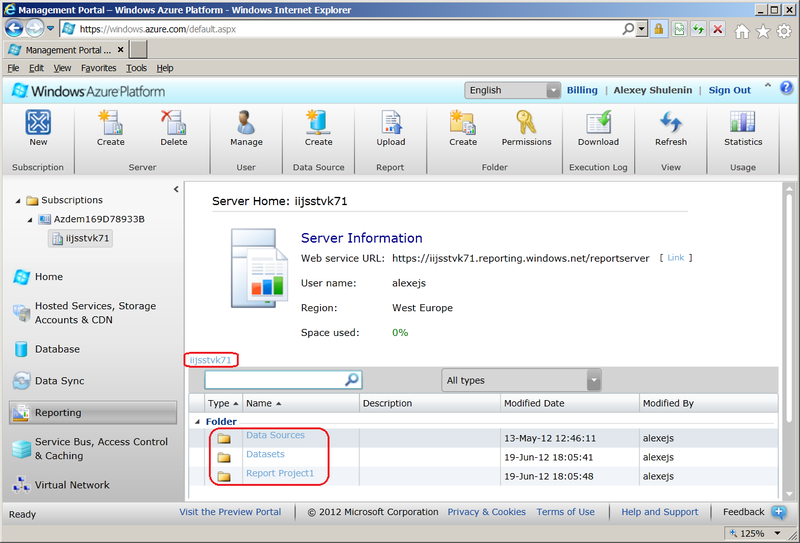
Fig.12
Go to the folder Report Project1, where we observe a freshly produced report:

Fig.13
Notice the Upload button in the top menu. It allows you to warm the report "manually", i.e. it is not necessary to resort to SSDT / Report Builder for this. The data source can also be created directly on the portal - the Create Data Source menu button. Click on the report, enter the login and password for authorization on the report server:
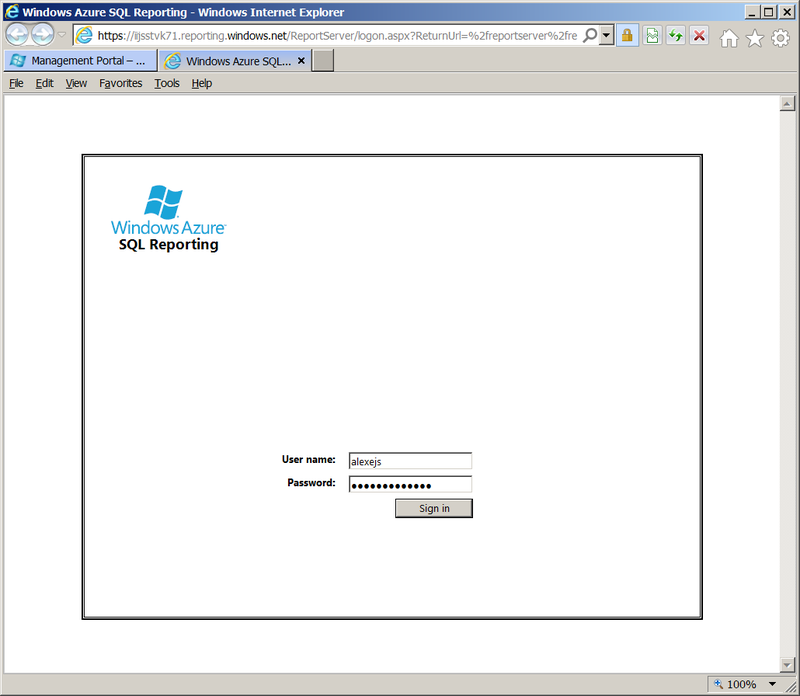
Fig.14
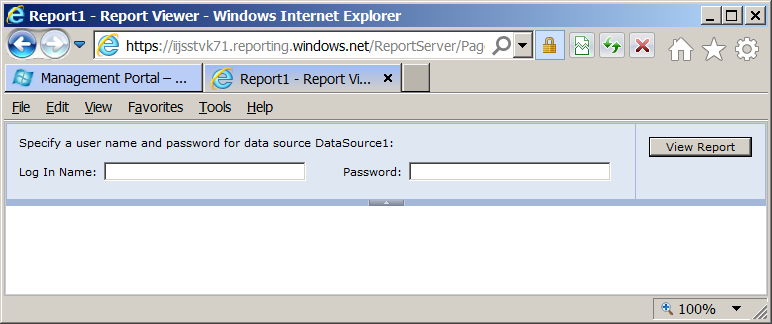
Next, you will be prompted to enter an account on whose behalf the Report Server will access the data source:
Pic.15
and after entering it we get an already familiar report in the cloud version:
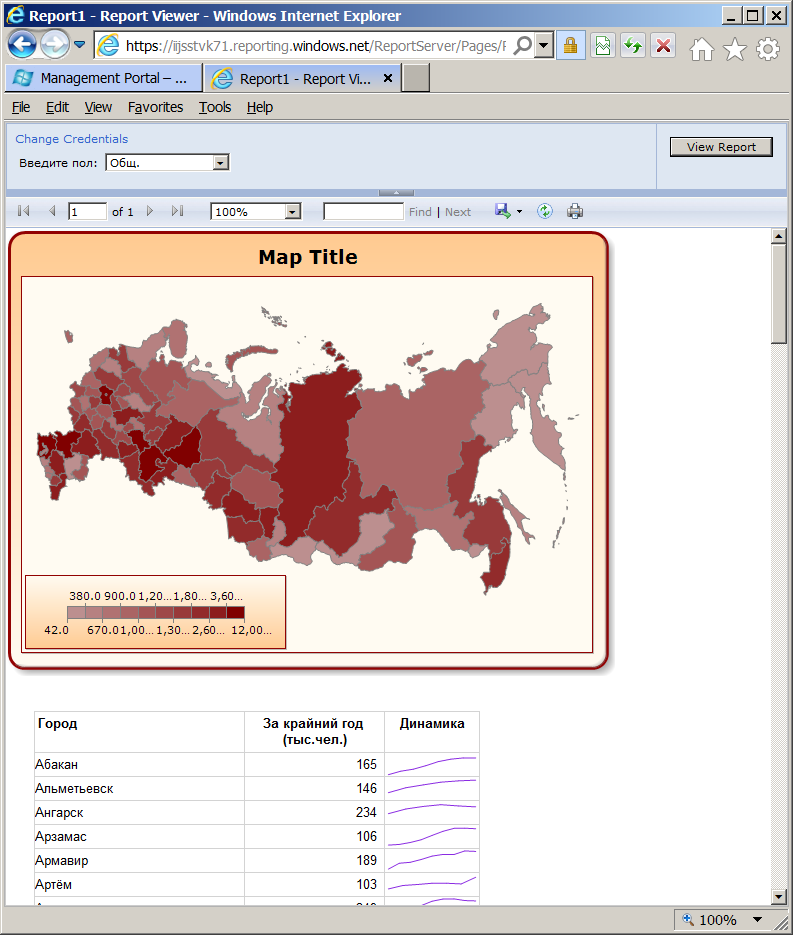
Figure 16
Users can access the report directly by url, which we see in the address bar, for example, iijsstvk71.reporting.windows.net/ReportServer/Pages/ReportViewer.aspx?/Report%20Project1/Report1 . To avoid constantly entering the account under which the Azure Reporting server goes to SQL Azure, it can be configured in the properties of the data source. To do this, in Figure 12, go to the Data Sources folder, click on Data Source1, note that the Credentials will be stored securely in the report server and enter them. In this case, the window of Fig.15 will not be displayed.
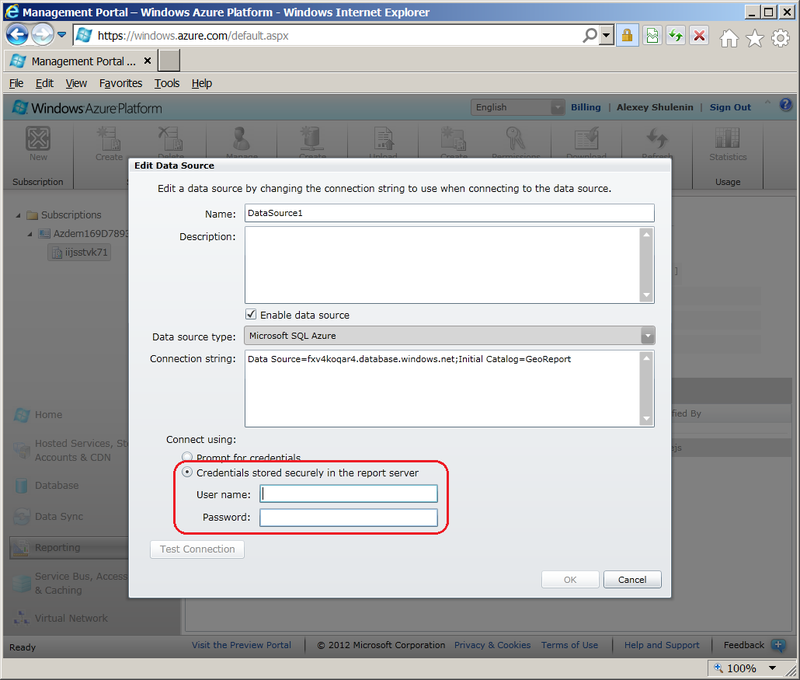
Pic.17
If you use ReportViewer Control, you can also avoid explicitly entering an account to access the Azure Reporting server Figure 14 using an authentication cookie, as shown here .
Note.
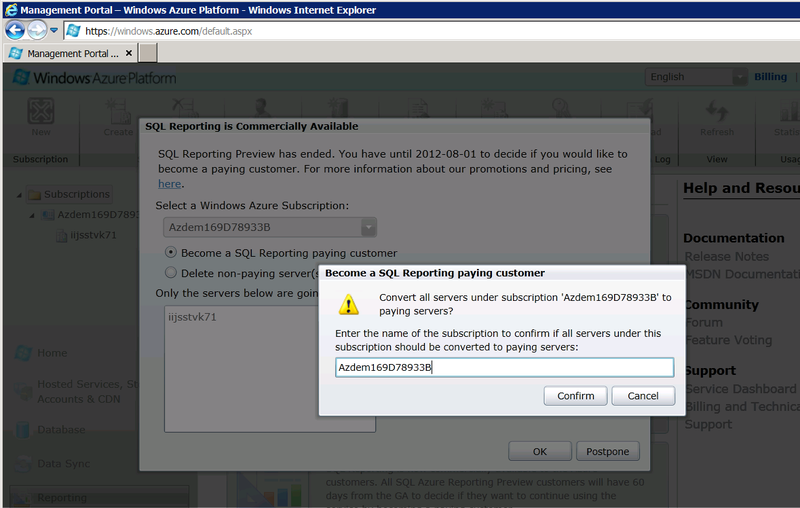
Starting from August 1, 2012, Windows Azure SQL Reporting, which was in the stage of free preview, will be available in commercial operation mode, and therefore they propose to decide what to do with previously created servers: delete or convert to a paid basis.
Pic.18
You can view the rates using a calculator .
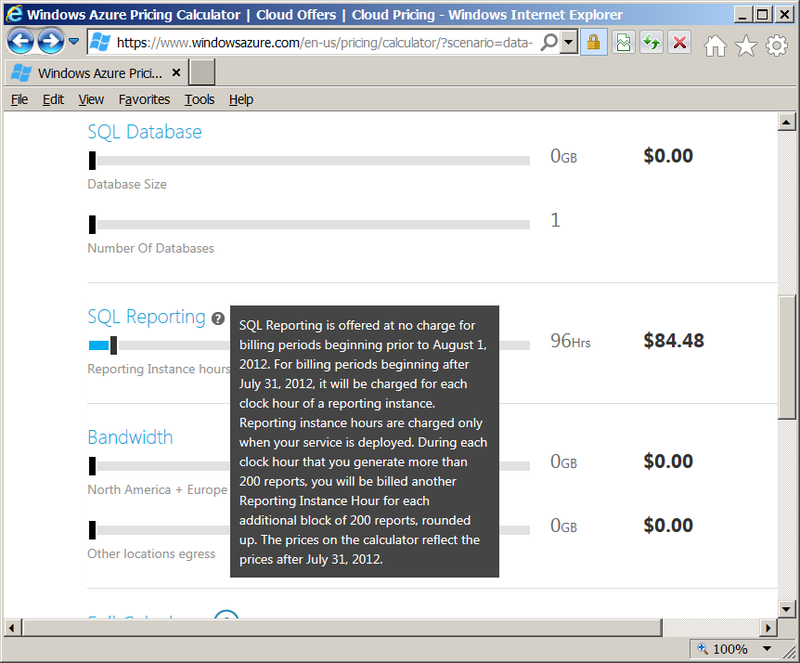
Figure 19
The report made in the previous article is fairly straightforward, but it can be used to sort out in general terms the process of migrating a report to the Cloud. First, create a cloud reporting server. We go into the portal of management of Windows Azure of the old sample. In what came out in the form of a preview at the beginning of June 2012, neither Reporting nor Data Sync have yet been implemented. If you are quick to agree to a proposal to try a new portal, click on the green Preview button at the top and select Take me to the previous portal. Click Reporting bottom left:
Pic.1
Since there are no cloud reporting servers in the current subscription, you will be offered to create a new SQL Azure Reporting Server:
')
Pic2
Reporting services are available in all existing Microsoft cloud data centers. I will create it in the West European Center (Amsterdam), because there is also a cloud SQL Server where the data on which the report is based is stored, and the traffic within the data center is free. As in the case of creating SQL Server, the name is automatically generated and cannot be changed.
Pic.3
You will also be prompted to specify the name and password of the server administrator:
Pic.4
after which the server is ready to accept and execute reports.
Pic.5
Cloud reports are created by the same tools (Report Designer as part of SSDT , Report Builder ) as local ones. The main feature is that the data source for it should be the Windows Azure SQL Database (SQL Azure), while the local report supports a lot of embedded and configurable data sources:
Pic.6
As we can see, among them is SQL Azure, which allows you to implement a hybrid, or, if you like, intermediate scenario, when the report is run on a local reporting server, using data from the Cloud.
Despite the significant intersection of cloud and on-premise SQL Server functionality, if the data is taken from SQL Azure, the source should be SQL Azure, not SQL Server. Otherwise, the deployment will fail
An error has occurred during report processing. Tracing ID is: f8806086-edd3-4a68-89b6-26bd33504f82. (rsProcessingAborted)
The data set 'DataSet1' failed for the shared data set. (rsDataSetExecutionError)
This is a version of the Reporting Services. (rsDataExtensionNotFound)
To begin with, the data on the basis of which the report is based, should be transferred from the local database to SQL Azure. This can be done using a lot of ways, from which we have analyzed five: bcp , SSIS , DACPAC , BACPAC , SQL Azure Data Sync , and their combinations.
For simplicity, I choose the Deploy Database to SQL Azure method, which exports the local database to BACPAC and immediately imports it to the specified SQL Azure server:
Pic.7
Fig.8
After the data has moved to the Cloud, the DataSource1 connection in the report needs to be redone from the local SQL Server to the cloud:
Fig.9
Now a local report will be performed on cloud data, as previously on local data. If an error suddenly pops up that the connection to the server was successfully established, but the certificate’s CN name does not match the passed value, add to the connection string Fig.9; TrustServerCertificate = True.
Transfer the report from the local Report Server to the Cloud. The easiest way to do this is to warm it directly from the development tool, in this case, SSDT. In the project properties (Project -> <project name> Properties), as the Target Server Url, we indicate the name of the cloud reporting server that we saw in the Azure Management Portal (Figure 5). As usual, we set the names of the folders where the common data sources and datasets will be placed. Change the OverwriteDatasets and OverwriteDatasources properties to true. Otherwise, if a dataset / data source with the same name already exists in this folder, it will not be replicated:
- Deploy started: Project: Report Project1, Configuration: Debug - Deploying to iijsstvk71.reporting.windows.net/ReportServer
Deploying data source '/ Data Sources / DataSource1'.
Warning: Cannot be deployed to the server because of the data source because it does not exist and OverwriteDataSources is not specified.
Deploying data set '/ Datasets / DataSet1'.
Warning: Cannot be deployed dataset DataSet1 to the server because it already exists and OverwriteDatasets is not specified.
Pic.10
In the SSDT menu bar, move to the Build item and select Deploy <project name>.
Figure 11
Go to the Azure Portal -> Reporting and notice that, compared to Figure 5, the Data Sources, Datasets and Report Project1 folders were formed on the reporting server, as was ordered in Figure 10.
Fig.12
Go to the folder Report Project1, where we observe a freshly produced report:
Fig.13
Notice the Upload button in the top menu. It allows you to warm the report "manually", i.e. it is not necessary to resort to SSDT / Report Builder for this. The data source can also be created directly on the portal - the Create Data Source menu button. Click on the report, enter the login and password for authorization on the report server:
Fig.14
Next, you will be prompted to enter an account on whose behalf the Report Server will access the data source:
Pic.15
and after entering it we get an already familiar report in the cloud version:
Figure 16
Users can access the report directly by url, which we see in the address bar, for example, iijsstvk71.reporting.windows.net/ReportServer/Pages/ReportViewer.aspx?/Report%20Project1/Report1 . To avoid constantly entering the account under which the Azure Reporting server goes to SQL Azure, it can be configured in the properties of the data source. To do this, in Figure 12, go to the Data Sources folder, click on Data Source1, note that the Credentials will be stored securely in the report server and enter them. In this case, the window of Fig.15 will not be displayed.
Pic.17
If you use ReportViewer Control, you can also avoid explicitly entering an account to access the Azure Reporting server Figure 14 using an authentication cookie, as shown here .
Note.
Starting from August 1, 2012, Windows Azure SQL Reporting, which was in the stage of free preview, will be available in commercial operation mode, and therefore they propose to decide what to do with previously created servers: delete or convert to a paid basis.
Pic.18
You can view the rates using a calculator .
Figure 19
Source: https://habr.com/ru/post/146289/
All Articles