Google Play and root rights for Android Emulator
Hi, Habr!
I want to share my experience ofstuffing Google Play add cones into the emulator that is part of the Android SDK. You ask: " What can be so difficult here? Add the necessary .apk and use it with pleasure, they already wrote about it on Habré here ! "
But no, the pitfalls turned out to be quite a lot. I will tell about them under a cat. By the way, along the way, I'll tell you how to get root rights for the emulator.
')

Interesting? Welcome under cat.
UPD : Updated outdated links.
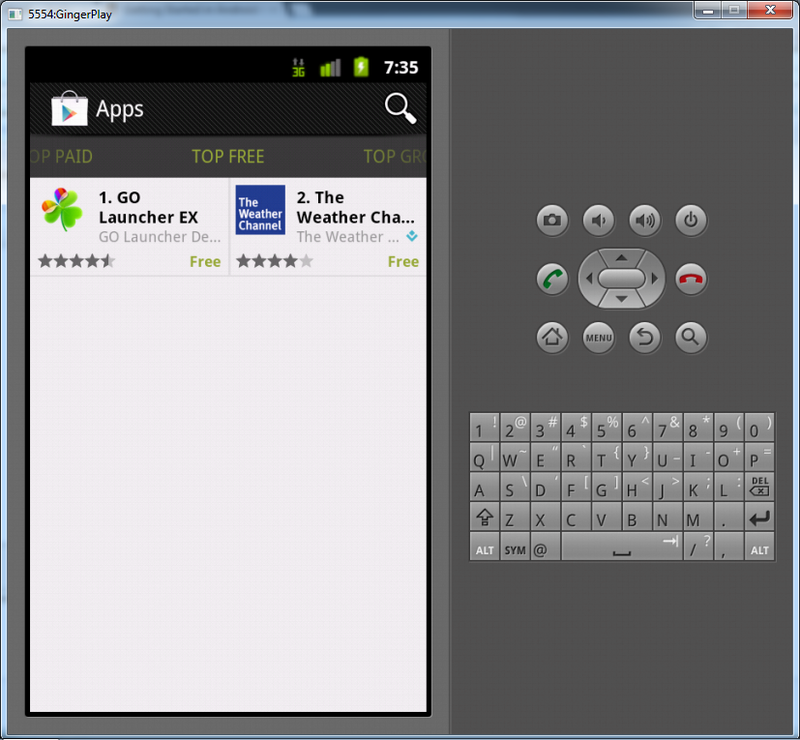
And so, for a start - how does my instruction differ from what was written earlier? That when using Google Play you will not face such picture when in categories three and a half applications are visible. For example, here in Top Free you can see as many as two (sic!) Applications .:
The instruction is written for Windows, but it is also suitable for other supported OS SDKs, just with minor changes.
We will need:
Andoid SDK with the following installed packages:
Create a folder called GooglePlay and open the console in it. This is easy to do by right clicking on the folder with the Shift key pressed. Unfortunately, this only works in Windows Vista and above. Those who use XP will have to write paths for cd.
Now you need to download some files. Save all downloads to the created folder.
We use emulator 2.3, so we take:
After installing all the packages, add android-sdk \ tools and android-sdk \ platform-tools to the system PATH for convenience.
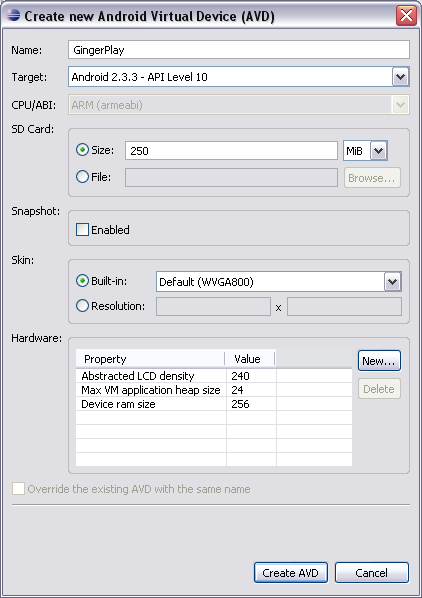
Create an emulator for Android 2.3 using the AVD Manager, setting the size of the SD card to 200-250 MB.
Start the emulator and when it is fully loaded - open the command line and enter the command " adb devices ". You will need to see the emulator in the list of connected devices:

If it is not there, go to the settings in the emulator ( Menu button - Settings - Applications - Development ). Check the box " Debug USB " and restart the emulator. Now it should appear in the list.
Next you willfind a not very exciting input heaps of console commands and waiting.
We will need the GoogleServicesFramework.apk , MarketUpdater.apk and Vending.apk files from the downloaded archive with GoogleApps . Open it and copy them to the folder you created earlier.
Now we need to make some tricky hacks so that all applications from Google Play are available to us, regardless of their requirements. Otherwise, a picture from several single applications expects you, as was shown above. It is worth making a remark - launching unsupported applications will not work, but these hacks will allow you to download these applications to the device and, after that, pull apk out of the emulator, for example.
Execute the command:
Just in case, I note that the dot at the end of the command is not a typo.
The file build.prop will appear in the folder. Open it with a text editor, find the line starting with ro.product.cpu.abi
After it we add one more line:
Just after the comment ADDITIONAL_BUILD_PROPERTIES you need to add the line
This will allow us to see applications that require the ARM7 processor architecture and version 2.0 support.
We also need an archive with permissions , which can be found here .
Drag the permissions folder from the archive into our GooglePlay folder.
These files are needed for applications that require certain equipment to work. For example, a camera or accelerometer.
By the way, about entering heaps of console commands, I lied. Hehe.
You will only need to create two .bat files. Let's start with.
Name the first file permissions.bat and fill it with this content:
After - create another one with an arbitrary name, for example make.bat and such content:
For those who chose an emulator from Intel - pay attention to the file names in make.bat.
Lines
should be replaced by:
As a result, the contents of the GooglePlay folder should be:

Now - run the make.bat file and start waiting. Keep in mind that the last two commands from the make.bat file will take a long time to execute. There is a little trick - to speed up this process you need to do something on the emulator. For example, surf Habrahabr from the emulator. I do not know how or why, but when the emulator is loaded, it speeds up the process of creating and copying system.img.
After the console reports about its completion by its closure, we will find the system.img file in the working folder. Now close the emulator. You do not need to immediately log in or install any applications - you will lose all changes after restarting the emulator.
Grab the appeared system.img and replace it with a file from the folder
If someone took Intel's x86 image as a base, use the folder
Do not forget to backup the original system.img!
Please note that the android-10 folder is equivalent for Android version 2.3. For other versions of the android, the number after android is equal to the API Level of this version.
Now go to the folder where you have the emulator files and delete the files " cache.img ", " userdata-qemu.img ", " snapshot.img ", " userdata.img " (if it is there). The default for Win7 is
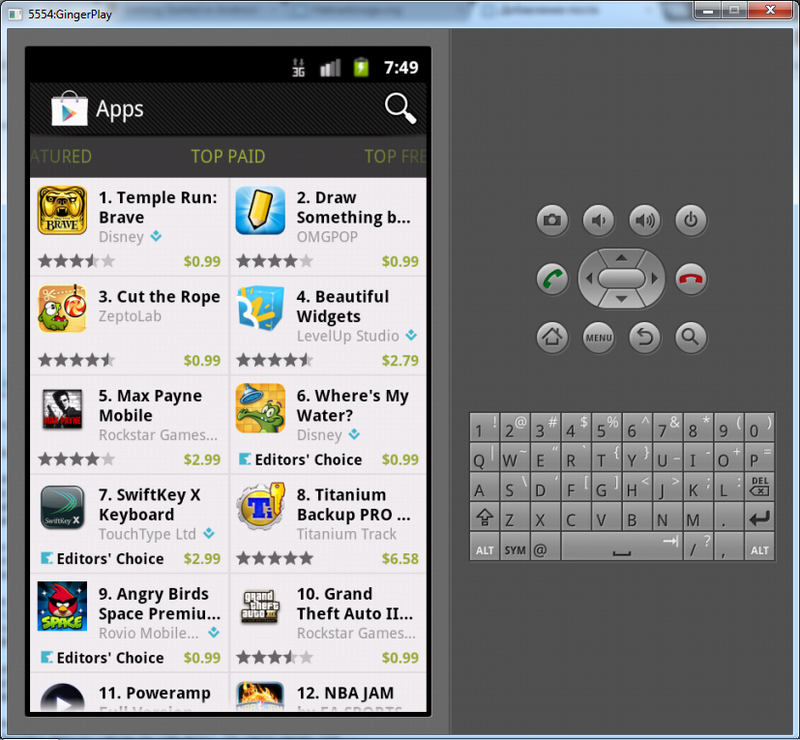
After that, start the emulator, open Google Play, log in, accept the terms of the agreement and ... restart the emulator again, because, often, applications do not want to load immediately after login.
And now, after the last reboot, you can finally fully use the emulator.
I hope my article will help someone save time. Thank you for taking the time to read it.
I want to share my experience of
But no, the pitfalls turned out to be quite a lot. I will tell about them under a cat. By the way, along the way, I'll tell you how to get root rights for the emulator.
')
Interesting? Welcome under cat.
UPD : Updated outdated links.
And so, for a start - how does my instruction differ from what was written earlier? That when using Google Play you will not face such picture when in categories three and a half applications are visible. For example, here in Top Free you can see as many as two (sic!) Applications .:
The instruction is written for Windows, but it is also suitable for other supported OS SDKs, just with minor changes.
We will need:
Andoid SDK with the following installed packages:
- Android SDK Tools
- Android SDK Platform-tools
- SDK Platform for Android 2.3.3
- Extras / Android Support
- Extras / Google USB Driver
Create a folder called GooglePlay and open the console in it. This is easy to do by right clicking on the folder with the Shift key pressed. Unfortunately, this only works in Windows Vista and above. Those who use XP will have to write paths for cd.
Now you need to download some files. Save all downloads to the created folder.
We use emulator 2.3, so we take:
- Google Apps for CyanogenMod 7
- Mkfs.yaffs2 utility : for ARM emulator
- Or mkfs.yaffs2 for x86 emulator
- SuperUser.apk and su for ARM or x86.
After installing all the packages, add android-sdk \ tools and android-sdk \ platform-tools to the system PATH for convenience.
Create an emulator for Android 2.3 using the AVD Manager, setting the size of the SD card to 200-250 MB.
Start the emulator and when it is fully loaded - open the command line and enter the command " adb devices ". You will need to see the emulator in the list of connected devices:
If it is not there, go to the settings in the emulator ( Menu button - Settings - Applications - Development ). Check the box " Debug USB " and restart the emulator. Now it should appear in the list.
Next you will
We will need the GoogleServicesFramework.apk , MarketUpdater.apk and Vending.apk files from the downloaded archive with GoogleApps . Open it and copy them to the folder you created earlier.
Now we need to make some tricky hacks so that all applications from Google Play are available to us, regardless of their requirements. Otherwise, a picture from several single applications expects you, as was shown above. It is worth making a remark - launching unsupported applications will not work, but these hacks will allow you to download these applications to the device and, after that, pull apk out of the emulator, for example.
Execute the command:
adb pull system / build.prop.
Just in case, I note that the dot at the end of the command is not a typo.
The file build.prop will appear in the folder. Open it with a text editor, find the line starting with ro.product.cpu.abi
After it we add one more line:
ro.product.cpu.abi2 = armeabi-v7a
Just after the comment ADDITIONAL_BUILD_PROPERTIES you need to add the line
ro.opengles.version = 131072
This will allow us to see applications that require the ARM7 processor architecture and version 2.0 support.
We also need an archive with permissions , which can be found here .
Drag the permissions folder from the archive into our GooglePlay folder.
These files are needed for applications that require certain equipment to work. For example, a camera or accelerometer.
By the way, about entering heaps of console commands, I lied. Hehe.
You will only need to create two .bat files. Let's start with.
Name the first file permissions.bat and fill it with this content:
adb push permissions / android.hardware.camera.autofocus.xml / system / etc / permissions /
adb push permissions / android.hardware.camera.flash-autofocus.xml / system / etc / permissions /
adb push permissions / android.hardware.camera.front.xml / system / etc / permissions /
adb push permissions / android.hardware.camera.xml / system / etc / permissions /
adb push permissions / android.hardware.location.gps.xml / system / etc / permissions /
adb push permissions / android.hardware.location.xml / system / etc / permissions /
adb push permissions / android.hardware.sensor.accelerometer.xml / system / etc / permissions /
adb push permissions / android.hardware.sensor.compass.xml / system / etc / permissions /
adb push permissions / android.hardware.sensor.gyroscope.xml / system / etc / permissions /
adb push permissions / android.hardware.sensor.light.xml / system / etc / permissions /
adb push permissions / android.hardware.sensor.proximity.xml / system / etc / permissions /
adb push permissions / android.hardware.telephony.gsm.xml / system / etc / permissions /
adb push permissions / android.hardware.touchscreen.multitouch.jazzhand.xml / system / etc / permissions /
adb push permissions / android.hardware.touchscreen.multitouch.xml / system / etc / permissions /
adb push permissions / android.hardware.touchscreen.xml / system / etc / permissions /
adb push permissions / android.hardware.wifi.xml / system / etc / permissions /
adb push permissions / android.software.live_wallpaper.xml / system / etc / permissions /
adb push permissions / android.software.sip.voip.xml / system / etc / permissions /
adb push permissions / com.android.location.provider.xml / system / etc / permissions /
adb push permissions / features.xml / system / etc / permissions /
adb push permissions / handheld_core_hardware.xml / system / etc / permissions /
adb push permissions / platform.xml / system / etc / permissions /
After - create another one with an arbitrary name, for example make.bat and such content:
adb remount
adb push build.prop / system /
adb push su / system / bin /
adb push Superuser.apk / system / app /
adb push Vending.apk / system / app /
adb push MarketUpdater.apk / system / app /
adb push GoogleServicesFramework.apk / system / app /
call permissions.bat
adb push mkfs.yaffs2 / data / misc /
adb shell rm /system/app/SdkSetup.apk
adb remount
adb shell chmod 4755 / system / bin / su
adb shell chmod 777 /data/misc/mkfs.yaffs2
adb shell ./data/misc/mkfs.yaffs2 / system /sdcard/system.img
adb pull /sdcard/system.img system.img
For those who chose an emulator from Intel - pay attention to the file names in make.bat.
Lines
adb push su / system / bin /
adb push mkfs.yaffs2 / data / misc /
adb shell chmod 777 /data/misc/mkfs.yaffs2
adb shell ./data/misc/mkfs.yaffs2 / system /sdcard/system.img
should be replaced by:
adb push su.x86 / system / bin / su
adb push mkfs.yaffs2.x86 / data / misc /
adb shell chmod 777 /data/misc/mkfs.yaffs2.x86
adb shell ./data/misc/mkfs.yaffs2.x86 / system /sdcard/system.img
As a result, the contents of the GooglePlay folder should be:
Now - run the make.bat file and start waiting. Keep in mind that the last two commands from the make.bat file will take a long time to execute. There is a little trick - to speed up this process you need to do something on the emulator. For example, surf Habrahabr from the emulator. I do not know how or why, but when the emulator is loaded, it speeds up the process of creating and copying system.img.
After the console reports about its completion by its closure, we will find the system.img file in the working folder. Now close the emulator. You do not need to immediately log in or install any applications - you will lose all changes after restarting the emulator.
Grab the appeared system.img and replace it with a file from the folder
android-sdk / platforms / android-10 / images /
If someone took Intel's x86 image as a base, use the folder
android-sdk / add-ons / addon-intel_atom_x86_system_image-intel_corporation-10 / images / x86
Do not forget to backup the original system.img!
Please note that the android-10 folder is equivalent for Android version 2.3. For other versions of the android, the number after android is equal to the API Level of this version.
Now go to the folder where you have the emulator files and delete the files " cache.img ", " userdata-qemu.img ", " snapshot.img ", " userdata.img " (if it is there). The default for Win7 is
C: / Users / Your User Name / .android / avd / Your Emulator Name. Avd /
After that, start the emulator, open Google Play, log in, accept the terms of the agreement and ... restart the emulator again, because, often, applications do not want to load immediately after login.
And now, after the last reboot, you can finally fully use the emulator.
I hope my article will help someone save time. Thank you for taking the time to read it.
Source: https://habr.com/ru/post/146277/
All Articles