Water cooling system from the construction shop
Introduction
I wanted to build a water cooling system for a home computer for a long time, and it was to build, not buy. And it should be:
- quiet
- compact, and better secretive, so as not to annoy home.
- inexpensive.
- easy to perform.
I looked at these questions for 10 years, and finally, making repairs, I matured a plan on how to do this at one time. The client of the system is a small barebone, the entrance gateway of the home network and so on, lives in a bathroom, because of its beauty, it is hidden in a cupboard, where, despite the small heat pack of 95 watts and regular airflow, it also regularly hung out from overheating every few days.
Water block
Studying the ordeals of comrades from the sites for overclocking, I came to the conclusion that "not mine" was either soldering from copper plates, not searching for a locksmith with a milling machine, nor the subsequent pop-cover plexiglass and pouring yellow-green liquid into the system.
The thing should be simple, concrete and reliable, like the recently rebuilt water supply and sewage system in the apartment.
And the thoughts spun around the fittings and plugs-caps from the plumbing shop.
The first (un) option
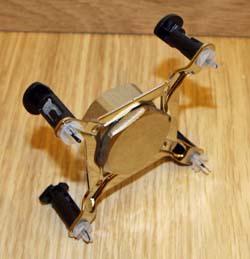
What's so complicated? Nothing! I go to the building shop and buy a brass plug + cover with a diameter of 3/4 ". I take the frame (hereinafter - the" spider ") from the cooler for the 1155 socket in the barebone, twist it - it's done!
Only now there is no space left for supplying and removing liquids, fittings no more than 1/8 "fit into the lid, which is extremely small for full cooling. The chipset can only be cooled, no more.
')
Therefore, I went to another store and chose Pobol, 1 1/4 ", which already allows us to think about thermal inertia, flows and other necessary things for cooling.
Second option
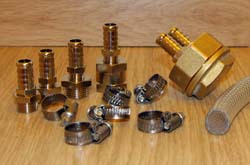
Along the way, picking up a lid and a 1 1/4 "cap, I bought the following:
- 6 nozzles 12mm-1/4 "- for water block and pump.
- 2 adapters 1/4 "-3/8" - used as nuts, because they were not on sale.
- 2 adapters 1/4 "-1/2" - for docking with a radiator.
- 12mm reinforced hose.
- 8 hose clamps for hose.
- 1/4 "tap - a set of 2 pieces.
Everything else for manufacturing has already been on the farm:
- powerful screwdriver / impact drill 24v.
- drill.
- Dies M3 and nuts / washers are the same.
- vice antique (semi-manual because of its size).
- hacksaw
- plumbing keys.
- sanitary flax and pasta for him.
- files, files and sandpaper of different varieties.
- cold welding for auto radiator.
- clean floor - neither the workbench, nor the stool has been left after the repair, therefore it wasn’t something that was done on the knee, it was necessary to do it on the floor, except to spread the plywood, and crawled on my knees all the time.
Manufacturing process
I will write concisely and in the case:

At first he twisted the cork and the cap, understood where it was possible to “settle” the fittings and to disassemble / assemble.
Grinded and polished top / bottom of the future water block - the fact that the fittings and the fact that the processor.
The hole in the "spider" for the processor is square, and the shape of the cork is hexagonal, using a hacksaw and a file I eliminate the excess brass on the cork (thickness is enough, the remainder of the walls is about 3 mm).
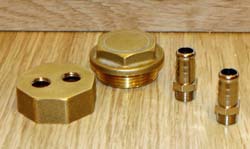 I would not recommend doing the opposite - boring the "spider" to the nut - will lead uneven thickness when fixed to the motherboard.
Marked and drilled the centering holes in the 3mm plug - if you have ever drilled soft metal with a hobby drill, then remember how smartly it leads in such an environment, especially in the hands, + the part breaks out of the hands is simply unrealistic.
 I received the fifth drilling through drills with an increasing diameter, the desired size of the holes for the tap — passed number 1, then number 2.
I tried the fittings - ok, it turned out, we do the mounting of the water block to the “spider” cooler, I drill two holes for the fittings in the washer (yes, the workshop would be the way), it is harder to drill steel in your hands, it’s good not to observe accuracy).
I connect two holes in the washer with a hacksaw (4 cuts) and trim it with a beauty file - at the outlet a washer with a diamond-shaped hole.
 Also in the washer I drill 4 holes 3mm - for studs.
Thin moment - the coincidence of the holes on the washer-flange and the "spider" when assembling, should be as straight and vertical as possible, one hole to look into another.
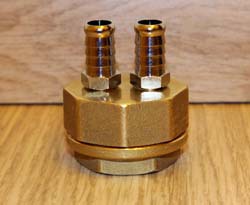
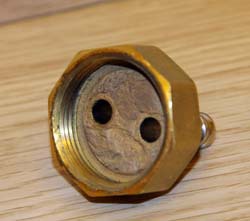
It is time to assemble, stage one - fittings, coat with cold welding the threads on the lid and on the fittings, collect, wait for setting, then from the inside I add the welding level flush so that there are no air bubbles and related problems, then from time to time I twist it to get a tight connection and beautiful grooves inside a wet cork - so that welding does not clutch before (see image).
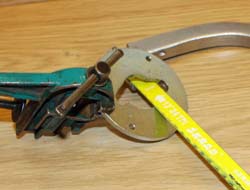 Time to make a flange for the top of the waterblock from a figure-cut washer - a layer of cold welding onto the vertically standing plug with fittings up, then on top of the washer and align it with the horizon.
The most responsible - the assembly of the water block consists of landing on flax with a bottom paste to the cover of the water block, it is necessary to twist strongly and if everything is correct with the amount of flax, the last turns will not be easy, the diameter is large and the force needs to be applied seriously.
 I highly recommend not using FUM tape - as having gathered more than one hundred connections, I assert that it is unreliable and at one time - if you accidentally turn the tightened connection for at least half a minute - it will flow, then it’s better to put it on cold welding, I wasn’t I am sure of hermetic installation of fittings and therefore I did so, but I guess you can not worry about disassembling this design in the future and immediately make and forget about cold welding.
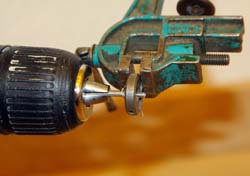
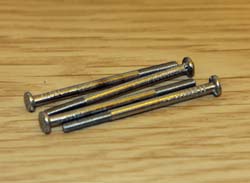 The hairpin is not in the store, and there would be no crawling from the bottom of the “spider” with nuts - there is not enough height, so we take a nail 100, its diameter is just 3mm, we clamp it into the drill and tick. Repeat 4 times (see image).
The water block is ready, it remains to check for leaks and collect.
Pump and expansion tank
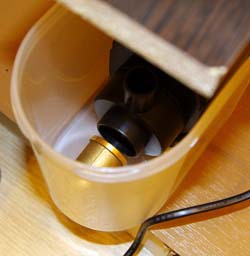
A Chinese pump was purchased in the poultry market for 800 rubles, a lifting height of 2 meters, a productivity of 2000 liters / hour, a standard fence along the axis of rotation, an ejection at an angle of 90 degrees. Having bought, I decided to try it, and by the way she famously jumped out of a 15-liter basin on a stream of water, she realized that he was greedy and could have been taken weaker, but oh well.
It would be expensive for me to boil hellish in the expansion tank, and I decided to adapt a 1.75 liter plastic container for bulk products purchased in the household store, and in order to avoid a taut jet, I inserted a brass corner through two adapters (1/4 "-3/8" - like a nut, see above, 3/8 "- 1/2", and the corner itself 1/2 "-1/2"), forwarding the supply stream again directly to the water intake. The pump itself is glued to the bottom of the tank by the suction cups, the outlet pipe is threaded through a neatly holed removable cover. Then the pump was placed inside the cabinet with a computer along the wall of the bathroom on the furniture corners, to reduce vibration, self-adhesive foam rubber (?) From some plumbing was placed under it.
Unfortunately, there is no complete photo left, the key fragments are visible in the pictures.
Hoses
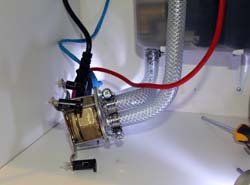
To use a 12mm reinforced hose straight from the store is very difficult, its elasticity was enough to turn over to the side of the computer, so I cut it and bent as I needed. The process looks like this:
- we heat up over the gas stove to the necessary temperature.
- Bend to 1/3 of the bend and quickly wrap in a wet rag, hold to cool in the desired position
- We repeat it even before the seemingly three times, but a very elastic “patient”, the correct bend was obtained in 5-6 approaches.
Radiator
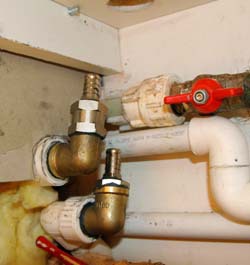
The radiator “turned out” by accident - 5 meters of a metal-plastic pipe embedded in cement with a total weight of 250 kg. The “warm floor” system on the water-bearing system did not come out, there was not enough “blowing out” from the riser with hot water and the floor was cold, I decided to use it with benefit - we warm not the air, but the floor in the bathroom!
The picture shows a shelf, on which there is a mini-server on top and one of two holes for it to hoses.

The assembled and installed water block looks like this:
The picture shows a beige-brown fan of a little-known European company for the production of cooling systems, unfortunately it is needed to disperse the air inside a small case, otherwise the chipset and memory freeze, the barebone is not intended for such things as complete removal of the active airflow, it turned out after about a week of operation.
Refrigerant
Distilled water with vodka, for 2 liters of water accounted for 300 grams of vodka. Lime, living creatures for six months is not detected.
Assembly
The system is going to be quite simple, except that I will focus on the attachment to the processor. The waterblock was pressed to the processor through the paste, the studs were smeared with blue thread lock, pulled up with the fingers of the gadget and then alternately “12-6 hours” and “9-3 hours” we tighten the keys slightly . Calling them full names language does not rotate, very small.
findings
What is achieved:
- the system is quiet, though I later had to add a dimmer for an incandescent lamp for 90 rubles to the pump chain, it became much quieter.
- the system does not overheat, stable operation at 27 degrees in the apartment, the processor temperature is not more than 35 degrees when fully loaded.
- system is not visible.
- The system was inexpensive.
- there is a reserve for cooling - you can still put something, 12mm hoses are a lot.
- one more dream is realized, you can dream more and fulfill other desires.
What does not suit:
- the floor is cold, in winter the family is not very happy, the power of 95 watts is not enough.
- The barebone was not the best choice, overheating of the viscera without air acceleration takes place.
PS Yes, all the repetitions of this experience are at your own peril and risk, I did it, I hope you will succeed too.
UPD: In connection with flax for plumbing, I want to add that transverse incisions are very desirable on the “papa” thread, they are not at all from the curves of the manufacturers' hands, but are specially made by a cutter to keep flax on the thread from twisting when twisting the parts. I had to apply them manually with a file, otherwise I could not achieve the quality of the joint, especially on small diameters. In general, if it turns lightly, it means something is wrong, there is little flax, or it turns along with the details.
UPD2: According to numerous requests, I spent a stress load of the processor in order to heat the floor, but many people are interested in how hot it is. The test went for two days (it makes less sense, the inertial radiator is too much), it was mprime to all processor cores, WCPU 200%, it was measured using sysctl dev.cpu | grep temp and mbmon -A, in both cases the temperature did not rise above 43C, the floor warmed to 29C, the temperature in the room was 25C at a height of 1.5 from the floor. Temperature difference with continuous loading - 43-29 = 14C . At this point you can put an end to the study of this design and move on. Thanks to all participants who have shown interest, made changes and additions to this post!
Source: https://habr.com/ru/post/146251/
All Articles