The battle against redeployments reaches the clouds
The author of this article is our friend and user of the Jelastic platform - Anton Arkhipov. Anton currently holds the position of JRebel product manager at ZeroTurnaround , and is also a co-founder of the devclub.eu and JUG.ee developer community.
The English version of the article can be read here .
 Perhaps you have not heard of such a product as JRebel. So, JRebel is a tool designed to eliminate the problem of redeploying an application during development, and therefore save your time. It updates the application immediately after making any changes to the class structure, resource files, and framework configuration files. It should be noted that this tool is very popular among Java developers. And not in vain, because using JRebel, the developer gets rid of the need to re-assemble and deploy the application. However, it saves an average of 10.5 minutes per hour of coding, according to the latest JavaEE productivity report. This is more than 5 weeks of work each year - which means more than 1 monthly salary of each developer in the team.
Most recently released JRebel 5.0 . The main feature of this release is the JRebel Remoting function, which allows you to use JRebel in cases when the application is running in a cloud environment.
With this feature it will be very easy to develop and test Java applications in the clouds. Let's take a look at how to install and configure JRebel on the Jelastic cloud platform.
')
First, you need to create an environment that you will use to host your application. Let's take as a server application Tomcat, which is the most widely used server according to Developer Productivity Report 2012 .

After creating the environment, you can proceed to the installation of the JRebel agent. To do this, you need to download jrebel.jar . And don't forget about the license file, which should be located in the {user.home} /. Jrebel folder .

Jelastic introduced support for custom JVM properties a few months ago, and we will use this feature to configure JRebel. To do this, we need to make some changes to the variables.conf file.
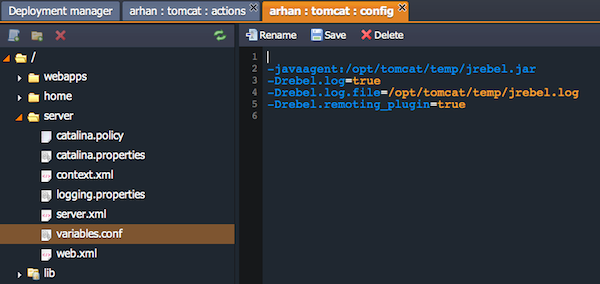
In addition to the -javaagent parameter, in order to ensure that JRebel Remoting works, we will need the JRebel remoting plugin . We connect it with a special JVM argument:
-Drebel.remoting_plugin = true
Now we can view the JRebel logs to make sure the installation of this tool was successful. Remember to save all changes and restart Tomcat to apply new configuration settings.
Note! JRebel installation procedures for Jetty and Tomcat are almost the same. But GlassFish instead of variables.conf uses domain.xml or admin panel.
JRebel Remoting requires two config files to work: rebel.xml and rebel-remote.xml . JRebel requires the rebel.xml configuration file to allow class loaders to see changes made to project files directly.
Rebel-remote.xml is required for remote work. This is a very simple configuration file containing two parameters, the module ID and the URL for which the application is available.
Both configuration files can be generated using the JRebel plug-in for Eclipse, which is available in the Eclipse Marketplace .

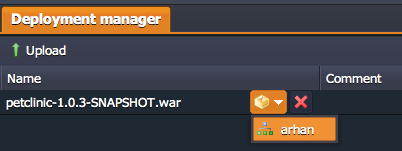
When both files are generated, you can collect the project in the war archive and deploy it to the Jelastic environment.
Let's make changes to the project to check how JRebel works.
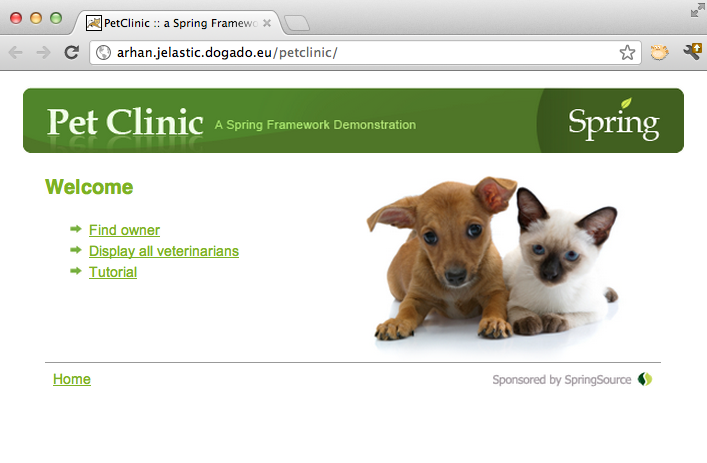
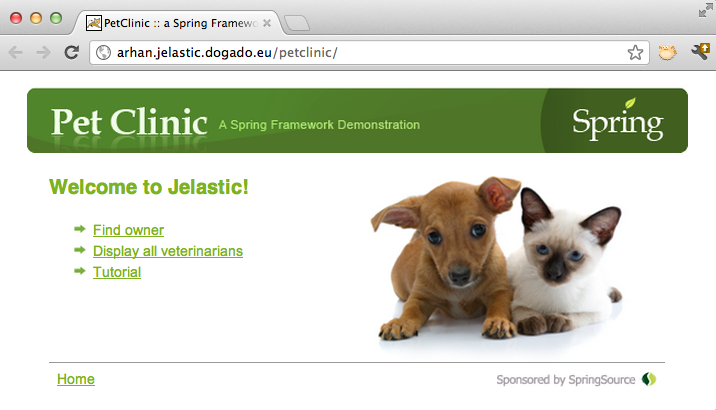
For example, change the first page (welcome.jsp). Instead of “Welcome,” we write “Welcome to Jelastic!” And call the “Sync Now” method provided by the JRebel IDE plugin to update our application.
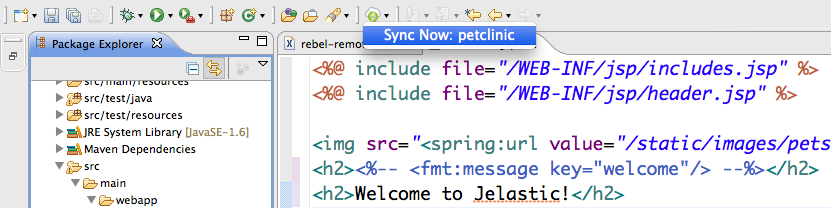
After that, the following message will appear in the IDE console:
As a rule, it takes about a second to upload changes to the server, but this, of course, depends on the connection. After the synchronization is complete, refresh the page - and voila!
Currently JRebel Remoting is supported by an IDE plug-in that is available for Eclipse, plug-ins for IntelliJ and NetBeans will appear soon.
With JRebel 5.0 and Jelastic , the opportunity has appeared to work both locally and remotely, without wasting time on re-deployment. Try and share your opinion in the comments to this post. We will be very grateful.
The English version of the article can be read here .
Perhaps you have not heard of such a product as JRebel. So, JRebel is a tool designed to eliminate the problem of redeploying an application during development, and therefore save your time. It updates the application immediately after making any changes to the class structure, resource files, and framework configuration files. It should be noted that this tool is very popular among Java developers. And not in vain, because using JRebel, the developer gets rid of the need to re-assemble and deploy the application. However, it saves an average of 10.5 minutes per hour of coding, according to the latest JavaEE productivity report. This is more than 5 weeks of work each year - which means more than 1 monthly salary of each developer in the team.Most recently released JRebel 5.0 . The main feature of this release is the JRebel Remoting function, which allows you to use JRebel in cases when the application is running in a cloud environment.
With this feature it will be very easy to develop and test Java applications in the clouds. Let's take a look at how to install and configure JRebel on the Jelastic cloud platform.
')
Installing JRebel on Jelastic
First, you need to create an environment that you will use to host your application. Let's take as a server application Tomcat, which is the most widely used server according to Developer Productivity Report 2012 .
After creating the environment, you can proceed to the installation of the JRebel agent. To do this, you need to download jrebel.jar . And don't forget about the license file, which should be located in the {user.home} /. Jrebel folder .
Jelastic introduced support for custom JVM properties a few months ago, and we will use this feature to configure JRebel. To do this, we need to make some changes to the variables.conf file.
In addition to the -javaagent parameter, in order to ensure that JRebel Remoting works, we will need the JRebel remoting plugin . We connect it with a special JVM argument:
-Drebel.remoting_plugin = true
Now we can view the JRebel logs to make sure the installation of this tool was successful. Remember to save all changes and restart Tomcat to apply new configuration settings.
Note! JRebel installation procedures for Jetty and Tomcat are almost the same. But GlassFish instead of variables.conf uses domain.xml or admin panel.
Application configuration
JRebel Remoting requires two config files to work: rebel.xml and rebel-remote.xml . JRebel requires the rebel.xml configuration file to allow class loaders to see changes made to project files directly.
Rebel-remote.xml is required for remote work. This is a very simple configuration file containing two parameters, the module ID and the URL for which the application is available.
Both configuration files can be generated using the JRebel plug-in for Eclipse, which is available in the Eclipse Marketplace .
JRebel Remoting in action
When both files are generated, you can collect the project in the war archive and deploy it to the Jelastic environment.
Let's make changes to the project to check how JRebel works.
For example, change the first page (welcome.jsp). Instead of “Welcome,” we write “Welcome to Jelastic!” And call the “Sync Now” method provided by the JRebel IDE plugin to update our application.
After that, the following message will appear in the IDE console:
Manually triggered JRebel remoting synchronization.Scheduling JRebel Remoting synchronization for projects: petclinicStarting manual synchronization for project: petclinicParsing configuration for /Users/anton/work-src/petclinicDirectory target/classes/ will be used for uploadingDirectory src/main/webapp/ will be used for uploading…JRebel-Remoting uploaded changes successfully, have fun!As a rule, it takes about a second to upload changes to the server, but this, of course, depends on the connection. After the synchronization is complete, refresh the page - and voila!
Currently JRebel Remoting is supported by an IDE plug-in that is available for Eclipse, plug-ins for IntelliJ and NetBeans will appear soon.
With JRebel 5.0 and Jelastic , the opportunity has appeared to work both locally and remotely, without wasting time on re-deployment. Try and share your opinion in the comments to this post. We will be very grateful.
Source: https://habr.com/ru/post/146240/
All Articles