Swarp SDK or how to quickly create an AR application

Augmented reality applications are becoming increasingly popular. Sooner or later, but someone in Russia would definitely release the SDK to create such applications. And so it happened - the Russian company Sectar released its Swarp SDK product for creating such applications on the .NET platform. Next, I will describe Swarp and show you how to quickly and easily create your AR application.
Overview
After downloading and installing the product (at the time of this writing, version 1.0.249.925 is relevant) you can see 5 subdirectories:
- Bin - here are all the assemblies of the Swarp SDK, as well as the libraries of the Managed Ogre (Mogre) engine, which is used for rendering.
- Docs - keeps in itself (besides the license agreement and ReleaseNotes) a very interesting file “Documentation.chm”. It contains all the Swarp documentation, including a description of the classes and a tutorial. By the way, all the documentation is in Russian and executed in the MSDN style, which in theory should facilitate the perception of the developer on .NET.
- Examples is a folder with examples written by the developers of Sectar. In this version of the SDK, there are 3 examples that demonstrate how to work with the recognition system, with the rendering system based on Mogre - .Net-wrapper Ogre3D, as well as the dynamic binding mechanism of the 3D model with the marker. All examples are solutions for Visual Studio 2010.
- Trackable - contains several Swarp SDK markers. Looking ahead, I can say that you can create markers yourself using the SquareMarkerCreator utility.
- Utilities - here you can find utilities SquareMarkerCreator, HID and LicenseViewer. The last two are used to register the product and view the installed license, so I don’t pay much attention to them, if anyone is interested, you can read about them in the documentation. But about SquareMarkerCreator I will tell separately.
Markers
In Swarp SDK uses a kind of marker system. The marker is represented as an XML file with the extension .trackable. The contents of one of the standard markers is shown below.
')
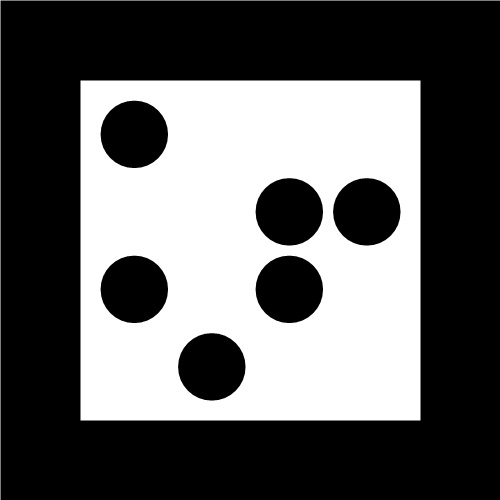
What the marker looks like on paper:
and its contents in the .trackable file:
<?xml version="1.0" encoding="utf-8"?> <Trackable Type="Sectar Square Marker" Description="Marker with square detection element" Version="1.0" Company="Sectar"> <SquareMarker MarkerSize="500" FrameWidth="80" CellsCount="4" FrameMargin="15" CellMargin="5" CellsType="Circle"> <Code>111100010101</Code> </SquareMarker> </Trackable> Many will have a question: how to convert a .trackable file to a banal .jpg or .png, to print it on paper? It's simple: the SquareMarkerCreator.exe utility will come to the rescue.
Marker Utility (SquareMarkerCreator)
As the name implies, this utility is used to create markers used in the Swarp SDK. After its launch, the visual marker editor appears:
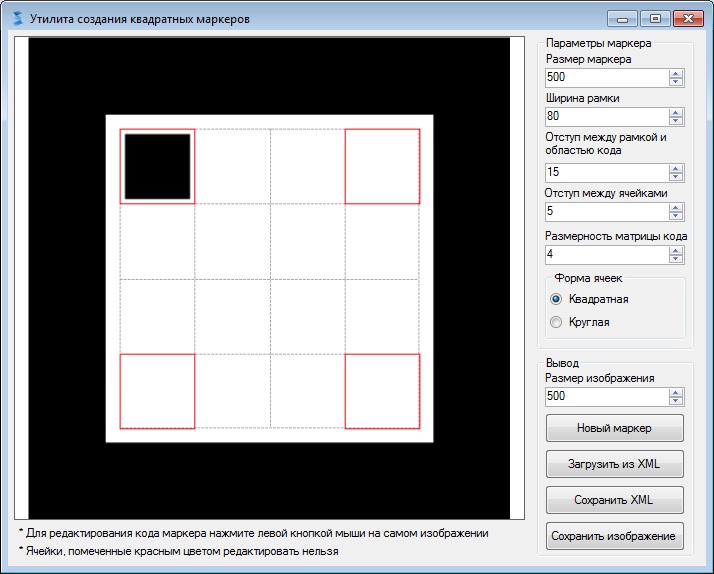
You can change the color of the marker cell simply by clicking on the corresponding cell. Here you can change the marker parameters such as indents, frame width, the dimension of the matrix of cells and others.
In order to convert a marker from an XML format to a graphic one, you need to load a marker by clicking on the “Load from XML” button, and then save the marker to an .EMF file by clicking on the “Save Image” button.
"Hello, world!" On the Swarp SDK
It's time to try to write your AR-application. I want to analyze the OgreSimpleSceneExample example, which will use the first available camera and use Mogre to render a single 3D model.
Let's create a project for a console Win32 application. And add the used assemblies to the Reference:

And in the code we add links to the used namespaces:
using System; using System.Collections.Generic; using System.Drawing; using System.Windows.Forms; using Mogre; using Swarp.Examples.OgreSimpleSceneExample.Properties; using Swarp.SDK.Management; using Swarp.SDK.Ogre3DRendering; using Swarp.SDK.Rendering; using Swarp.SDK.Target.SquareMarkerTracking; using Swarp.SDK.Tracking; using Swarp.SDK.DirectShowInput; Now we need to add fields to the static class Program, which will implement the process of augmented reality. We need the AugmentedRealityManager class, which will interface and control the various SDK modules. We will also need the ITrackable interface to describe the marker used. After adding these fields we get the following code:
static class Program { /// <summary> /// . /// </summary> private static AugmentedRealityManager _arManager; /// <summary> /// . /// </summary> private static ITrackable _houseTrackable; /// <summary> /// The main entry point for the application. /// </summary> [STAThread] public static void Main() { Application.EnableVisualStyles(); Application.SetCompatibleTextRenderingDefault(false); } } Now we have an entry point to the application. The question arises - what to do next? Next I will provide a picture from the Swarp SDK documentation:

In the picture, the red frame highlights the actions that the developer must perform.
At the current stage it is necessary to initialize the camera. To do this, use the CameraManager class:
// . var camera = CameraManager.Instance.GetFirstWorkedCamera(); // , . if (camera == null) { MessageBox.Show(Resources.CameraNotFoundString, Resources.WarningString, MessageBoxButtons.OK, MessageBoxIcon.Warning); return; } var displayParameters = new DisplayParameters(30, new Size(800, 600)); // , . camera.DisplayParameters = camera.IsSupportedDisplayParameters(displayParameters) ? displayParameters : camera.GetSupportedDisplayParameters()[0]; Then you need to specify which markers will be used in the application. This is done in this way:
var tracker = new SquareMarkerTracker(1); // 1 . . _houseTrackable = new SquareMarker("House Marker", "Trackable\\5.trackable"); tracker.TrackableObjects.Add(_houseTrackable); Thus, we indicate that the Trackable \ 5.trackable marker will be searched for by the marker tracking system.
And now we need to initialize the Mogre based rendering system:
// , . var ogreSimpleSceneForm = new Form { Size = new Size(1066, 600), Text = Resources.SwarpSDKExampleString, Icon = Resources.Swarp, }; // . // plugins.cfg - Ogre3D. // ogre.cfg - , Ogre3D. // ogre.log - -, Ogre3D. // , // . var renderer = new Ogre3DRenderSystem(ogreSimpleSceneForm.Handle, "OgreConfig\\plugins.cfg", "OgreConfig\\ogre.cfg", "OgreConfig\\ogre.log") { SizeMode = SizeMode.Autosize }; // . // // (3D , .., Ogre3D ). renderer.LoadResources("OgreConfig\\resources.cfg"); // . . var houseScene = new Ogre3DScene(renderer.Root, "House Scene"); renderer.Scenes.Add(houseScene); LoadScene(houseScene.SceneManager); Working with Managed Ogre is encapsulated in the Ogre3DRenderingSystem class, which greatly simplifies the life of the developer, since he takes over most of the routine operations. In general, Mogre is a separate and very large topic, so if anyone is interested, then at the end of the article there is a link to the Mogre wiki.
Swarp SDK does not restrict developers to Ogre only. In principle, the developer can integrate another rendering tool. To do this, you need to create two classes inherited from Renderer and Scene that are in the Swarp.SDK.Rendering namespace.
Let's return to our application. When calling the Ogre3DRenderSystem constructor, 4 parameters are specified: the form handle or control that Mogre will work with, the path to the Ogre configuration files describing plug-ins and rendering system settings, and the path to the log file.
Next, load the resources Ogre. To load 3D models, it is necessary that links to them be given in the resource configuration file. For example, my resource configuration file looks like this:
# Resource locations to be added to the 'boostrap' path # This also contains the minimum you need to use the Ogre example framework [Bootstrap] # Resource locations to be added to the default path [General] FileSystem= FileSystem=Resources Zip=Resources/House.zip Here, only one House.zip model is loaded, which is located in a ZIP archive.
Then the LoadScene method is called . It is needed to create a Mogre scene and add a model to it. Read more about this in the Mogre wiki. The method description is given below:
private static void LoadScene(SceneManager sceneManager) { // Mogre, , // .. . http://www.ogre3d.org/tikiwiki/Mogre+Tutorials. // , . var houseNode = sceneManager.RootSceneNode.CreateChildSceneNode("HouseNode"); // ( ). var houseEntity = sceneManager.CreateEntity("House", "House.mesh"); houseNode.AttachObject(houseEntity); houseNode.Scale(6.0f, 6.0f, 6.0f); } Now everything is ready to initialize the manager and launch:
// . _arManager = new AugmentedRealityManager(camera, trackers, renderer); // . // . camera.Start(); // . // . _arManager.Start(); ogreSimpleSceneForm.Show(); while (ogreSimpleSceneForm.Created) { // , // , . UpdateScenes(); // . // , , // . _arManager.Renderer.RenderFrame(); // . Application.DoEvents(); } // . _arManager.Dispose(); renderer.Dispose(); camera.Dispose(); An important point: before launching the augmented reality process, it is necessary to enable capture from the camera.
The UpdateScenes method orients the model (if it is found by the tracker) according to the position of the marker in space:
private static void UpdateScenes() { // , // , . var foundTrackableObjects = new List<ITrackable>(_arManager.Trackers[0].LastDetectedObjects); // . foreach (var scene in _arManager.Renderer.Scenes) { // , . if (foundTrackableObjects.Contains(_houseTrackable)) { // , . scene.Visible = true; // . var trackablePose =_arManager.Trackers[0].GetPose(_houseTrackable); // . scene.OrientScene(trackablePose); } else { scene.Visible = false; } } } Thus, we got the first AR-application, a kind of “Hello, world!” In the world of augmented reality. I skipped a screenshot of what I did:
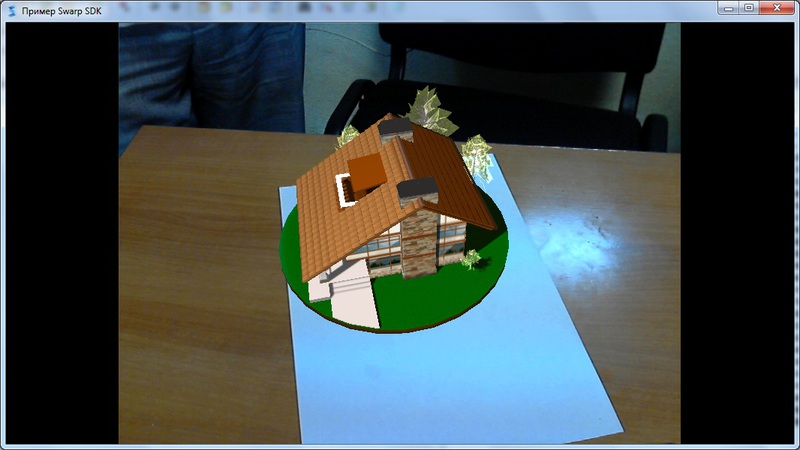
And a little bit of the Swarp SDK video in action:
Nice little house, isn't it?
Finally
That seems to be all that is needed to create your own AR-application. It took me about 2 hours to read the SDK documentation and understand how it works.
I hope that the article will help those who want to understand Swarp. In the following articles we will try to write an application more serious and more complicated. Thank you for reading.
Links
Developer site: www.sectar.com
Download link SDK: Swarp SDK
Managed Ogre: Mogre wiki
UPD: posted a video.
UPD 2: News from the fields: Sectar rolled out a new update. In the old version there was an error with trial mode activation. It seems corrected. In the post corrected links to download.
Source: https://habr.com/ru/post/146041/
All Articles