A couple of devices for DSLRs
A modern digital SLR camera is not a bad thing in itself. But for the disclosure of all the possibilities there are many additional devices. In this article I want to describe the creation of a converter for connecting an old flash to a modern SLR and remote control. Yes, it was possible to buy everything ready, but this is not ours, and the prices for them are too high.
The Soviet outbreak of "Saulut" was fired at me. Well, do not throw it away. More power than the built-in puff and the camera's battery does not fit. And the fact that her head is not spinning, there is no zoom, and so on. I didn’t really care, the main goal is just to connect it. It is not recommended to cling it directly to modern fotik, because it has a voltage of up to 100V on the sync terminal (in some flash models it can be 600V). In the network, you can find a bunch of converters, but they are all unreasonably expensive and of incomprehensible quality. There are also homemade products of the type, but there is no galvanic isolation. Therefore, I decided to compile such a scheme:
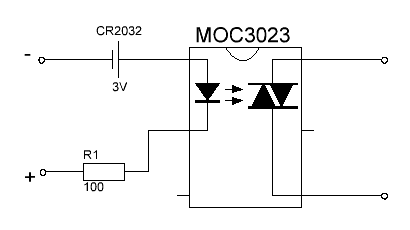
I tested, pozamykal contact - everything plows. I collected everything on the stump of a breadboard model about 10x25mm in size and wrapped it with scotch tape and shoved it into the flash case, the battery didn’t fit - I had to hang it outside on the wiring, well, okay - it will be easier to change if it sits down. Collected, put on the camera and ... And nothing. I’ll go through the flash modes, read the internet - all in vain. But after all, when I close a sync contact with some kind of wire, the flash works. I began to study in more detail the hot shoe of my Nikon. He began to check it with a tester in the dial mode - nothing peaks. I found descriptions of contacts, I began to look for a description of the protocol, I thought I’d already sculpted additional contacts and a microcontroller on the flash. But somehow it occurred to me to ring a shoe with a long shutter speed - 5s (before it was 1/30 and shorter): it turns out that the camera does not short-circuit the contacts, but with a resistance of about 1 kOhm. Optocoupler this is not enough, I had to redo the shemka like this:

Transistor - any N-channel MOSFET, preferably from the IRL series (IRL3102, IRLML2502), I used a Vypayanny from somewhere in the TO-92 package. Instead of a MOSFET, you can use some NPN transistor: BC547, KT315, in this case we connect the base to the gate (minus sync contact), the collector - instead of the drain (to the cathode of the LED) and the emitter instead of the source (to the negative of the battery). Resistor nominal 10kOm-100kOm. If the value of the resistor is less than the resistance of the sync contact, the transistor will not open, if it is very large, it can open arbitrarily from pickups or touches.
This is how it looks in the collection:
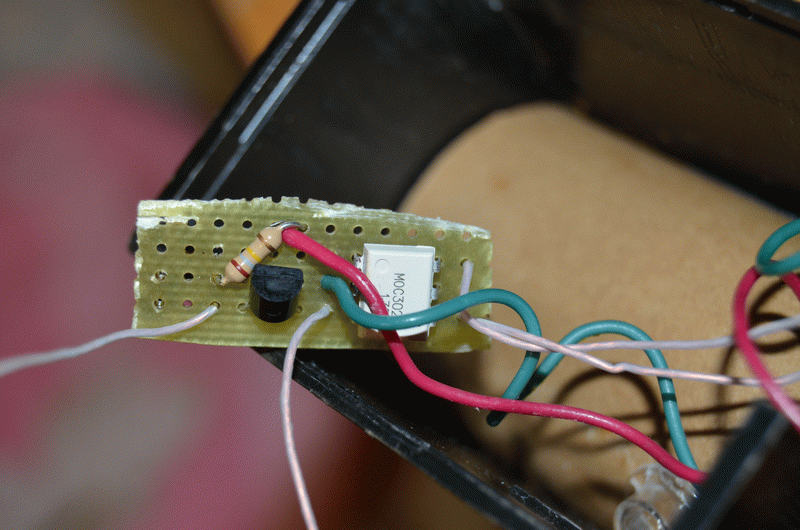
And this is already in the shrink tube, before being placed in the flash body:

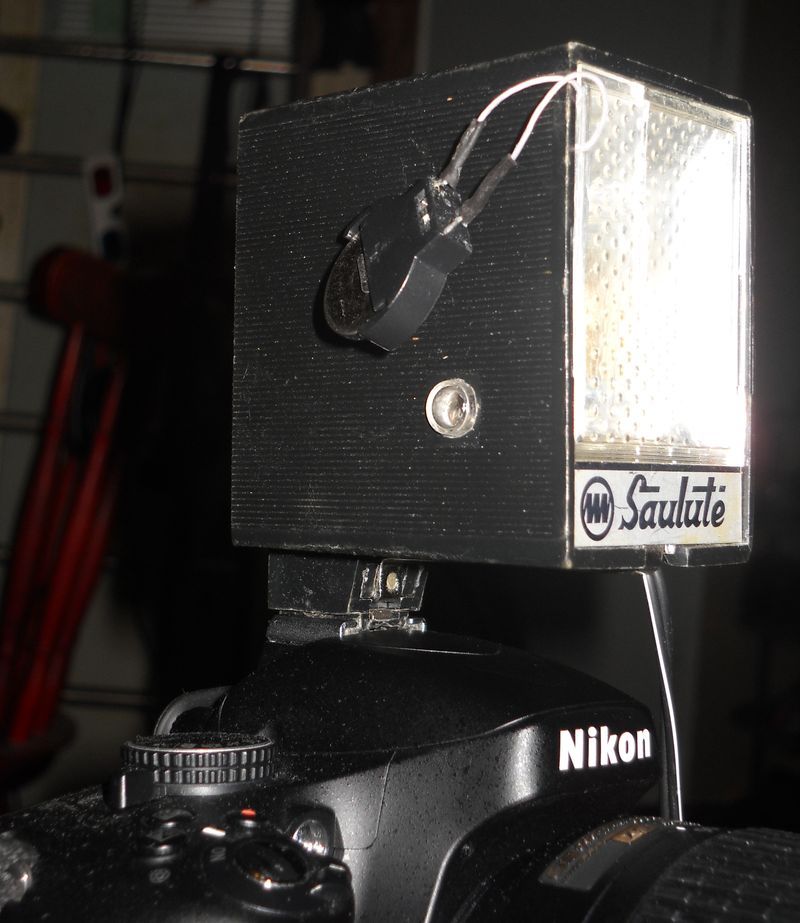
Well, all in the collection:
You can connect a photodiode / phototransistor / photoresistor to the low-voltage contact of the converter (with as wide a range of resistances as possible) and pick up the resistor nominal and get a light synchronizer. All this cost less than 10 UAH = $ 1.25.
ATTENTION! The discharge flash capacitor stores high voltage for a long time after the flash has been disconnected from the power source, so if you climb inside, do not forget to discharge it! I, as the author, do not bear any responsibility for the consequences of the actions of readers. You do everything at your own peril and risk.
')
The following device will be very useful when shooting with a tripod at high shutter speeds or when photographing a loved one.
The remotes are wired and wireless, I settled on the latter: firstly, it is cooler, secondly, you do not need to connect anything directly to the fotik.
Original consoles just blink IR LED in a certain way. Googling, I found this article with descriptions of protocols from various manufacturers. Since I didn't have the required controller at home, I rewrote the firmware first under ATmega8, and then on ATtiny13. At the same time, and simplified the scheme in order to reduce energy consumption. The bounce is suppressed programmatically. The scheme is very simple: the infrared LED is connected to the foot of the microcontroller PB0 (the same for both ATmega8 and ATtiny13), the second leg of the LED through a resistor is connected to the power supply minus 100-330 ohms. The controller minus (GND) is connected directly to the power supply minus, and the plus (VCC) is connected via a small clock button.

On the breadboard looks like this:

The photo was taken in the control mode from the remote control by a command from him.
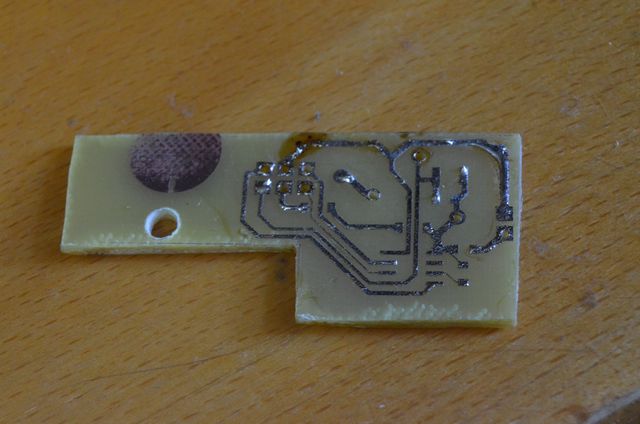
And this is already etched board after drilling and gnarled tinning:
With soldered parts, stitched by the controller (the moment when there were pins of the connector of the programmer, I missed) and ready for installation in the case:
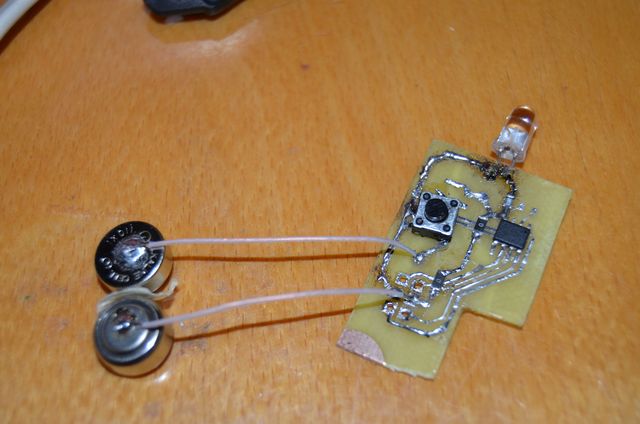
As a case, I used the standard KM-11B / 1 case, having pierced the hole for the LED with the file:

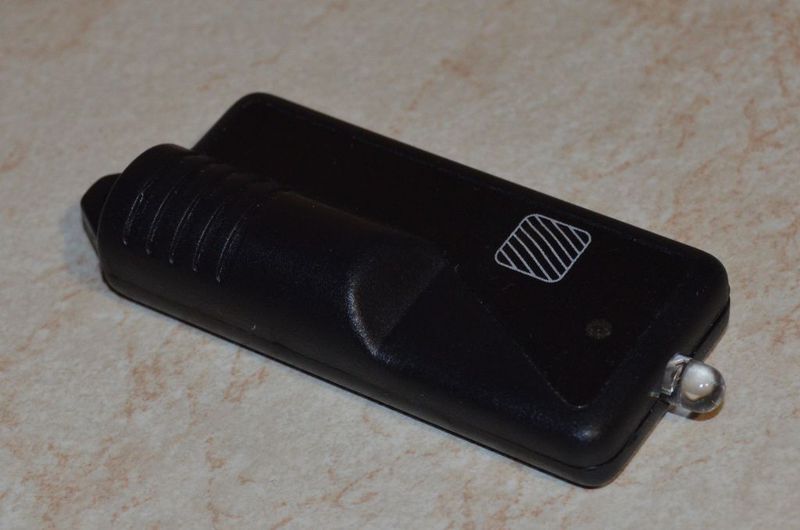
Well, the finished device:
Power: any 3-5V source, in my case these are two LR44 batteries. A few words about the LED: since only the engineers of the manufacturer know the correct wavelength, you can use the first infrared LED (you can drop it off from some remote control). For debugging purposes, or in the absence of an IR diode, you can take a normal red LED of the visible range, it should work at a short distance (10-50 cm), even a green LED works at a shorter distance (up to 10 cm). With IR LED at 920nm, 20mA (although not a fact, since the seller could confuse something), the console works at a distance of about 10m, and maybe it can continue - did not check. The archive contains firmware for Nikon for mega8 and tiny13 as well as a board (note that the programmer connector is a bit non-standard) in the .lyt, .dxf and .pdf formats. ATmega8 Fyuza is tuned to the internal 8 MHz generator (CKSEL3..0 = 0100), ATtiny13 - to 9.6 MHz (CKSEL1..0 = 10, CKDIV8 = 1), we do not touch the rest of the fuses. The most expensive part of the device is the case, in total it turned out about 20 UAH. = $ 2.5.
Flash
The Soviet outbreak of "Saulut" was fired at me. Well, do not throw it away. More power than the built-in puff and the camera's battery does not fit. And the fact that her head is not spinning, there is no zoom, and so on. I didn’t really care, the main goal is just to connect it. It is not recommended to cling it directly to modern fotik, because it has a voltage of up to 100V on the sync terminal (in some flash models it can be 600V). In the network, you can find a bunch of converters, but they are all unreasonably expensive and of incomprehensible quality. There are also homemade products of the type, but there is no galvanic isolation. Therefore, I decided to compile such a scheme:
I tested, pozamykal contact - everything plows. I collected everything on the stump of a breadboard model about 10x25mm in size and wrapped it with scotch tape and shoved it into the flash case, the battery didn’t fit - I had to hang it outside on the wiring, well, okay - it will be easier to change if it sits down. Collected, put on the camera and ... And nothing. I’ll go through the flash modes, read the internet - all in vain. But after all, when I close a sync contact with some kind of wire, the flash works. I began to study in more detail the hot shoe of my Nikon. He began to check it with a tester in the dial mode - nothing peaks. I found descriptions of contacts, I began to look for a description of the protocol, I thought I’d already sculpted additional contacts and a microcontroller on the flash. But somehow it occurred to me to ring a shoe with a long shutter speed - 5s (before it was 1/30 and shorter): it turns out that the camera does not short-circuit the contacts, but with a resistance of about 1 kOhm. Optocoupler this is not enough, I had to redo the shemka like this:
Transistor - any N-channel MOSFET, preferably from the IRL series (IRL3102, IRLML2502), I used a Vypayanny from somewhere in the TO-92 package. Instead of a MOSFET, you can use some NPN transistor: BC547, KT315, in this case we connect the base to the gate (minus sync contact), the collector - instead of the drain (to the cathode of the LED) and the emitter instead of the source (to the negative of the battery). Resistor nominal 10kOm-100kOm. If the value of the resistor is less than the resistance of the sync contact, the transistor will not open, if it is very large, it can open arbitrarily from pickups or touches.
This is how it looks in the collection:
And this is already in the shrink tube, before being placed in the flash body:
Well, all in the collection:
You can connect a photodiode / phototransistor / photoresistor to the low-voltage contact of the converter (with as wide a range of resistances as possible) and pick up the resistor nominal and get a light synchronizer. All this cost less than 10 UAH = $ 1.25.
ATTENTION! The discharge flash capacitor stores high voltage for a long time after the flash has been disconnected from the power source, so if you climb inside, do not forget to discharge it! I, as the author, do not bear any responsibility for the consequences of the actions of readers. You do everything at your own peril and risk.
')
Remote control
The following device will be very useful when shooting with a tripod at high shutter speeds or when photographing a loved one.
The remotes are wired and wireless, I settled on the latter: firstly, it is cooler, secondly, you do not need to connect anything directly to the fotik.
Original consoles just blink IR LED in a certain way. Googling, I found this article with descriptions of protocols from various manufacturers. Since I didn't have the required controller at home, I rewrote the firmware first under ATmega8, and then on ATtiny13. At the same time, and simplified the scheme in order to reduce energy consumption. The bounce is suppressed programmatically. The scheme is very simple: the infrared LED is connected to the foot of the microcontroller PB0 (the same for both ATmega8 and ATtiny13), the second leg of the LED through a resistor is connected to the power supply minus 100-330 ohms. The controller minus (GND) is connected directly to the power supply minus, and the plus (VCC) is connected via a small clock button.
On the breadboard looks like this:
The photo was taken in the control mode from the remote control by a command from him.
And this is already etched board after drilling and gnarled tinning:
With soldered parts, stitched by the controller (the moment when there were pins of the connector of the programmer, I missed) and ready for installation in the case:
As a case, I used the standard KM-11B / 1 case, having pierced the hole for the LED with the file:
Well, the finished device:
Power: any 3-5V source, in my case these are two LR44 batteries. A few words about the LED: since only the engineers of the manufacturer know the correct wavelength, you can use the first infrared LED (you can drop it off from some remote control). For debugging purposes, or in the absence of an IR diode, you can take a normal red LED of the visible range, it should work at a short distance (10-50 cm), even a green LED works at a shorter distance (up to 10 cm). With IR LED at 920nm, 20mA (although not a fact, since the seller could confuse something), the console works at a distance of about 10m, and maybe it can continue - did not check. The archive contains firmware for Nikon for mega8 and tiny13 as well as a board (note that the programmer connector is a bit non-standard) in the .lyt, .dxf and .pdf formats. ATmega8 Fyuza is tuned to the internal 8 MHz generator (CKSEL3..0 = 0100), ATtiny13 - to 9.6 MHz (CKSEL1..0 = 10, CKDIV8 = 1), we do not touch the rest of the fuses. The most expensive part of the device is the case, in total it turned out about 20 UAH. = $ 2.5.
Source: https://habr.com/ru/post/145849/
All Articles