Manipulate pixels on canvas using Javascript
This article will look at image management using Javascript and HTML canvas tags. The article is a translation. Original on phpied.com.
The simplest way to process data from an image is to take each pixel and change the value of one or more of its channels: red, green, blue, and alpha (transparency), for brevity we will call them R, G, B, and A.
Example: change some values, for example, change B and G:
It was rgb (100, 50, 30, 255) will become rgb (100, 30, 50, 255)
Manipulation as such can be represented by the simplest callback function. For the above example:
Here we ignore the alpha channel, we do not need it and will be set to 255.
')
Result:

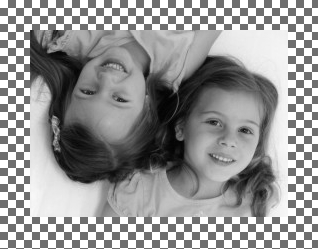
from the original:

Suppose we want to change the alpha channel and make the image partially transparent. Then the function will look like:
Here we use the variable factor, with which we will set the transparency of the image. The value of this variable will be returned as an alpha channel:

and more complex example. Here we will additionally specify which part of the image to apply transparency:
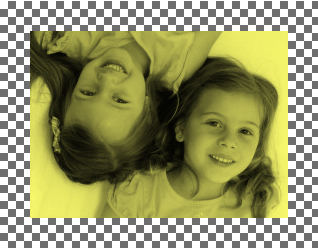
If we make factor = 111, we get:

this refers to the object we created that could be seen a little. It stores in itself some of the necessary information, which can be useful, as a considered example.
Consider the structure of our canvas. Let's start with the constructor:
Use this to pass a link to the canvas element somewhere on the page, as well as the url of the image.
The image must be in the same domain where its data is being processed:
The constructor creates a new Image object, and after loading the image is drawn on the canvas. Then we save some things for the future, such as the context, the image object, and the original image data. 'this' is the same one to which the pixel handler has access in the example above.
Further we use 3 simple methods for setting, obtaining and dumping image data from the canvas:
The brain of all processing is the transform () method. It handles the callback call of the manipulator by pixels and factor, which is essentially the configuration setting for the manipulator. Then it goes through all the pixels, passes the value of the rdba channel's olddata to the callback function, and uses the returned values as newdata. At the end of the newdata is written to the canvas.
Pretty simple, isn't it? The only embarrassing moment should be the increment i + = 4 in the cycle. Data is returned via getImageData (). Data as an array with 4 elements for each pixel.
Suppose the image has only 2 pixels: red and blue, and there is no transparency. Then the data for this image looks like:
The following code simply shows the various options for the callback function, and creates a UI to use them. Consider a few of them:
Grayscale is an equal amount of red, blue, green. The easiest way to achieve this is to calculate the average value:
var agv = (r + g + b) / 3;
That is quite enough. But there is a secret formula for processing photos with people, it sets a different sensitivity for channels:
The simplest option: make a gray version and add a little color to it - an equal amount of rgb for each pixel. I added 100 red, 50 green, but you can choose other values.
Here is another option that may be better, but I don’t really like it:
Subtract the value of each channel from 255 to get negative
Add noise. This is just fun, take a random value between –factor and factor and add it to each channel:
The example itself is published by reference . Some of the manipulations are suggested to consider independently, using the source code and imagination.
As a template, we take the following:
Try, for example, to make the image black and white (not grayscale, but black and white, where each pixel is either 0.0.0 or 255.255.255).
Or come up with some interesting example.
Pixel management
The simplest way to process data from an image is to take each pixel and change the value of one or more of its channels: red, green, blue, and alpha (transparency), for brevity we will call them R, G, B, and A.
Example: change some values, for example, change B and G:
It was rgb (100, 50, 30, 255) will become rgb (100, 30, 50, 255)
Manipulation as such can be represented by the simplest callback function. For the above example:
function (r, g, b) { return [r, b, g, 255]; } Here we ignore the alpha channel, we do not need it and will be set to 255.
')
Result:
from the original:
Suppose we want to change the alpha channel and make the image partially transparent. Then the function will look like:
function (r, g, b, a, factor) { return [r, g, b, factor]; } Here we use the variable factor, with which we will set the transparency of the image. The value of this variable will be returned as an alpha channel:
and more complex example. Here we will additionally specify which part of the image to apply transparency:
function (r, g, b, a, factor, i) { var total = this.original.data.length; return [r, g, b, factor + 255 * (total - i) / total]; } If we make factor = 111, we get:
this refers to the object we created that could be seen a little. It stores in itself some of the necessary information, which can be useful, as a considered example.
Canvas
Consider the structure of our canvas. Let's start with the constructor:
function CanvasImage(canvas, src) { // var context = canvas.getContext('2d'); var i = new Image(); var that = this; i.onload = function(){ canvas.width = i.width; canvas.height = i.height; context.drawImage(i, 0, 0, i.width, i.height); // that.original = that.getData(); }; i.src = src; // this.context = context; this.image = i; } Use this to pass a link to the canvas element somewhere on the page, as well as the url of the image.
The image must be in the same domain where its data is being processed:
var transformador = new CanvasImage( $('canvas'), '/wp-content/uploads/2008/05/zlati-nathalie.jpg' ); The constructor creates a new Image object, and after loading the image is drawn on the canvas. Then we save some things for the future, such as the context, the image object, and the original image data. 'this' is the same one to which the pixel handler has access in the example above.
Further we use 3 simple methods for setting, obtaining and dumping image data from the canvas:
CanvasImage.prototype.getData = function() { return this.context.getImageData(0, 0, this.image.width, this.image.height); }; CanvasImage.prototype.setData = function(data) { return this.context.putImageData(data, 0, 0); }; CanvasImage.prototype.reset = function() { this.setData(this.original); } The brain of all processing is the transform () method. It handles the callback call of the manipulator by pixels and factor, which is essentially the configuration setting for the manipulator. Then it goes through all the pixels, passes the value of the rdba channel's olddata to the callback function, and uses the returned values as newdata. At the end of the newdata is written to the canvas.
CanvasImage.prototype.transform = function(fn, factor) { var olddata = this.original; var oldpx = olddata.data; var newdata = this.context.createImageData(olddata); var newpx = newdata.data var res = []; var len = newpx.length; for (var i = 0; i < len; i += 4) { res = fn.call(this, oldpx[i], oldpx[i+1], oldpx[i+2], oldpx[i+3], factor, i); newpx[i] = res[0]; // r newpx[i+1] = res[1]; // g newpx[i+2] = res[2]; // b newpx[i+3] = res[3]; // a } this.setData(newdata); }; Pretty simple, isn't it? The only embarrassing moment should be the increment i + = 4 in the cycle. Data is returned via getImageData (). Data as an array with 4 elements for each pixel.
Suppose the image has only 2 pixels: red and blue, and there is no transparency. Then the data for this image looks like:
[ 255, 0, 0, 255, 0, 0, 255, 255 ] Callback
The following code simply shows the various options for the callback function, and creates a UI to use them. Consider a few of them:
Grayscale
Grayscale is an equal amount of red, blue, green. The easiest way to achieve this is to calculate the average value:
var agv = (r + g + b) / 3;
That is quite enough. But there is a secret formula for processing photos with people, it sets a different sensitivity for channels:
function(r, g, b) { var avg = 0.3 * r + 0.59 * g + 0.11 * b; return [avg, avg, avg, 255]; } Sepia
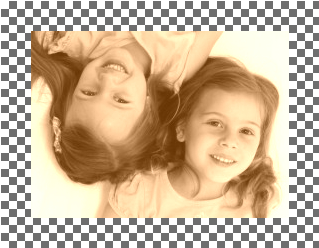
The simplest option: make a gray version and add a little color to it - an equal amount of rgb for each pixel. I added 100 red, 50 green, but you can choose other values.
function(r, g, b) { var avg = 0.3 * r + 0.59 * g + 0.11 * b; return [avg + 100, avg + 50, avg, 255]; } Here is another option that may be better, but I don’t really like it:
Negative
Subtract the value of each channel from 255 to get negative
function(r, g, b) { return [255 - r, 255 - g, 255 - b, 255]; } Noises
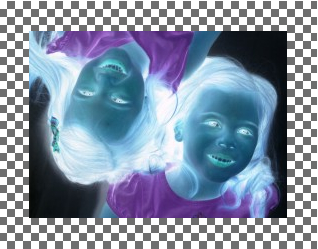
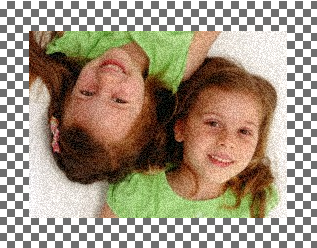
Add noise. This is just fun, take a random value between –factor and factor and add it to each channel:
function(r, g, b, a, factor) { var rand = (0.5 - Math.random()) * factor; return [r + rand, g + rand, b + rand, 255]; } Your turn
The example itself is published by reference . Some of the manipulations are suggested to consider independently, using the source code and imagination.
As a template, we take the following:
transformador.transform(function(r, g, b, a, factor, i) { // ... return [r, g, b, a]; }); Try, for example, to make the image black and white (not grayscale, but black and white, where each pixel is either 0.0.0 or 255.255.255).
Or come up with some interesting example.
Source: https://habr.com/ru/post/145816/
All Articles