The second practical task from unity3dstudent.com
Continuing the analysis of tasks with unity3dstudent.com , consider the second one. Here is an analysis of the first task .

Link to the original task: www.unity3dstudent.com/2010/07/challenge-c02-beginner
The bottom line: you need to create a scene in which, by pressing a space in the player’s field of view, the box will begin to fall, eventually launching another box towards the target. After hitting the target should disappear with some sound. The launch of the box is based on a lever: one box is already on one side, another one is falling on the other side of the lever.
UPD: the third task
')
First, we will create a standard plane, a light source, and arrange the camera so that “everything is clearly visible” (this is in the analysis of the previous problem).
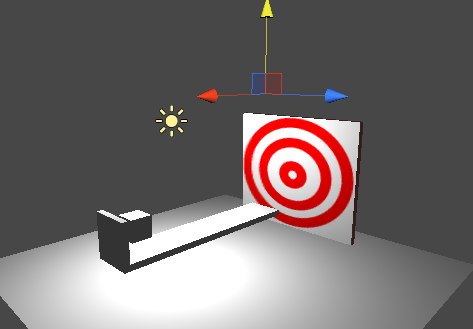
Now add a target: create a cube and stretch it to a size appropriate for a decent target. We move the target so that it is perpendicular to the OX axis (the directions of the axes can be viewed from the top right in the Scene tab). Immediately, in any editor, we sketch a simple texture, remotely resembling a target (we will make it square) and save it in the Materials folder on the Project panel (after creating this folder):
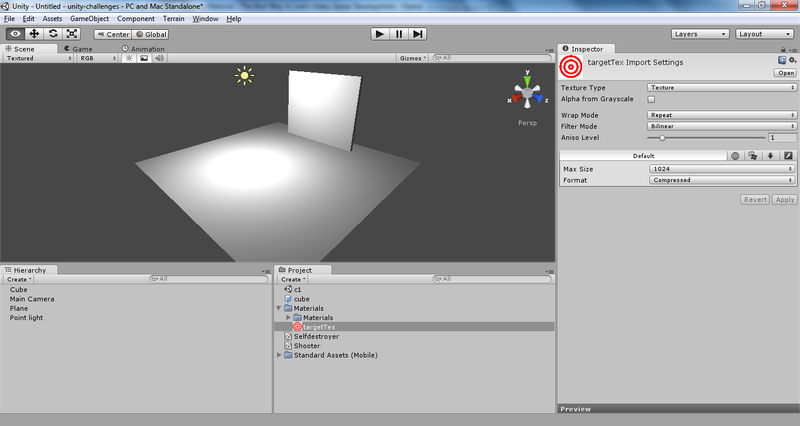
Now let's add the targetMaterial material to the project (again in the Materials folder) and drag the newly added texture into its Texture field (in the Inspector panel). The material is dragged onto the target (let's call its object in the Hierarchy panel “target”).
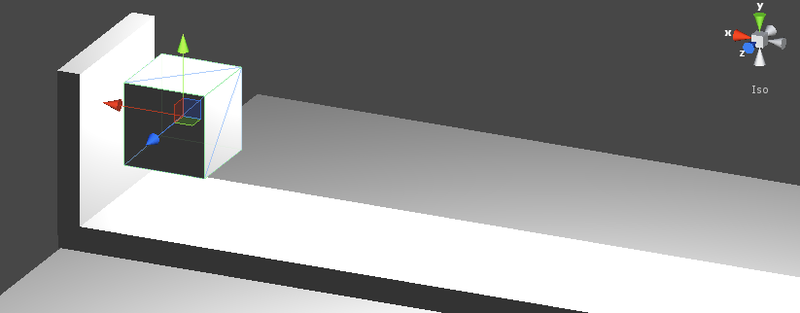
Now let's do the lever-catapult. Add a cube to the scene, call it plank1 and stretch it “to the board”:
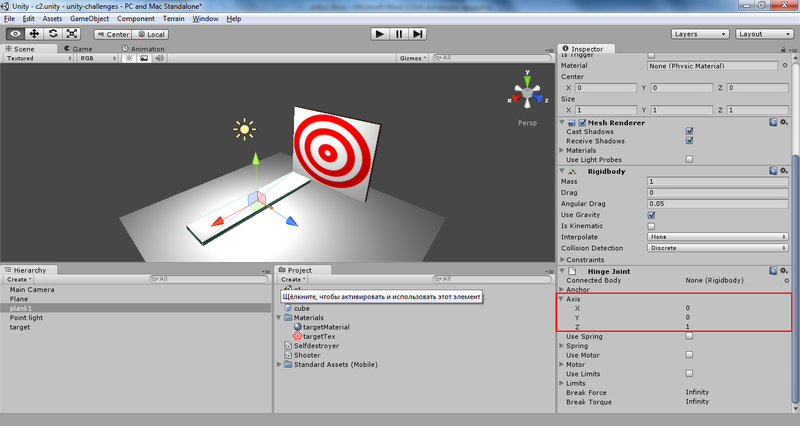
Now add to plank1 the component Hinge Joint (Component-> Physics-> Hinge Joint) - translated as “hinge”. In the screenshot above, it has already been added - an orange vector has appeared. It shows which axis the object will rotate. Now this direction coincides with the axis OX. It is possible to rotate the board relative to OX to test it and start the scene.
So, we are not satisfied with the axis of rotation - after all, with a sharp turn of the board, it is necessary for the box to fly from one edge to the target. In the Inspector panel, we find the Hinge Joint component for plank1 and find the Axis field group. This is the axis of rotation. The default values are:
X: 1
Y: 0
Z: 0
This shows the axial orientation of the OX axis. We will approach the axis parallel to OZ. Set the Z in the unit, the rest - zeros. Note how the orange vector has changed direction from the center of plank1 on the stage.
With the lever almost finished. Now the problem is that there is not enough stop for the dice. Add it: add a cube (let's call it plank2), compress (see the screenshot below) and move it so that it slightly intersects with plank1, forming a grip (so far only virtual):

Add the Rigidbody component to plank2 (this component has already been automatically added to plank1 when Hinge Joint is added). Let us inform the physics engine that plank1 and plank2 are stapled. Object plank1 add component Fixed Joint (Component-> Physics-> Fixed Joint). In the Connected Body field in the Inspector panel is now set to None (Rigidbody). Drag plank2 into its place from the hierarchy panel.
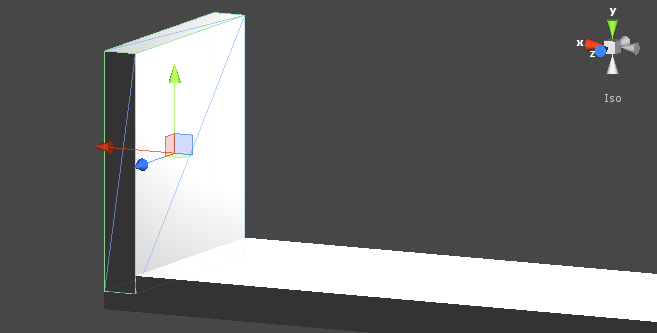
Now, running the scene, we will see how our lever down one edge. It already pleases. Add a cube to the scene and place it so that it is just above the lever at its left (closest to the camera) end. At the same time, we will reduce all cube sizes by 2 times:
Add the Rigidbody component to it. If you start the scene now, when the lever is lowered, the cube falls on its end (lowering). The design is ready for a “shot”, it remains to prepare a counterweight, the fall of which will be sent to the flight just added cube.
Add a prefab to the project, let's call it dropcube. Create a new cube in the scene and drag it from the hierarchy panel to the prefab. Add the prefab component Rigidbody, and remove the cube from the scene. We set the mass of the prefab to 30 (for the location of objects on the stage I created, this value allows the launching cube to reach the target).
Now add an empty object to the scene (Game Object-> Create Empty) with the name dropper. Place it above the end of the lever far from the camera in the camera’s field of view (this can be checked by selecting the Main Camera object and selecting Game Object -> Align View to Selected) - from there will appear cubes later (the same as dropcube):
Let's do the scripting part.
First, the target should disappear after hitting the cube. From the previous task (LINK) we take the Selfdestroyer script (I’ll use one project for all tasks, so I didn’t even have to add a new script - everything is already in the Project panel) and attach it to the target object. Here is the complete code for this script (very small):
Now let's add a Boxdropper C # script to the project. He must create a cube at the point where the object is attached to (more precisely, create the dropcube prefab Instance) by clicking on the space bar.
Once all that is required is a response to pressing the keys - we leave the Update method, the Start method (if it was automatically generated) is deleted. To implement our plans, at a minimum, we will need to transfer a prefab to the script. Add a public variable of type GameObject to the class:
Change the Update method:
A couple of comments about this code:
- first, instead of Input.GetButtonDown ("Jump"), you can use Input.GetKeyDown (KeyCode.Space). The second option is strictly linked to the space key code, and the first to the key, which in the game control settings plays the role of a jump key (the default is a space). These settings can be seen by assembling a project and running the resulting executable file (if this is unclear, I can describe the process in more detail).
- It is also worth noting that, unlike the script in the first task , when calling GameObject.Instantiate, the result of the function is not saved because we simply do not need it. If last time we, after creating an object, additionally acted on it by force, then here it is not required.
- here the overloaded Instantiate function is called, which has 3 parameters, whereas there is an option with one: Instantiate (Object original). The latter will set the position and rotation parameters (the second and third parameters respectively in the Instantiate call with three parameters) are the same as those of the object passed by the actual parameter. It is important to remember that these parameters are not taken from the corresponding values for the object to which the script is attached!
Now drag the Boxdropper script from the Project panel onto the dropper object in the hierarchy panel.
Well, the task is almost completed. If you start the scene and press the spacebar, a cube will fall and a small cube (which is already lying on the shoulder of the lever) will fly to the target. There is only one minor discrepancy with the wording: there is no sound when destroying the target.
First of all, we need the sound itself, that is, the file with some sound. I took the first sound that had any relation to the sound of an explosion, from one of my past projects. Add sound to the project (I have it named onDestroySound).
A small lyrical digression about sound in Unity. The sound here is mono and 3D (3D Sound). In fact, it shows 1 or 2 channels in audio. For effects that have a sufficiently clear spatial position (explosion, impact sound, etc.), it is recommended to use mono sound, since its actual volume (heard by the player) will depend on the source’s distance from the listener (determined by the presence of the Audio Listener component, default is the Main Camera object).
If your sound turned out to be 3D (there is a tick "3D Sound" in the Inspector panel), do not despair. Remove the “tick” from the “3D Sound” item, select the “Force to mono” item in the same panel and click “Apply”. Now we modify the Selfdestroyer script. We will need a public variable for the sound to be played:
Now, in the OnCollisionEnter method, in addition to calling the Destroy method, we will add sound playback:
Such a call to the AudioSource.PlayClipAtPoint method will play the onDestroy sound as if the sound source is at the location of the object to which this script is attached (transform.position).
It remains to select the target object on the stage or in the hierarchy panel and drag a sound file (onDestroySound) into the “On Destroy (Audio Clip)” field of the Inspector panel from the project.
Note: you can add an Audio Source component to any object and then access it as “audio” from scripts. There is even a special method that will play the transmitted sound at the location of the object:
However, in our case, the sound is played immediately before the object is destroyed, and if you use audio.PlayOneShot, then after the deletion, the sound will stop playing. This means that we will not hear him. You can check it yourself (it is even useful).
So, the task is completed.
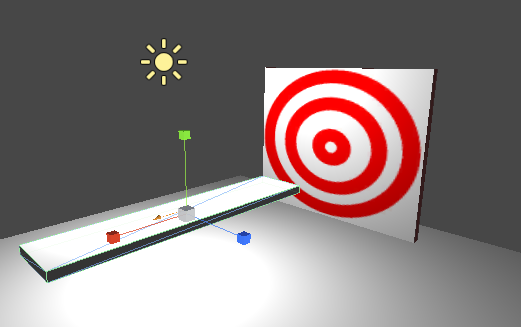
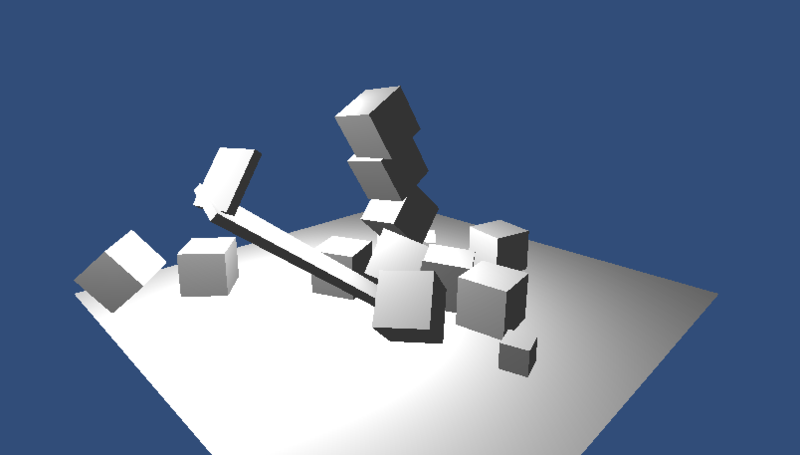
It would seem, what else? But I was tormented by one detail: if you throw several dice at a time (press the space several times in a row), the two “boards” that form the lever (plank1 and plank2) begin to move relative to each other. You can see, for example, in this screenshot (here another light source is added to the scene):
Then I thought about the simplest solution: since we only need to connect plank1 and plank2 just once, why not get rid of it after it has already played its role? Just destroy plank2? Ugly.
Again, select plank1 in the hierarchy panel and find the Fixed Joint component in the Inspector panel. We notice a curious field:
Break Force: Infinity
Exactly what is needed! In my case, the value of the force required to break the connections approached 10 (I hope that Newtons). By “fit,” I mean that at the moment when the cube is lifted from the surface of the lever, plank2 is detached from plank1 and sent to flight:
As it turned out, Hinge Joint is subject to the same problem - the strange behavior of plank1 is again observed with a large number of falling cubes. We will solve the problem in the same way - we set the value in the Break Force field to 30. As a result, the entire design of the lever after the first launch is destroyed, and quite physically.
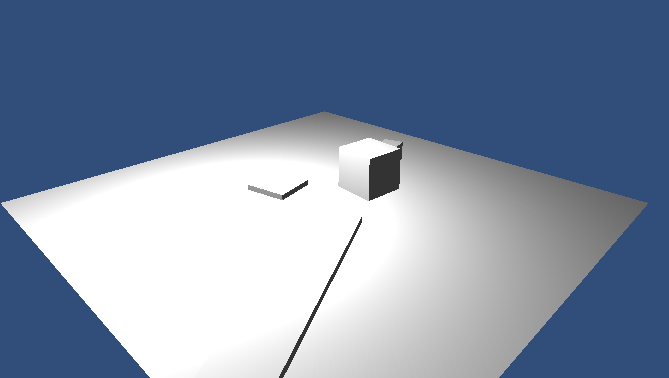
This is the scene after the first launch:
PS For greater beauty, you can add materials to all objects in the scene: a lever, all cubes (large and small), floor. How this is done is described at the beginning of the article.
This time, the code is slightly larger (although there are still less than 10 “semantic” lines, except for curly brackets and code generated automatically), and the task is more meaningful. Some kind of physics controlled by us (in the form of compounds) and a sound that has been turned on at certain events in the scene have already appeared.
Link to the original task: www.unity3dstudent.com/2010/07/challenge-c02-beginner
The bottom line: you need to create a scene in which, by pressing a space in the player’s field of view, the box will begin to fall, eventually launching another box towards the target. After hitting the target should disappear with some sound. The launch of the box is based on a lever: one box is already on one side, another one is falling on the other side of the lever.
UPD: the third task
')
Part 1: Scene.
First, we will create a standard plane, a light source, and arrange the camera so that “everything is clearly visible” (this is in the analysis of the previous problem).
Now add a target: create a cube and stretch it to a size appropriate for a decent target. We move the target so that it is perpendicular to the OX axis (the directions of the axes can be viewed from the top right in the Scene tab). Immediately, in any editor, we sketch a simple texture, remotely resembling a target (we will make it square) and save it in the Materials folder on the Project panel (after creating this folder):
Now let's add the targetMaterial material to the project (again in the Materials folder) and drag the newly added texture into its Texture field (in the Inspector panel). The material is dragged onto the target (let's call its object in the Hierarchy panel “target”).
Now let's do the lever-catapult. Add a cube to the scene, call it plank1 and stretch it “to the board”:
Now add to plank1 the component Hinge Joint (Component-> Physics-> Hinge Joint) - translated as “hinge”. In the screenshot above, it has already been added - an orange vector has appeared. It shows which axis the object will rotate. Now this direction coincides with the axis OX. It is possible to rotate the board relative to OX to test it and start the scene.
So, we are not satisfied with the axis of rotation - after all, with a sharp turn of the board, it is necessary for the box to fly from one edge to the target. In the Inspector panel, we find the Hinge Joint component for plank1 and find the Axis field group. This is the axis of rotation. The default values are:
X: 1
Y: 0
Z: 0
This shows the axial orientation of the OX axis. We will approach the axis parallel to OZ. Set the Z in the unit, the rest - zeros. Note how the orange vector has changed direction from the center of plank1 on the stage.
With the lever almost finished. Now the problem is that there is not enough stop for the dice. Add it: add a cube (let's call it plank2), compress (see the screenshot below) and move it so that it slightly intersects with plank1, forming a grip (so far only virtual):
Add the Rigidbody component to plank2 (this component has already been automatically added to plank1 when Hinge Joint is added). Let us inform the physics engine that plank1 and plank2 are stapled. Object plank1 add component Fixed Joint (Component-> Physics-> Fixed Joint). In the Connected Body field in the Inspector panel is now set to None (Rigidbody). Drag plank2 into its place from the hierarchy panel.
Now, running the scene, we will see how our lever down one edge. It already pleases. Add a cube to the scene and place it so that it is just above the lever at its left (closest to the camera) end. At the same time, we will reduce all cube sizes by 2 times:
Add the Rigidbody component to it. If you start the scene now, when the lever is lowered, the cube falls on its end (lowering). The design is ready for a “shot”, it remains to prepare a counterweight, the fall of which will be sent to the flight just added cube.
Add a prefab to the project, let's call it dropcube. Create a new cube in the scene and drag it from the hierarchy panel to the prefab. Add the prefab component Rigidbody, and remove the cube from the scene. We set the mass of the prefab to 30 (for the location of objects on the stage I created, this value allows the launching cube to reach the target).
Now add an empty object to the scene (Game Object-> Create Empty) with the name dropper. Place it above the end of the lever far from the camera in the camera’s field of view (this can be checked by selecting the Main Camera object and selecting Game Object -> Align View to Selected) - from there will appear cubes later (the same as dropcube):
Part 2: Scripts.
Let's do the scripting part.
First, the target should disappear after hitting the cube. From the previous task (LINK) we take the Selfdestroyer script (I’ll use one project for all tasks, so I didn’t even have to add a new script - everything is already in the Project panel) and attach it to the target object. Here is the complete code for this script (very small):
using UnityEngine; using System.Collections; public class Selfdestroyer : MonoBehaviour { void OnCollisionEnter(Collision obj) { Destroy(gameObject); } } Now let's add a Boxdropper C # script to the project. He must create a cube at the point where the object is attached to (more precisely, create the dropcube prefab Instance) by clicking on the space bar.
Once all that is required is a response to pressing the keys - we leave the Update method, the Start method (if it was automatically generated) is deleted. To implement our plans, at a minimum, we will need to transfer a prefab to the script. Add a public variable of type GameObject to the class:
public GameObject cubePrefab; Change the Update method:
void Update () { if (Input.GetButtonDown("Jump")) { GameObject.Instantiate(cubePrefab, transform.position, transform.rotation); } } A couple of comments about this code:
- first, instead of Input.GetButtonDown ("Jump"), you can use Input.GetKeyDown (KeyCode.Space). The second option is strictly linked to the space key code, and the first to the key, which in the game control settings plays the role of a jump key (the default is a space). These settings can be seen by assembling a project and running the resulting executable file (if this is unclear, I can describe the process in more detail).
- It is also worth noting that, unlike the script in the first task , when calling GameObject.Instantiate, the result of the function is not saved because we simply do not need it. If last time we, after creating an object, additionally acted on it by force, then here it is not required.
- here the overloaded Instantiate function is called, which has 3 parameters, whereas there is an option with one: Instantiate (Object original). The latter will set the position and rotation parameters (the second and third parameters respectively in the Instantiate call with three parameters) are the same as those of the object passed by the actual parameter. It is important to remember that these parameters are not taken from the corresponding values for the object to which the script is attached!
Now drag the Boxdropper script from the Project panel onto the dropper object in the hierarchy panel.
Well, the task is almost completed. If you start the scene and press the spacebar, a cube will fall and a small cube (which is already lying on the shoulder of the lever) will fly to the target. There is only one minor discrepancy with the wording: there is no sound when destroying the target.
First of all, we need the sound itself, that is, the file with some sound. I took the first sound that had any relation to the sound of an explosion, from one of my past projects. Add sound to the project (I have it named onDestroySound).
A small lyrical digression about sound in Unity. The sound here is mono and 3D (3D Sound). In fact, it shows 1 or 2 channels in audio. For effects that have a sufficiently clear spatial position (explosion, impact sound, etc.), it is recommended to use mono sound, since its actual volume (heard by the player) will depend on the source’s distance from the listener (determined by the presence of the Audio Listener component, default is the Main Camera object).
If your sound turned out to be 3D (there is a tick "3D Sound" in the Inspector panel), do not despair. Remove the “tick” from the “3D Sound” item, select the “Force to mono” item in the same panel and click “Apply”. Now we modify the Selfdestroyer script. We will need a public variable for the sound to be played:
public AudioClip onDestroy; Now, in the OnCollisionEnter method, in addition to calling the Destroy method, we will add sound playback:
void OnCollisionEnter(Collision obj) { AudioSource.PlayClipAtPoint(onDestroy, transform.position); Destroy(gameObject); } Such a call to the AudioSource.PlayClipAtPoint method will play the onDestroy sound as if the sound source is at the location of the object to which this script is attached (transform.position).
It remains to select the target object on the stage or in the hierarchy panel and drag a sound file (onDestroySound) into the “On Destroy (Audio Clip)” field of the Inspector panel from the project.
Note: you can add an Audio Source component to any object and then access it as “audio” from scripts. There is even a special method that will play the transmitted sound at the location of the object:
audio.PlayOneShot(AudioClip clip); However, in our case, the sound is played immediately before the object is destroyed, and if you use audio.PlayOneShot, then after the deletion, the sound will stop playing. This means that we will not hear him. You can check it yourself (it is even useful).
So, the task is completed.
Part 3. Aesthetic.
It would seem, what else? But I was tormented by one detail: if you throw several dice at a time (press the space several times in a row), the two “boards” that form the lever (plank1 and plank2) begin to move relative to each other. You can see, for example, in this screenshot (here another light source is added to the scene):
Then I thought about the simplest solution: since we only need to connect plank1 and plank2 just once, why not get rid of it after it has already played its role? Just destroy plank2? Ugly.
Again, select plank1 in the hierarchy panel and find the Fixed Joint component in the Inspector panel. We notice a curious field:
Break Force: Infinity
Exactly what is needed! In my case, the value of the force required to break the connections approached 10 (I hope that Newtons). By “fit,” I mean that at the moment when the cube is lifted from the surface of the lever, plank2 is detached from plank1 and sent to flight:
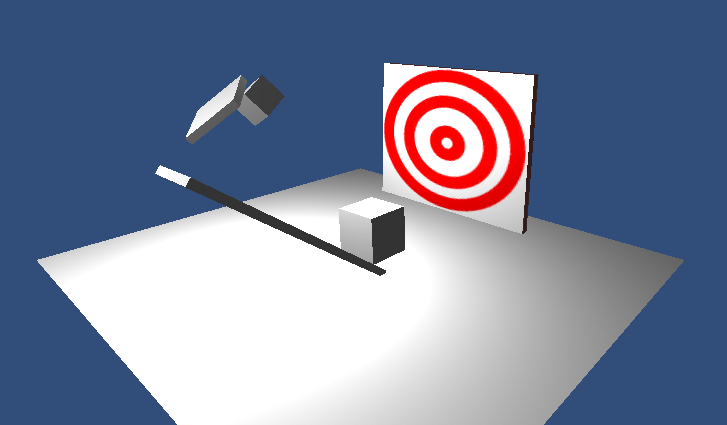
As it turned out, Hinge Joint is subject to the same problem - the strange behavior of plank1 is again observed with a large number of falling cubes. We will solve the problem in the same way - we set the value in the Break Force field to 30. As a result, the entire design of the lever after the first launch is destroyed, and quite physically.
This is the scene after the first launch:
PS For greater beauty, you can add materials to all objects in the scene: a lever, all cubes (large and small), floor. How this is done is described at the beginning of the article.
Conclusion
This time, the code is slightly larger (although there are still less than 10 “semantic” lines, except for curly brackets and code generated automatically), and the task is more meaningful. Some kind of physics controlled by us (in the form of compounds) and a sound that has been turned on at certain events in the scene have already appeared.
Source: https://habr.com/ru/post/145697/
All Articles