Practical tasks from unity3dstudent.com
From the posts of DisaDisa - translations of lessons from the unity3dstudent site - I learned about this interesting site. In addition to the lessons (quite reasonable, though not entirely logical - in some places the narration goes to the obvious moments of programming languages (javascript, in the case of these lessons), such as cycles or boolean expressions) there were also so-called “Challenges” - practical tasks for material from the lessons. Tasks are accompanied by a video example of the result of the decision.

So far there are only three such tasks, but hopefully they will appear again. But even these tasks allow in practice to feel the simplicity and convenience of Unity. Of course, they imply an independent decision (references to tasks will be before their decision), but if something suddenly does not work, you can look here. Another goal of the post (in addition to the analysis of specific tasks) is to show by example what can be done with the help of Unity with minimal effort.
/ * To understand the article, it is desirable to have at least a little experience with Unity (especially with the user interface) - you can see a couple of posts from DisaDisa or the first lessons on unity3dstudent.com * /
In this article - only about the first of the tasks. The rest - in the near future.
')
UPD: The second task
UPD 2: Third
Yes, I would also note that under the statement of the assignment (video + small text) the site provides links to the lessons necessary to complete the assignment.
Challenge accepted?
Link to the original task: www.unity3dstudent.com/2010/07/challenge-c01-beginner
The bottom line: create a scene in which when you press a space in the wall throws a box, and after hitting the wall disappears.
First, create an empty new project, immediately a scene with a camera will appear. We add a plane to the scene - this will be our “floor”. Slightly bring the viewing point to the plane (mouse wheel) to achieve the state “not very small, not very large”.
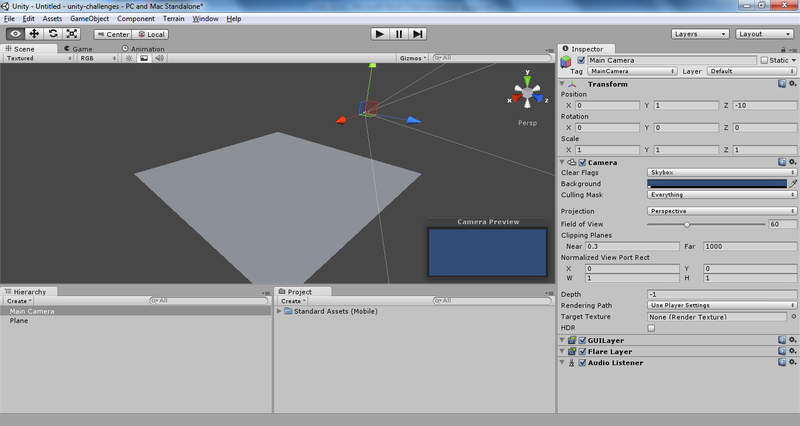
In the screenshot, the camera is highlighted.
Note that the camera (the MainCamera object in the Hierarchy panel) is deployed so that the newly added plane is not visible (see the screenshot above). Need to fix it. No wonder we were “aiming” at the plane! Now you can select the camera (in the Hierarchy panel or directly on the stage) and click GameObject-> Align With View (or press Ctrl + Shift + F). This will take the camera to the point in space from which we looked at the plane. The camera is in place, now fix the lighting. Add a Point Light to the stage and place it somewhere so that the scene becomes more pleasant visually:

Now add a cube to the scene (let's call it wall) and stretch it to the wall state. Let us turn / move the wall so that it stands “facing” the camera. These manipulations are caused by the fact that we will shoot the box from the point of the camera's location “forward” (in quotation marks, since this is quite a relative concept; our “forward” will look the same way as the camera).
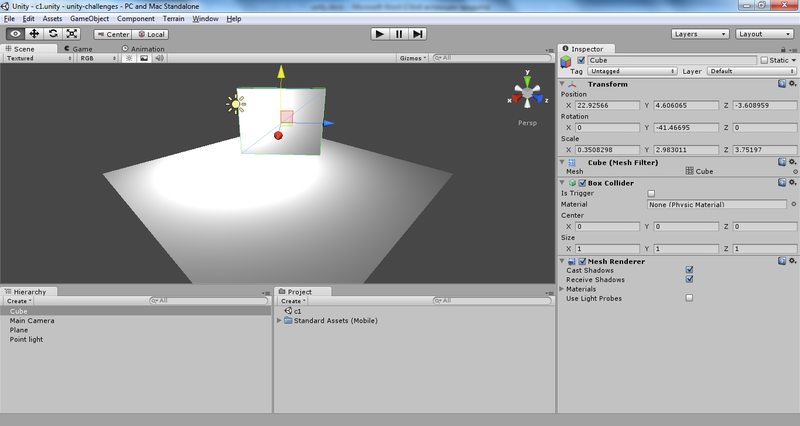
With the stage almost finished. More precisely, with its visible part. We also need a cube-prefab, which we will shoot. Add a cube to the scene (you can slightly reduce it if you want), and a prefab to the project (let's call it, for example, cube). Drag the cube from the hierarchy panel to the prefab and remove the cube from the scene - we will not need it anymore. Select our cube in the hierarchy panel and add the Rigidbody component to it.
Now you can start writing two scripts - the Selfdestroyer script will delete an object when another object is hit on it, and the Shooter script will actually shoot a cube in the direction of the wall.
Create a new C # script, let's call it Selfdestroyer. Remove the Update and Start methods from its text — we just need to delete the object on impact. We describe the OnCollisionEnter method - it will be simple to disgrace (it is assumed that nothing other than the boxes will hit our wall):
Here, gameObject is a GameObject object associated with the object on the stage to which the script is attached.
Note that it was possible to describe a function with the prototype
Drag this script from the Project panel onto the wall object in the hierarchy panel. Make sure that while launching the scene, nothing happens.
Now let's do the second script - Shooter. Let's create a variable of the GameObject type, which will contain the object with which we will subsequently shoot at the wall:
Here we don’t need the Start () method, but we’ll leave Update and add it so that when you press the spacebar (this is the jump key at standard settings) from the location of the object to which the script is attached (in our case it will be a camera) forward with some force rushed cube. As a result, the script file will look like this:
Attach the script to the MainCamera object. Run the scene and make sure that ... when you press the space in the console, an error is issued:

It tells us that in the Shooter script, the variable cubePrefab is not assigned any value. We will correct this shortcoming - select a camera object in the hierarchy pane, find a section called “Shooter (Script)” in the Inspector panel. Indeed, in the “Cube Prefab” field there is a value of None. Drag cube into this field from the Project panel.
Now we launch and we shoot cubes, yet will not bother.
So, having written 5 meaningful lines of code, we have: a scene that responds to user input and an object (wall) that reacts to “external stimuli” in the form of collisions. Not bad for a start.
In general, I was going to write about the first two tasks at once, but the article is already quite voluminous for its content, so tasks 2 and 3 will be considered in the next articles. I will note in advance that in the following tasks (unlike the first one) there will be small (or not so small) additions to the lesson material of the unity3dstudent lessons from the motivations to makethis world a better article a little more interesting.
So far there are only three such tasks, but hopefully they will appear again. But even these tasks allow in practice to feel the simplicity and convenience of Unity. Of course, they imply an independent decision (references to tasks will be before their decision), but if something suddenly does not work, you can look here. Another goal of the post (in addition to the analysis of specific tasks) is to show by example what can be done with the help of Unity with minimal effort.
/ * To understand the article, it is desirable to have at least a little experience with Unity (especially with the user interface) - you can see a couple of posts from DisaDisa or the first lessons on unity3dstudent.com * /
In this article - only about the first of the tasks. The rest - in the near future.
')
UPD: The second task
UPD 2: Third
Yes, I would also note that under the statement of the assignment (video + small text) the site provides links to the lessons necessary to complete the assignment.
Challenge accepted?
First task
Link to the original task: www.unity3dstudent.com/2010/07/challenge-c01-beginner
The bottom line: create a scene in which when you press a space in the wall throws a box, and after hitting the wall disappears.
First, create an empty new project, immediately a scene with a camera will appear. We add a plane to the scene - this will be our “floor”. Slightly bring the viewing point to the plane (mouse wheel) to achieve the state “not very small, not very large”.
In the screenshot, the camera is highlighted.
Note that the camera (the MainCamera object in the Hierarchy panel) is deployed so that the newly added plane is not visible (see the screenshot above). Need to fix it. No wonder we were “aiming” at the plane! Now you can select the camera (in the Hierarchy panel or directly on the stage) and click GameObject-> Align With View (or press Ctrl + Shift + F). This will take the camera to the point in space from which we looked at the plane. The camera is in place, now fix the lighting. Add a Point Light to the stage and place it somewhere so that the scene becomes more pleasant visually:
Now add a cube to the scene (let's call it wall) and stretch it to the wall state. Let us turn / move the wall so that it stands “facing” the camera. These manipulations are caused by the fact that we will shoot the box from the point of the camera's location “forward” (in quotation marks, since this is quite a relative concept; our “forward” will look the same way as the camera).
With the stage almost finished. More precisely, with its visible part. We also need a cube-prefab, which we will shoot. Add a cube to the scene (you can slightly reduce it if you want), and a prefab to the project (let's call it, for example, cube). Drag the cube from the hierarchy panel to the prefab and remove the cube from the scene - we will not need it anymore. Select our cube in the hierarchy panel and add the Rigidbody component to it.
Now you can start writing two scripts - the Selfdestroyer script will delete an object when another object is hit on it, and the Shooter script will actually shoot a cube in the direction of the wall.
Create a new C # script, let's call it Selfdestroyer. Remove the Update and Start methods from its text — we just need to delete the object on impact. We describe the OnCollisionEnter method - it will be simple to disgrace (it is assumed that nothing other than the boxes will hit our wall):
void OnCollisionEnter() { Destroy(gameObject); } Here, gameObject is a GameObject object associated with the object on the stage to which the script is attached.
Note that it was possible to describe a function with the prototype
void OnCollisionEnter(Collision obj) and use information about the object that hit the object to which the script is attached. But we do not need it, so leave the list of formal parameters empty.Drag this script from the Project panel onto the wall object in the hierarchy panel. Make sure that while launching the scene, nothing happens.
Now let's do the second script - Shooter. Let's create a variable of the GameObject type, which will contain the object with which we will subsequently shoot at the wall:
public GameObject cubePrefab; Here we don’t need the Start () method, but we’ll leave Update and add it so that when you press the spacebar (this is the jump key at standard settings) from the location of the object to which the script is attached (in our case it will be a camera) forward with some force rushed cube. As a result, the script file will look like this:
using UnityEngine; using System.Collections; public class Shooter : MonoBehaviour { public GameObject cubePrefab; // Update is called once per frame void Update () { if (Input.GetButtonDown("Jump")) { GameObject cube = Instantiate(cubePrefab, transform.position, transform.rotation) as GameObject; cube.rigidbody.AddForce(transform.forward * 1000); } } } Attach the script to the MainCamera object. Run the scene and make sure that ... when you press the space in the console, an error is issued:
It tells us that in the Shooter script, the variable cubePrefab is not assigned any value. We will correct this shortcoming - select a camera object in the hierarchy pane, find a section called “Shooter (Script)” in the Inspector panel. Indeed, in the “Cube Prefab” field there is a value of None. Drag cube into this field from the Project panel.
Now we launch and we shoot cubes, yet will not bother.
So, having written 5 meaningful lines of code, we have: a scene that responds to user input and an object (wall) that reacts to “external stimuli” in the form of collisions. Not bad for a start.
PS
In general, I was going to write about the first two tasks at once, but the article is already quite voluminous for its content, so tasks 2 and 3 will be considered in the next articles. I will note in advance that in the following tasks (unlike the first one) there will be small (or not so small) additions to the lesson material of the unity3dstudent lessons from the motivations to make
Source: https://habr.com/ru/post/145678/
All Articles