Connecting Access Points to a Cisco Wi-Fi Controller
Using the first tutorial from my series of articles, you configured and connected to your local network your Cisco Wireless Access Point Controller WLC. There is access to it, but there is no “wifi users” yet. Your next step is to connect to the controller the available access points, which will serve the radio clients. How to make it, and will be discussed today.
Despite the openness of the CAPWAP protocol, your controller will work only with Cisco-made points, which is directly stated by the manufacturer. From the currently available devices, there are several classes:
A good comparison of the capabilities of different devices is given by the manufacturer. Pick yourself, depending on the budget, the task. For experiments, or a simple network, old, not fully supported models 1121 b / g (but for $ 15), or newer devices, 1131AG, are quite suitable. How many points to take - it is necessary to find out experimentally by measuring the signal level, calculations, own and others experience. In any case, later nothing will prevent you from simply adding one or two new access points to a place where a weak signal level is clearly visible (software like WCS / NCS will show you directly on the map, and even give advice in the planning mode). In this case, no reconfiguration is required, the controller will sort out the power level and frequency plan automatically. The number of supported access points is determined by the license; for some controllers (5508 and 2504) additional licenses can be purchased. It is recommended to increase the fault tolerance, it is desirable to have two controllers, and correctly distribute the points between them. About this, apparently, another time.
In the meantime, if your access points come from the “autonomous world” (AIR-AP-xxx), they need to be converted to the world of controllers (AIR-LAP-xx). All access points support this operation. To do this, you will need an access point itself, accessible over the network (with a specified IP address and known access rights), and either a special free utility or a WCS or NCS management software with the required tool. All preproshivka, by and large, is reduced to the following operations:
The certificate is needed because the communication protocol of the access point with the controller, CAPWAP, is based on the Datagram TLS protocol, which is actually protected via UDP transport certificates.
')
The converted access point reboots and then “searches” for its controller. So does the “lightweight” access point out of the box, which was purchased immediately. The search process includes getting the IP address of the device, as well as getting a list of controllers, checking the availability, availability and load of each of them, and actually registering with the selected one. Let us dwell on this issue in detail, since it is the key in this article, and usually causes the most problems.
The access point can OR obtain an IP address from a DHCP server (any manufacturer: Cisco IOS, Miscosoft, Unix ISC-DHCP), OR use a statically configured IP address. Depending on the circumstances, you can use any method. In your case, it may turn out that there is no DHCP server (or no rights to it), or the access point is already installed in a hard-to-reach place (behind a false ceiling). Either there is no longer a COM port anywhere (but we hope that you are aware of the USB-COM adapters).
To manually configure the access point, you need to connect to the console (9600/8 / N / 1), except for the Model 1121, which has no console port. When loading, the access point gets into the mode of receiving the address, and finding the controller. By default, the login and password is " Cisco " (with a capital letter), the enable password is the same. With a certain number of unsuccessful attempts, the point reboots and continues the process forever. To prevent reboots, cancel them with the following undocumented command:
Next, we explicitly set the address to the point:
Attention! The lightweight access point performs a special IOS version in which the configuration mode is not available. In an amicable way, it is not needed: the point receives all configuration settings from the controller at the time of registration on it. The exception is a small set of static configuration, such as an IP address. In theory, you can force the point to switch to configuration mode from the command line through an undocumented debug capwap console cli command , but this method is fraught with consequences and is not needed in practice.
Next, set the point addresses of the controllers. The first controller (one is enough):
If you have two or more controllers, then this is better:
You must specify the address of the management interface of the controller (where you connect to the web interface), and not the address of the ap-manager interface. You can view the result of the configuration with the show capwap client config command:
To automatically configure the IP address of the access point via DHCP, you must also set an additional option, number 43, which tells the point about the addresses of the controllers available to it. Read more about setting up different servers here . The trick is to pass in the parameters of option 43 the addresses of your controllers. The parameter value (in HEX format) has the format TLV, for example, f108c0a80a05c0a80a14 , where 0xf1 (241) is the parameter number of the option, 0x08 (data length, twice 4 bytes / octet of the IP address), 0xc0a80a05 is translated into 192.168.10.5 and 0xc0a80a14 at 192.168.10.20.
The access point can get the addresses of the controllers also through a query by DNS, or from neighbors "by air".
A little about connecting the device to the local network. All the access point needs is IP connectivity with the controller. Simply connect it to the access-port (access port) of your local network, along with other computers. Only in the case of video or voice applications in the radio network, you will need to configure prioritization , and in the case of a remote office and the H-REAP configuration point, the trunk port. Even if one access point provides connectivity to multiple SSIDs (radio networks) with its own security policies and connection to VLANs, you only need to worry about the interface settings with the wired network at the controller level.
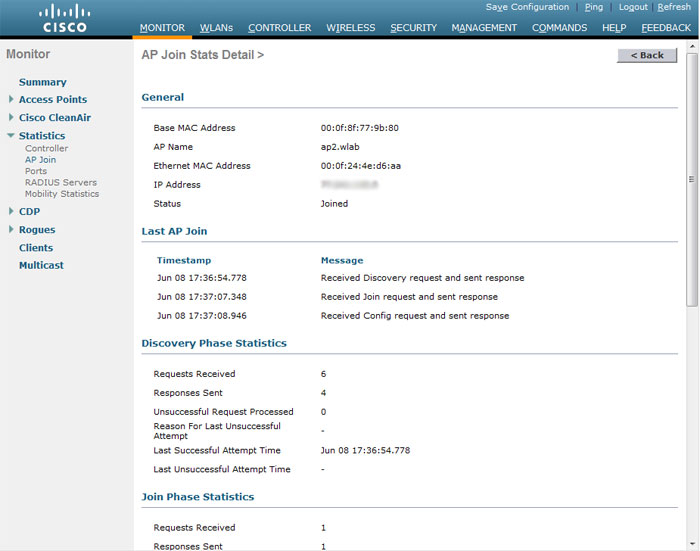
Having established a point in the local network, we look at how it tries to connect to the controller ( Monitor-AP Join ):
However, it happens that the access point seems to see the controller, but does not want to connect to it point-blank. This is almost certainly due to the established security policies that are configured in the " Security-AAA-AP Policies " menu. Almost all of these policies are somehow related to certificates. We will understand this issue in detail.
As stated above, due to the details of the CAPWAP operation, the data between the point and the controller is encrypted using certificates. Certificates are, of course, on the controller, and on the access point. The controller comes with already installed Cisco Systems certificates (root, and its derivatives), may carry additional certificates for web authorization and a local RADIUS server that do not belong to access points, and can also be supplemented with a certificate from your own Certificate Authority (PKI) . Certificates of access points, which are then authorized on the controller, are of the following four types:
The first type of certificates is present at all access points, including autonomous, issued after 2006. This certificate is sewn at the factory, signed by the vendor itself, and tied to the MAC address of the access point.
SSC certificates are generated by the point itself at the time of its conversion to the “lightweight” one if the MIC certificate is not present. It is signed by itself.
You can write out LSC certificates yourself with your PKI, if your organization has instructions to use only local means for digital signature and encryption systems.
The LBS-SSC certificate is created and used by Mobility Services Engine devices when interacting with the controller.
What types of certificates of access points to take when trying to authorize, you can configure yourself.

In addition, you can use the RADIUS server to verify the validity of the MAC address of the access point. You can also explicitly set the MAC address of the point using the MIC certificate (auth-list). However, for SSC certificates, in any case, you must add each of them to the list, while not only specifying the MAC address of the Ethernet interface of the access point, but also the hash of the certificate. Where to get it? On the controller, enable debugging of the certificate verification process:
(Cisco Controller)> debug pm pki enable
Select Add, type SSC, Copy-MAC address and hash in the corresponding fields, Apply, wait for the point to reboot, turn off debug (debug disable-all), the point is connected:
You can also add a certificate hash manually:
Everything that can be done with the controller via the web interface can also be obtained via the command line. This is a matter of convenience and habit. Warning: some specific commands are available only from the command line.
Now that our access point is connected (I hope all the others too), you can turn on the radio interfaces (Wireless - 802.11a / n, 802.11b / g / n), the -g, -n modes, and go on to setting up wireless networks (SSID) About this next time.
UPD: Continued: Configuring Wireless Networks on a Cisco Controller
Despite the openness of the CAPWAP protocol, your controller will work only with Cisco-made points, which is directly stated by the manufacturer. From the currently available devices, there are several classes:
- with one 2.4 GHz radio module (b / g / n), or with two 2.4 and 5 GHz (a / n). Due to the foulness of the first band (there are only three non-overlapping 20-MHz channels: 1, 6, 11), it is highly recommended to choose dual-band access points, since the controller has the means of “squeezing” clients into a free 5 GHz band (about 23 channels);
- with the support of high transmission rates (-n), which is mainly achieved by other signal modulations (MCS), an increase in the number of input / output streams (MIMO), channel fusion, games with interframe intervals and other tricks). It must be remembered that the speed of data transmission between the client and the access point has, roughly speaking, an inverse dependence on distance, and the total capacity of the network segment is shared between all users;
- with support for connecting external antennas, or with built-in ones (choose - for you to work in a simple office with cardboard walls, or in a warehouse, street, ...);
- having the ability to work autonomously, or only through a controller (Aironet 3600);
- simple in functionality of electronics, or with tricks to work in difficult radio conditions (ClientLink, CleanAir, ...)
A good comparison of the capabilities of different devices is given by the manufacturer. Pick yourself, depending on the budget, the task. For experiments, or a simple network, old, not fully supported models 1121 b / g (but for $ 15), or newer devices, 1131AG, are quite suitable. How many points to take - it is necessary to find out experimentally by measuring the signal level, calculations, own and others experience. In any case, later nothing will prevent you from simply adding one or two new access points to a place where a weak signal level is clearly visible (software like WCS / NCS will show you directly on the map, and even give advice in the planning mode). In this case, no reconfiguration is required, the controller will sort out the power level and frequency plan automatically. The number of supported access points is determined by the license; for some controllers (5508 and 2504) additional licenses can be purchased. It is recommended to increase the fault tolerance, it is desirable to have two controllers, and correctly distribute the points between them. About this, apparently, another time.
In the meantime, if your access points come from the “autonomous world” (AIR-AP-xxx), they need to be converted to the world of controllers (AIR-LAP-xx). All access points support this operation. To do this, you will need an access point itself, accessible over the network (with a specified IP address and known access rights), and either a special free utility or a WCS or NCS management software with the required tool. All preproshivka, by and large, is reduced to the following operations:
- rewriting (TFTP) of a special recovery image to an access point
- delete old config file
- remove existing offline software
- clock synchronization
- generation of the certificate of the access point, if it does not already exist
The certificate is needed because the communication protocol of the access point with the controller, CAPWAP, is based on the Datagram TLS protocol, which is actually protected via UDP transport certificates.
')
The converted access point reboots and then “searches” for its controller. So does the “lightweight” access point out of the box, which was purchased immediately. The search process includes getting the IP address of the device, as well as getting a list of controllers, checking the availability, availability and load of each of them, and actually registering with the selected one. Let us dwell on this issue in detail, since it is the key in this article, and usually causes the most problems.
The access point can OR obtain an IP address from a DHCP server (any manufacturer: Cisco IOS, Miscosoft, Unix ISC-DHCP), OR use a statically configured IP address. Depending on the circumstances, you can use any method. In your case, it may turn out that there is no DHCP server (or no rights to it), or the access point is already installed in a hard-to-reach place (behind a false ceiling). Either there is no longer a COM port anywhere (but we hope that you are aware of the USB-COM adapters).
To manually configure the access point, you need to connect to the console (9600/8 / N / 1), except for the Model 1121, which has no console port. When loading, the access point gets into the mode of receiving the address, and finding the controller. By default, the login and password is " Cisco " (with a capital letter), the enable password is the same. With a certain number of unsuccessful attempts, the point reboots and continues the process forever. To prevent reboots, cancel them with the following undocumented command:
debug capwap client no-reloadNext, we explicitly set the address to the point:
capwap ap ip address <ip_address> <subnet mask>
capwap ap ip default-gateway <gw_address>
Attention! The lightweight access point performs a special IOS version in which the configuration mode is not available. In an amicable way, it is not needed: the point receives all configuration settings from the controller at the time of registration on it. The exception is a small set of static configuration, such as an IP address. In theory, you can force the point to switch to configuration mode from the command line through an undocumented debug capwap console cli command , but this method is fraught with consequences and is not needed in practice.
Next, set the point addresses of the controllers. The first controller (one is enough):
capwap ap controller ip address <wlc_mgmt_ip>If you have two or more controllers, then this is better:
capwap ap primary-base <controller_name> <wlc_mgmt_ip>
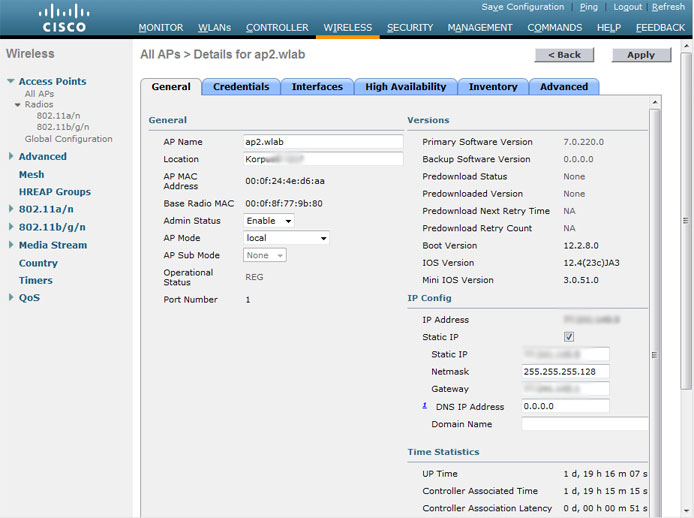
capwap ap secondary-base <controller_name> <wlc_mgmt_ip>You must specify the address of the management interface of the controller (where you connect to the web interface), and not the address of the ap-manager interface. You can view the result of the configuration with the show capwap client config command:
configMagicMark 0xF1E2D3C4
chkSumV2 47358
chkSumV1 27913
swVer 7.0.220.0
adminState ADMIN_ENABLED(1)
name ap2.wlab
location KorpusXX
group name ApGg1
mwarName wlc2...n
mwarIPAddress ...3
mwarName
mwarIPAddress 0.0.0.0
mwarName
mwarIPAddress 0.0.0.0
ssh status Enabled
Telnet status Disabled
...
To automatically configure the IP address of the access point via DHCP, you must also set an additional option, number 43, which tells the point about the addresses of the controllers available to it. Read more about setting up different servers here . The trick is to pass in the parameters of option 43 the addresses of your controllers. The parameter value (in HEX format) has the format TLV, for example, f108c0a80a05c0a80a14 , where 0xf1 (241) is the parameter number of the option, 0x08 (data length, twice 4 bytes / octet of the IP address), 0xc0a80a05 is translated into 192.168.10.5 and 0xc0a80a14 at 192.168.10.20.
The access point can get the addresses of the controllers also through a query by DNS, or from neighbors "by air".
A little about connecting the device to the local network. All the access point needs is IP connectivity with the controller. Simply connect it to the access-port (access port) of your local network, along with other computers. Only in the case of video or voice applications in the radio network, you will need to configure prioritization , and in the case of a remote office and the H-REAP configuration point, the trunk port. Even if one access point provides connectivity to multiple SSIDs (radio networks) with its own security policies and connection to VLANs, you only need to worry about the interface settings with the wired network at the controller level.
Having established a point in the local network, we look at how it tries to connect to the controller ( Monitor-AP Join ):
However, it happens that the access point seems to see the controller, but does not want to connect to it point-blank. This is almost certainly due to the established security policies that are configured in the " Security-AAA-AP Policies " menu. Almost all of these policies are somehow related to certificates. We will understand this issue in detail.
As stated above, due to the details of the CAPWAP operation, the data between the point and the controller is encrypted using certificates. Certificates are, of course, on the controller, and on the access point. The controller comes with already installed Cisco Systems certificates (root, and its derivatives), may carry additional certificates for web authorization and a local RADIUS server that do not belong to access points, and can also be supplemented with a certificate from your own Certificate Authority (PKI) . Certificates of access points, which are then authorized on the controller, are of the following four types:
- MIC (Manufacture Installed Certificate)
- SSC (Self-Signed Certificate)
- LSC (Locally Significant Certificate)
- LBS-SSC (Location-Based Services-SSC)
The first type of certificates is present at all access points, including autonomous, issued after 2006. This certificate is sewn at the factory, signed by the vendor itself, and tied to the MAC address of the access point.
SSC certificates are generated by the point itself at the time of its conversion to the “lightweight” one if the MIC certificate is not present. It is signed by itself.
You can write out LSC certificates yourself with your PKI, if your organization has instructions to use only local means for digital signature and encryption systems.
The LBS-SSC certificate is created and used by Mobility Services Engine devices when interacting with the controller.
What types of certificates of access points to take when trying to authorize, you can configure yourself.
In addition, you can use the RADIUS server to verify the validity of the MAC address of the access point. You can also explicitly set the MAC address of the point using the MIC certificate (auth-list). However, for SSC certificates, in any case, you must add each of them to the list, while not only specifying the MAC address of the Ethernet interface of the access point, but also the hash of the certificate. Where to get it? On the controller, enable debugging of the certificate verification process:
(Cisco Controller)> debug pm pki enable
*spamReceiveTask: Jun 10 21:49:39.450: sshpmGetCID: called to evaluate cscoDefaultIdCert
*spamReceiveTask: Jun 10 21:49:39.450: sshpmGetCID: comparing to row 0, CA cert bsnOldDefaultCaCert
*spamReceiveTask: Jun 10 21:49:39.450: sshpmGetCID: comparing to row 1, CA cert bsnDefaultRootCaCert
*spamReceiveTask: Jun 10 21:49:39.450: sshpmGetCID: comparing to row 2, CA cert bsnDefaultCaCert
...
*spamReceiveTask: Jun 10 21:49:39.731: sshpmGetIssuerHandles: subject L=San Jose, ST=California, C=US, O=Cisco Systems, MAILTO=support@cisco.com, CN=C1100-000f244ed6aa
*spamReceiveTask: Jun 10 21:49:39.731: sshpmGetIssuerHandles: issuer L=San Jose, ST=California, C=US, O=Cisco Systems, MAILTO=support@cisco.com, CN=C1100-000f244ed6aa
*spamReceiveTask: Jun 10 21:49:39.732: sshpmGetIssuerHandles: Mac Address in subject is 00:0f:24:4e:d6:aa
*spamReceiveTask: Jun 10 21:49:39.732: sshpmGetIssuerHandles: Cert Name in subject is C1100-000f244ed6aa
*spamReceiveTask: Jun 10 21:49:39.732: sshpmGetIssuerHandles: Cert is issued by Cisco Systems.
*spamReceiveTask: Jun 10 21:49:39.741: ssphmSsUserCertVerify: self-signed user cert verfied.
...
*spamReceiveTask: Jun 10 21:49:39.752: sshpmGetIssuerHandles: SSC Key Hash is d886bcaf0d22398538ccdef3f53d6ec7893463b8
*spamReceiveTask: Jun 10 21:49:39.755: sshpmFreePublicKeyHandle: called with 0xf2de114
Select Add, type SSC, Copy-MAC address and hash in the corresponding fields, Apply, wait for the point to reboot, turn off debug (debug disable-all), the point is connected:
You can also add a certificate hash manually:
config auth-list ap-policy ssc enable
config auth-list add ssc 00:0f:24:4e:d6:aa d886bcaf0d22398538ccdef3f53d6ec7893463b8
Everything that can be done with the controller via the web interface can also be obtained via the command line. This is a matter of convenience and habit. Warning: some specific commands are available only from the command line.
Now that our access point is connected (I hope all the others too), you can turn on the radio interfaces (Wireless - 802.11a / n, 802.11b / g / n), the -g, -n modes, and go on to setting up wireless networks (SSID) About this next time.
UPD: Continued: Configuring Wireless Networks on a Cisco Controller
Source: https://habr.com/ru/post/145677/
All Articles