Creating a Java game without third-party libraries, part one

Introduction and preparation
Hello habrozhiteli. This post is the "rewrite" of my post for the sandbox. This time I will try to cover more with what than then.
')
Why java?
I will not say anything objective here, but I will only say that I love this language, and I like to write on it. Yes, there are no AAA-class games in Java, but Java provides tremendous opportunities, more built-in tools and speed of writing code.
IDE
Let's start by choosing an IDE. I am an Eclipse fan and will recommend it to you.
If for some reason you didn’t like it, you can use NetBeans, Intellij IDEA or the command line and your favorite editor.
Jdk
And download the latest version of JDK : JDK 7u4
Most likely you will not have problems installing IDE, and if you have a 64-bit system, I would advise you to install 32-bit Eclipse, because sometimes there are errors and you just won’t get Eclipse.
Under the cut, we will start creating the game.
Game class
So, we create the project, in it the class Game (in passing creating an entry point in it). This class must inherit from the Canvas class and implement the Runnable interface:
public class Game extends Canvas implements Runnable { private static final long serialVersionUID = 1L; public void run() { // run , "implements Runnable" } public static void main(String[] args) { } } Let's create a running variable of type Boolean, which, as you may have guessed, will show us whether the game is running or not.
Let's create the start () function and in it we will create a new thread and convert the running to true:
public void start() { running = true; new Thread(this).start(); } Create three functions - update (long delta), render () and init (). I hope that you understand their meaning. In the run () function, we will create the main game loop, in front of it we will call init (), and in the render () and update () itself. We will also calculate the difference between frames (delta time).
public void run() { long lastTime = System.currentTimeMillis(); long delta; init(); while(running) { delta = System.currentTimeMillis() - lastTime; lastTime = System.currentTimeMillis(); update(delta); render(); } } public void init() { } public void render() { } public void update(long delta) { } For now, let's work on the render () function.
public void render() { BufferStrategy bs = getBufferStrategy(); if (bs == null) { createBufferStrategy(2); // BufferStrategy requestFocus(); return; } Graphics g = bs.getDrawGraphics(); // Graphics BufferStrategy g.setColor(Color.black); // g.fillRect(0, 0, getWidth(), getHeight()); // g.dispose(); bs.show(); // } You probably can not wait to run and try, but do not hurry. We need to create a frame and add our canvas to it. At the same time and declare three variables.
public static int WIDTH = 400; // public static int HEIGHT = 300; // public static String NAME = "TUTORIAL 1"; // public static void main(String[] args) { Game game = new Game(); game.setPreferredSize(new Dimension(WIDTH, HEIGHT)); JFrame frame = new JFrame(Game.NAME); frame.setDefaultCloseOperation(JFrame.EXIT_ON_CLOSE); // ESC frame.setLayout(new BorderLayout()); frame.add(game, BorderLayout.CENTER); // frame.pack(); frame.setResizable(false); frame.setVisible(true); game.start(); } 
Something like this is our Game class now.
Sprite class
Create a new class Sprite. Since this class is small, I will immediately bring all its code with comments:
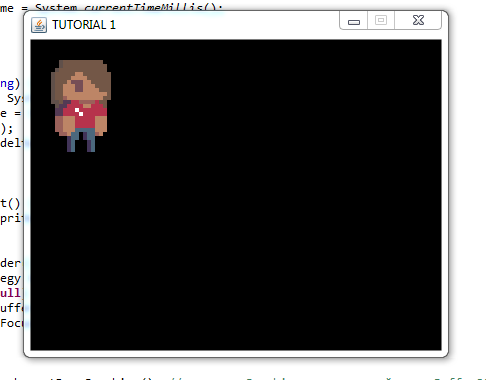
import java.awt.Graphics; import java.awt.Image; public class Sprite { private Image image; // public Sprite(Image image) { this.image = image; } public int getWidth() { // return image.getWidth(null); } public int getHeight() { // return image.getHeight(null); } public void draw(Graphics g,int x,int y) { // g.drawImage(image,x,y,null); } } Immediately check the performance. Take this picture and copy it to the folder with our Sprite class. Add the getSprite () function to the Game class (temporarily).

public Sprite getSprite(String path) { BufferedImage sourceImage = null; try { URL url = this.getClass().getClassLoader().getResource(path); sourceImage = ImageIO.read(url); } catch (IOException e) { e.printStackTrace(); } Sprite sprite = new Sprite(Toolkit.getDefaultToolkit().createImage(sourceImage.getSource())); return sprite; } Add our image to the assets folder (create folder in the project root), the folder itself must be added to the build path.
Next, create a variable of hero type Sprite. In the init () function, we initialize it. In the function render () we draw:
// "" public static Sprite hero; // init() hero = getSprite("man.png"); // render() g.fillRect(0, 0, getWidth(), getHeight()); hero.draw(g, 20, 20); Result:
All Game.java Code
Input
To handle the input, we will create a class that inherits the KeyAdapter:
private class KeyInputHandler extends KeyAdapter { } We also declare two variables in the header of the Game class:
private boolean leftPressed = false; private boolean rightPressed = false; Inside the KeyInputHandler class, create two functions:
public void keyPressed(KeyEvent e) { // if (e.getKeyCode() == KeyEvent.VK_LEFT) { leftPressed = true; } if (e.getKeyCode() == KeyEvent.VK_RIGHT) { rightPressed = true; } } public void keyReleased(KeyEvent e) { // if (e.getKeyCode() == KeyEvent.VK_LEFT) { leftPressed = false; } if (e.getKeyCode() == KeyEvent.VK_RIGHT) { rightPressed = false; } } Now in the init () function add the following:
addKeyListener(new KeyInputHandler()); Create variables x and y for the hero (since we have not yet written the class Entity). Let's make the hero always draw on these coordinates.
private static int x = 0; private static int y = 0; hero.draw(g, x, y); And now in the update () function we will check if the keys are pressed and change the x-coordinate.
public void update(long delta) { if (leftPressed == true) { x--; } if (rightPressed == true) { x++; } } 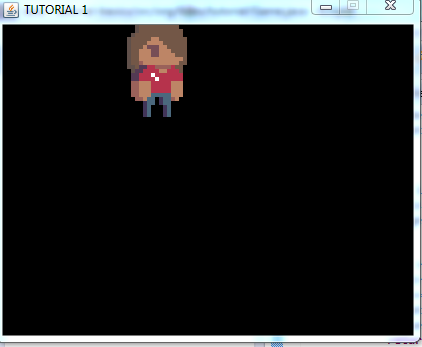
He moves!
Thanks for attention.
PS Link to github
Source: https://habr.com/ru/post/145433/
All Articles