OpenShift: “hello, cloud!”
This is a continuation of a note about using OpenShift as a java-hosting.
Last time, we figured out how to create applications in the OpenShift cloud. We have a free hosting service with JBoss AS 7.1 server and git repository. Now let's try to write something a bit more complicated than the usual “hello, world”, and using the capabilities of JBoss AS and the JBoss Tools development tools.

One of the common tasks is to allow access to certain resources only to authorized users, with separation according to assigned roles. It is proposed to do this using the login module embedded in jboss, namely the implementation of org.jboss.security.auth.spi.DatabaseServerLoginModule. As it is not difficult to guess, in this case, users and their roles will be stored in the database.
The data schema is quite simple: it is the table APP_USER (users), APP_ROLE (role guide) and APP_MEMBERSHIP (assigned roles) through which the many-to-many relationship between the first two tables is realized.
Create a new jbossas-7 application with a mysql-5.1 cartridge in the web console and import it into Eclipse. Switch to the “Web” perspective. Immediately after the import, most likely, the Java Resources section will be flagged as containing an error, and the reason window will be written:
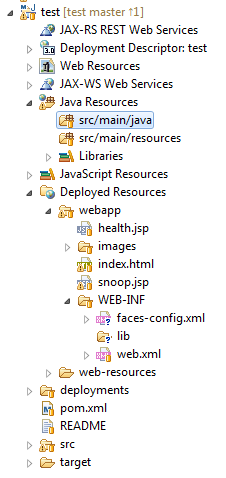
Deploy the project tree:
')
As you can see, there are already folders for java classes and resources, as well as index.html files in the webapp folder, a pair of jsp files, a WEB-INF directory with handles. The health.jsp file can be immediately deleted (as well as the description of the servlet health from the web.xml descriptor), why it is not clear here. The snoop.jsp file can still be useful, it displays some statistics about our application.
At the root of the project is pom.xml with a single dependency.
This gives us access to all modules included in jboss (you can familiarize yourself with the entire list by expanding the Libraries - Maven Dependencies branch.
Now we need a file that has not been imported by Eclipse. It is located in the project directory at .openshift / config / standalone.xml, and, as the name implies, describes the configuration of the jboss server instance. Open it right there in Eclipse (if the application is debugged on the local jboss server, you will have to perform similar manipulations with the file in the server folder standalone / configuration / standalone.xml).
To work with Russian characters in the database, the connection must be in UTF-8 encoding. Therefore, we find the data source (in this case, MysqlDS) and add information about the encoding:
Now we will create a security domain, which we will call, for example, “app-auth”. It is necessary to find the subsystem “urn: jboss: domain: security: 1.1” and add the description of our domain to it:
Assigning dsJndiName properties, principalsQuery, rolesQuery, I think, obviously. The last 2 properties indicate that password hashes will be stored in the database. If these properties are removed, the passwords will have to be stored in clear text, which is permissible when debugging, but you should not do it with real data.
Add to the project JPA. To do this, open the project properties and find the Project Facets section, in this section, tick the box next to JPA. The persistence.xml file will be automatically created. Then you can configure access to the database in this file, or you can pass the setting to hibernate.cfg.xml. I prefer the latter, since in this case there is a convenient graphical interface at hand, and also there is an opportunity to do reverse engineering from the existing base.
For the second method it is necessary:
- in persistence.xml refer to hibernate.cfg.xml:
- add the hibernate.cfg.xml file to the src / main / resources folder as follows:
Pay attention to hibernate.hbm2ddl.auto: the update value allows you to automatically update the data schema to fit the model, and we do not have to write a single DDL line for this database!
format_sql and show_sql can be useful when debugging;
The “Session Factory” editor tab provides a bunch of settings, but until you need them.
At this setting can be considered complete.
The data is described by 2 classes. A many-to-many relationship is described on both sides by sets. The connection master will be AppUser (AppRole rarely changes, it’s a directory rather than an entity).
Since MySql lacks sequences and auto-increment, GenerationType.TABLE has been chosen for the generator. The rest, I think, is clear from the annotations.
For the password, the length is 30: this should be enough for the SHA-1 digest (20 bytes) encoded in base64;
For the enabled field, the type is Boolean, not every server will understand this (for example, in FirebirdSQL you will have to create a domain with this name), but MySql interprets it without question.
If desired, you can also add the AppGen class to the project, which will correspond to the APP_GEN generator table, so that our application can work with legacy SQL servers. The fact is that a field will be created in the table APP_GEN by default - the primary key GEN_NAME of 256 characters length, which is not always supported, and this length can be reduced by explicitly specifying the annotation. For me, 30 characters is enough (see, for example, the length of sequence names in Oracle).
Initialization of the application will be performed by the same class my.app.jaas.Initializer, which was previously specified in the web.xml
As you can see, the only listener method ServletContextListener.contextInitialized is implemented, in which roles are checked and, if necessary, created, and at least 1 administrator is checked. If there is no administrator, an admin account is created.
The static encode method can be used in the user management module.
We also need one more method logout (), with an obvious purpose.
The work with the database in this case is not carried out through JPA, but to the level below - through the hibernate API, as a result, you can use the wonderful org.hibernate.Criteria interface and perform all actions without a single line on sql, hql or jpql.
Here you can draw any form, the only requirement is that the j_username and j_password values must be submitted to the server. Since in this case richfaces components are used, jQuery is automatically included in the page code, the capabilities of which are used in the script to position the login container and automatically select the element with the user name.
So, everything is ready for the first run. Next, we place any content in the webapp / view, webapp / admin directories, commit the changes to the server, and after launching the application we make sure that access to these directories is possible only after authentication and with the appropriate roles.
When the application starts, the necessary tables and records will be automatically created in the database, you can make sure of this by installing the phpmyadmin cartridge, or by turning on the query tracing in the hibernate.cfg.xml file:
In the example above, application development with authentication for OpenShift was considered. The same application can be compiled and used on any other JBoss AS 7.1 server and with any of the supported sql dialects. The difference will be only in the location of the standalone.xml configuration file, and in the need to install the necessary jdbc module.
When setting up a connection to a data source, you should remember about the encoding.
The considered template used a minimum of loadable libraries, which is important for the limited resources provided by OpenShift Express. Most of the modules used are already included in the JBoss distribution, as a result - saving disk space and application publishing time.
Last time, we figured out how to create applications in the OpenShift cloud. We have a free hosting service with JBoss AS 7.1 server and git repository. Now let's try to write something a bit more complicated than the usual “hello, world”, and using the capabilities of JBoss AS and the JBoss Tools development tools.
One of the common tasks is to allow access to certain resources only to authorized users, with separation according to assigned roles. It is proposed to do this using the login module embedded in jboss, namely the implementation of org.jboss.security.auth.spi.DatabaseServerLoginModule. As it is not difficult to guess, in this case, users and their roles will be stored in the database.
The data schema is quite simple: it is the table APP_USER (users), APP_ROLE (role guide) and APP_MEMBERSHIP (assigned roles) through which the many-to-many relationship between the first two tables is realized.
Create a new jbossas-7 application with a mysql-5.1 cartridge in the web console and import it into Eclipse. Switch to the “Web” perspective. Immediately after the import, most likely, the Java Resources section will be flagged as containing an error, and the reason window will be written:
Project configuration is not up-to-date with pom.xml. Run project configuration update Deploy the project tree:
')
As you can see, there are already folders for java classes and resources, as well as index.html files in the webapp folder, a pair of jsp files, a WEB-INF directory with handles. The health.jsp file can be immediately deleted (as well as the description of the servlet health from the web.xml descriptor), why it is not clear here. The snoop.jsp file can still be useful, it displays some statistics about our application.
At the root of the project is pom.xml with a single dependency.
<dependency> <groupId>org.jboss.spec</groupId> <artifactId>jboss-javaee-6.0</artifactId> <version>1.0.0.Final</version> <type>pom</type> <scope>provided</scope> </dependency> This gives us access to all modules included in jboss (you can familiarize yourself with the entire list by expanding the Libraries - Maven Dependencies branch.
Server configuration setup
Now we need a file that has not been imported by Eclipse. It is located in the project directory at .openshift / config / standalone.xml, and, as the name implies, describes the configuration of the jboss server instance. Open it right there in Eclipse (if the application is debugged on the local jboss server, you will have to perform similar manipulations with the file in the server folder standalone / configuration / standalone.xml).
Encoding setting
To work with Russian characters in the database, the connection must be in UTF-8 encoding. Therefore, we find the data source (in this case, MysqlDS) and add information about the encoding:
<connection-url>jdbc:mysql://${env.OPENSHIFT_DB_HOST}:${env.OPENSHIFT_DB_PORT}/${env.OPENSHIFT_GEAR_NAME}?characterEncoding=UTF-8</connection-url> Configure authentication module
Now we will create a security domain, which we will call, for example, “app-auth”. It is necessary to find the subsystem “urn: jboss: domain: security: 1.1” and add the description of our domain to it:
<security-domain name="app-auth"> <authentication> <login-module code="org.jboss.security.auth.spi.DatabaseServerLoginModule" flag="required"> <module-option name="dsJndiName" value="java:jboss/datasources/MysqlDS"/> <module-option name="principalsQuery" value="select PWD from APP_USER where USER_NAME=? and ENABLED=1"/> <module-option name="rolesQuery" value="select r.ROLE_NAME, 'Roles' from APP_ROLE r, APP_MEMBERSHIP m, APP_USER u where r.ROLE_ID=m.ROLE_ID and m.USER_ID=u.USER_ID and u.USER_NAME=?"/> <module-option name="hashAlgorithm" value="SHA-1"/> <module-option name="hashEncoding" value="base64"/> </login-module> </authentication> </security-domain> Assigning dsJndiName properties, principalsQuery, rolesQuery, I think, obviously. The last 2 properties indicate that password hashes will be stored in the database. If these properties are removed, the passwords will have to be stored in clear text, which is permissible when debugging, but you should not do it with real data.
Application Setup: Faces, Security, Initialization
add the following lines to web.xml:
<!-- JSF mapping --> <servlet> <servlet-name>Faces Servlet</servlet-name> <servlet-class>javax.faces.webapp.FacesServlet</servlet-class> <load-on-startup>1</load-on-startup> </servlet> <servlet-mapping> <servlet-name>Faces Servlet</servlet-name> <url-pattern>*.xhtml</url-pattern> </servlet-mapping> <!-- security --> <login-config> <auth-method>FORM</auth-method> <realm-name>app-auth</realm-name> <form-login-config> <form-login-page>/login.xhtml</form-login-page> <form-error-page>/login.xhtml</form-error-page> </form-login-config> </login-config> <security-role> <role-name>Admin</role-name> </security-role> <security-role> <role-name>Manager</role-name> </security-role> <security-constraint> <web-resource-collection> <web-resource-name>Admin Part</web-resource-name> <url-pattern>/admin/*</url-pattern> <http-method>GET</http-method> <http-method>POST</http-method> </web-resource-collection> <auth-constraint> <role-name>Admin</role-name> </auth-constraint> </security-constraint> <security-constraint> <web-resource-collection> <web-resource-name>All Users</web-resource-name> <url-pattern>/view/*</url-pattern> </web-resource-collection> <auth-constraint> <role-name>*</role-name> </auth-constraint> <user-data-constraint> <transport-guarantee>NONE</transport-guarantee> </user-data-constraint> </security-constraint> <!-- --> <listener> <listener-class>my.app.jaas.Initializer</listener-class> </listener> - JSF mapping - we will use xhtml page format
- Security configuration: refer to the server login module configured previously; form authentication; Next, we define 2 roles and assign paths to protected resources.
- Initialization - we define a class, the code of which must be executed when the application starts. Here we will be able to create the necessary records in the database (when you first start, the user must be created in the database as an administrator)
Configuring Maven: Additional dependencies in pom.xml
open pom.xml and add dependencies:
<dependency> <groupId>org.hibernate</groupId> <artifactId>hibernate-core</artifactId> <version>4.0.1.Final</version> <scope>provided</scope> </dependency> <dependency> <groupId>org.richfaces.core</groupId> <artifactId>richfaces-core-impl</artifactId> <version>4.2.2.Final</version> <scope>runtime</scope> </dependency> <dependency> <groupId>org.richfaces.ui</groupId> <artifactId>richfaces-components-ui</artifactId> <version>4.2.2.Final</version> <scope>runtime</scope> </dependency> <dependency> <groupId>commons-codec</groupId> <artifactId>commons-codec</artifactId> <version>1.6</version> </dependency> - hibernate is an optional dependency, just a little cheating, but in principle you can get by with JPA features
- richfaces - a large set of components, extended support for ajax, several ready-made skins, a built-in jQuery library, in short, easier life when programming the client part. You can replace it with IceFaces , PrimeFaces or any other library you like.
- commons-codec - needed for encoding hashes in base64
Configure Java Persistence
Add to the project JPA. To do this, open the project properties and find the Project Facets section, in this section, tick the box next to JPA. The persistence.xml file will be automatically created. Then you can configure access to the database in this file, or you can pass the setting to hibernate.cfg.xml. I prefer the latter, since in this case there is a convenient graphical interface at hand, and also there is an opportunity to do reverse engineering from the existing base.
For the second method it is necessary:
- in persistence.xml refer to hibernate.cfg.xml:
persistence.xml
<?xml version="1.0" encoding="UTF-8"?> <persistence version="2.0" xmlns="http://java.sun.com/xml/ns/persistence" xmlns:xsi="http://www.w3.org/2001/XMLSchema-instance" xsi:schemaLocation="http://java.sun.com/xml/ns/persistence http://java.sun.com/xml/ns/persistence/persistence_2_0.xsd"> <persistence-unit name="test"> <properties> <property name="hibernate.ejb.cfgfile" value="/hibernate.cfg.xml" /> </properties> </persistence-unit> </persistence> - add the hibernate.cfg.xml file to the src / main / resources folder as follows:
hibernate.cfg.xml
<?xml version="1.0" encoding="utf-8"?> <!DOCTYPE hibernate-configuration PUBLIC "-//Hibernate/Hibernate Configuration DTD 3.0//EN" "http://hibernate.sourceforge.net/hibernate-configuration-3.0.dtd"> <hibernate-configuration> <session-factory name=""> <property name="hibernate.dialect">org.hibernate.dialect.MySQLDialect</property> <property name="hibernate.format_sql">true</property> <property name="hibernate.show_sql">false</property> <property name="hibernate.hbm2ddl.auto">update</property> <property name="hibernate.connection.datasource">java:jboss/datasources/MysqlDS</property> </session-factory> </hibernate-configuration> Pay attention to hibernate.hbm2ddl.auto: the update value allows you to automatically update the data schema to fit the model, and we do not have to write a single DDL line for this database!
format_sql and show_sql can be useful when debugging;
The “Session Factory” editor tab provides a bunch of settings, but until you need them.
At this setting can be considered complete.
Data model
The data is described by 2 classes. A many-to-many relationship is described on both sides by sets. The connection master will be AppUser (AppRole rarely changes, it’s a directory rather than an entity).
Since MySql lacks sequences and auto-increment, GenerationType.TABLE has been chosen for the generator. The rest, I think, is clear from the annotations.
AppUser.java
import java.util.*; import javax.persistence.*; @ Entity @ Table(name = "APP_USER", uniqueConstraints = @ UniqueConstraint(columnNames = "USER_NAME")) public class AppUser implements java.io.Serializable { private Long userId; private String userName; private String displayName; private String pwd; private Boolean enabled; private Set<AppRole> roles = new HashSet<AppRole>(0); @ TableGenerator( name = "UserIdGen", table = "APP_GEN", pkColumnName = "GEN_NAME", pkColumnValue = "USER_ID", valueColumnName = "GEN_VAL", allocationSize = 10) @ Id @ Column(name = "USER_ID", nullable = false) @ GeneratedValue(strategy=GenerationType.TABLE, generator="UserIdGen") public Long getUserId() { return this.userId; } public void setUserId(Long userId) { this.userId = userId; } @ Column(name = "USER_NAME", nullable = false, length = 30) public String getUserName() { return this.userName; } public void setUserName(String userName) { this.userName = userName; } @ Column(name = "DISPLAY_NAME", length = 250) public String getDisplayName() { return this.displayName; } public void setDisplayName(String displayName) { this.displayName = displayName; } @ Column(name = "PWD", length = 30) public String getPwd() { return this.pwd; } public void setPwd(String pwd) { this.pwd = pwd; } @ Column(name = "ENABLED") public Boolean getEnabled() { return this.enabled; } public void setEnabled(Boolean enabled) { this.enabled = enabled; } @ ManyToMany(fetch = FetchType.LAZY, cascade=CascadeType.ALL) @ JoinTable( name = "APP_MEMBERSHIP", joinColumns = { @ JoinColumn(name = "USER_ID", nullable = false, updatable = false) }, inverseJoinColumns = { @ JoinColumn(name = "ROLE_ID", nullable = false, updatable = false) }) public Set<AppRole> getRoles() { return this.roles; } public void setRoles(Set<AppRole> roles) { this.roles = roles; } } For the password, the length is 30: this should be enough for the SHA-1 digest (20 bytes) encoded in base64;
For the enabled field, the type is Boolean, not every server will understand this (for example, in FirebirdSQL you will have to create a domain with this name), but MySql interprets it without question.
AppRole.java
import java.util.*; import javax.persistence.*; @ Entity @ Table(name = "APP_ROLE", uniqueConstraints = @ UniqueConstraint(columnNames = "ROLE_NAME")) public class AppRole implements java.io.Serializable { private Long roleId; private String roleName; private String displayName; private Set<AppUser> users = new HashSet<AppUser>(0); @ TableGenerator( name = "RoleIdGen", table = "APP_GEN", pkColumnName = "GEN_NAME", pkColumnValue = "ROLE_ID", valueColumnName = "GEN_VAL", allocationSize = 10) @ Id @ Column(name = "ROLE_ID", nullable = false) @ GeneratedValue(strategy=GenerationType.TABLE, generator="RoleIdGen") public Long getRoleId() { return this.roleId; } public void setRoleId(Long roleId) { this.roleId = roleId; } @ Column(name = "ROLE_NAME", length = 30) public String getRoleName() { return this.roleName; } public void setRoleName(String roleName) { this.roleName = roleName; } @ Column(name = "DISPLAY_NAME", length = 250) public String getDisplayName() { return this.displayName; } public void setDisplayName(String displayName) { this.displayName = displayName; } @ ManyToMany(fetch = FetchType.LAZY, mappedBy = "roles") public Set<AppUser> getUsers() { return this.users; } public void setUsers(Set<AppUser> users) { this.users = users; } } If desired, you can also add the AppGen class to the project, which will correspond to the APP_GEN generator table, so that our application can work with legacy SQL servers. The fact is that a field will be created in the table APP_GEN by default - the primary key GEN_NAME of 256 characters length, which is not always supported, and this length can be reduced by explicitly specifying the annotation. For me, 30 characters is enough (see, for example, the length of sequence names in Oracle).
Application Initialization
Initialization of the application will be performed by the same class my.app.jaas.Initializer, which was previously specified in the web.xml
Initializer.java
@ ManagedBean public class Initializer implements ServletContextListener { private static final Logger log = Logger.getLogger(Initializer.class); @Override public void contextDestroyed(ServletContextEvent event) {} @Override public void contextInitialized(ServletContextEvent event) { loadData(); } @ PersistenceContext EntityManager em; private AppRole checkRole(String roleName, String displayName, Session session) { AppRole role = (AppRole)session.createCriteria(AppRole.class) .add(Restrictions.eq("roleName", roleName)) .uniqueResult(); if (role == null) { role = new AppRole(); role.setRoleName(roleName); role.setDisplayName(displayName); session.save(role); } return role; } private void loadData() { Session session = (Session) em.getDelegate(); AppRole adminRole = checkRole("Admin", "", session); checkRole("Manager", "", session); if (adminRole.getUsers().size()==0) { AppUser user = (AppUser)session.createCriteria(AppUser.class) .add(Restrictions.eq("userName", "admin")) .uniqueResult(); if(user==null) { user = new AppUser(); user.setUserName("admin"); user.setDisplayName(""); user.setPwd(encode("topsecret")); user.setEnabled(true); session.save(user); } adminRole.getUsers().add(user);//nothing user.getRoles().add(adminRole); session.save(adminRole); session.save(user); } session.flush(); session.close(); } public static String encode(String value) { //get the message digest try{ MessageDigest md = MessageDigest.getInstance("SHA"); //SHA-1 algorithm md.update(value.getBytes("UTF-8")); //byte-representation using UTF-8 encoding format byte raw[] = md.digest(); String hash = Base64.encodeBase64String(raw).trim(); return hash; } catch(Exception e) { log.error(e, e); } return value; } public String logout() { FacesContext ctx = FacesContext.getCurrentInstance(); HttpSession session = (HttpSession)ctx.getExternalContext().getSession(false); session.invalidate(); return("logout"); } } As you can see, the only listener method ServletContextListener.contextInitialized is implemented, in which roles are checked and, if necessary, created, and at least 1 administrator is checked. If there is no administrator, an admin account is created.
The static encode method can be used in the user management module.
We also need one more method logout (), with an obvious purpose.
The work with the database in this case is not carried out through JPA, but to the level below - through the hibernate API, as a result, you can use the wonderful org.hibernate.Criteria interface and perform all actions without a single line on sql, hql or jpql.
Authentication form
login.xhtml
<html xmlns="http://www.w3.org/1999/xhtml" xmlns:a4j="http://richfaces.org/a4j" xmlns:rich="http://richfaces.org/rich" xmlns:f="http://java.sun.com/jsf/core" xmlns:ui="http://java.sun.com/jsf/facelets" xmlns:c="http://java.sun.com/jsp/jstl/core" xmlns:h="http://java.sun.com/jsf/html"> <h:head> <title> </title> <h:outputStylesheet> div.login-container { width: 255px; position: relative; margin: 0 auto 0 auto; } </h:outputStylesheet> </h:head> <h:body> <div class="login-container" id="login_container"> <rich:panel> <f:facet name="header"> <h:outputText value=" " /> </f:facet> <form method="post" action="j_security_check" name="loginform" id="loginForm" target="_parent"> <h:panelGrid columns="2" cellpadding="2" columnClasses="right,left" width="100%"> <h:outputLabel for="j_username" value=":" /> <h:inputText style="width: 155px;" id="j_username" value="" /> <h:outputLabel for="j_password" value=":" /> <h:inputSecret style="width: 155px;" id="j_password" value="" /> <h:panelGroup /> <h:panelGroup /> <h:panelGroup /> <h:panelGroup> <h:commandButton name="login" id="login-submit" value="" /> <h:outputText value=" " escape="false"/> <h:commandButton type="button" id="login-cancel" value="" /> </h:panelGroup> </h:panelGrid> </form> </rich:panel> </div> <h:outputScript> (function(){ jQuery("#login_container").offset({top:Math.max(0,(jQuery(window).height()/2)-150)}); var el = jQuery("#j_username").get(0);el.focus();el.select(); })(); </h:outputScript> </h:body> </html> Here you can draw any form, the only requirement is that the j_username and j_password values must be submitted to the server. Since in this case richfaces components are used, jQuery is automatically included in the page code, the capabilities of which are used in the script to position the login container and automatically select the element with the user name.
So, everything is ready for the first run. Next, we place any content in the webapp / view, webapp / admin directories, commit the changes to the server, and after launching the application we make sure that access to these directories is possible only after authentication and with the appropriate roles.
When the application starts, the necessary tables and records will be automatically created in the database, you can make sure of this by installing the phpmyadmin cartridge, or by turning on the query tracing in the hibernate.cfg.xml file:
<property name="hibernate.show_sql">false</property> findings
In the example above, application development with authentication for OpenShift was considered. The same application can be compiled and used on any other JBoss AS 7.1 server and with any of the supported sql dialects. The difference will be only in the location of the standalone.xml configuration file, and in the need to install the necessary jdbc module.
When setting up a connection to a data source, you should remember about the encoding.
The considered template used a minimum of loadable libraries, which is important for the limited resources provided by OpenShift Express. Most of the modules used are already included in the JBoss distribution, as a result - saving disk space and application publishing time.
Source: https://habr.com/ru/post/145289/
All Articles