Draw a flickering text particle system
 In my last year’s article on creating a postcard using OpenGL for Android, I left the phrase “add a greeting text later.” So, the time has come.
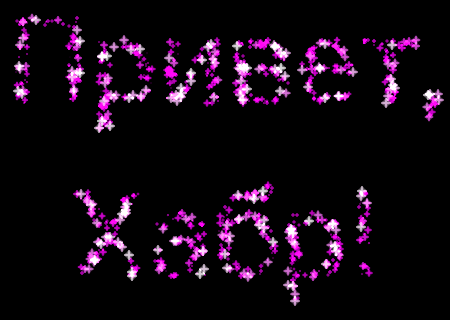
The text will look something like the picture, except for the fact that it flickers slightly, each “star” disappears smoothly and appears (besides, in the final version the text itself is different, the color is not the same, and the font sizes and particles also ). It is drawn with the help of an animated particle system, and in the array of vertices only the coordinates of the center of each point and a kind of “phase shift” for animation are set, and the animation itself is done through shaders.
Particle rendering is carried out by the Point Sprites mechanism, which is precisely created for such cases. Its main feature is that we specify only the coordinates of the center of the point and its size, and OpenGL itself generates four corner vertices and two triangles, including their spatial and texture coordinates, for drawing many identical ones (in the sense of having the same texture) square pictures. So, look under the ka [by] t.
Actually the text
The first thing we need to do is to determine the coordinates of the points. To do this, we will make Bitmap, in which we will display arbitrary text in a convenient place, after which we will find the points of the desired color in the resulting picture and randomly select those to which we will attach our particles.
')
Generate Bitmap:
int width = screenWidth, height = screenHeight, fontSize = (int) (screenHeight / 8); // Create an empty, mutable bitmap Bitmap bitmap = Bitmap.createBitmap(width, height, Bitmap.Config.ARGB_4444); // get a canvas to paint over the bitmap Canvas canvas = new Canvas(bitmap); bitmap.eraseColor(Color.BLACK); // Draw the text Paint textPaint = new Paint(); textPaint.setTextSize(fontSize); textPaint.setAntiAlias(false); textPaint.setARGB(0xff, 0xff, 0xff, 0xff); textPaint.setTextAlign(Paint.Align.CENTER); textPaint.setTypeface(Typeface.SANS_SERIF); // draw the text centered canvas.drawText(",", width / 2, height / 4, textPaint); canvas.drawText("!", width / 2, height / 2, textPaint); int[] pixels = new int[width * height]; bitmap.getPixels(pixels, 0, width, 0, 0, width, height); bitmap.recycle(); Here, screenWidth and screenHeight are derived from the arguments to the onSurfaceChanged function of the heir Renderer class. The penultimate line in this piece of code received an array of pixels in the form of packed integers. Black dots (background) have a color of 0xff000000 in it, white ones - 0xffffffff (the high byte is the alpha channel).
By the way, if we wanted to stretch this text on the texture, we would do this by adding, for example, such lines before calling bitmap.recycle ():
GLES20.glGenTextures(1, textures, 0); GLES20.glBindTexture(GLES20.GL_TEXTURE_2D, textures[0]); GLES20.glTexParameterf(GLES20.GL_TEXTURE_2D, GLES20.GL_TEXTURE_MIN_FILTER, GLES20.GL_NEAREST); GLES20.glTexParameterf(GLES20.GL_TEXTURE_2D, GLES20.GL_TEXTURE_MAG_FILTER, GLES20.GL_LINEAR); GLES20.glTexParameterf(GLES20.GL_TEXTURE_2D, GLES20.GL_TEXTURE_WRAP_S, GLES20.GL_REPEAT); GLES20.glTexParameterf(GLES20.GL_TEXTURE_2D, GLES20.GL_TEXTURE_WRAP_T, GLES20.GL_REPEAT); // Use the Android GLUtils to specify a two-dimensional texture image from our bitmap GLUtils.texImage2D(GLES20.GL_TEXTURE_2D, 0, bitmap, 0); However, we need something completely different. We find white dots on a black background, select random ones, create an array of particles and immediately convert it to the vertex buffer (see the conversion function in the previous post):
private final int mParticles = 1200; private int glParticleVB; ... int colored = 0; float[] cx = new float[width * height]; float[] cy = new float[width * height]; for (int y = 0, idx = 0; y < height; y++) for (int x = 0; x < width; x++) if ((pixels[idx++] & 0xffffff) != 0) { cx[colored] = x / (float)width; cy[colored] = y / (float)height; colored++; } float[] particleBuf = new float[3 * mParticles]; for (int i = 0, idx = 0; i < mParticles; i++, idx += 3) { int n = (int) (Math.random() * colored); particleBuf[idx + 0] = cx[n] * 2 - 1; particleBuf[idx + 1] = 1 - cy[n] * 2; particleBuf[idx + 2] = (float) Math.random(); } glParticleVB = createBuffer(particleBuf); The number of particles is selected by eye. As mentioned above, each particle contains only a pair of coordinates and a “phase shift” for animation. It is worth noting that the Y-coordinate is inverted, since in OpenGL the bottom of the screen has a coordinate "-1" and the top is "+1", whereas in bitmap the top of the picture is "0" and the bottom is "height" .

Particle texture
Now load the particle texture. I used this picture (I generated it separately), although you can use any other one, just to arrange the final result. The file with the image (say, it is called particle.png) is placed in the project's res / drawable folder, and then we write the texture loading code from the resource:
private int particleTex; ... public static int loadTexture(final Context context, final int resourceId) { final int[] textureHandle = new int[1]; GLES20.glGenTextures(1, textureHandle, 0); if (textureHandle[0] != 0) { final BitmapFactory.Options options = new BitmapFactory.Options(); options.inScaled = false; // No pre-scaling // Read in the resource final Bitmap bitmap = BitmapFactory.decodeResource(context.getResources(), resourceId, options); // Bind to the texture in OpenGL GLES20.glBindTexture(GLES20.GL_TEXTURE_2D, textureHandle[0]); // Set filtering GLES20.glTexParameteri(GLES20.GL_TEXTURE_2D, GLES20.GL_TEXTURE_MIN_FILTER, GLES20.GL_NEAREST); GLES20.glTexParameteri(GLES20.GL_TEXTURE_2D, GLES20.GL_TEXTURE_MAG_FILTER, GLES20.GL_NEAREST); // Load the bitmap into the bound texture. GLUtils.texImage2D(GLES20.GL_TEXTURE_2D, 0, bitmap, 0); // Recycle the bitmap, since its data has been loaded into OpenGL. bitmap.recycle(); } return textureHandle[0]; } ... particleTex = loadTexture(mContext, R.drawable.particle); Here it is assumed that we saved mContext at the time of creating an instance of the Renderer class.
Shaders
I wanted to create the following effect: each particle should “pulsate”, i.e. cyclically increase and shrink, and each must move independently. Looking at the result, I added another improvement: when the particle size reaches 3/4 of the maximum, its color begins to turn white (and becomes so at the maximum point).
private final String particleVS = "precision mediump float;\n" + "attribute vec4 vPosition;\n" + "attribute float vSizeShift;\n" + "uniform float uPointSize;\n" + "uniform float uTime;\n" + "uniform vec4 uColor;\n" + "varying vec4 Color;\n" + "void main() {\n" + " float Phase = abs(fract(uTime + vSizeShift) * 2.0 - 1.0);\n" + " vec4 pColor = uColor;\n" + " if (Phase > 0.75) {\n" + " pColor.y = (Phase - 0.75) * 4.0;\n" + " };\n" + " Color = pColor;\n" + " gl_PointSize = uPointSize * Phase;\n" + " gl_Position = vPosition;\n" + "}\n"; private final String particleFS = "precision mediump float;\n" + "uniform sampler2D uTexture0;\n" + "varying vec4 Color;\n" + "void main()\n" + "{\n" + " gl_FragColor = texture2D(uTexture0, gl_PointCoord) * Color;\n" + "}\n"; It is easy to see that the vertex shader here is responsible for the animation of particle size and color, and the fragment shader only applies the texture using the gl_PointCoord system variable. The vSizeShift attribute here has a range from 0 to 1; when added to uTime and the fractional part is selected, we get our animation phase value for each particle. By the way, since the original color will be set to purple, the transition to white color is done only due to the green component. Copy the position, determine the color of the particle and its size - and it’s done.
It remains only to load the shaders (again, see the Compile function in the source post):
private int mPProgram; private int maPPosition; private int maPSizeShift; private int muPPointSize; private int muPTime; private int muPTexture; private int muPColor; ... mPProgram = Compile(particleVS, particleFS); maPPosition = GLES20.glGetAttribLocation(mPProgram, "vPosition"); maPSizeShift = GLES20.glGetAttribLocation(mPProgram, "vSizeShift"); muPPointSize = GLES20.glGetUniformLocation(mPProgram, "uPointSize"); muPTime = GLES20.glGetUniformLocation(mPProgram, "uTime"); muPTexture = GLES20.glGetUniformLocation(mPProgram, "uTexture0"); muPColor = GLES20.glGetUniformLocation(mPProgram, "uColor"); and draw everything.
Render
Everything is ready with us, it remains only to set the constants and call the draw function.
private void DrawText() { GLES20.glUseProgram(mPProgram); GLES20.glDisable(GLES20.GL_DEPTH_TEST); GLES20.glActiveTexture(GLES20.GL_TEXTURE0); GLES20.glBindTexture(GLES20.GL_TEXTURE_2D, particleTex); GLES20.glBindBuffer(GLES20.GL_ARRAY_BUFFER, glParticleVB); GLES20.glEnableVertexAttribArray(maPPosition); GLES20.glVertexAttribPointer(maPPosition, 2, GLES20.GL_FLOAT, false, 12, 0); GLES20.glEnableVertexAttribArray(maPSizeShift); GLES20.glVertexAttribPointer(maPSizeShift, 1, GLES20.GL_FLOAT, false, 12, 8); GLES20.glBindBuffer(GLES20.GL_ARRAY_BUFFER, 0); GLES20.glUniform1f(muPPointSize, 12); GLES20.glUniform4f(muPColor, 1, 0, 1, 1); GLES20.glUniform1i(muPTexture, 0); GLES20.glUniform1f(muPTime, (SystemClock.uptimeMillis() % 1000) / 1000.0f); GLES20.glDrawArrays(GLES20.GL_POINTS, 0, mParticles); GLES20.glDisableVertexAttribArray(maPPosition); GLES20.glDisableVertexAttribArray(maPSizeShift); } Result
Conclusion
This is where my tutorial series on OpenGL ES 2.0 on Android ends for now, and I announce a week break, after which I can upload an .apk file that will allow you to evaluate the result on your device, as well as compare performance. However, during this time, the appearance of new articles is possible if I want to add some special effects to the postcard.
Source: https://habr.com/ru/post/145231/
All Articles