Electronic thermometer with web interface based on UniPing RS-485
As is known, the phenotype of an organism is formed under the influence of a genotype and the environment. One of my projects is the WheatPGE system for analyzing the relationship between the genotype, phenotype and the environment in wheat. In summer, plants are grown in the field. After the season, I wanted to have access to detailed meteorological data, precisely in the place where the plants grew. These data are necessary for comparing them with genotypes and various phenotypic characteristics of plants and conducting various statistical analyzes.
The field where biologists work is located at some distance from the building into which we could get access, the ability to install our equipment and use the Internet.
In the diagram, the sensor installation location is indicated by a red dot. The main sights are also noted: the cooling fountains of the Institute of Nuclear Physics, the Karasik shop and the field where plants are grown. All this is in the Novosibirsk Academgorodok.

')
The task was to find a device capable of reading environmental parameters and transmit data over an Ethernet network. At the same time, there was almost no time for experiments and reflections, since After two weeks, the sowing campaign was to begin, and by that time everything was supposed to work. On eBay, they sell a huge array of inexpensive Chinese devices that cost about $ 100, and there are projects like pywws that provide data reading from such devices. However, shipping from eBay would take a lot of time. At the same time, it’s not a fact that in the end we would get what we wanted. In the meantime, I came across an article with a positive review about NetPing devices . In general, they specialize in devices for security systems and administration, but among other things they produce temperature and humidity sensors. It was decided to order from them.
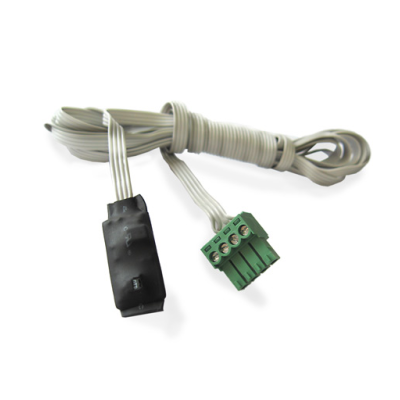
A device was ordered that reads data from various sensors, the temperature and humidity sensor itself, and the sensor extension for 4 meters:
For our purposes, RS-485 and RS-232 are completely identical. The choice of RS-485 due to its presence in stock.

In the photo UniPing RS-485. Delivery set: device, power adapter, mating connector, adapter for contact sensors. The humidity sensor is not a contact. Thermal sensors - are. Here is such a strange logic. Therefore, the adapter for contact sensors will not be used.
To UniPing RS-485, you can connect one humidity sensor and 4 temperature sensors. To connect several sensors, it is better to use the NetPing Connection board, otherwise you will have to solder everything yourself. It is not included in the delivery package and must be ordered separately.
The humidity sensor allows you to get the value of the relative humidity in percent. Also, the humidity sensor allows you to measure temperature. Accuracy of humidity measurement + -4.5%. Accuracy of temperature measurement 0,5.
Just a temperature sensor is cheaper than a humidity sensor: 352. in a waterproof case and 176r. for the usual.
To connect the humidity sensor, you must use the counterpart of the DHS-44 connector. Below is a wiring diagram:
DHS-44M numbering (numbers are indicated on the connector itself and its counterpart)

The documentation says that for long loops, more than 2 meters, it is recommended to additionally include a 10K resistor between pins 28 and 24. But I didn’t have to do that, because and without that, everything works well, although I use a 5-meter-long train.
When trying to turn on the device revealed the first and only trouble. The device did not turn on. Diagnostics showed that the power supply is not working. Posted in NetPing support. He asked what we would do. They offered to come to them in Moscow with a non-working unit and replace them. I objected that this option is not acceptable to me. They offered to send a block that does not work by mail, they will check it and if there is a problem, they will send a new one. At the same time transfer back and forth at my expense! Again he objected that at the same time the cost of shipping would exceed the cost of the unit itself many times. After that, they made concessions: they suggested that I send them not a working unit at their own expense, but they will send a new one for me. After that, I thanked the support, went to the radio store and found a unit with exactly the same characteristics and connector for 250 rubles. Lucky.
The summary of this short story is as follows: NetPing does not test its products before sending it to the customer. Even does not try to include! There are no complaints about support - they simply follow the guidelines of the company. But it could be all very different, here is a great example .
UniPing RS-485 has a built-in web-interface for editing settings. We go there and change the network settings and administrator password. Network settings can only be set statically. Here you can see which sensors are connected to the device and make sure that they work. At this setting is over.
NetPing devices support SNMP v1 operation. Data acquisition via the SNMP v1 protocol is reduced to reading special addresses inside the device, called OIDs. To obtain the values of humidity and temperature, you need to know the OID, which correspond to these parameters. A list of all OIDs supported by the device can be read from a MID file. In fact, a MID file is a firmware, or rather its description. It can be downloaded from the device manufacturer's website. To work with a MID file, I used the iReasoning MIB Browser program - it is free. With its help, the necessary OIDs were obtained. I quote a perl script that receives data via SNMP and writes it to the MySQL database. This script is placed in cron, which is triggered every hour.
To access the database data, a simple API was implemented that returns data in JSON format. The data is returned as a two-dimensional array and sorted by time. An example of such an array of two elements:
The following is now available:
The implemented web-interface is available by reference . In the case of the Habro Effect I also provide a screenshot.
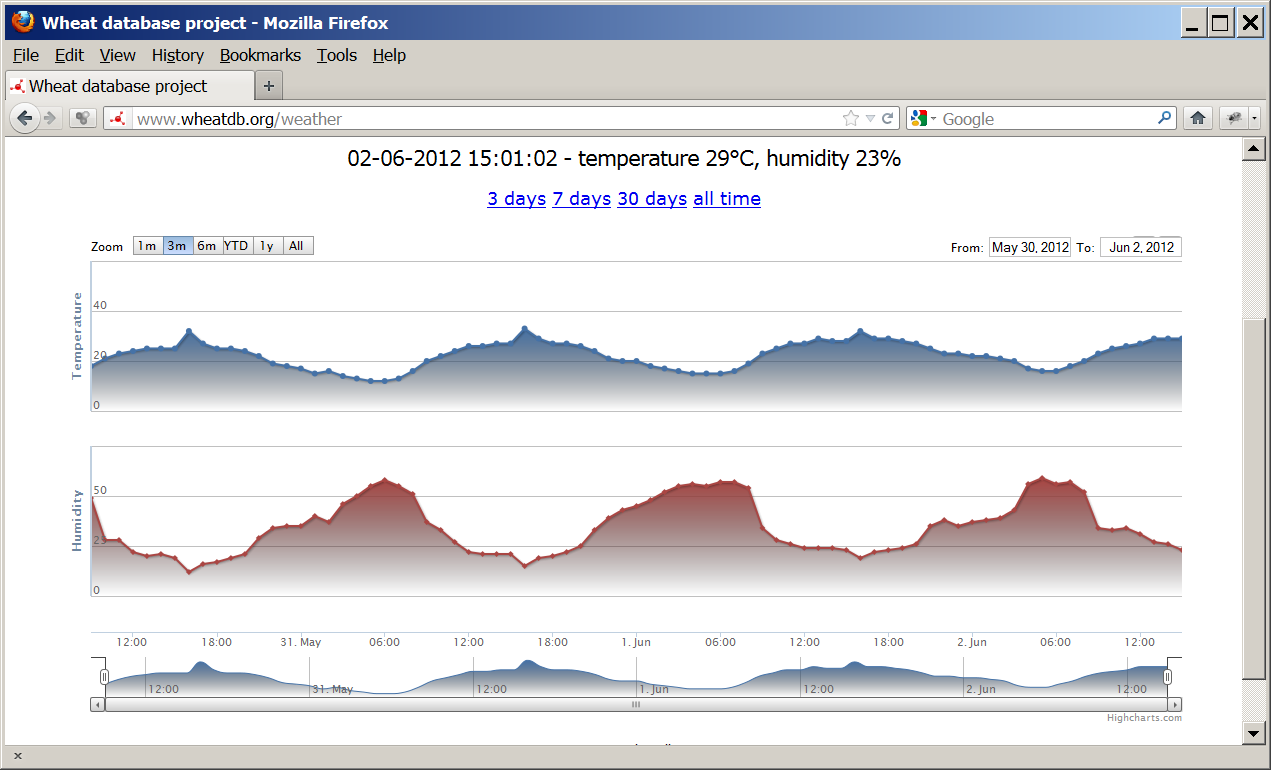
The interface shows the current values of humidity, temperature and graphs of changes in these values. For the construction of graphs used library HighStock, free for non-commercial use. Given the already implemented API, the client-side code looks very simple:
The system has been running for about a month. No failures were detected, the data is read correctly. In general, the selected device showed its applicability to the task. I would be very grateful if in the comments you share your experience of automatically obtaining data on the state of the environment. Particularly interested in wireless solutions.
The field where biologists work is located at some distance from the building into which we could get access, the ability to install our equipment and use the Internet.
In the diagram, the sensor installation location is indicated by a red dot. The main sights are also noted: the cooling fountains of the Institute of Nuclear Physics, the Karasik shop and the field where plants are grown. All this is in the Novosibirsk Academgorodok.
')
Device selection
The task was to find a device capable of reading environmental parameters and transmit data over an Ethernet network. At the same time, there was almost no time for experiments and reflections, since After two weeks, the sowing campaign was to begin, and by that time everything was supposed to work. On eBay, they sell a huge array of inexpensive Chinese devices that cost about $ 100, and there are projects like pywws that provide data reading from such devices. However, shipping from eBay would take a lot of time. At the same time, it’s not a fact that in the end we would get what we wanted. In the meantime, I came across an article with a positive review about NetPing devices . In general, they specialize in devices for security systems and administration, but among other things they produce temperature and humidity sensors. It was decided to order from them.
Order and description of UniPing RS-485
A device was ordered that reads data from various sensors, the temperature and humidity sensor itself, and the sensor extension for 4 meters:
- WS-1 humidity sensor (1 m) - 1,056 p.
- Extension (4 m) - 160 p.
- UniPing RS-485 device - 2,700 r.
- Delivery of the order (Express mail), SERVICE - 1 130 r.
- Total - 5 046 p.
For our purposes, RS-485 and RS-232 are completely identical. The choice of RS-485 due to its presence in stock.
In the photo UniPing RS-485. Delivery set: device, power adapter, mating connector, adapter for contact sensors. The humidity sensor is not a contact. Thermal sensors - are. Here is such a strange logic. Therefore, the adapter for contact sensors will not be used.
To UniPing RS-485, you can connect one humidity sensor and 4 temperature sensors. To connect several sensors, it is better to use the NetPing Connection board, otherwise you will have to solder everything yourself. It is not included in the delivery package and must be ordered separately.
The humidity sensor allows you to get the value of the relative humidity in percent. Also, the humidity sensor allows you to measure temperature. Accuracy of humidity measurement + -4.5%. Accuracy of temperature measurement 0,5.
Just a temperature sensor is cheaper than a humidity sensor: 352. in a waterproof case and 176r. for the usual.
Connection of the humidity sensor
To connect the humidity sensor, you must use the counterpart of the DHS-44 connector. Below is a wiring diagram:
| Color loop | DHS-44 contact number |
| Yellow | 28 |
| Green | 32 |
| Red | 23 |
| The black | 24 |
DHS-44M numbering (numbers are indicated on the connector itself and its counterpart)
The documentation says that for long loops, more than 2 meters, it is recommended to additionally include a 10K resistor between pins 28 and 24. But I didn’t have to do that, because and without that, everything works well, although I use a 5-meter-long train.
Communication with customer support
When trying to turn on the device revealed the first and only trouble. The device did not turn on. Diagnostics showed that the power supply is not working. Posted in NetPing support. He asked what we would do. They offered to come to them in Moscow with a non-working unit and replace them. I objected that this option is not acceptable to me. They offered to send a block that does not work by mail, they will check it and if there is a problem, they will send a new one. At the same time transfer back and forth at my expense! Again he objected that at the same time the cost of shipping would exceed the cost of the unit itself many times. After that, they made concessions: they suggested that I send them not a working unit at their own expense, but they will send a new one for me. After that, I thanked the support, went to the radio store and found a unit with exactly the same characteristics and connector for 250 rubles. Lucky.
The summary of this short story is as follows: NetPing does not test its products before sending it to the customer. Even does not try to include! There are no complaints about support - they simply follow the guidelines of the company. But it could be all very different, here is a great example .
Device setup
UniPing RS-485 has a built-in web-interface for editing settings. We go there and change the network settings and administrator password. Network settings can only be set statically. Here you can see which sensors are connected to the device and make sure that they work. At this setting is over.
We read data from the sensor
NetPing devices support SNMP v1 operation. Data acquisition via the SNMP v1 protocol is reduced to reading special addresses inside the device, called OIDs. To obtain the values of humidity and temperature, you need to know the OID, which correspond to these parameters. A list of all OIDs supported by the device can be read from a MID file. In fact, a MID file is a firmware, or rather its description. It can be downloaded from the device manufacturer's website. To work with a MID file, I used the iReasoning MIB Browser program - it is free. With its help, the necessary OIDs were obtained. I quote a perl script that receives data via SNMP and writes it to the MySQL database. This script is placed in cron, which is triggered every hour.
#!/usr/bin/perl use strict; use warnings; use DBI; use Net::SNMP; # my $database_login = 'login'; my $database_passwd = 'password'; my $database_name = 'db_name'; # my $dbh = DBI -> connect("DBI:mysql:$database_name;host=localhost;", $database_login, $database_passwd) || die $DBI::errstr; # my $snmp_host = '172.25.13.5'; # IP hostname my $snmp_community = 'SWITCH'; # SNMP Community # my $snmp_oid_temperature = '.1.3.6.1.4.1.25728.8400.2.4.0'; # OID # my $snmp_oid_humidity = '.1.3.6.1.4.1.25728.8400.2.2.0'; # OID # # -varbindlist OID' # $result : OID => my $snmp_session = Net::SNMP->session( -hostname => $snmp_host, -community => $snmp_community, -version => 1, # ) or die "can't connect"; my $result = $snmp_session->get_request(-varbindlist => [$snmp_oid_temperature,$snmp_oid_humidity]) or die "can't execute request\n"; # print "$result->{$snmp_oid_temperature}\n$result->{$snmp_oid_humidity}\n"; # $dbh -> do("INSERT INTO netping1 SET temperature=\"$result->{$snmp_oid_temperature}\", humidity=\"$result->{$snmp_oid_humidity}\"") || die $DBI::errstr; API
To access the database data, a simple API was implemented that returns data in JSON format. The data is returned as a two-dimensional array and sorted by time. An example of such an array of two elements:
[[ 1338541272000, # 12, # 53 # ], [ 1338544861000, # 14, # 49 # ]] The following is now available:
http://wheatdb.org/weather/json/now - http://wheatdb.org/weather/json/1 - http://wheatdb.org/weather/json/3 - 3 http://wheatdb.org/weather/json/7 - http://wheatdb.org/weather/json/30 - 30 http://wheatdb.org/weather/json/0 - Web interface
The implemented web-interface is available by reference . In the case of the Habro Effect I also provide a screenshot.
The interface shows the current values of humidity, temperature and graphs of changes in these values. For the construction of graphs used library HighStock, free for non-commercial use. Given the already implemented API, the client-side code looks very simple:
<script type="text/javascript" src="http://wheatdb.org/static/js/stock/highstock.js"></script> <script type="text/javascript" src="http://wheatdb.org/static/js/stock/modules/exporting.js"></script> <script type="text/javascript"> $(document).ready(function() { $.getJSON("http://wheatdb.org/weather/json/3",{}, function(data){ // split the data set var t = [], h = [], dataLength = data.length; for (i = 0; i < dataLength; i++) { t.push([ data[i][0], // date data[i][1] // temperature ]); h.push([ data[i][0], // date data[i][2] // humidity ]) } // Create the chart window.chart = new Highcharts.StockChart({ chart : { renderTo : 'container' }, rangeSelector : { selected : 1 }, title : { text : '' }, yAxis: [{ title: { text: 'Temperature' }, height: 150, lineWidth: 2 }, { title: { text: 'Humidity' }, top: 220, height: 150, offset: 0, lineWidth: 2 }], series : [{ name : 'Temperature', type : 'area', data : t, marker : { enabled : true, radius : 3 }, shadow : true, tooltip : { valueDecimals : 0 }, fillColor : { linearGradient : { x1: 0, y1: 0, x2: 0, y2: 1 }, stops : [[0, Highcharts.getOptions().colors[0]], [1, 'rgba(0,0,0,0)']] } } , { name : 'Humidity', type : 'area', data : h, marker : { enabled : true, radius : 3 }, shadow : true, tooltip : { valueDecimals : 0 }, fillColor : { linearGradient : { x1: 0, y1: 0, x2: 0, y2: 1 }, stops : [[0, Highcharts.getOptions().colors[1]], [1, 'rgba(0,0,0,0)']] }, yAxis: 1 }] }); }); }); </script> <div id="container" style="height: 500px; min-width: 500px"></div> findings
The system has been running for about a month. No failures were detected, the data is read correctly. In general, the selected device showed its applicability to the task. I would be very grateful if in the comments you share your experience of automatically obtaining data on the state of the environment. Particularly interested in wireless solutions.
Source: https://habr.com/ru/post/145184/
All Articles