Replacing the WiFi module on the Lenovo B450. Fix error 104-Unsupported wireless network device detected
Some laptop manufacturers artificially limit hardware compatibility by stitching the manufacturer ID of the WiFi module in the BIOS. Under the cut a little description of how I struggled with this problem. This operation was applied to the Lenovo B450, but probably can be applied to other devices with a similar problem (for example, HP Pavilion laptops, of course, with the appropriate BIOS file).
And so, after replacing the WiFi module, with a faster one, I found the error: 104-Unsupported wireless network device detected.
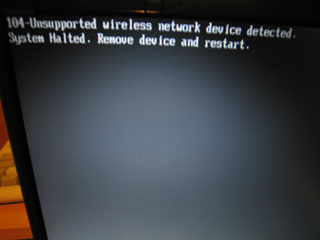
The fact is that the manufacturer sewed in the laptop BIOS a specific model of the WiFi adapter. The BIOS detects someone else's module and stops the download. To restore the normal boot, you need to edit the BIOS and flash it. Let's get started
')
Attention, further steps are unsafe and may damage your equipment. Remember that doing them you do it at your own peril and risk.
Or all in one archive (for free).

This can be done by connecting the new WiFi to another laptop. If you have no such opportunity, then you can do so.
Our old ID was PCI \ VEN_ 168C & DEV_ 002A & SUBSYS_ 0034168 & ...
In BIOS, bytes go in reverse order (the first becomes the last, and so on), we get three groups of digits from our identifier
8 16 (from 16 8), 2A 00 (from 00 2A), 8 16 34 00 (from 00 34 16 8).
We are looking for the latest sequence in our editor.
Editing in the memory of EzH2O was necessary so that the correct checksum was entered in the modified file.

PS Wi-Fi off levers work with the new module.
And so, after replacing the WiFi module, with a faster one, I found the error: 104-Unsupported wireless network device detected.
The fact is that the manufacturer sewed in the laptop BIOS a specific model of the WiFi adapter. The BIOS detects someone else's module and stops the download. To restore the normal boot, you need to edit the BIOS and flash it. Let's get started
')
Attention, further steps are unsafe and may damage your equipment. Remember that doing them you do it at your own peril and risk.
We load the necessary programs
- The official firmware [InsydeFlash] (you can take it along with the bios from the lenovo site).
- BIOS Editor - [EXH2O_v2.1.0.4]
- Hex editor - [HxD]
Or all in one archive (for free).
Save the old WiFi adapter ID
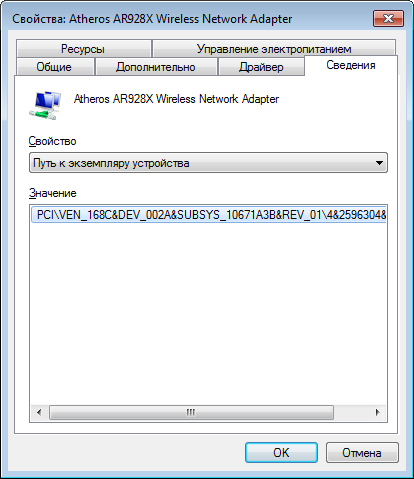
- We find it in the device manager.
- Go to the properties and there:
Save the current BIOS
- Unpack 1DCN26WW.exe, go to the directory with the program.
- Open platform.ini
- Change the following values
[FDFile] "BackupName=" "BackupName=OLDBIOS.FD" [FlashComplete] "Action=2" "Action=0" [UI] "ConfirmInfo=0" "ConfirmInfo=1" [Option] "Flag=0" "Flag=1" - Save the file, close, run InsydeFlash.exe.
- If you are using Windows Vista / Windows 7, then to launch, you must right-click on InsydeFlash.exe and select "run as administrator".
- In the window that opens, click Option, in the settings dialog, in the file name field, select the 1DCN26WW.fd file, click OK.
- After that, click Start, wait a few seconds, at this time the old BIOS is saved to disk.
- In the window that opens, we refuse to flash (click cancel).
Get the Device ID of the new device
This can be done by connecting the new WiFi to another laptop. If you have no such opportunity, then you can do so.
- When you turn on the laptop when the BIOS has worked, and transfers control to the operating system, you must click the Pause button. This must be done at the moment when the screen turns black, before the Windows boot animation starts to appear. This will stop the download.
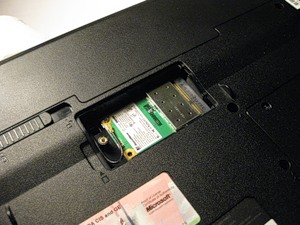
- Without turning off the laptop, carefully, without closing anything, we remove the old WiFi module and insert a new one.
Press Enter to continue the download. - When Windows boots, we get the Device ID of the new device in the same way as the old one.
Editing the BIOS
- Run EzH2O, open the old BIOS.
- Without closing the program run HxD.
- Click "Advanced" -> "Open RAM" -> Select "EzH2O.exe" in the list.
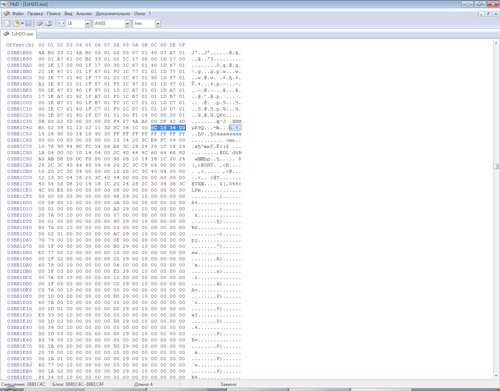
- We need to find the old device ID in memory.
Our old ID was PCI \ VEN_ 168C & DEV_ 002A & SUBSYS_ 0034168 & ...
In BIOS, bytes go in reverse order (the first becomes the last, and so on), we get three groups of digits from our identifier
8 16 (from 16 8), 2A 00 (from 00 2A), 8 16 34 00 (from 00 34 16 8).
We are looking for the latest sequence in our editor.
- And replace with a new one.
PCI \ VEN_ 168C & DEV_ 002A & SUBSYS_ 10671A3B & ...
8C 16 (out of 16 8C), 2A 00 (out of 00 2A), 3B 1A 67 10 (out of 10 67 1A 3B). - Click save to HxD. Close the program.
- Switch to EzH2O.
- Save the BIOS.
Editing in the memory of EzH2O was necessary so that the correct checksum was entered in the modified file.
Flash the modified BIOS
- Extract the 1DCN26WW.exe archiver to a new empty directory.
- We delete 1DCN26WW.fd from this directory and place our edited file there.
- Run InsydeFlash.exe, flash it, wait for the laptop to reboot.
PS Wi-Fi off levers work with the new module.
Source: https://habr.com/ru/post/145163/
All Articles