Making a chat on ASP.NET using Web Socket
Introduction
I think that many web developers are asking themselves the question of how to send a message to the user, a reminder. Previously, it was necessary to constantly send requests to the web server, but now there is such a convenient technology as Web Socket.
In this article I want to show how you can write a simple chat on ASP.NET MVC 4 using Web Socket.
')
Getting started
First we need to create an empty ASP.NET MVC 4 project.

And add to it the universal ChatHandler handler.
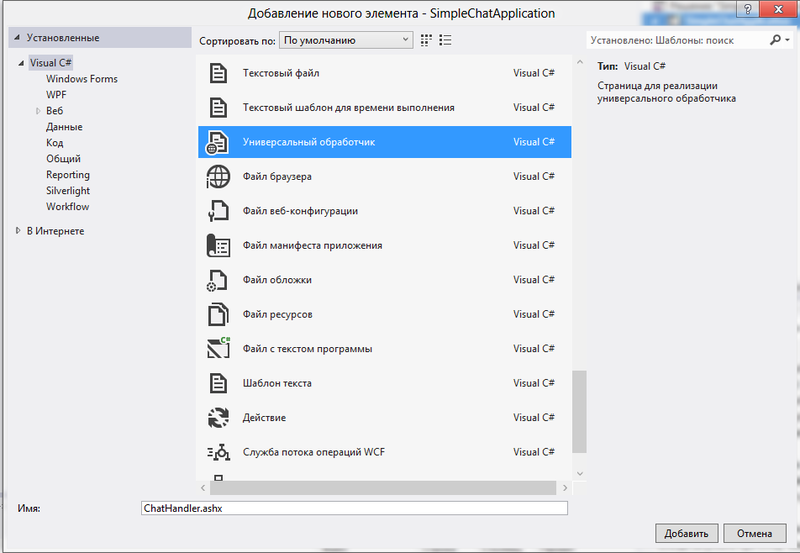
Now we will change the code of the ProcessRequest method of our handler to
public void ProcessRequest(HttpContext context) { // if (context.IsWebSocketRequest) context.AcceptWebSocketRequest(WebSocketRequest); } Add 2 variables
// private static readonly List<WebSocket> Clients = new List<WebSocket>(); // private static readonly ReaderWriterLockSlim Locker = new ReaderWriterLockSlim(); And write the main method of our chat
private async Task WebSocketRequest(AspNetWebSocketContext context) { // var socket = context.WebSocket; // Locker.EnterWriteLock(); try { Clients.Add(socket); } finally { Locker.ExitWriteLock(); } // while (true) { var buffer = new ArraySegment<byte>(new byte[1024]); // var result = await socket.ReceiveAsync(buffer, CancellationToken.None); // for (int i = 0; i < Clients.Count; i++) { WebSocket client = Clients[i]; try { if (client.State == WebSocketState.Open) { await client.SendAsync(buffer, WebSocketMessageType.Text, true, CancellationToken.None); } } catch (ObjectDisposedException) { Locker.EnterWriteLock(); try { Clients.Remove(client); i--; } finally { Locker.ExitWriteLock(); } } } } } Now our handler should look like this:
Hidden text
public class ChatHandler : IHttpHandler { // private static readonly List<WebSocket> Clients = new List<WebSocket>(); // private static readonly ReaderWriterLockSlim Locker = new ReaderWriterLockSlim(); public void ProcessRequest(HttpContext context) { // if (context.IsWebSocketRequest) context.AcceptWebSocketRequest(WebSocketRequest); } private async Task WebSocketRequest(AspNetWebSocketContext context) { // var socket = context.WebSocket; // Locker.EnterWriteLock(); try { Clients.Add(socket); } finally { Locker.ExitWriteLock(); } // while (true) { var buffer = new ArraySegment<byte>(new byte[1024]); // var result = await socket.ReceiveAsync(buffer, CancellationToken.None); // for (int i = 0; i < Clients.Count; i++) { WebSocket client = Clients[i]; try { if (client.State == WebSocketState.Open) { await client.SendAsync(buffer, WebSocketMessageType.Text, true, CancellationToken.None); } } catch (ObjectDisposedException) { Locker.EnterWriteLock(); try { Clients.Remove(client); i--; } finally { Locker.ExitWriteLock(); } } } } } public bool IsReusable { get { return false; } } } Now we can write a simple html page that will contain a web socket connecting to our handler.
<!DOCTYPE html> <html> <head> <title> </title> </head> <body> <input type="text" id="user" /> <input type="text" id="message" /> <input type="button" value="send" id="send" /> <div id='messages'></div> <script type="text/javascript"> var socket, $txt = document.getElementById('message'), $user = document.getElementById('user'), $messages = document.getElementById('messages'); if (typeof (WebSocket) !== 'undefined') { socket = new WebSocket("ws://localhost/SimpleChatApplication/ChatHandler.ashx"); } else { socket = new MozWebSocket("ws://localhost/SimpleChatApplication/ChatHandler.ashx"); } socket.onmessage = function (msg) { var $el = document.createElement('p'); $el.innerHTML = msg.data; $messages.appendChild($el); }; socket.onclose = function (event) { alert(' . , '); }; document.getElementById('send').onclick = function () { socket.send($user.value + ' : ' + $txt.value); $txt.value = ''; }; </script> </body> </html> Now we can start our chat, but here only the context.IsWebSocketRequest property will always be false.
This is due to the fact that Visual Studio uses IIS Express for debugging by default, which does not support Web Socket. In order to finally play with sockets, we need to install IIS and configure Visual Studio to work with it by default.
To do this, follow a few steps:
Step 1. Install IIS.
To do this, go to the Control Panel -> Programs -> Enable or disable Windows components
There we will find IIS services and put a check on them

Step 2. Configure IIS.
By default, the Web Socket component is disabled in IIS. To enable it in the components of Windows, go through IIS -> Internet Services -> Application Development Components. There we will find the WebSocket Protocol and put a checkbox on it

Step 3. Configure Visual Studio.
In order to force VS to use IIS for debugging, we need to go to the project properties -> Web and click the Use IIS Express checkbox there. (If your daw is not active, restart the studio)

Completion
Now we can safely launch our project and greet ourselves!

Download the project file here .
Source: https://habr.com/ru/post/145077/
All Articles