UI State Management for Windows Phone Development
Recently, our team (Sly Lamb) released a client for the Pruffi.ru service under Windows Phone. During development, we had a question - how to display to the user a list of vacancies that may be in several states.
In this article, we want to show an easy mechanism for changing the state of displaying elements using Expression Blend and MVVM pattern. An example will be given using the MVVM Light Toolkit framework, but I think the differences with others should be minimal.
So, on the panorama there is a list of vacancies. It can be loaded, empty, or displayed. The first two states can be combined into one visual - this is a message output. Total two states: show list, show message.
')
But how to show the message? It is not good to frighten a person with standard MessageBoxes. Then, focusing on standard applications, we decided to remove all elements, and display a message in place of the elements. We did the same as in the screenshots.

The first thing that comes to mind is to manipulate the properties of the Visiblity of all elements, depending on the state. This approach is cumbersome, since to switch from one state to another, you will need to write a function to hide and display the necessary elements, plus you will have to initiate this function yourself under the right conditions.
For this case, Expression Blend prepared us a convenient tool, this State (state) for each element, as well as the behavior of DataStateBehavior .
State is the visual state of the element relative to the baseline, in which the parameters of the element itself and its children, such as colors, positions, transparency, etc., are stored.
DataStateBehavior is the behavior that switches between two States , depending on the condition. If the bound parameter coincides with the Value value, then TrueState is used, if it does not match, then FalseState .
I will give a small example in which two states are created and switched in time.
Create an empty project using the MvvmLight template (WP71) .
The template is included in the MVVM Light Toolkit .
Immediately create the logic in the ViewModel of the MainPage page. Add a property that will change every five seconds from the text “ok” to “hello world”.
Open MainViewModel.cs and create the MessageText property there:
To change the property every five seconds, add the code to the MainViewModel class constructor :
Let's turn to the page design, for this we will open the project in Expression Blend .
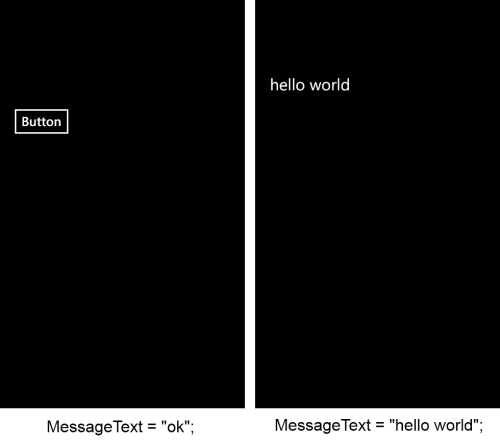
Add a button and a text block to the MainPage . The button will be displayed when the MessageText property is equal to “ok”, in all other cases we display a text field with the contents of the MessageText.
I note that the button plays the role of the page content, and the text field is a non-critical error or message, in which the content cannot be shown or is empty.
After adding the form will look like this.

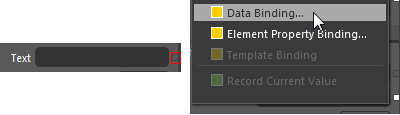
To the TextBlock value of the TextBlock element, we bind our MessageText property by clicking on the square to the right of the property and selecting the DataBinding item . In the window that opens, select the desired property and click "OK".
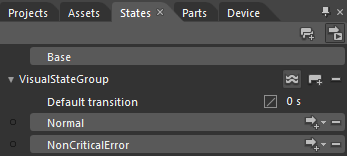
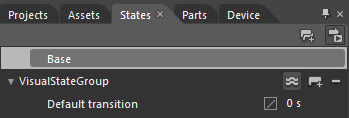
Let's move on to creating states. Click the States tab in the panel, which is located in the upper left corner of the screen. Click the Add state group button in it. Select the Base state - this is the one from which all the others will make a start.
Change the Visibility property of the text field to Collapsed so that it disappears.
Click the Add State button on the right of the VisualStateGroup group of states to create a state called Normal and then a Message .
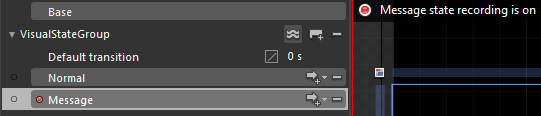
Normal condition leave, because it should be the same as Base . And we write the Message state by clicking on it. A message should appear about the recording as in the screenshot. After that, change the Visiblity property of the button to Collapsed , and the text block to change to Visiblity . To complete the recording, click on one of the red buttons.
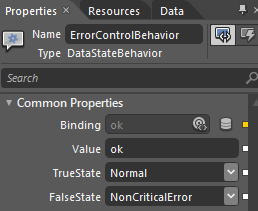
The states are created, it remains to add a switch between them. To do this, add to the DataStateBehavior page from the Assets tab in the Behaviors category.
The Binding property is tied to the MessageText property, the Value value is set to “ok”. TrueState state is set to Normal , and FalseState is set to Message . We start the application and see how the state of the page changes depending on the value of the MessageText field.
You can also add animation between states or simple transitions through the Default transition property in a VisualStateGroup .
I would also like to draw your attention to GoToStateAction , which is able to switch to a state with some action, for example, when you press a button.
That's all, comment, I will be glad to answer your questions.
Source code: download / view
In this article, we want to show an easy mechanism for changing the state of displaying elements using Expression Blend and MVVM pattern. An example will be given using the MVVM Light Toolkit framework, but I think the differences with others should be minimal.
What is it for?
So, on the panorama there is a list of vacancies. It can be loaded, empty, or displayed. The first two states can be combined into one visual - this is a message output. Total two states: show list, show message.
')
But how to show the message? It is not good to frighten a person with standard MessageBoxes. Then, focusing on standard applications, we decided to remove all elements, and display a message in place of the elements. We did the same as in the screenshots.
How to implement?
The first thing that comes to mind is to manipulate the properties of the Visiblity of all elements, depending on the state. This approach is cumbersome, since to switch from one state to another, you will need to write a function to hide and display the necessary elements, plus you will have to initiate this function yourself under the right conditions.
For this case, Expression Blend prepared us a convenient tool, this State (state) for each element, as well as the behavior of DataStateBehavior .
State is the visual state of the element relative to the baseline, in which the parameters of the element itself and its children, such as colors, positions, transparency, etc., are stored.
DataStateBehavior is the behavior that switches between two States , depending on the condition. If the bound parameter coincides with the Value value, then TrueState is used, if it does not match, then FalseState .
How to use?
I will give a small example in which two states are created and switched in time.
Create an empty project using the MvvmLight template (WP71) .
The template is included in the MVVM Light Toolkit .
Immediately create the logic in the ViewModel of the MainPage page. Add a property that will change every five seconds from the text “ok” to “hello world”.
Open MainViewModel.cs and create the MessageText property there:
public const string MessageTextPropertyName = "MessageText"; private string _messageText = "ok"; public string MessageText { get { return _messageText; } set { if (_messageText == value) return; _messageText = value; RaisePropertyChanged(MessageTextPropertyName); } } To change the property every five seconds, add the code to the MainViewModel class constructor :
// var dispatcherTimer = new System.Windows.Threading.DispatcherTimer(); // dispatcherTimer.Tick += ((a,b) => { MessageText = MessageText == "ok" ? "hello world" : "ok"; }); // dispatcherTimer.Interval = new TimeSpan(0, 0, 5); // dispatcherTimer.Start(); Let's turn to the page design, for this we will open the project in Expression Blend .
Add a button and a text block to the MainPage . The button will be displayed when the MessageText property is equal to “ok”, in all other cases we display a text field with the contents of the MessageText.
I note that the button plays the role of the page content, and the text field is a non-critical error or message, in which the content cannot be shown or is empty.
After adding the form will look like this.
To the TextBlock value of the TextBlock element, we bind our MessageText property by clicking on the square to the right of the property and selecting the DataBinding item . In the window that opens, select the desired property and click "OK".
Let's move on to creating states. Click the States tab in the panel, which is located in the upper left corner of the screen. Click the Add state group button in it. Select the Base state - this is the one from which all the others will make a start.
Change the Visibility property of the text field to Collapsed so that it disappears.
Click the Add State button on the right of the VisualStateGroup group of states to create a state called Normal and then a Message .
Normal condition leave, because it should be the same as Base . And we write the Message state by clicking on it. A message should appear about the recording as in the screenshot. After that, change the Visiblity property of the button to Collapsed , and the text block to change to Visiblity . To complete the recording, click on one of the red buttons.
The states are created, it remains to add a switch between them. To do this, add to the DataStateBehavior page from the Assets tab in the Behaviors category.
The Binding property is tied to the MessageText property, the Value value is set to “ok”. TrueState state is set to Normal , and FalseState is set to Message . We start the application and see how the state of the page changes depending on the value of the MessageText field.
You can also add animation between states or simple transitions through the Default transition property in a VisualStateGroup .
I would also like to draw your attention to GoToStateAction , which is able to switch to a state with some action, for example, when you press a button.
That's all, comment, I will be glad to answer your questions.
Source code: download / view
Source: https://habr.com/ru/post/144836/
All Articles