Create syntax highlighting in Notepad ++
Programming in 1C you get used to the syntax highlighting used in the configurator, but when you want to print the source of a module, in the evening sit with a pencil and think about what you have written, then there is some problem: what about it to print with the backlight preserved? Copy-paste to a text editor - loss of coloring, printing directly from the configurator - the same result.
Recently hooked on notepad ++, he can print with the selected syntax highlighting, but the problem is that there is no highlighting specifically for the language used in 1C. Long and without result I was searching for the necessary syntax highlighting. I found it on one site, but they ask for money and there is no guarantee that this is exactly what you are looking for.
I tried to manually create the highlighting myself, but all shamanism with xml files did not lead to success. I stumbled upon the article “Turn on syntax highlighting for less files in Notepad ++”, expected to see a recipe for creating this very highlight there, but like many commentators I was disappointed with the content of the post. As a result of digging manuals, I managed to create the lighting I needed. It turns out it's not at all difficult! So let's start:
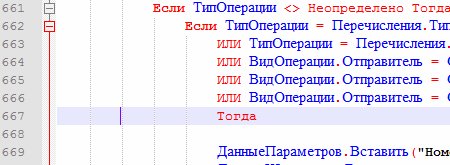
Everything! Finally, you can now print the code in color:
')
The only inconvenience is to manually select syntax highlighting each time you open a file.
Link to the finished xml for highlighting the 1C language on Github . To use it, you need to do the import through the "Custom Language Definition" and restart Notepad ++.
Recently hooked on notepad ++, he can print with the selected syntax highlighting, but the problem is that there is no highlighting specifically for the language used in 1C. Long and without result I was searching for the necessary syntax highlighting. I found it on one site, but they ask for money and there is no guarantee that this is exactly what you are looking for.
I tried to manually create the highlighting myself, but all shamanism with xml files did not lead to success. I stumbled upon the article “Turn on syntax highlighting for less files in Notepad ++”, expected to see a recipe for creating this very highlight there, but like many commentators I was disappointed with the content of the post. As a result of digging manuals, I managed to create the lighting I needed. It turns out it's not at all difficult! So let's start:
- Open Notepad ++.
- For convenience, open a text file with a code that will be colored.
- In the "Syntax" menu, select the "Custom Settings"
- In the “View” menu, select the “Custom language definition” item or click the button on the toolbar:

The syntax settings window will open. You can click the “Dock” button in the upper right corner (which may be called a “Dock”, depending on the completeness of the interface translation) to stick to the right edge of the window. The advantage of this solution will be the scroll bar, which makes it possible to get to the lower parameters, which may simply not get vertically into the monitor - On the Standard tab, we configure the basic display style in the Standard Style Setup section: the main font, size, background color and text that will not fall under the rest of the coloring. All parameters are applied immediately and any changes can be observed firsthand.

On the same tab in the section “Setting the opening of keywords” we indicate the tags of the group by which the blocks of text are determined. For example, in our case, the block is everything between the “Procedure” and “End of Procedure” operators, therefore “Procedure” is written in the first field, and “End of the Procedure” in the field below. For each group, you can specify individual font settings and colors. Keywords are separated by a space. Add there the procedures of cycles and conditions so that you can fold them into groups. - With the blocks figured out, now tint the keywords. For this we need the tab "Keyword Lists". Here we have 4 groups that we can use as we please. Add to the first one all the operators that need to be highlighted in color, these will be all sorts of “Move”, “Select”, etc. In the second group we will write the preprocessor instructions "#" and tick the "Prefix" in order for the color scheme to spread to the word after this symbol.

- Smoothly go to the comments coloring tab. Filling this tab should not cause any difficulties.

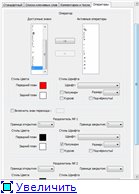
- The "Operators" tab is slightly different from those described above. Here we are provided with a list of single operators that we can color. Using the button with the arrow, we transfer the operators we need to the “Active operators” field and set the coloring parameters below. The checkbox “Include transition sign” didn’t help me, because when turned on, Chinese characters appear in the field and don’t want to change. The following is a group of delimiters: here we specify the color and font parameters for the edited text. I think it will not be difficult to make the settings to your taste.
- It now remains to save our creation under any name. To do this, at the top of the window, click the "Save As ..." button and enter the name of our syntactic highlighting. The coloring is saved in a special file userDefineLang.xml. Settings can be exported to a separate file, which can later be distributed.
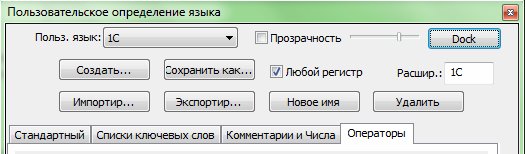
By the way, the checkbox “Any register” is somehow ignored and the backlight remains case-sensitive.
Everything! Finally, you can now print the code in color:
')
The only inconvenience is to manually select syntax highlighting each time you open a file.
Link to the finished xml for highlighting the 1C language on Github . To use it, you need to do the import through the "Custom Language Definition" and restart Notepad ++.
Source: https://habr.com/ru/post/144830/
All Articles