The simplest ESR meter for electrolytic capacitors
Actually, as I once promised a long time ago, I will tell you about the simplest ESR meter. In the future, I will not write ESR, but EPS (equivalent series resistance), because I am too lazy to switch the layout. And so, briefly, what is EPS.
EPS can be represented as a resistor connected in series with a condenser.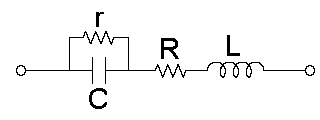
In this picture - R. Actually, in a working capacitor, this indicator is measured in ohm fractions, for small capacitors (up to 100 μF) it can reach 2-3 Ohms. In more detail, the values of EPS for serviceable capacitors can be found in the manufacturer's reference data. Over time, due to the evaporation of the electrolyte, this resistance increases, which leads to an increase in power loss. As a result, the capacitor heats up more, which further accelerates the process of evaporation of the electrolyte and leads to a loss of capacity.
In practice, repair the exact measurement of EPS is not necessary. It is enough to assume that any capacitor with EPS above 1-2 Ohms is faulty. It can be considered a controversial statement; on the Internet it is easy enough to find whole tables with ESR values for capacitors of various capacities. However, I was repeatedly convinced that a rough estimate is quite enough. Not to mention the fact that the measurement results of EPS of the same capacitors (new), the same manufacturer vary greatly depending on the party, time of year and phase of the moon.
I use a simple gauge on a penny chip. Developed it by Manfred Mornhinweg .
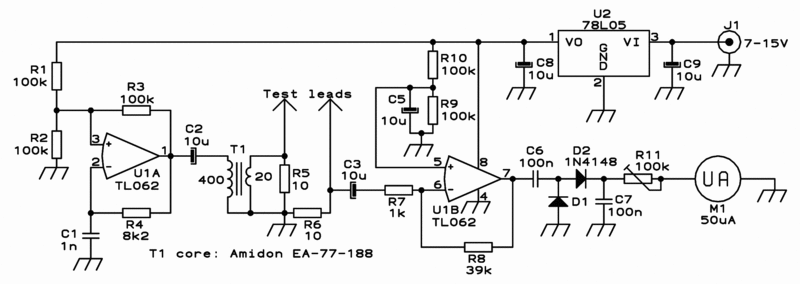
The design is quite simple, but it is attractive because of its undemandingness to the transformer. Of the shortcomings - the scale is “wide”, in my case, the 0-20th. Accordingly, we need a large measuring head, the so-called. “Tape recorders” (from tape recorder level indicators) will not work - it will be inconvenient to work.
As a transformer, the author wound two windings of 400 and 20 turns on a ferritic ring 19x16x5mm 2000NM. However, you can do much easier - use the transformer on duty from any ATX power supply. It is enough to replace R8 with a trimming multi-turn resistor 3296W with a resistance of 51k. With this resistor you can increase the gain of the measuring amplifier and compensate for the insufficient transformation ratio. LM7805 needs to be replaced with LM1117-5, this will reduce the current consumption, plus the lower threshold of the supply voltage will drop to about 6.5V. The stabilizer is required, otherwise the scale will float depending on the supply voltage. For food, I used the usual "Krona". The microcircuit itself must be in the socket!
Instrument setup is reduced to setting “zero” and calibrating the scale. To calibrate the scale, low-impedance resistors are used with tolerances of 0.5% and resistances from 0 to 2-5 Ohms. Calibration is performed as follows - remove the protective glass from the indicator head. Turn on the device and measure the resistance of the reference resistors. We look, where the arrow deviates and put a label with the corresponding resistance in this place on the scale. So mark the scale.
The measured low-voltage capacitors (up to 50-80 volts without problems) are discharged by resistors R5, R6 and the primary winding of the transformer. “Network” capacitances (those which, after a diode bridge in pulsed power supplies), I pre-discharge with a device made of a 510 Ohm / 1W resistor, needles from a syringe, a crocodile, and a gel pen body. In theory, the R5-R6 chain should discharge such capacities, but in practice, it knocks out the TL062 :) That is why it must be inserted into a socket — to be quickly replaced. But it is safer to pre-discharge the “network” capacity.
In general - a very good device - cheap, simple, not picky about the transformer.
EPS can be represented as a resistor connected in series with a condenser.
In this picture - R. Actually, in a working capacitor, this indicator is measured in ohm fractions, for small capacitors (up to 100 μF) it can reach 2-3 Ohms. In more detail, the values of EPS for serviceable capacitors can be found in the manufacturer's reference data. Over time, due to the evaporation of the electrolyte, this resistance increases, which leads to an increase in power loss. As a result, the capacitor heats up more, which further accelerates the process of evaporation of the electrolyte and leads to a loss of capacity.
In practice, repair the exact measurement of EPS is not necessary. It is enough to assume that any capacitor with EPS above 1-2 Ohms is faulty. It can be considered a controversial statement; on the Internet it is easy enough to find whole tables with ESR values for capacitors of various capacities. However, I was repeatedly convinced that a rough estimate is quite enough. Not to mention the fact that the measurement results of EPS of the same capacitors (new), the same manufacturer vary greatly depending on the party, time of year and phase of the moon.
I use a simple gauge on a penny chip. Developed it by Manfred Mornhinweg .
The design is quite simple, but it is attractive because of its undemandingness to the transformer. Of the shortcomings - the scale is “wide”, in my case, the 0-20th. Accordingly, we need a large measuring head, the so-called. “Tape recorders” (from tape recorder level indicators) will not work - it will be inconvenient to work.
As a transformer, the author wound two windings of 400 and 20 turns on a ferritic ring 19x16x5mm 2000NM. However, you can do much easier - use the transformer on duty from any ATX power supply. It is enough to replace R8 with a trimming multi-turn resistor 3296W with a resistance of 51k. With this resistor you can increase the gain of the measuring amplifier and compensate for the insufficient transformation ratio. LM7805 needs to be replaced with LM1117-5, this will reduce the current consumption, plus the lower threshold of the supply voltage will drop to about 6.5V. The stabilizer is required, otherwise the scale will float depending on the supply voltage. For food, I used the usual "Krona". The microcircuit itself must be in the socket!
Instrument setup is reduced to setting “zero” and calibrating the scale. To calibrate the scale, low-impedance resistors are used with tolerances of 0.5% and resistances from 0 to 2-5 Ohms. Calibration is performed as follows - remove the protective glass from the indicator head. Turn on the device and measure the resistance of the reference resistors. We look, where the arrow deviates and put a label with the corresponding resistance in this place on the scale. So mark the scale.
The measured low-voltage capacitors (up to 50-80 volts without problems) are discharged by resistors R5, R6 and the primary winding of the transformer. “Network” capacitances (those which, after a diode bridge in pulsed power supplies), I pre-discharge with a device made of a 510 Ohm / 1W resistor, needles from a syringe, a crocodile, and a gel pen body. In theory, the R5-R6 chain should discharge such capacities, but in practice, it knocks out the TL062 :) That is why it must be inserted into a socket — to be quickly replaced. But it is safer to pre-discharge the “network” capacity.
In general - a very good device - cheap, simple, not picky about the transformer.
')
Source: https://habr.com/ru/post/144431/
All Articles