Work with SSL / TLS in Caché DBMS
This article will discuss only some examples of setting up a secure connection to the Caché DBMS based on SSL, namely:
The process of generating / receiving certificates is quite complicated and is beyond the scope of this article, therefore, it will not be described in detail here.
On the Internet you can find a lot of materials on this topic, for example: Electronic signature .
A set of bat scripts has been prepared that simplify the process of generating, signing, checking and revoking your test certificates. You can change them at your discretion. See the relevant files for details.
So, let's create our certificates:
Content of ca.config file:
Contents of the cfgCA.txt file:
Contents of the cfgServer.txt file:
Contents of the cfgClient.txt file:
Now you have test certificates. Then they should be registered in Caché, Apache, certificate store and, if necessary, installed on eToken, who have it.

to increase
')
To do this, you can use the appropriate equipment through the management console (mmc.exe):
To do this, use the software supplied with the device.
In the CSP-Gateway, it is necessary to enable the transfer to Caché of all additional CGI environment variables:
to increase
Now in the web application, you can get the certificate settings depending on the type of web server as follows:
Other certificate attributes can be read in the same way:
The first valid certificate from the personal certificate store will be used. If the certificate is on the eToken, the PIN code will be requested.
If the store is empty, for example, the eToken is not inserted, or all certificates are invalid, then the connection will be terminated with an error.
First we need to add our certificates to the appropriate repositories: the trusted certificate in the truststore , the client certificate in the keystore .
In our case, the client_pwd.pfx file protected by the password “mysecret” will be suitable as a keystore .
The root certificate can be inserted either in a separate truststore or in the standard cacerts :
Next you need to create a client configuration file SSLConfig.Properties :
Now you can connect from java-applications using SSL, as follows:
to increase
Check the connection to the server, whether we have configured everything correctly:
to increase
SSL configuration settings are stored in the registry: HKEY_CURRENT_USER \ Software \ InterSystems \ Cache \ SSLConfigurations \ SSL configuration name
Parameter descriptions can be found in the Security.SSLConfigs class.
Test settings can be found in the file CacheOdbcSSL.reg (see below).
Check the connection to the server, whether we have configured everything correctly:

Source scripts
- setting and enabling SSL on the Caché DBMS side ;
- configuring SSL in Apache, built into Caché;
- reading data from a client certificate in CSP / ZEN web applications;
- connect from .NET using SSL ;
- Connecting from .Java using SSL
- Configuring SSL in the CSP Gateway to establish a secure connection between the web server and the Caché DBMS;
- configure SSL in ODBC .
Note: Other examples of using SSL with Caché DBMS are mirroring, Telnet, TCP / IP (sockets), web services, Caché Studio, etc. - You can find in the documentation or technical support .First, let's generate the certificates themselves: the root (CA: Certificate Authority), server and client.
On the Internet you can find a lot of materials on this topic, for example: Electronic signature .
Note: Having an eToken is desirable but not necessary.
Generation of a set of test digital certificates
A set of bat scripts has been prepared that simplify the process of generating, signing, checking and revoking your test certificates. You can change them at your discretion. See the relevant files for details.
So, let's create our certificates:
- generate private keys without a password. If desired, they can be password-protected by adding, for example, the -aes256 parameter:
openssl genrsa -out cakey.pem -rand randfile 4096 openssl genrsa -out serverkey.pem -rand randfile 2048 openssl genrsa -out clientkey.pem -rand randfile 2048 - create certification requests. We take the data for requests from the corresponding files:
openssl req -new -key cakey.pem -config cfgCA.txt -out cacsr.pem openssl req -new -key serverkey.pem -config cfgServer.txt -out servercsr.pem openssl req -new -key clientkey.pem -config cfgClient.txt -out clientcsr.pem - create and sign certificates:
openssl x509 -req -signkey cakey.pem -in cacsr.pem -extfile cfgCA.txt -extensions v3_req -out cacrt.pem -days 365 openssl ca -config ca.config -extensions v3_server -in servercsr.pem -out servercrt.pem -batch openssl ca -config ca.config -extensions v3_client -in clientcsr.pem -out clientcrt.pem -batch - Recode certificates in DER format suitable for .NET, eToken, certificate stores in Windows. The password for export can be left blank:
openssl x509 -inform PEM -in cacrt.pem -outform DER -out ca.cer openssl x509 -inform PEM -in servercrt.pem -outform DER -out server.cer openssl x509 -inform PEM -in clientcrt.pem -outform DER -out client.cer openssl pkcs12 -export -in cacrt.pem -inkey cakey.pem -out ca.pfx -name "CA certificate CACHE" openssl pkcs12 -export -in servercrt.pem -inkey serverkey.pem -out server.pfx -name "Server certificate CACHE" openssl pkcs12 -export -in clientcrt.pem -inkey clientkey.pem -out client.pfx -name "Client certificate CACHE" - revoke one of our client certificates (optional). Re-create the list of revoked certificates:
rem openssl ca -config ca.config -revoke clientcrt.pem openssl ca -config ca.config -gencrl -out crl.pem openssl crl -outform DER -in crl.pem -out crl.crl -CAfile cacrt.pem copy crl.crl C:\Inetpub\wwwroot\crl.crl - print the contents of the certificates to a file for easy reading:
openssl x509 -in cacrt.pem -noout -text >ca.log openssl x509 -in servercrt.pem -noout -text >server.log openssl x509 -in clientcrt.pem -noout -text >client.log openssl crl -in crl.pem -text -noout - check the validity of our certificates:
openssl verify -CAfile cacrt.pem servercrt.pem clientcrt.pem
Content of ca.config file:
[ca] default_ca=CA_CLIENT [CA_CLIENT] dir=./db certs = $dir/certs new_certs_dir = $dir/newcerts database = $dir/index.txt serial = $dir/serial certificate = ./cacrt.pem private_key = ./cakey.pem default_days = 365 default_crl_hours = 4 default_md = sha1 policy = policy_anything # [policy_anything] countryName = optional stateOrProvinceName = optional localityName = optional organizationName = optional organizationalUnitName = optional commonName = supplied emailAddress = optional serialNumber = optional [v3_server] basicConstraints = critical,CA:false nsComment = "Server certificate CACHE" nsCertType = server keyUsage = critical,digitalSignature, nonRepudiation, keyEncipherment, keyAgreement crlDistributionPoints = URI:http://localhost/crl.crl [v3_client] subjectAltName = email:copy basicConstraints = critical,CA:false nsComment = "Client certificate CACHE" nsCertType = client, email, objsign keyUsage = critical,digitalSignature, nonRepudiation, keyEncipherment, keyAgreement crlDistributionPoints = URI:http://localhost/crl.crl Contents of the cfgCA.txt file:
# [req] distinguished_name = req_distinguished_name prompt = no extensions = v3_req [req_distinguished_name] # C=MD # ST=Moldova # L=Chisinau # O=abc # OU=zxc # (, ) CN=CACHE # emailAddress=support@abc.md [v3_req] subjectAltName = email:copy keyUsage = critical, keyCertSign, cRLSign basicConstraints = critical, CA:TRUE, pathlen:0 nsComment = "CA certificate CACHE" nsCertType = sslCA, emailCA crlDistributionPoints = URI:http://localhost/crl.crl Contents of the cfgServer.txt file:
# [req] distinguished_name = distinguished_name prompt = no [distinguished_name] C=MD ST=Moldova L=Chisinau O=abc OU=zxc CN=localhost Contents of the cfgClient.txt file:
# [req] distinguished_name = distinguished_name prompt = no [distinguished_name] serialNumber=987654321 CN=superuser emailAddress=my@abc.md Now you have test certificates. Then they should be registered in Caché, Apache, certificate store and, if necessary, installed on eToken, who have it.
Installing certificates in the Windows certificate store
to increase
')
To do this, you can use the appropriate equipment through the management console (mmc.exe):
- ca.cer should be installed in the trusted root certification authorities of the local computer;
- server.pfx should be installed in the personal certificates of the local computer (required to configure IIS);
- client.pfx should be installed in the current user's personal certificates. Owners of eToken can skip this item.
Installing certificates on eToken
To do this, use the software supplied with the device.
SSL configuration in Caché
- in the Portal, we create and configure an SSL configuration with the name % SuperServer :
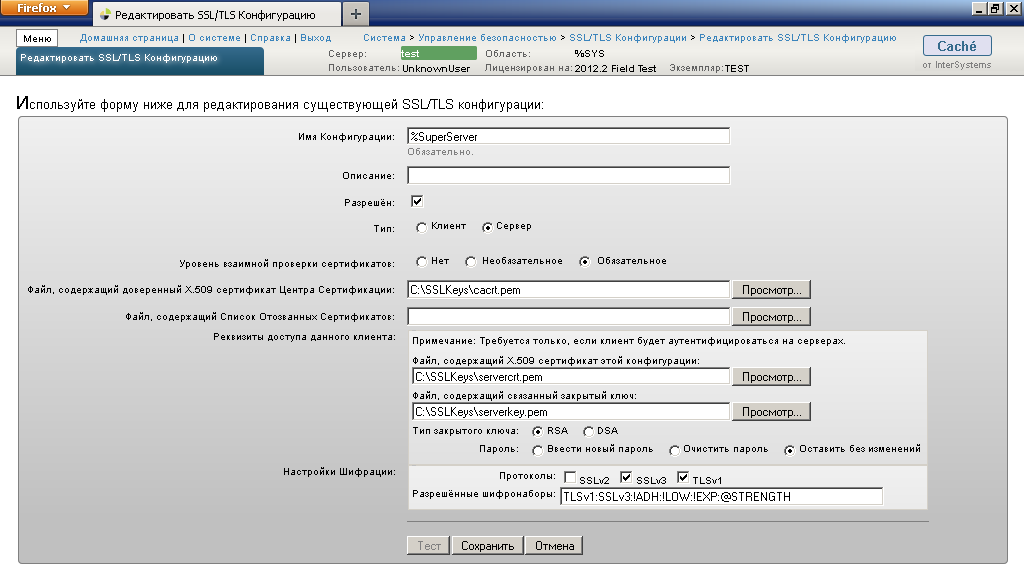
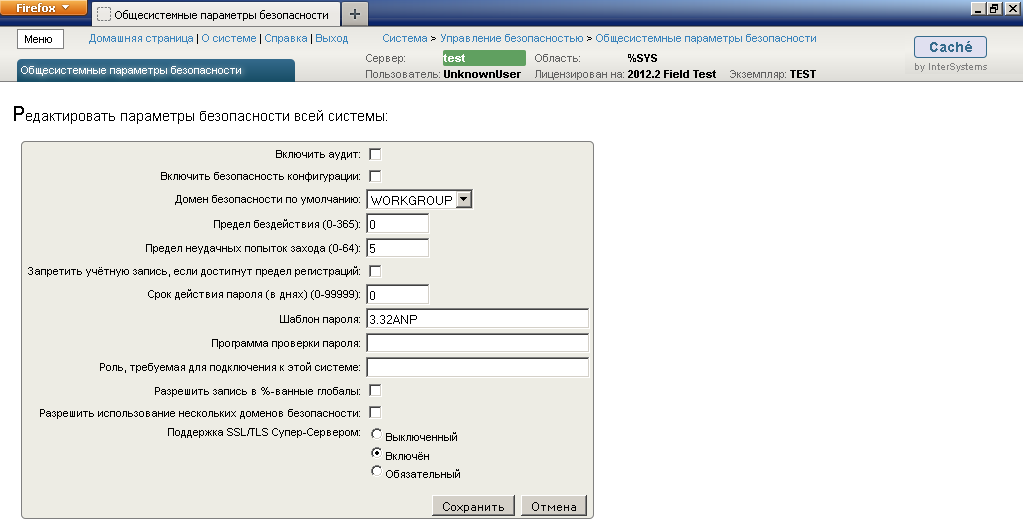
to increase - Enable SSL / TLS Caché Super Server:
to increase - To make sure that we have configured everything correctly and SSL support is working, we will create and configure a test client configuration:
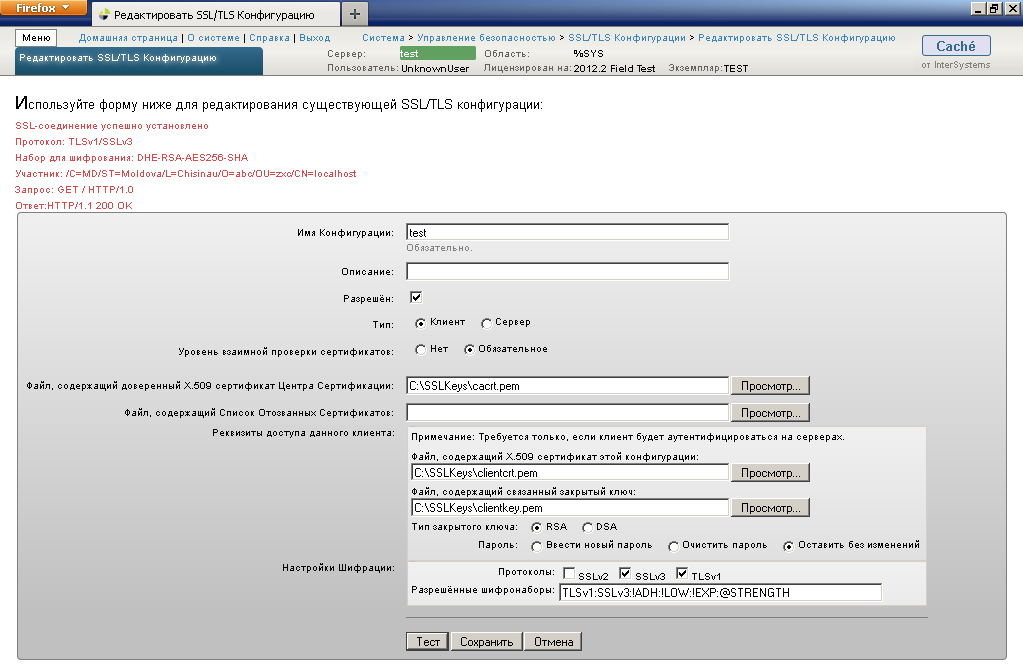
to increase
Next we test the SSL connection. If you did everything correctly, you will see a message about the successful establishment of a secure connection, as in the screenshot.Note: If you wish, you can create an SSL configuration with the name % TELNET / SSL to support SSL in telnet connections.
Configuring SSL in Apache built into Caché
Note: A full and detailed description of this section can be found in the mod_ssl documentation. Download Apache with SSL support for Windows from here.
- install the mod_ssl.so file in the % acheHome% \ httpd \ modules folder;
- In the % acheHome% \ httpd \ conf \ httpd.conf file we add the following lines:
... UseCanonicalName Off SSLEngine on SSLCertificateFile C:/SSLKeys/servercrt.pem SSLCertificateKeyFile C:/SSLKeys/serverkey.pem SSLCACertificateFile C:/SSLKeys/cacrt.pem SSLVerifyClient require SSLVerifyDepth 10 SSLCipherSuite TLSv1:SSLv3:!ADH:!LOW:!EXP:@STRENGTH SSLOptions +StdEnvVars ... LoadModule ssl_module modules/mod_ssl.so ... - Restart the embedded Apache from the command line:
httpd.exe -k restart -n CACHEhttpd -c "Listen 8972" - we start the System Management Portal or documentation from Cuba and make sure that to establish a secure connection, you must have a valid client certificate signed by the same certification authority as the server certificate.
Reading client certificate data from CSP / ZEN applications
In the CSP-Gateway, it is necessary to enable the transfer to Caché of all additional CGI environment variables:
to increase
Now in the web application, you can get the certificate settings depending on the type of web server as follows:
Class sqlru.testpage Extends %ZEN.Component.page
{

/// This XML block defines the contents of this page.
XData Contents [ XMLNamespace = "www.intersystems.com/zen" ]
{
< page xmlns = "www.intersystems.com/zen" title = "" >
< textarea id = "ta" value = "test" rows = "10" cols = "50" />
</ page >
}

Method %OnAfterCreatePage() As %Status
{
if %request. CgiEnvs ( "SERVER_SOFTWARE" )[ "Apache" {
set a = %request. CgiEnvs ( "SSL_CLIENT_S_DN" )
} else {
set a = %request. CgiEnvs ( "CERT_SUBJECT" )
}

do .. %SetValueById ( "ta" ,a)
Quit $$$OK
}
}
Other certificate attributes can be read in the same way:
- SSL_CLIENT_I_DN ;
- SSL_SERVER_I_DN ;
- SSL_SERVER_S_DN ;
- ...
Connect from .NET to Caché using SSL
var db = new CacheConnection("Server = localhost; Port = 1972; Namespace = SAMPLES; Password = SYS; User ID = _SYSTEM; SSL=true;"); if (db.State == ConnectionState.Closed) { db.Open(); textBox1.Text = db.ServerZV; } db.Close(); The first valid certificate from the personal certificate store will be used. If the certificate is on the eToken, the PIN code will be requested.
If the store is empty, for example, the eToken is not inserted, or all certificates are invalid, then the connection will be terminated with an error.
Connect from Java to Caché using SSL
First we need to add our certificates to the appropriate repositories: the trusted certificate in the truststore , the client certificate in the keystore .
In our case, the client_pwd.pfx file protected by the password “mysecret” will be suitable as a keystore .
The root certificate can be inserted either in a separate truststore or in the standard cacerts :
keytool -importcert -alias CACHE -file c:\SSLKeys\ca.cer -keystore truststore -storepass mysecret or keytool -importcert -alias CACHE -file c:\SSLKeys\ca.cer -keystore cacerts -storepass changeit Next you need to create a client configuration file SSLConfig.Properties :
protocol=SSLv3 keyStore=C:/SSLKeys/client_pwd.pfx keyStoreType=PKCS12 keyStorePassword=mysecret keyRecoveryPassword=mysecret # ca cacerts, trustStore=C:/SSLKeys/truststore trustStoreType=JKS trustStorePassword=mysecret Note: More detailed information can be found in the JSSE documentation.
Now you can connect from java-applications using SSL, as follows:
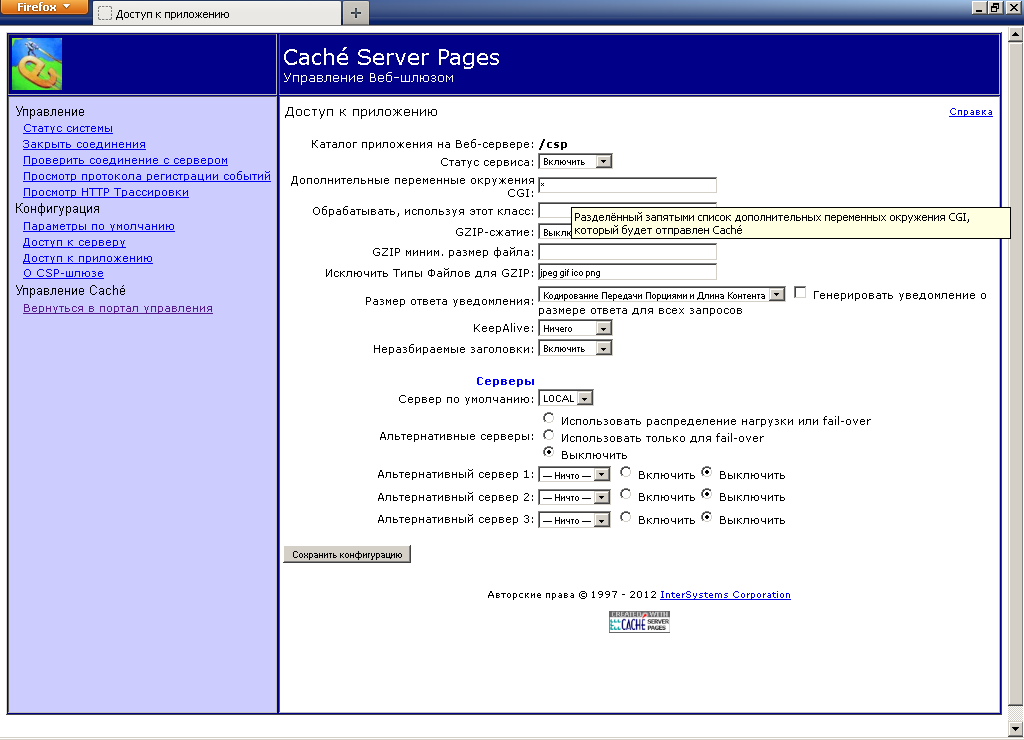
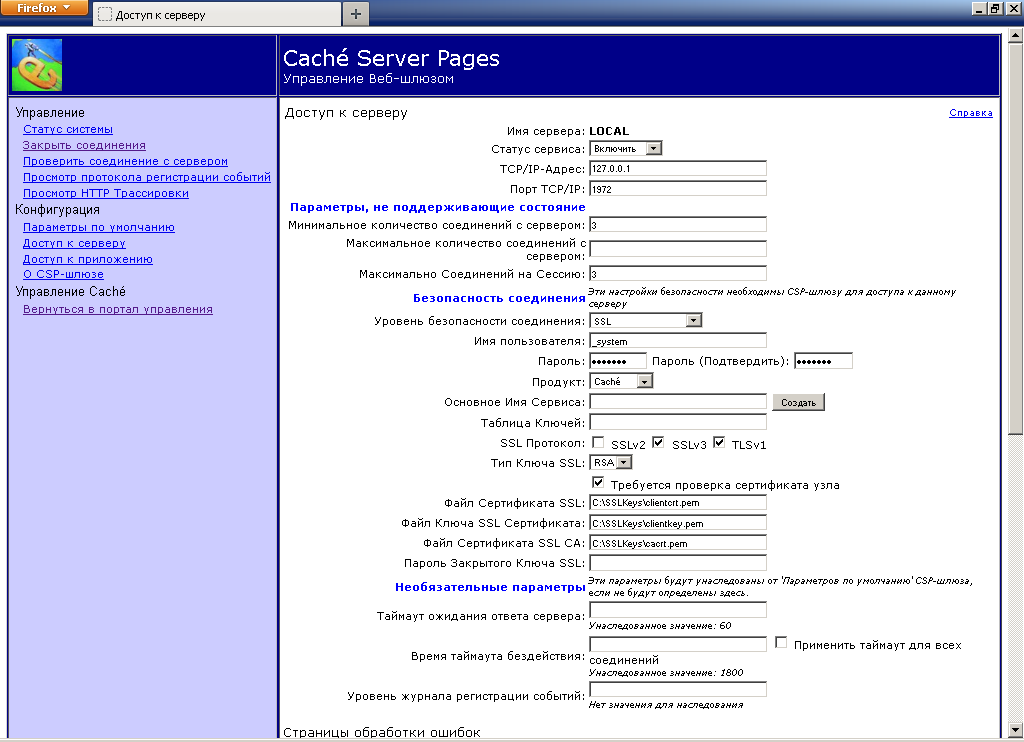
package test; import java.sql.Connection; import com.intersys.jdbc.CacheDataSource; public class Test { public static void main(String[] args) throws Throwable { String url = "jdbc:Cache://localhost:1972/USER"; String username = "_SYSTEM"; String password = "SYS"; System.setProperty("com.intersys.SSLConfigFile", "C:/SSLKeys/SSLConfig.Properties"); CacheDataSource cs = new CacheDataSource(); cs.setURL(url); cs.setUser(username); cs.setPassword(password); cs.setConnectionSecurityLevel(10); Connection cn = cs.getConnection(); System.out.println(" !"); //Database db = CacheDatabase.getDatabase(cn); } } Configuring SSL in CSP-Gateway
to increase
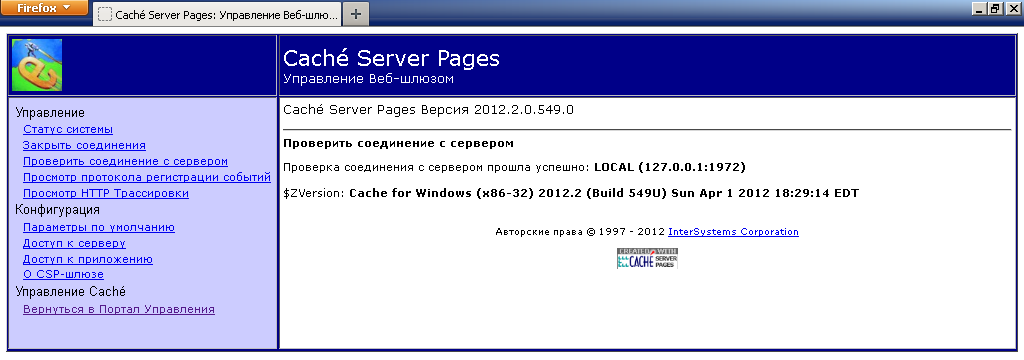
Check the connection to the server, whether we have configured everything correctly:
to increase
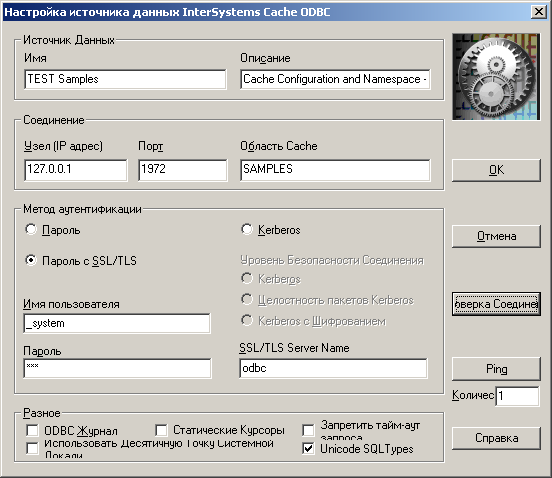
Configuring SSL in ODBC
SSL configuration settings are stored in the registry: HKEY_CURRENT_USER \ Software \ InterSystems \ Cache \ SSLConfigurations \ SSL configuration name
Parameter descriptions can be found in the Security.SSLConfigs class.
Test settings can be found in the file CacheOdbcSSL.reg (see below).
Check the connection to the server, whether we have configured everything correctly:
Source scripts
Source: https://habr.com/ru/post/144310/
All Articles