Back to the past: Printing photos on a photographic enlarger
 Recently, I wanted to update the memories of distant childhood, when printed photographs were not born in photo labs, but in some magical way from light and shade originated in closets and baths of ordinary Soviet citizens. Despite those vague memories, I have never had any experience in printing photos, so this will be an absolute noob article that tried to figure out how the technology worked twenty years ago and how to run this whole kitchen in modern realities.
Probably, all this will cause only a smile for the older generation, but of those of those who are not 30 years old, only a few have experience in printing photos. And now even a distant understanding of the ways in which people like Ensel Adams or Michael Kenna achieve or achieve the masterpiece of their photos goes little by little into the story.
Surprisingly, on the Internet I could not find a guide for a complete beginner. You can find the answer to any development / printing question, or find a huge book on the subject, but it’s very difficult to find a general presentation of the process in a nutshell. If it were not for my father, who explained to me a simple version of this whole process, everything would be much more complicated.
I will begin with a couple of words about the components needed to complete the magical process of turning ambient light into a picture on paper.
Film
To print photos they must first be removed. What is a film? Once upon a time (as far back as in 1725) it was noticed that silver salts darken when sunlight hits them. About a hundred years after that, the first photographs appeared. The effect of darkening the silver under the action of sunlight is used in the film today. Today's negative film is a sheet of transparent plastic on which a photosensitive layer is applied, consisting of a mixture of gelatin and silver halides. Each company has a slightly different formulation of the photosensitive layer, which leads to different effects when shooting (contrast, grain size). And although, at first glance, digital photography has completely displaced the film from a narrow format, there are still a lot of companies that produce black and white 35mm film. The most famous of them: Ilford, Kodak, Agfa, Foma. Virtually any photo shop sells it.
Camera
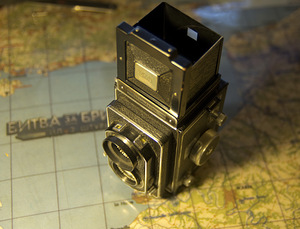
If suddenly you are going to print, then the camera is unlikely to have problems. How not cool, and the film era cameras remained at almost all. Someone is Zenit someone someone Kiev or Smena, maybe even the soap dish of the early nineties, many in the bins may lie even over-fancy SLR of the late nineties. It is better to use the technique under the 35 mm film. In principle, you can use medium format cameras, but you need to make sure that the enlarger can work with the appropriate film. Personally, I used Ikoflex II for the 36th year, for the greater entourage of the process, since Crocus allows:
')
Photo Enlarger
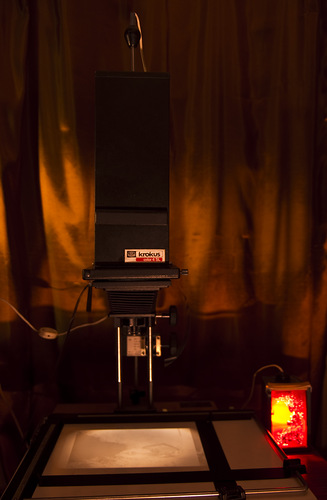
 The most mystical unit in the whole process for me was a photographic enlarger. But if you figure out what it is and what it is eaten with, it becomes not at all scary. In the picture on the left, I tried to schematically depict the simplest version of a magnifier. It consists of:
- Enlarger head, limiting the spread of light
- Light source (eg incandescent bulbs)
- Negative holder
- Lens
- Support stand
The light passing through the negative is sharpened by the lens and hits the photo paper. The simplest lens in this case may be a pinhole (pinhole camera). Such a magnifier will work, although it will not issue high-quality frames.
In reality, slightly more complex enlargers are used. Uneven flow of light from the lamp and the reflected light lead to the Calle effect . To combat it, use condensers (lenses that align the luminous flux) and frosted glass. In addition, a mass of chips and trinkets can be attached to the enlarger: built-in timer, built-in red lantern, a set of light filters, etc. In the photo below the condenser from the crocus magnifier, as well as the assembly from the lens and the holder of the negative from Crocus.

Find a magnifier is usually not a problem, even if someone of your friends is usually in the country or in the closet. If there is none, then a simple enlarger can be found on the Internet from the hands of 500 rubles on the first site. Maybe even to him in the kit will attach useful small things for printing. The main thing to look at is that it does not fall apart from touch, that there are all the details and that the lenses are not cracked. If a light bulb burns out inside or the wiring is broken, you need not worry, this is solved in five minutes.
Magnifier Setup
Of course, ideally, it's a good idea to get instructions for the magnifier you are using. For example, there may be tips on how to facilitate the focusing of negatives or how to properly position the light bulb. But in most cases it is enough to do the following sequence of actions:
- Turn on the lamp magnifier, fully open the aperture, turn off the ambient light. The enlarger should give a lit rectangle. If this rectangle is illuminated unevenly, you need to move the light bulb (usually a special horn sticks out from above the enlarger).
- Insert an arbitrary negative. Instead of a white rectangle on the subject area, images from the negative will now be projected. The first step is to adjust the image scale. This is done by raising or lowering the head along the guides. The scale is selected based on what photo paper is used.
- Now sharpen. If there is fur, then the adjustment is carried out by its movement, if there is no fur, then the sharpness setting is somewhere on the lens.
Photo paper
In essence, photographic paper is the same negative film. But with a little difference. It uses special silver chloride as a photosensitive component. It is sensitive only to light in the ultraviolet part of the spectrum. It allows to print not in absolute darkness, but with red illumination.
Photo paper is not stored for very long, so even if you dug up its stocks, it is better to buy a new one.
Photo paper has many features and, as a result, there are a huge number of varieties thereof. You can read in detail, for example, on Wikipedia . I will focus on the things that seemed most important to me when choosing a paper.
- Substrate. Most professional black and white photographs are printed on photo paper with a barite substrate. This gives a better photo quality, but significantly increases the complexity of printing. Compounding the process of drying paper, it becomes necessary to gloss it. Therefore, for the first printing experience I advise you to do the same as I do - to take plastic paper. The paper should be marked "RC". For paper produced in Russia, the mark turns into “PE”.
- Contrast Paper is commercially available for the most part multicontrast . This means that when printing, you can use light filters to change the contrast of the resulting image. They say that sometimes there is paper with a certain level of contrast on sale, but I do not advise taking it.
- Glossy or matte. If the paper is on a plastic backing, then everything is simple. What you want, and take this.
In the shops of Moscow, photographic paper is usually the firms FOMA, Slavich, ILFORD.
Reagents
For a full cycle of printing and film development, you need: film developer (I used ILFORD ILFOSOL 3), paper developer (ILFORD PQ UNIVERSAL), fixer (FOMAFIX), vinegar (in principle, you can do without it, but advise for speed ). Vinegar will come off and table.
Small things
Small things can often be found in the same place where you dug up and magnifier. On the Internet flea markets all this farm can often be bought for 200-300 rubles. And in extreme cases, flashlight / cuvette / forceps can be made and most of what was at hand. The only thing that is desirable to find is a developing tank.
Shine
In the process of printing, in order not to do everything in the dark you need to have lighting. Due to the fact that the photo paper is not susceptible to red color, red lights are used when printing. If there is no flashlight, then you can paint the bulb with red paint. Just make sure that the paint is red, not orange, and the light bulb is painted tightly and does not let in white.
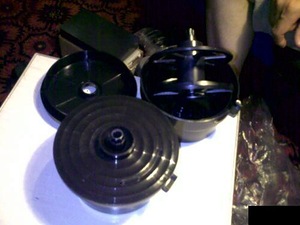
Tanks for film development
Film development is the process from which everything begins (it will be discussed in more detail below). Development is almost impossible without a film tank . The tank provides uniform washing of the film with a solution, as well as does not allow it to light.

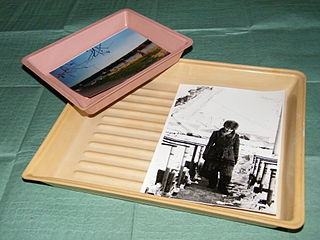
Cuvettes
About the printing process you need to have cuvettes at hand. For the process that I will describe - at least four pieces.
Forceps
Any forceps will do, but there are special forceps for photography. All the above reagents are not desirable for contact with hands and eyes, so forceps are a must-have. At least 2 pieces!
Timer
Any timer without illumination will do.
Developing
So. We come to the first part of the process of creating a photo. It is divided into 2 parts: first, inserting the film into the developing tank, then pouring the film with chemicals. To insert the film in the tank you need an absolutely dark room. As an option - you can hide your hands under the blanket, but if you do this, then there is a chance to skip the illumination from some gap. Yes, and hands will be less free. For the process you need: the captured film, the tank for film development, the pliers (if it is a 35mm film).
First of all, you need to get the film from the reel. For a medium format film, this is not a problem, and for a regular 35mm, difficulties may arise. As you remember, the film is sealed in a light-tight container. Collapsing them almost do not. So the only way to get the tape from there is to break the container to hell with pliers. It was more convenient for me to break off the upper part. In more detail, I can not say, since all this was happening in the dark. The main thing - do not accidentally break the film. The film that you got you need to rewind to the reel tank. There is a special spiral notch into which you need to insert a film. First, you can shove her there, and then, moving the coil-compressing elements of the coil back and forth, push it inside. Practice in advance in the light of some old (or already captured and developed) film, since the entire specified process needs to be done in the dark, which is quite difficult. After the entire film has entered the helix, place the coil in the tank, close it tightly. Now it can be brought to the light. It has holes for the bay and for draining liquids.
At the second stage, you need to sequentially pour reagents into it. It is better to prepare them in advance. You will need: a developer for the film, a weak solution of vinegar, fixer, water. For the developer and fixer, read the manual on which dilution concentrations to use in water and how many minutes they will affect the film. The time depends on the sensitivity of the film, its type and on the ambient temperature. For example, for those liquids that I used the concentration was 1 part of the developer for 9 parts of water and 1 part of fixer for 5 parts of water. The time ranged from 4 to 10 minutes for the first and from 3 to 5 minutes for the second. The concentration of vinegar is not very important. I used vinegar and diluted about 1 part vinegar to 9 parts water. So the process is as follows:
- Developer fill After pouring, shake every couple of minutes.
- Fill low concentration of vinegar (stop bath). Filled for ten seconds. You need only a few times to shake and merge.
- Pouring clean water. To chat a tank of seconds 30, to merge.
- Fixer fill. Shake every few minutes. Not too much.
- After draining the fixer, remove the film. It shows a developed image. Now it needs to be washed. You can put 10-20 minutes in running water.
- The washed film is hung to dry until it dries.
First you need to dilute the solutions in the cuvettes. In the first cuvette, the developer is poured in for the paper (I had a concentration of 1 + 9), in the second cuvette a stop bath (water and a little vinegar), in the third clean water, in the fourth fixer (1 + 5 in me, but this again depends on fixer used).
Uff ... So. Now we have a film on hand. Before us on the table is a magnifier. The red lantern is on, and there are cuvettes with reagents around. Romance! And what to do now?
First, we must make sure that the room is really dark. To do this, get one sheet of photo paper from an envelope, cut into small pieces and pieces are laid out around the table with a magnifier for a couple of minutes. Slices appear as ordinary photographs (which will be described below). If they are dark, then somewhere there is illumination. Remember that the light from the enlarger also causes illumination! The enlarger is turned on only at the moment of exposure of the frame, or when all the photo paper is securely hidden in the envelope.
Second, set up the enlarger. We believe that the sharpness and frame size are already set. It remains to adjust the aperture and shutter speed. I always managed to set a fully closed diaphragm. Probably due to the fact that I did not use filters that change the contrast. The exposure time is determined as follows. We find an illuminated frame on the film (usually at the very beginning of the film), insert it into the magnifier. Let's cut more photo paper into pieces. Now we will expose each piece with a magnifier with our time. The first 1 second, the second 2 seconds, the third 5 seconds, the fourth 10, ... 15, ... 20. Most likely this time is enough. If not, then continue in increments of 10-20 seconds ... All the pieces need to show. From them you need to understand the moment at which a piece of paper will be completely black. This will be the time we take as the base exposure time. If you want a more reduced frame, you need to expose less, darker - more.
Next actually begins printing photos. Photo paper is placed under the enlarger, the enlarger is activated for the exposure time set above.
The process of developing photo paper is very similar to the film, but slightly different.
- First of all, the paper is put into the developer. The time here is usually less variable than in the case of the film, but it is better to look at the exact time specifically for the developer used. Usually it will be 3 minutes. Since the red light is on in the room, you will see the development process with your own eyes. After 15-20 seconds, the outlines of the photo will appear. Time needs to be detected by a timer. It is desirable that the timer beep.
- After the required time, take a photo with forceps and transfer it to the stop bath for a couple of seconds to wash the developer off the paper. It is very important to remember that forceps who have been in the developer should not get into fixative. On the contrary too.
- Then stop-bath shifts the photo in the bath with water to wash the solution of vinegar.
- Then in the bath with fixative. Here time is also not strictly defined. But still, read what they write for the fixer you use. Usually it is 10-15 minutes.
- After fixing, thorough rinsing is required. To do this, put the photo in the bath or in the sink with running water for an hour and a half.
- After washing, you need to dry the photos. The easiest way is to lay them out on newspapers.
And finally! On the hands you should have a fully finished photo! Well, and a few words about how the simplest photoshop in the enlarger works. Some of this has already been mentioned by me, something is not. Of the above, I used only the last two points.
- Contrast. Changes if you have a multi-contrast paper. To change, put the appropriate color filter.
- Brightness. Varies by increasing or decreasing shutter speed.
- Local brightness You can simply make individual areas brighter / darker (for example, faces). For this, it is enough to darken the area of interest for a short time during the exposure. For example, cover your face on the frame with your hand. It will make it brighter.
Total
Of course, I did not succeed in any masterpiece photographs, but the process itself brought a lot of pleasure. Maybe something I was doing is not quite right, but most importantly: the photos were received! Maybe 20 years later development and printing of photos will become a myth, then there will be something to be proud of.
At last
All specified chemistry in Moscow can be bought in several stores or via the Internet. I took it here . Also in Moscow a couple of months ago opened an interesting place . There you can rent a photo lab for a couple of hours. But there you need to be able to print at least a little, they do not allow everyone in a row.
Source: https://habr.com/ru/post/144250/
All Articles