Mailings on segments on the basis of MailChimp
Hi, Habr! Today I will talk about how you can integrate the mailchimp mailing list service on your website.
The service provides many features:
- advanced tracking;
- user selection;
- beautiful letter templates;
- integration with social networks;
- integration with Google Analytics;
- saving time on developing your project.
On the basis of this service, we have made automatic distribution of special offers for targeted sections - to certain vendors and product categories. Let's try to briefly talk about some of the features of the implementation.
Create a list of users.
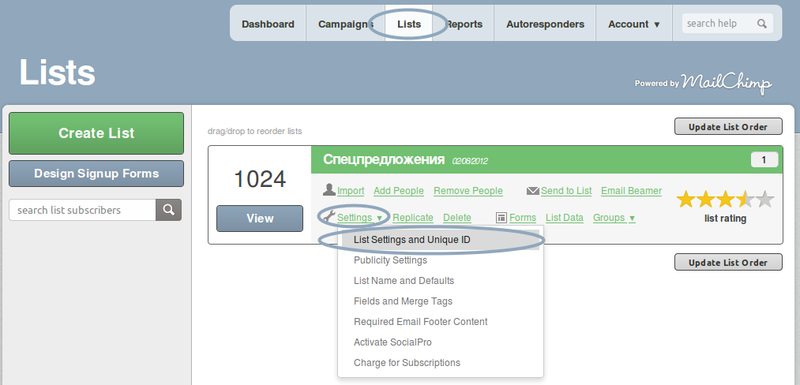
Mailchimp mailings are built on the basis of the list of users, so first of all, in the mailchimp.com personal account, we will create the following list: Lists - Create List. My list is called "special offers", it contains users who subscribe to news and promotions of our online store. After creating the list, you need to know its unique number: Lists - special offers - Settings - List Settings and Unique ID, in order to work with this list through the API.
')
Let's create user groups in the list, in my case these are vendors and categories: Lists - special offers - Groups - View Groups
Here, for example, the vendor section:
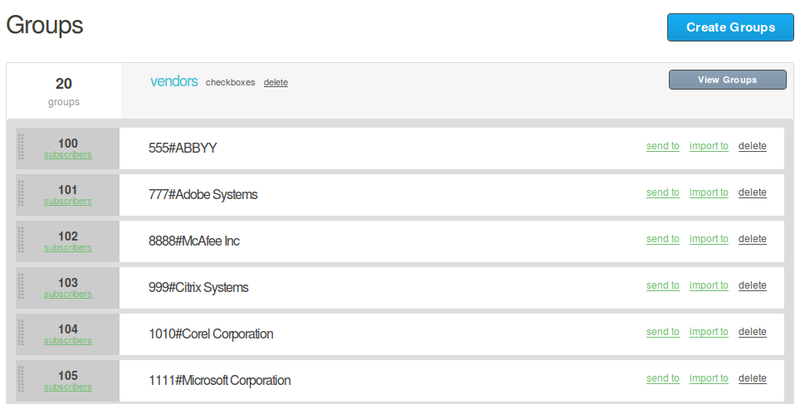
When creating groups, you need to take into account that apart from the name, there are no additional parameters anymore, and this complicates the creation of a connection between
group and your database. We stopped at the composite name of the group, the first part - the number - the vendor / category code in our database, the second - the display name of the vendor / category.
By the way, the groups themselves can not create more than 60, and this important information is stored as a comment to one of the API methods.
Import users to the mailing list.
Typically, users get on the mailing list through the subscription form, but you can download them as a whole bundle through the import mechanism. (Lists - special offers - import.) Opportunities for “from” are quite large, there is an import from files, google contacts, documents, etc. You can import directly into certain groups.

Please note that the free version has a limit of 2,000 subscribers, so if you upload more e-mail addresses there, the message “You've hit your sending limit. You can’t upgrade and re-enable your subscriber count (all lists combined) and you’ll fail to launch mailings even if not all subscribers are involved in the mailing, but only a small segment.
Also, after importing, you will most likely see the message “Our review team recently emailed you some questions. Before we can approve your account for sending email campaigns, we need your reply. They ask you to tell about your company, indicate where you get the user lists - in general, pass a kind of verification. Here is an explanation of why this check is needed: kb.mailchimp.com/article/why-is-my-account-under-review
API MailChimp
After the list of users is created, you can start creating the first mailing list. We are not interested in creating and launching mailings through the mailchimp control panel, since we need an automatic system. Therefore, we are going to immediately explore the MailChimp API.
Currently the API is version 1.3 and is here: apidocs.mailchimp.com/api/1.3
Practically everything that can be done through the control panel is implemented in API methods and there is a set of ready-made wrapper classes for various languages. Here is for php: apidocs.mailchimp.com/api/downloads/#php
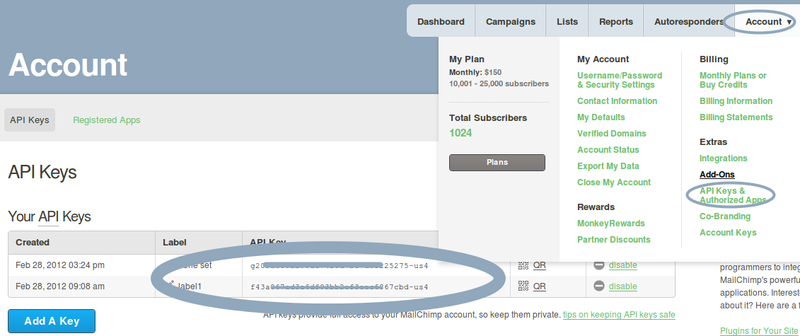
To work with the API, you need a key that can be created in your personal account:
An example of working with the API:
Segments.
Segments are a great opportunity for a service to launch a mailing list not for all users in the list, but only for those who meet certain criteria — for example, group, user name, or even location.
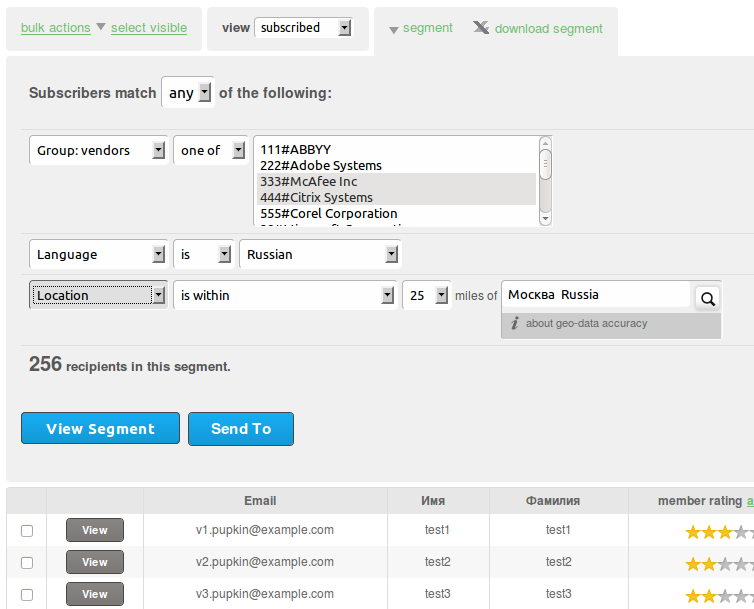
The screenshot shows a sample of users in 3 different segments: groups, language, location. In general, the samples can be quite complex and even a separate tool, the HairBall, was created to create such samples, more details here: blog.mailchimp.com/introducing-hairball-an-air-app-for-really-complicated-mailchimp-lists
In our project we use only segments by groups (vendors / categories). Here is an example of creating a mailing list based on groups:
In the $ opts array, the distribution settings are specified, in the $ content array, the letter content, html and plain text.
In the $ segmentGroups parameter, there must be a specially-formed array with user segments from the list.
If a segment is a group (our case), then the name of the segment should consist of the prefix 'interests-' + the root ID of the group (generally called groupings - grouping), and the value - the names of groups listed comma-separated.
As you can see, 5555 and 4444 are id of root groups, in our case vendors and categories.
You can find out the id of root groups and all information by groups through the listInterestGroupings
apidocs.mailchimp.com/api/1.3/listinterestgroupings.func.php
It can be seen that the API supports sampling by several segments. In my case, these are 2 groups, and also supports various conditions, both between segments - the key is match = "any" (OR), match = "all" (AND), and inside the segments - the key is op = "all" (full match with a list in value), op = "one" (one of the matches with the list in value).
apidocs.mailchimp.com/api/1.3/campaigncreate.func.php
Let's go back to the $ content array - where to get the text of the letter?
There are several situations here - for example, the manager in the mailchimp admin can choose a nice letter template, and there are a lot of them, edit the text to the desired one, save it to “my templates”. Next, using the templates () method, (http://apidocs.mailchimp.com/api/1.3/templates.func.php) we get the ID of the desired template and create a mailing list based on it (in the $ opts array of the campaignCreate () method, you need to specify key template_id).
But in the case of automatic mailing, this option is not suitable, if only because we need to programmatically change the text of the letter, so we store the contents of the necessary templates on our server, adding tags to the Twig template engine to add special offers to the text. This is convenient, now the templates themselves are stored in the version control system and you can not be afraid to break the layout.
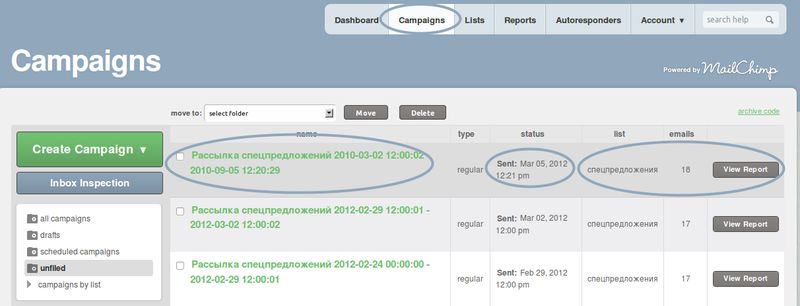
The campaignCreate () method will create a campaign and return its ID, the campaign itself can be observed in the list of campaigns in the mailchimp control panel, and after the campaignSendNow () is executed, the distribution will start, and letters will be sent.
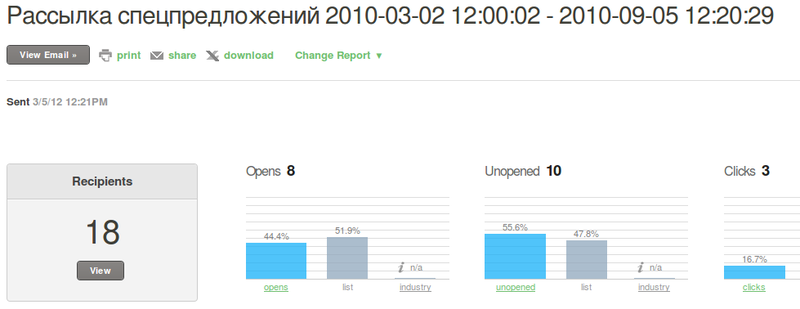
By sending mailings you can see the reports. Here, for example, a report on the distribution of some test group:
As a result, we wrote a script that:
1. selects new special offers from our database
2. looking for user groups in mailchimp based on a selection of special offers (special offers are tied to the vendor / category)
3. generates a letter text based on a layout with Twig tags attached, with top-end blocks, additional special offers, a manager's block, banners, etc.
4. starts the newsletter and marks the time of the last launch
5. goes to step 1 the next day :)
Subscription forms for mailing.
The service itself already provides subscription forms for mailing lists, you can edit them through a visual editor, add fields, translations for different languages or change color schemes, get the source code of such a form, and paste them into your site.
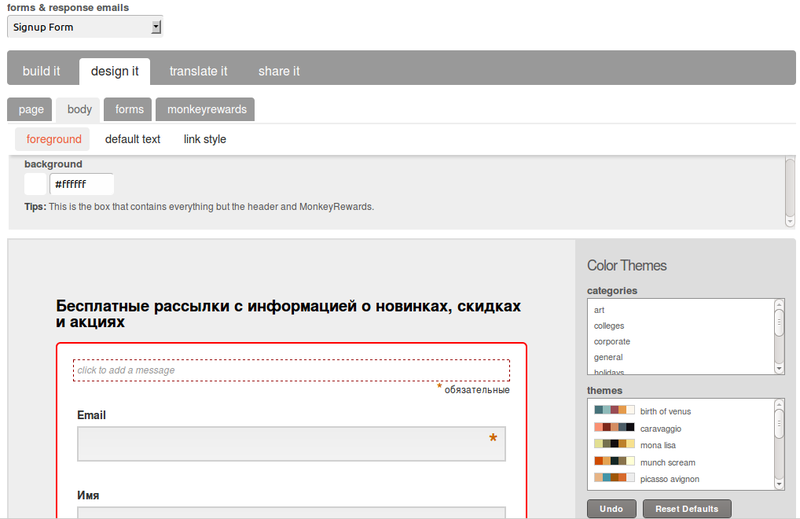
But we needed a dynamic form that subscribes to certain groups depending on the pages on which it is located.
We use the API.
User subscription is represented by 2 methods: listSubscribe - creating a subscription for a new user and listUpdateMember - updating a user subscription:
apidocs.mailchimp.com/api/1.3/listsubscribe.func.php
apidocs.mailchimp.com/api/1.3/listupdatemember.func.php
The methods are almost identical, for example, specifying the key update_existing = true turns listSubscribe () into listUpdateMember ()
We will consider only the listSubscribe method, since it is more complete:
Important parameters:
• $ listId - user list ID
• $ email - the email address of the user whose subscription you want to create or update
• $ mergeVars - an array with variable data, for example groups
• $ updateExisting - update the subscription if it already exists
• $ replaceGroups - replace groups if they are in $ mergeVars or merge with existing
To update user groups, we need the $ mergeVars parameter, where the id key is the id of the root groups (vendors and categories), and the groups key are the names of groups listed by comma:
We also set $ replaceGroups = false to merge already existing groups with new ones in $ mergeVars.
To completely replace groups with new ones, firstly, set $ replaceGroups = true, and secondly, transfer the entire array of root groups with empty values of the groups themselves to $ mergeVars.
That is, the $ replaceGroups = true parameter works within the same root group, but not all.
Using this method we made 2 variants of the form:
1. For all users, the usual form with an email field and hidden fields for distribution groups, depending on the current page.
2. Form in the personal account, which displays a list of checkboxes from groups to which you can subscribe / unsubscribe.
Features of the listSubscribe method:
1. If the subscription is new, then all its processing goes to the mailchimp service, a confirmation letter is sent to the subscription, after confirmation a link to the subscriber's profile is given, where he can edit his data, the profile is again on the mailchimp website.
2. If the user's email is already on the mailing list, the method will generate an error and will offer to manually edit personal data and groups of the subscriber, the link to the profile will appear in the text of the error $ mailchimpAPI-> errorMessage. You need to specify $ updateExisting = true - to make a subscription update, but this key can also overwrite someone else's subscription, so it is not suitable for an unauthorized user.
As a result, we have 2 problems:
1. All processing of a new subscriber does not take place here; we cannot influence it, for example, set up a distribution group.
2. It is not clear how to renew a subscription to an unauthorized user, since we cannot be sure that the specified email belongs to him.
Therefore, we have disabled the listSubscribe to send subscription confirmation emails - the parameters $ doubleOptin = false, $ sendWelcome = false and wrote a mechanism that:
1 - when sending a subscription form on our website, it sends a letter with a unique confirmation link.
2 - a link handler that hard-creates or updates a subscription using $ doubleOptin = false, $ sendWelcome = false, $ updateExisting = true. Now we are sure that the specified email really belongs to an unauthorized user, as he followed the link in his letter.
It should be understood that with the $ doubleOptin = false parameter we sign / update the subscription of any user without confirming it, so this approach should be used only where you are sure that this subscription belongs to the current user, for example in your account or when clicking on a unique link .
Eventually:
On the basis of mailchimp mailings, it is quite possible to make a system of automatic mailings to specific segments - vendor groups and product categories, make subscription and unsubscribe forms to specific segments, customize email templates. All the logic of a subscription / unsubscribe can be transferred to your site and implement it at your discretion, leaving the service itself sending letters and collecting statistics.
Author: Andrey Ryabin - Softline Developer
The service provides many features:
- advanced tracking;
- user selection;
- beautiful letter templates;
- integration with social networks;
- integration with Google Analytics;
- saving time on developing your project.
On the basis of this service, we have made automatic distribution of special offers for targeted sections - to certain vendors and product categories. Let's try to briefly talk about some of the features of the implementation.
Create a list of users.
Mailchimp mailings are built on the basis of the list of users, so first of all, in the mailchimp.com personal account, we will create the following list: Lists - Create List. My list is called "special offers", it contains users who subscribe to news and promotions of our online store. After creating the list, you need to know its unique number: Lists - special offers - Settings - List Settings and Unique ID, in order to work with this list through the API.
')
Let's create user groups in the list, in my case these are vendors and categories: Lists - special offers - Groups - View Groups
Here, for example, the vendor section:
When creating groups, you need to take into account that apart from the name, there are no additional parameters anymore, and this complicates the creation of a connection between
group and your database. We stopped at the composite name of the group, the first part - the number - the vendor / category code in our database, the second - the display name of the vendor / category.
By the way, the groups themselves can not create more than 60, and this important information is stored as a comment to one of the API methods.
Import users to the mailing list.
Typically, users get on the mailing list through the subscription form, but you can download them as a whole bundle through the import mechanism. (Lists - special offers - import.) Opportunities for “from” are quite large, there is an import from files, google contacts, documents, etc. You can import directly into certain groups.
Please note that the free version has a limit of 2,000 subscribers, so if you upload more e-mail addresses there, the message “You've hit your sending limit. You can’t upgrade and re-enable your subscriber count (all lists combined) and you’ll fail to launch mailings even if not all subscribers are involved in the mailing, but only a small segment.
Also, after importing, you will most likely see the message “Our review team recently emailed you some questions. Before we can approve your account for sending email campaigns, we need your reply. They ask you to tell about your company, indicate where you get the user lists - in general, pass a kind of verification. Here is an explanation of why this check is needed: kb.mailchimp.com/article/why-is-my-account-under-review
API MailChimp
After the list of users is created, you can start creating the first mailing list. We are not interested in creating and launching mailings through the mailchimp control panel, since we need an automatic system. Therefore, we are going to immediately explore the MailChimp API.
Currently the API is version 1.3 and is here: apidocs.mailchimp.com/api/1.3
Practically everything that can be done through the control panel is implemented in API methods and there is a set of ready-made wrapper classes for various languages. Here is for php: apidocs.mailchimp.com/api/downloads/#php
To work with the API, you need a key that can be created in your personal account:
An example of working with the API:
<?php require_once('MCAPI.class.php'); // API $apiKey = 'd43a8xxxxxxxxxxxxxxxxxc6867cbd-us4'; //ID $listId = '8e2xxxxx44'; $mailchimpAPI = new MCAPI($apiKey); // $groups = $mailchimpAPI->listInterestGroupings($listId); print_r($groups); Segments.
Segments are a great opportunity for a service to launch a mailing list not for all users in the list, but only for those who meet certain criteria — for example, group, user name, or even location.
The screenshot shows a sample of users in 3 different segments: groups, language, location. In general, the samples can be quite complex and even a separate tool, the HairBall, was created to create such samples, more details here: blog.mailchimp.com/introducing-hairball-an-air-app-for-really-complicated-mailchimp-lists
In our project we use only segments by groups (vendors / categories). Here is an example of creating a mailing list based on groups:
$opts= array( 'list_id' => $listId, 'from_email' => ' ', 'from_name' => ' ', 'tracking' => array('opens' => true, 'html_clicks' => true, 'text_clicks' => false), 'authenticate' => true, 'analytics' => array('google'=>'UA-XXXXXX-2'), 'subject' => ' ', 'title' => ' ', ); $content = array( 'html' => 'html ', 'text' => 'plain text ', ); $segmentGroups = array( 'match' => 'any', 'conditions' => array( array('field' => 'interests-5555', 'op' => 'all', 'value' => '17#ABBYY, 19#Adobe Systems, 20#McAfee Inc'), array('field' => 'interests-4444', 'op' => 'all', 'value' => '88#. , 99# , 77# '), ) ); // $campaignId = $mailchimpAPI->campaignCreate('regular', $opts, $content, $segmentGroups); // if ($campaignId) { $mailchimpAPI->campaignSendNow($campaignId); } In the $ opts array, the distribution settings are specified, in the $ content array, the letter content, html and plain text.
In the $ segmentGroups parameter, there must be a specially-formed array with user segments from the list.
If a segment is a group (our case), then the name of the segment should consist of the prefix 'interests-' + the root ID of the group (generally called groupings - grouping), and the value - the names of groups listed comma-separated.
As you can see, 5555 and 4444 are id of root groups, in our case vendors and categories.
You can find out the id of root groups and all information by groups through the listInterestGroupings
$groups = $mailchimpAPI->listInterestGroupings($listId); print_r($groups); apidocs.mailchimp.com/api/1.3/listinterestgroupings.func.php
It can be seen that the API supports sampling by several segments. In my case, these are 2 groups, and also supports various conditions, both between segments - the key is match = "any" (OR), match = "all" (AND), and inside the segments - the key is op = "all" (full match with a list in value), op = "one" (one of the matches with the list in value).
apidocs.mailchimp.com/api/1.3/campaigncreate.func.php
Let's go back to the $ content array - where to get the text of the letter?
There are several situations here - for example, the manager in the mailchimp admin can choose a nice letter template, and there are a lot of them, edit the text to the desired one, save it to “my templates”. Next, using the templates () method, (http://apidocs.mailchimp.com/api/1.3/templates.func.php) we get the ID of the desired template and create a mailing list based on it (in the $ opts array of the campaignCreate () method, you need to specify key template_id).
But in the case of automatic mailing, this option is not suitable, if only because we need to programmatically change the text of the letter, so we store the contents of the necessary templates on our server, adding tags to the Twig template engine to add special offers to the text. This is convenient, now the templates themselves are stored in the version control system and you can not be afraid to break the layout.
The campaignCreate () method will create a campaign and return its ID, the campaign itself can be observed in the list of campaigns in the mailchimp control panel, and after the campaignSendNow () is executed, the distribution will start, and letters will be sent.
By sending mailings you can see the reports. Here, for example, a report on the distribution of some test group:
As a result, we wrote a script that:
1. selects new special offers from our database
2. looking for user groups in mailchimp based on a selection of special offers (special offers are tied to the vendor / category)
3. generates a letter text based on a layout with Twig tags attached, with top-end blocks, additional special offers, a manager's block, banners, etc.
4. starts the newsletter and marks the time of the last launch
5. goes to step 1 the next day :)
Subscription forms for mailing.
The service itself already provides subscription forms for mailing lists, you can edit them through a visual editor, add fields, translations for different languages or change color schemes, get the source code of such a form, and paste them into your site.
But we needed a dynamic form that subscribes to certain groups depending on the pages on which it is located.
We use the API.
User subscription is represented by 2 methods: listSubscribe - creating a subscription for a new user and listUpdateMember - updating a user subscription:
apidocs.mailchimp.com/api/1.3/listsubscribe.func.php
apidocs.mailchimp.com/api/1.3/listupdatemember.func.php
The methods are almost identical, for example, specifying the key update_existing = true turns listSubscribe () into listUpdateMember ()
We will consider only the listSubscribe method, since it is more complete:
$mailchimpAPI->listSubscribe($listId, $email, $mergeVars, $emailType, $doubleOptin, $updateExisting, $replaceGroups, $sendWelcome); Important parameters:
• $ listId - user list ID
• $ email - the email address of the user whose subscription you want to create or update
• $ mergeVars - an array with variable data, for example groups
• $ updateExisting - update the subscription if it already exists
• $ replaceGroups - replace groups if they are in $ mergeVars or merge with existing
To update user groups, we need the $ mergeVars parameter, where the id key is the id of the root groups (vendors and categories), and the groups key are the names of groups listed by comma:
$mergeVars = array('GROUPINGS' => array( array( 'id' => '4444', 'groups' => '99# , 77# ' ), )); We also set $ replaceGroups = false to merge already existing groups with new ones in $ mergeVars.
To completely replace groups with new ones, firstly, set $ replaceGroups = true, and secondly, transfer the entire array of root groups with empty values of the groups themselves to $ mergeVars.
$mergeVars = array('GROUPINGS' => array( // array( 'id' => '4444', 'groups' => '99# , 77# ' ), // array( 'id' => '5555', 'groups' => '' ), // array( 'id' => '7777', 'groups' => '' ), )); That is, the $ replaceGroups = true parameter works within the same root group, but not all.
Using this method we made 2 variants of the form:
1. For all users, the usual form with an email field and hidden fields for distribution groups, depending on the current page.
2. Form in the personal account, which displays a list of checkboxes from groups to which you can subscribe / unsubscribe.
Features of the listSubscribe method:
1. If the subscription is new, then all its processing goes to the mailchimp service, a confirmation letter is sent to the subscription, after confirmation a link to the subscriber's profile is given, where he can edit his data, the profile is again on the mailchimp website.
2. If the user's email is already on the mailing list, the method will generate an error and will offer to manually edit personal data and groups of the subscriber, the link to the profile will appear in the text of the error $ mailchimpAPI-> errorMessage. You need to specify $ updateExisting = true - to make a subscription update, but this key can also overwrite someone else's subscription, so it is not suitable for an unauthorized user.
As a result, we have 2 problems:
1. All processing of a new subscriber does not take place here; we cannot influence it, for example, set up a distribution group.
2. It is not clear how to renew a subscription to an unauthorized user, since we cannot be sure that the specified email belongs to him.
Therefore, we have disabled the listSubscribe to send subscription confirmation emails - the parameters $ doubleOptin = false, $ sendWelcome = false and wrote a mechanism that:
1 - when sending a subscription form on our website, it sends a letter with a unique confirmation link.
2 - a link handler that hard-creates or updates a subscription using $ doubleOptin = false, $ sendWelcome = false, $ updateExisting = true. Now we are sure that the specified email really belongs to an unauthorized user, as he followed the link in his letter.
It should be understood that with the $ doubleOptin = false parameter we sign / update the subscription of any user without confirming it, so this approach should be used only where you are sure that this subscription belongs to the current user, for example in your account or when clicking on a unique link .
Eventually:
On the basis of mailchimp mailings, it is quite possible to make a system of automatic mailings to specific segments - vendor groups and product categories, make subscription and unsubscribe forms to specific segments, customize email templates. All the logic of a subscription / unsubscribe can be transferred to your site and implement it at your discretion, leaving the service itself sending letters and collecting statistics.
Author: Andrey Ryabin - Softline Developer
Source: https://habr.com/ru/post/144190/
All Articles