Another copter: part one, description and selection of parts
So, probably many of you would like to have a flying toy on the radio. The easiest to manage (in my subjective and inexperienced opinion) is a quadcopter. In addition, the quadcopter provides great opportunities for programming - there are control boards based on Arduino, you can connect sensors (GPS, barometer, sonar, digital compass, of course, gyros).
Many posts are calling for you to do this. I will tell you how I assembled and flew (literally yesterday) my first quadcopter in my life. What problems I encountered and how I solved them. What is important, I would like to write this story precisely from the position of a novice in radio-controlled aircraft.
The article is part of a cycle:
1. Part one, description and selection of parts
2. Part two, frame assembly
')
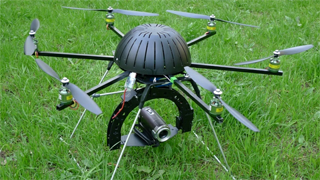
the copter in the picture is not mine
So immediately put a huge fly in the ointment. Do not strongly believe (I did not immediately believe) in enticing appeals to build a quadcopter for 150, 120, 100, 50 and less dollars. I do not want to say that it is not possible. I just did not succeed. And you, if you, like me, decided to assemble your first model, it will not work out most likely.
Why? Well, let's for example open the list from the above post . There is a lack of a second battery (and you probably want to fly a little longer), a charger, a power supply for a charger (it is not included), a spare motor and a regulator, and other things. In addition, at least a minimum tool will be required for work, and if you only have a screwdriver at home, you will have to enter it in the price. Delivery from China of heavy batteries and equipment will also be noticeable in the general price tag. Well, and in order to completely dramatize the situation, I will say that almost all of the above is subject to falls from a height and will have to be changed sooner or later.
Summarizing, I mentally set aside $ 500 (15,000 rubles) to the copter. At the moment they are completely spent. To start building a copter is to build a solid solution, the postponement of money and time.
So let's go.
Begin by selecting and ordering parts. Here you have several ways, the main two:
1) Choose the right parts yourself, using store recommendations, article tips, and tools like xcopterCalc
2) Find someone's ready config and order it completely.
Personally, at my first glance at xcopterCalc, my teeth were noticeably sore. Three-quarters of what I needed to drive, I just did not understand. In addition, unknowingly, you can forget to order something and then think about how to connect the battery without having the appropriate connector. Anyway, with no experience, it is better to rely on comrades. Therefore, I immediately went to the second. We open a wonderful forum on radio models and choose one of the many topics where they are asked to help with the selection of components , choosing mainly according to the estimated size of the future Copter, read, and order a list completely adjusted according to the advice. It's simple. In addition, you can use mine. :)
The main components are:
management fee
-transmitter
-receiver
motor controllers
-motor
-battery
-frame
Rama is best done by yourself, because if you buy a beautiful textolite frame, then after the fall the cracked beam will have nothing to replace. And if the frame is made of materials purchased in the nearest hardware store, then repair is not a problem. In addition to the assembly is useful a number of different necessary things. Here is what I ordered:
Total about $ 460. If you throw MultiWii then $ 390. Remember that if you pay by PayPal with a ruble card, then the exchange rate is pretty unpleasant there.
We take an extra regulator and a motor in case of a breakdown or a marriage, do not wait for the same month until a replacement is sent, if at all. According to reviews marriage sometimes happens, burning regulators is even more often. I ordered two control boards due to the fact that MiltiWii is more attractive in terms of performance, but according to reviews there are problems with it if bad sensors are caught. KaptinKuk (and clones), a simpler fee, while flying on it - shows itself quite well.
In addition, you will need:
- aluminum "square tube". Side 10mm wall thickness 1mm
-teklotekstolit (it took me 20 * 30cm)
-thin wires and connectors for the manufacture of wires connecting the receiver and board (better in different colors).
- at will LED tape (for beauty and designation "before" kopter)
- connectors for making a charging cord (the one that comes with the charger doesn’t fit to our batteries. We must either look for another one or make a cord. It took me 10 minutes and 40 rubles for the cord)
-bank from CD or food container (light)
-insulating tape
wire ties
- power supply unit at 11-18 volts and 3-5A (amps can be more)
-screwdrivers, keys, pasatizhi
soldering iron or soldering station
-if there is a station with a hairdryer then heat shrink
-pasatizhi
- metal knob
- file and file
- drill or screwdriver and drill
-glue
-Double-sided tape
Voltmeter also does not hurt
-thin hexagon
-patience
As an announcement, a photo of what I got in 14 hours
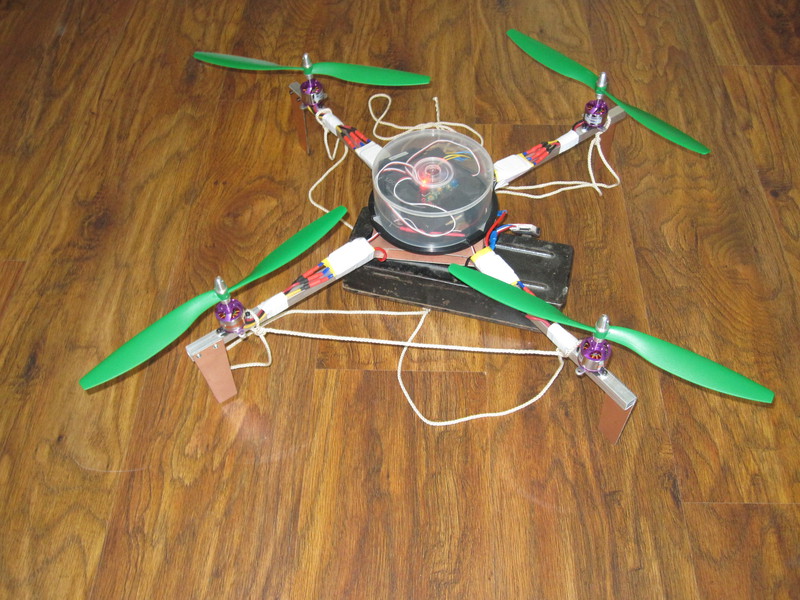
The copter is brutally tied to a box with screws for testing the firmware settings. Flight video and assembly in the following articles. To begin, I advise you to watch these videos here .
Summary:
- to make a kopter - it is expensive, it is worth starting with a firm desire and allocation of money
- choose the right parts for the first model itself is almost impossible, rely on proven options
I am pleased to answer questions. If you notice an inaccuracy or error, please write in a personal, I will make corrections and will add UPD, in which, if desired, I will indicate your nickname.
Many posts are calling for you to do this. I will tell you how I assembled and flew (literally yesterday) my first quadcopter in my life. What problems I encountered and how I solved them. What is important, I would like to write this story precisely from the position of a novice in radio-controlled aircraft.
The article is part of a cycle:
1. Part one, description and selection of parts
2. Part two, frame assembly
')
the copter in the picture is not mine
So immediately put a huge fly in the ointment. Do not strongly believe (I did not immediately believe) in enticing appeals to build a quadcopter for 150, 120, 100, 50 and less dollars. I do not want to say that it is not possible. I just did not succeed. And you, if you, like me, decided to assemble your first model, it will not work out most likely.
Why? Well, let's for example open the list from the above post . There is a lack of a second battery (and you probably want to fly a little longer), a charger, a power supply for a charger (it is not included), a spare motor and a regulator, and other things. In addition, at least a minimum tool will be required for work, and if you only have a screwdriver at home, you will have to enter it in the price. Delivery from China of heavy batteries and equipment will also be noticeable in the general price tag. Well, and in order to completely dramatize the situation, I will say that almost all of the above is subject to falls from a height and will have to be changed sooner or later.
Summarizing, I mentally set aside $ 500 (15,000 rubles) to the copter. At the moment they are completely spent. To start building a copter is to build a solid solution, the postponement of money and time.
So let's go.
Begin by selecting and ordering parts. Here you have several ways, the main two:
1) Choose the right parts yourself, using store recommendations, article tips, and tools like xcopterCalc
2) Find someone's ready config and order it completely.
Personally, at my first glance at xcopterCalc, my teeth were noticeably sore. Three-quarters of what I needed to drive, I just did not understand. In addition, unknowingly, you can forget to order something and then think about how to connect the battery without having the appropriate connector. Anyway, with no experience, it is better to rely on comrades. Therefore, I immediately went to the second. We open a wonderful forum on radio models and choose one of the many topics where they are asked to help with the selection of components , choosing mainly according to the estimated size of the future Copter, read, and order a list completely adjusted according to the advice. It's simple. In addition, you can use mine. :)
The main components are:
management fee
-transmitter
-receiver
motor controllers
-motor
-battery
-frame
Rama is best done by yourself, because if you buy a beautiful textolite frame, then after the fall the cracked beam will have nothing to replace. And if the frame is made of materials purchased in the nearest hardware store, then repair is not a problem. In addition to the assembly is useful a number of different necessary things. Here is what I ordered:
Total about $ 460. If you throw MultiWii then $ 390. Remember that if you pay by PayPal with a ruble card, then the exchange rate is pretty unpleasant there.
We take an extra regulator and a motor in case of a breakdown or a marriage, do not wait for the same month until a replacement is sent, if at all. According to reviews marriage sometimes happens, burning regulators is even more often. I ordered two control boards due to the fact that MiltiWii is more attractive in terms of performance, but according to reviews there are problems with it if bad sensors are caught. KaptinKuk (and clones), a simpler fee, while flying on it - shows itself quite well.
In addition, you will need:
- aluminum "square tube". Side 10mm wall thickness 1mm
-teklotekstolit (it took me 20 * 30cm)
-thin wires and connectors for the manufacture of wires connecting the receiver and board (better in different colors).
- at will LED tape (for beauty and designation "before" kopter)
- connectors for making a charging cord (the one that comes with the charger doesn’t fit to our batteries. We must either look for another one or make a cord. It took me 10 minutes and 40 rubles for the cord)
-bank from CD or food container (light)
-insulating tape
wire ties
- power supply unit at 11-18 volts and 3-5A (amps can be more)
-screwdrivers, keys, pasatizhi
soldering iron or soldering station
-if there is a station with a hairdryer then heat shrink
-pasatizhi
- metal knob
- file and file
- drill or screwdriver and drill
-glue
-Double-sided tape
Voltmeter also does not hurt
-thin hexagon
-patience
As an announcement, a photo of what I got in 14 hours
The copter is brutally tied to a box with screws for testing the firmware settings. Flight video and assembly in the following articles. To begin, I advise you to watch these videos here .
Summary:
- to make a kopter - it is expensive, it is worth starting with a firm desire and allocation of money
- choose the right parts for the first model itself is almost impossible, rely on proven options
I am pleased to answer questions. If you notice an inaccuracy or error, please write in a personal, I will make corrections and will add UPD, in which, if desired, I will indicate your nickname.
Source: https://habr.com/ru/post/144173/
All Articles