How to open your online store Ecwid on Facebook and Google Sites
No web studios, technical specifications, codes and programs. Alone and free. Quickly and without unnecessary problems. Just a couple of friendly tips to open your own online store in just 1 hour.
The procedure fits into 3 steps.
- Creating a store on Ecwid
- Store installation on Facebook page
- Store installation on Google Sites page
All information from official help and knowledge bases. Therefore, for store developers, these tips are obvious, elementary and primitive. However, I hope that the advice will be useful to those who are interested in online commerce, but do not yet have special knowledge and experience.
1. Go to www.ecwid.com and click the Big Blue Sign Up Now button (register now)
2. On the Login or Register page fill in the form fields on the right (do not forget to save everything you fill in the text file)
- Name
- E-mail
- Password
3. Click the Register button.
Is done. Your own store is created. An e-mail with an activation code has been sent to your E-mail. The Control Panel opens.
')

4. Receive an Email from Ecwid and activate your store . (Otherwise, Ecwid will decide that you are joking and after some time will delete your registration)
5. Click the Catalog Tab. Create your Categories. Put your products in the store. If Descriptions and Photos of your goods are not yet ready. Leave Test Categories and Products - Vegetables and Fruits. Click the blue save button.
6. Click the Settings tab. Set the name of the Store, E-mail where orders will be received, Language, Payment Systems and so on. Click the blue save button.
7. Click the blue button Go to the store . Check out how it will look.
Shop Ecwid to install on the site. As part of which he will work. To do this, there are several ways.
1. If you already have your own website or page (on the engine or without the engine) Click the Console tab of your Admin Panel Ecwid. To Install a store on your site, insert the codes of Ecwid widgets on the pages of your site.
- Catalog
- Basket (recommended)
- Horizontal Categories menu (optional)
- or Vertical Categories menu (optional)
- Search (optional)
Example: Shop 1 Websiteskin on Narod.Ru
websiteskin.narod.ru/shop
2. If your site is on a popular CMS engine . Install the Ecwid store as a Plugin (Module) There are ready-made modules for:
- WordPress
- Drupal
- Joomla
- MODx

3. If you do not have a website yet. And you do not understand the CMS engines. Create your website or page on social networks.
- Install Ecwid Store as an App on Facebook page
- Install the same store as Gadget on Google Sites.
Example: Websiteskin Shop 2 on Facebook
www.facebook.com/technograde
Example: 3 Websiteskin Store on Google Sites Page
sites.google.com/site/technograderu
1. Go to www.facebook.com to create your account .
2. On the Registration page, fill in the Form fields on the right (Do not forget to save everything you fill in the text file)
- Name
- E-mail
- Password
- Paul
- Date of Birth
3. Click the Register button .
Is done. Your Facebook account is created. An e-mail with an activation code has been sent to your E-mail. Your account will open.
4. Receive an Email from Facebook and activate your account . (Otherwise, Facebook will decide that you made a joke and after a while will delete your registration)
5. Create your Page. ( Ecwid store is embedded on the Page , and not in the account). To do this, at the very bottom, in the basement of your account, click the Create Page link. Facebook will offer to choose from several types of pages:
- Local Business, or Place
- Company, organization
- Brand or product
- Artist, musical group
- Entertainment
- Community purpose or community
Click the desired picture . Forms will appear, fill them out. Specify activity type, name, address, name. Click the Getting Started button. Enter the required data. Click the Create button.
6. Done . Your Facebook Page is created. Customize and fill it. Upload a photo for your logo and cover. Add some news, links, comments. Be sure to set the URL address of your page on the Internet. Set up access so that this address is available to everyone, not just Facebook users.
The store is installed on the Facebook page for 1 click on the link apps.facebook.com/ecwid-shop . Before that you must log in to your Facebook account. And also enter the Admin Panel of your Ecwid store.
1. Do any of the following:
- Just copy the link in the address bar of the browser and press Enter
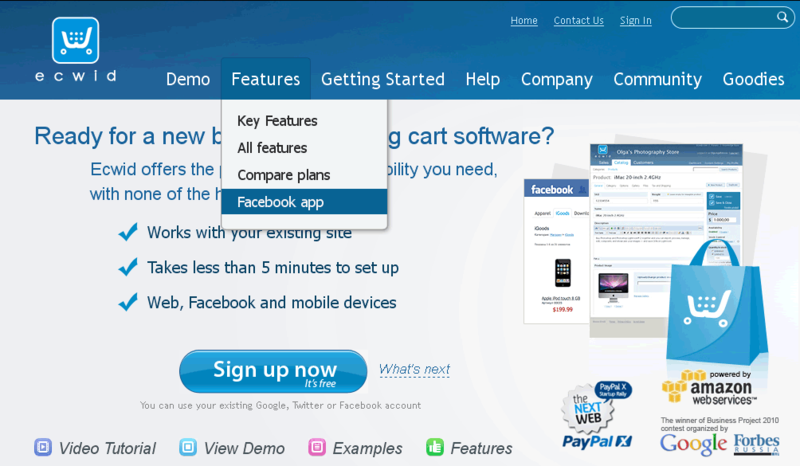
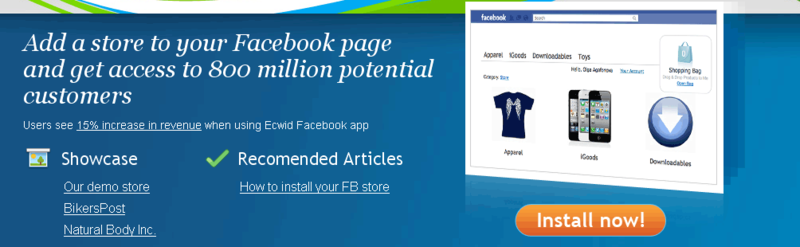
- On www.ecwid.com, in the top menu, click Features> Facebook App . The Awesome e-commerce Facebook app page with pictures will appear. Bottom Right Click the big orange Install Now button.
- On the www.ecwid.com website , in the top menu, click Help> Knowledge Base . The FrontPage page appears. On the left, in the How to add Ecwid To section, click the Facebook link. The Facebook Knowledge Page will appear. Under the heading How to add your store to Facebook (How to set up your store on Facebook, click the same Facebook link apps.facebook.com/ecwid-shop.
2. Facebook will ask for your permission to install the ECWID application. Click the Allow button.
3. Facebook will ask for the Store ID (Identification number of your store) Go to the Admin panel of your store Ecwid. On the Console tab, find the five or six-digit number on the right. Enter this number in the Facebook Preferences form. Click the Save button. Other settings are the location of categories and products on the page, they can be configured later.

4. Done. Your Ecwid store is installed on your Facebook page. The Shop Icon will appear in the TimeLine of your Facebook page. Click Shop . A gray Ajax animation appears. And your Ecwid store will load onto the page.
1. Go to www.google.com/sites to create your website using the Google Sites service.
2. If you already have a Google Account, enter your E-mail and password and click the blue Sign In button.
3. If you do not already have a Google Account, click the red button Register . On the Account Registration page, fill in the Form fields (Do not forget to save everything you fill in the text file)
- E-mail
- Password
- A country
- Date of Birth
When creating your website, Google will use the first half of your E-mail for its address.
3. Click the Create Account button.
Is done . Your google account is created. An e-mail with an activation code has been sent to your E-mail. Your account will open.
4. Receive an Email from Google and activate your account . (Otherwise, Google will decide that you made a joke and after a while will delete your registration)
5. Type the address of the Google Sites service sites.google.com and click Enter .
Another way - in the Top menu of your account, click the item More> All Services> The Google Products page opens. In the section Communicate and share information. Click the last link at the bottom of Google Sites .
6. On the Sites page, click the red Create button.
On the page that opens, select a site template, specify the site name, fill in the captcha and click the red Create button.
7. Ready o. Your site is created. Its address is sites.google.com/site (SITE NAME) By default, the site has a Homepage, a Site Map. If you are logged in to your account, a control panel with the tabs Edit Page, Create Page, More appears on the site .
8. Click the Create Page tab. Enter Page Title - Ecwid Store. Choose a location - Place the page on the top level. Click the red Create button.
Is done . Landing Page for setting up your store is created.
The store is installed on the Google Sites page as a Gadget at the URL link app.ecwid.com/jsp/STORE-ID/gadget-v2 . Before that, you must log in to your Google Account. And also enter the Admin panel of your Ecwid store.
1. Do the following:
- On the www.ecwid.com website , in the top menu, click Help> Knowledge Base . The FrontPage page appears. On the left in the How to add Ecwid To section Click the Google Sites link. The Google Sites Knowledge Page will appear. Under the heading How to add your store to Google Sites (How to set up your store on Google Sites) there is a link with the URL address of the gadget . Copy this link to any text editor.
2. Write your Store ID (Identification number of your store) in the URL address of the link. Go to the Admin panel of your Ecwid store. On the Console tab, find the five or six-digit number on the right. In a text editor, enter this NUMBER in the address of the link instead of the letters STORE-ID. Copy URL link with your number.
3. Go to your Google site in edit mode. In the Google menu of the site, click on the link link Ecwid Shop and go to the Landing Page to install your store.
4. In the top Control Panel of your Google site, click the Edit page tab. The Edit Menu will load. Pages with items - Insert, Format, Table, Layout . And text tools.
Click the menu item Insert> Additional gadgets (the subitem at the bottom of the left column)

5. A pop-up Add gadget to page will open. On the left, select Add gadget by URL . In the form window, enter the Ecwid Gadget URL copied from a text editor with the entered number of your store. Click the Add button. A gray box with the title Gadget Google and the name of your store will appear in the content edit box in the edit box. Click the blue save button.

6. Done . Your Ecwid store is installed on your Google site. In the site menu, click on Ecwid Shop . A gray Ajax animation appears. And your Ecwid store will load onto the page.
Creating a store is just the beginning. And all the difficulties still lie ahead.
And such ease and speed of installation of the store does not mean that it is easy to trade on the Internet. But only that the developers of store programs and social networks have worked well. To make it as easy as possible and reduce the threshold for entering e-commerce
Welcome
The procedure fits into 3 steps.
- Creating a store on Ecwid
- Store installation on Facebook page
- Store installation on Google Sites page
All information from official help and knowledge bases. Therefore, for store developers, these tips are obvious, elementary and primitive. However, I hope that the advice will be useful to those who are interested in online commerce, but do not yet have special knowledge and experience.
Creating a store on Ecwid
1. Go to www.ecwid.com and click the Big Blue Sign Up Now button (register now)
2. On the Login or Register page fill in the form fields on the right (do not forget to save everything you fill in the text file)
- Name
- Password
3. Click the Register button.
Is done. Your own store is created. An e-mail with an activation code has been sent to your E-mail. The Control Panel opens.
')
4. Receive an Email from Ecwid and activate your store . (Otherwise, Ecwid will decide that you are joking and after some time will delete your registration)
5. Click the Catalog Tab. Create your Categories. Put your products in the store. If Descriptions and Photos of your goods are not yet ready. Leave Test Categories and Products - Vegetables and Fruits. Click the blue save button.
6. Click the Settings tab. Set the name of the Store, E-mail where orders will be received, Language, Payment Systems and so on. Click the blue save button.
7. Click the blue button Go to the store . Check out how it will look.
But this is not all
Shop Ecwid to install on the site. As part of which he will work. To do this, there are several ways.
1. If you already have your own website or page (on the engine or without the engine) Click the Console tab of your Admin Panel Ecwid. To Install a store on your site, insert the codes of Ecwid widgets on the pages of your site.
- Catalog
- Basket (recommended)
- Horizontal Categories menu (optional)
- or Vertical Categories menu (optional)
- Search (optional)
Example: Shop 1 Websiteskin on Narod.Ru
websiteskin.narod.ru/shop
2. If your site is on a popular CMS engine . Install the Ecwid store as a Plugin (Module) There are ready-made modules for:
- WordPress
- Drupal
- Joomla
- MODx
3. If you do not have a website yet. And you do not understand the CMS engines. Create your website or page on social networks.
- Install Ecwid Store as an App on Facebook page
- Install the same store as Gadget on Google Sites.
Example: Websiteskin Shop 2 on Facebook
www.facebook.com/technograde
Example: 3 Websiteskin Store on Google Sites Page
sites.google.com/site/technograderu
Creating a Facebook Page
1. Go to www.facebook.com to create your account .
2. On the Registration page, fill in the Form fields on the right (Do not forget to save everything you fill in the text file)
- Name
- Password
- Paul
- Date of Birth
3. Click the Register button .
Is done. Your Facebook account is created. An e-mail with an activation code has been sent to your E-mail. Your account will open.
4. Receive an Email from Facebook and activate your account . (Otherwise, Facebook will decide that you made a joke and after a while will delete your registration)
5. Create your Page. ( Ecwid store is embedded on the Page , and not in the account). To do this, at the very bottom, in the basement of your account, click the Create Page link. Facebook will offer to choose from several types of pages:
- Local Business, or Place
- Company, organization
- Brand or product
- Artist, musical group
- Entertainment
- Community purpose or community
Click the desired picture . Forms will appear, fill them out. Specify activity type, name, address, name. Click the Getting Started button. Enter the required data. Click the Create button.
6. Done . Your Facebook Page is created. Customize and fill it. Upload a photo for your logo and cover. Add some news, links, comments. Be sure to set the URL address of your page on the Internet. Set up access so that this address is available to everyone, not just Facebook users.
Installing Ecwid Store on Facebook Page
The store is installed on the Facebook page for 1 click on the link apps.facebook.com/ecwid-shop . Before that you must log in to your Facebook account. And also enter the Admin Panel of your Ecwid store.
1. Do any of the following:
- Just copy the link in the address bar of the browser and press Enter
- On www.ecwid.com, in the top menu, click Features> Facebook App . The Awesome e-commerce Facebook app page with pictures will appear. Bottom Right Click the big orange Install Now button.
- On the www.ecwid.com website , in the top menu, click Help> Knowledge Base . The FrontPage page appears. On the left, in the How to add Ecwid To section, click the Facebook link. The Facebook Knowledge Page will appear. Under the heading How to add your store to Facebook (How to set up your store on Facebook, click the same Facebook link apps.facebook.com/ecwid-shop.
2. Facebook will ask for your permission to install the ECWID application. Click the Allow button.
3. Facebook will ask for the Store ID (Identification number of your store) Go to the Admin panel of your store Ecwid. On the Console tab, find the five or six-digit number on the right. Enter this number in the Facebook Preferences form. Click the Save button. Other settings are the location of categories and products on the page, they can be configured later.
4. Done. Your Ecwid store is installed on your Facebook page. The Shop Icon will appear in the TimeLine of your Facebook page. Click Shop . A gray Ajax animation appears. And your Ecwid store will load onto the page.
Website creation on Google Sites service
1. Go to www.google.com/sites to create your website using the Google Sites service.
2. If you already have a Google Account, enter your E-mail and password and click the blue Sign In button.
3. If you do not already have a Google Account, click the red button Register . On the Account Registration page, fill in the Form fields (Do not forget to save everything you fill in the text file)
- Password
- A country
- Date of Birth
When creating your website, Google will use the first half of your E-mail for its address.
3. Click the Create Account button.
Is done . Your google account is created. An e-mail with an activation code has been sent to your E-mail. Your account will open.
4. Receive an Email from Google and activate your account . (Otherwise, Google will decide that you made a joke and after a while will delete your registration)
5. Type the address of the Google Sites service sites.google.com and click Enter .
Another way - in the Top menu of your account, click the item More> All Services> The Google Products page opens. In the section Communicate and share information. Click the last link at the bottom of Google Sites .
6. On the Sites page, click the red Create button.
On the page that opens, select a site template, specify the site name, fill in the captcha and click the red Create button.
7. Ready o. Your site is created. Its address is sites.google.com/site (SITE NAME) By default, the site has a Homepage, a Site Map. If you are logged in to your account, a control panel with the tabs Edit Page, Create Page, More appears on the site .
8. Click the Create Page tab. Enter Page Title - Ecwid Store. Choose a location - Place the page on the top level. Click the red Create button.
Is done . Landing Page for setting up your store is created.
Installation of the Ecwid store on the Google Sites page
The store is installed on the Google Sites page as a Gadget at the URL link app.ecwid.com/jsp/STORE-ID/gadget-v2 . Before that, you must log in to your Google Account. And also enter the Admin panel of your Ecwid store.
1. Do the following:
- On the www.ecwid.com website , in the top menu, click Help> Knowledge Base . The FrontPage page appears. On the left in the How to add Ecwid To section Click the Google Sites link. The Google Sites Knowledge Page will appear. Under the heading How to add your store to Google Sites (How to set up your store on Google Sites) there is a link with the URL address of the gadget . Copy this link to any text editor.
2. Write your Store ID (Identification number of your store) in the URL address of the link. Go to the Admin panel of your Ecwid store. On the Console tab, find the five or six-digit number on the right. In a text editor, enter this NUMBER in the address of the link instead of the letters STORE-ID. Copy URL link with your number.
3. Go to your Google site in edit mode. In the Google menu of the site, click on the link link Ecwid Shop and go to the Landing Page to install your store.
4. In the top Control Panel of your Google site, click the Edit page tab. The Edit Menu will load. Pages with items - Insert, Format, Table, Layout . And text tools.
Click the menu item Insert> Additional gadgets (the subitem at the bottom of the left column)
5. A pop-up Add gadget to page will open. On the left, select Add gadget by URL . In the form window, enter the Ecwid Gadget URL copied from a text editor with the entered number of your store. Click the Add button. A gray box with the title Gadget Google and the name of your store will appear in the content edit box in the edit box. Click the blue save button.
6. Done . Your Ecwid store is installed on your Google site. In the site menu, click on Ecwid Shop . A gray Ajax animation appears. And your Ecwid store will load onto the page.
but
Creating a store is just the beginning. And all the difficulties still lie ahead.
And such ease and speed of installation of the store does not mean that it is easy to trade on the Internet. But only that the developers of store programs and social networks have worked well. To make it as easy as possible and reduce the threshold for entering e-commerce
Welcome
Source: https://habr.com/ru/post/143927/
All Articles