Pending User Notifications on Node.js & Redis
Task Description
Often, developers of web applications, as well as developers for mobile platforms, have the task of sending notifications about the completion of some event. For example: notify the user about a scheduled meeting, a call, a specific entry in the schedule (todo lists), or simply create a reminder of any other action in the future.
If such applications are located in the social. networks, for direct sending notifications, the VKontakte network provides a secure.sendNotification method for this;
For Odnoklassniki: notifications.sendSimple ;
And for Apple and Android devices, such notifications can be sent via the Apple Push Notification Service and the Android Cloud to Device Messaging (C2DM), respectively.
Selection of tools to solve
To solve the problem, two fixed assets were chosen:
Node.js (0.6.x) and Redis . Plus express to implement a primitive UI for displaying statistics on received and sent notifications and Vows for tests.
')
The first attracted the ability to easily use all the kernels through the Cluster module (included in 0.6), for Node.js version 0.4 Cluster is designed as a separate Cluster package.
Redis was chosen for supporting various types of data, right out of the box (Compared to the same Memcache). As well as the presence of convenient teams for organizing the work of queues. And also because Youporn.com is now a 100% Redis Site
Primary API
server_name / send_delayed - delayed notification (accepts both GET and POST parameters)
- delay - the interval at which you want to send (set in seconds)
- url - directly the address that you need to request when the time comes. For social networks, it is sending via sendNotification or notifications.sendSimple, for sending by pushing it can be sending to an additional service that deals directly with sending to APNS or C2DN.
- uid - user ID.
- type - parameter for statistics (appointment_1, planned_call)
- recheck_url - additional address that must be requested before sending the notification. This can be useful for tracking the current status of a job. For example, construction accelerated or canceled altogether. The url should answer “ok” or “error”, in case of a positive response, a notification will be sent. (this parameter is optional and if it is missing there will be no verification)
- send_than_online - an additional parameter, if it is present, the events are added to the queue, but sending will be carried out only if the query / user_online is invoked. The introduction of this parameter is due to the fact that many networks limit the number of packages per user per day.
server_name / user_online - take an event for a specific user (if it's time) and send
- uid - user ID
Application design
Basic structures for queuing:Message queue - SORTEDSET in which rank will be the time of the event;
Online message queue - SORTEDSET for each uid is separate, in which rank will be the time of the event triggering;
The queue for processing - LIST - when it enters the list, the message will be processed.
Master process
1. Start of several workers equal to the number of cores on the server;
2. The REPL starts;
3. Runs the message queue scanner (the online message queue is not scanned);
4. Tracks the fall of workers and restarts them in case of a fall.
5. Restores the message queue from individual events in case of a complete crash;
6. Starts the UI server for tracking statistics.
The scanner receives a batch of events via ZREVRANGEBYSCORE from the message queue in an amount of 100 in the reverse order from the current time ago. In a transaction, puts them in a processing queue for processing and removes them from the message queue .
Separate worker
1. Accepts send_delayed or user_online commands. These events are recorded in HASH in json format, via JSON.stringify. It also tested event storage in msgpack . Although according to the above tests it is written that it should be faster, but for simple objects there was no increase in speed. Event ID is created randomly and placed in the message queue . For each event key, the life time is set equal to the response time + delay from the settings.
2. Runs the queue scanner for processing
The scanner receives events from the LIST via BLPOP (in order to take them only when they are in the queue). If you run the MONITOR command in ./redis-cli while the server is running, the log may look something like this:
1336484301.674405 "zrevrangebyscore" "actual_queue_test-queue" "1336484301673" "-inf" "limit" "0" "100"
1336484301.675102 "zrevrangebyscore" "actual_queue_test-queue" "1336484301674" "-inf" "limit" "0" "100"
1336484301.675387 "zrevrangebyscore" "actual_queue_test-queue" "1336484301675" "-inf" "limit" "0" "100"
// fill processing queue
Worker.prototype.fetch = function(fn) {
var self = this;
this.client.zrevrangebyscore(this.queue_key, Date.now(),
"-inf", "limit", 0, self.pack, function(err, reply) {
process.nextTick(function() {
self.fetch();
}); // re-schedule fetch
...In this case, we set fetch to the next tick every time. As you can see, if there are no events in the queue, then there is no sense in checking it on every tick.
Makes JSON.parse, check the key of the last send if it is missing or (the current time is the key> USER_POLL_THRESHOLD - 30 min) - we trigger the event-data event at which UrlSender will send the http request, having previously checked for recheck_url, if it exists. If the http request received a 200 code, then we initiate an 'event-sent' event, erase the event in the database, set the last send key for the user with the current time.
The sequence of processing online events is as follows: we receive a queue of online messages for a specific user. Through ZREVRANGEBYSCORE, we receive the nearest event. Check by setting USET_POLL_THRESHOLD_ONLINE whether it’s time to send and puts them in the processing queue for processing and deletes them from the message queue .
Testing
Automated tests are written using the vows framework. The main idea of the tests is to record the sequence of events in the Redis LIST through a special logger method and then a comparison with the reference sequence of events.
logger.spec('event-processed'); //only test env
…
logger.spec('event-fetched'); //only test env
Running tests:
1. Copy config / settings.test.js -> config / settings.js and change the settings to your own;
2. Starting the server: APP_ENV = test npm start
3. Run tests: APP_ENV = test vows --spec test / delayed-request-test.js
Test script examples (ruby)
require 'uri'
require 'net/http'
api_url = "http://127.0.0.1:8000/send_delayed"
url = "http://127.0.0.1:8000/health"
recheck_url = "http://127.0.0.1:8000/recheck_url_correct"
# recheck_url = "http://127.0.0.1:8000/recheck_url_error"
uid=rand(1000)
type="test_common"
delay=1
post_url = URI.parse(api_url)
# res = Net::HTTP.post_form(post_url,{"url" => url, "delay" => delay,
# "uid" => uid, "type" => type, "recheck_url" => recheck_url, "send_than_online" => true})
res = Net::HTTP.post_form(post_url,{"url" => url, "delay" => delay,
"uid" => uid, "type" => type, "recheck_url" => recheck_url})
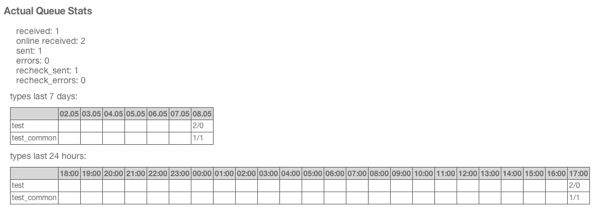
p res.inspectSample statistics viewing interface
Server source code
Written with pinkey
https://github.com/catz/actual_queue
Source: https://habr.com/ru/post/143673/
All Articles