[SSD only] Activating TRIM on Mac OS Lion / Mountain Lion 10.8
Hello, dear habrazhiteli.
This translation is intended primarily for those who already use the SSD drive and MacOS Lion. Personally, I’ve been happy for a year with the performance of the Intel X-25M SSD and the absence of the death carousel I wish you all the best.
Until today, I was confident that my SSD works at 100% of its capabilities. But it was not there! If you bought your apple computer without an SSD, that is, it left the store with a regular HDD, then the TRIM promised in Lev will be inactive , as it turned out, only computers equipped with the default SSD drive have this function by default. The problem, as you understand,in the marketing of the company , causing questions, has software roots, not iron. And for this Apple trick, Mr. Grant Pennel offers his threaded bolt.
')
Before proceeding directly to the translation, I suggest you check whether the TRIM works for you or not:

If your SSD has a SandForce 2 *** controller, then TRIM is not recommended for you. As they say, the whole point is that the SF2 *** controller processes the information deleted by the user in its own special way and generally stores data on a disk as one large archive ... the details of its work and the resulting problems are described here . The SF2 *** controller is equipped with a fairly wide range of devices, including the popular OCZ Vertex 3, so be sure to look at the list of SSDs equipped with the SandForce controller and watch carefully whether your disk is in this list, if yes, then in the Controller column determine the sequence number , if it starts at 2, then further operations to enable TRIM can only harm. For all other SSD users, this article will be useful:
Do not use the TRIM ENABLER program (1.1 or 1.2) to activate TRIM in Leo.
After a small check of this application, I found that instead of the usual patch, it replaces the most important system file at the kernel level of the system. This means that if you used TRIM Enabler, then it replaced the file with a mass of threads stretching from it all over MacOS (especially true for those who moved to Leo from MacOS Snow Leopard 10.6.8). Is that bad. Very bad. Along with the fact that TRIM really turns on, there is a real danger of facing a car of problems, ranging from the kernel panic and ending with input / output (I / O) problems, and that’s when the rotating and intimidating beach ball hits you.
In the process of discussion with the developer of this application (Oskar Groth), I heard only accusations through comments on his blog that they were doing trolling and gaining fear (although in fact I tried to offer an alternative, which is presented below). Probably - in the next version of TRIM Enabler - the file will be patched correctly, instead of directly replacing it, however, this update has not yet occurred.
So, here is the right way to enable TRIM support. To do this, run the following commands in the terminal:
1. First, make a backup of the file that we will patch:
2. Filing the file, thereby activating TRIM support:
3. Clean the cache:
Now reboot!
1. Shutdown:
2. Restore a file from backup:
All that this patch does is replace the phrase “APPLE SSD” with zeros in the IOAHCIBlockStorage file. This is necessary in order to circumvent the restriction of Apple itself on the use of brand SSDs only. The backup file is saved in the same directory where the original file is located.
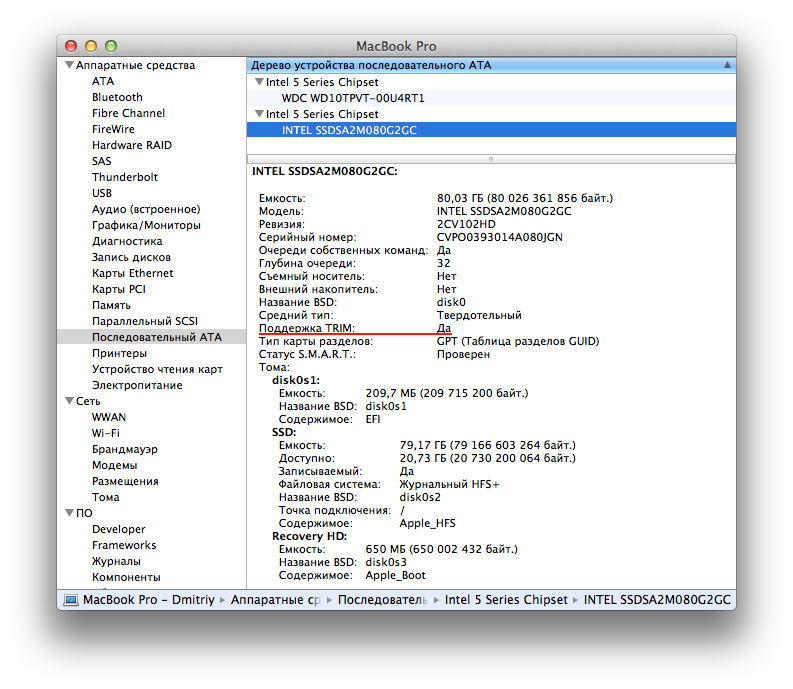
To check if TRIM has been activated, go here: About this Mac > System Report >
Remember, if you have a bearded SSD generation and the equipment itself does not support TRIM ... this patch will not help. The patch only bypasses the restriction created by Apple itself to limit TRIM support for any SSD that is not under the apple brand.
Having dealt with the TRIM Enabler and disliking his method, I began to look for a sane solution ... I found it here .
The MD5 checksum entries for the original and the patched file in 10.7.0 are as follows:
Original: 155b426c856c854e54936339fbc88d72
Modified: 945944136009c9228fffb513ab5bf734
If you have already used TRIM Enabler, you can do the following:
Wikipedia chews further in the article that TRIM does not work on standard HDDs, that the computer is not a fool and can distinguish HDD from SSD, that SSD cannot warm more when TRIM is activated, that the patch cannot affect the system in any way, since it does not no changes to the core itself, that if you turn on TRIM, and you have a HDD, then nothing will happen and all commands will be simply ignored ... and so on. In general: since the author called himself a mushroom, I had to get into the box to the very hat and answer all. If there are similar questions in local comments - I will translate his afterwords with the “Update” prefix, in portions.
EFFICIENT EFFORTS Thanks for attention.
TRIM:
TRIM technology increases the speed of writing to the cells where any data has already been stored before. In other words, this data is stored there after its deletion. And if it is necessary to rewrite the SSD, a command is sent to release these cells and only then does the recording begin. Thus, it takes time and reduces the recording speed. TRIM technology allows the controller to write data to bypass the cell release operation. For example: the declared speed of my SSD x-25M is up to 70 Mb per second . Having tested it before activation, TRIM produced no more than 50 Mb / s, now claimed 65-70 Mb / s. Test your SSD, maybe you will also miss the 30% speed when writing data ...
Update 1.0
There was information that TRIM in some cases causes problems on those SSDs that are equipped with a SandForce 2 *** controller, as they say, the whole thing is that the SF2 *** controller processes the information that the user has removed in a special way and generally stores data on disk in the form of one large archive ... the details of his work and the resulting problems are described here .
As it turned out, the SF2 *** controller is equipped with a fairly wide range of devices, including the popular OCZ Vertex 3, so be sure to take a look at the list of SSDs equipped with the SandForce controller and watch carefully if your disk is in this list, if yes, then define the Controller column sequence number, if it starts at 2, then disable the TRIM, the instruction is above.
Nevertheless, TRIM Enabler works, but on the Internet there are still opinions that it can tear down the system. You can try at your own risk, problems go away, if through this same program you disable TRIM when they occur, but you understand yourself - all this is “forks on water” - if it does, then individually.
When there is a method without interfering with the core of the system, I will write about it; if any of you, dear makovods, find a way earlier, do not be lazy to inform, please.
Run the following commands in the terminal:
1. Backup original drivers.
2. Change the driver.
3. Execute two commands to clear the OS X cache and pick up the modified driver.
4. Restart the Mac. Checking TRIM activation
Source: Science and Technology
This translation is intended primarily for those who already use the SSD drive and MacOS Lion. Personally, I’ve been happy for a year with the performance of the Intel X-25M SSD and the absence of the death carousel
I wish you all the best.Until today, I was confident that my SSD works at 100% of its capabilities. But it was not there! If you bought your apple computer without an SSD, that is, it left the store with a regular HDD, then the TRIM promised in Lev will be inactive , as it turned out, only computers equipped with the default SSD drive have this function by default. The problem, as you understand,
')
Before proceeding directly to the translation, I suggest you check whether the TRIM works for you or not:
If your SSD has a SandForce 2 *** controller, then TRIM is not recommended for you. As they say, the whole point is that the SF2 *** controller processes the information deleted by the user in its own special way and generally stores data on a disk as one large archive ... the details of its work and the resulting problems are described here . The SF2 *** controller is equipped with a fairly wide range of devices, including the popular OCZ Vertex 3, so be sure to look at the list of SSDs equipped with the SandForce controller and watch carefully whether your disk is in this list, if yes, then in the Controller column determine the sequence number , if it starts at 2, then further operations to enable TRIM can only harm. For all other SSD users, this article will be useful:
Do not use the TRIM ENABLER program (1.1 or 1.2) to activate TRIM in Leo.
After a small check of this application, I found that instead of the usual patch, it replaces the most important system file at the kernel level of the system. This means that if you used TRIM Enabler, then it replaced the file with a mass of threads stretching from it all over MacOS (especially true for those who moved to Leo from MacOS Snow Leopard 10.6.8). Is that bad. Very bad. Along with the fact that TRIM really turns on, there is a real danger of facing a car of problems, ranging from the kernel panic and ending with input / output (I / O) problems, and that’s when the rotating and intimidating beach ball hits you.
In the process of discussion with the developer of this application (Oskar Groth), I heard only accusations through comments on his blog that they were doing trolling and gaining fear (although in fact I tried to offer an alternative, which is presented below). Probably - in the next version of TRIM Enabler - the file will be patched correctly, instead of directly replacing it, however, this update has not yet occurred.
So, here is the right way to enable TRIM support. To do this, run the following commands in the terminal:
1. First, make a backup of the file that we will patch:
sudo cp /System/Library/Extensions/IOAHCIFamily.kext/Contents/PlugIns/IOAHCIBlockStorage.kext/Contents/MacOS/IOAHCIBlockStorage /System/Library/Extensions/IOAHCIFamily.kext/Contents/PlugIns/IOAHCIBlockStorage.kext/Contents/MacOS/IOAHCIBlockStorage.original2. Filing the file, thereby activating TRIM support:
sudo perl -pi -e 's|(\x52\x6F\x74\x61\x74\x69\x6F\x6E\x61\x6C\x00{1,20})[^\x00]{9}(\x00{1,20}\x51)|$1\x00\x00\x00\x00\x00\x00\x00\x00\x00$2|sg' /System/Library/Extensions/IOAHCIFamily.kext/Contents/PlugIns/IOAHCIBlockStorage.kext/Contents/MacOS/IOAHCIBlockStorage3. Clean the cache:
sudo kextcache -system-prelinked-kernel
sudo kextcache -system-caches
Now reboot!
If you suddenly need to disable TRIM support:
1. Shutdown:
sudo perl -pi -e 's|(\x52\x6F\x74\x61\x74\x69\x6F\x6E\x61\x6C\x00).{9}(\x00\x51)|$1\x41\x50\x50\x4C\x45\x20\x53\x53\x44$2|sg' /System/Library/Extensions/IOAHCIFamily.kext/Contents/PlugIns/IOAHCIBlockStorage.kext/Contents/MacOS/IOAHCIBlockStorage

sudo kextcache -system-prelinked-kernel

sudo kextcache -system-caches
2. Restore a file from backup:
sudo cp /System/Library/Extensions/IOAHCIFamily.kext/Contents/PlugIns/IOAHCIBlockStorage.kext/Contents/MacOS/IOAHCIBlockStorage.original /System/Library/Extensions/IOAHCIFamily.kext/Contents/PlugIns/IOAHCIBlockStorage.kext/Contents/MacOS/IOAHCIBlockStorageAll that this patch does is replace the phrase “APPLE SSD” with zeros in the IOAHCIBlockStorage file. This is necessary in order to circumvent the restriction of Apple itself on the use of brand SSDs only. The backup file is saved in the same directory where the original file is located.
To check if TRIM has been activated, go here: About this Mac > System Report >
Remember, if you have a bearded SSD generation and the equipment itself does not support TRIM ... this patch will not help. The patch only bypasses the restriction created by Apple itself to limit TRIM support for any SSD that is not under the apple brand.
Having dealt with the TRIM Enabler and disliking his method, I began to look for a sane solution ... I found it here .
The MD5 checksum entries for the original and the patched file in 10.7.0 are as follows:
Original: 155b426c856c854e54936339fbc88d72
Modified: 945944136009c9228fffb513ab5bf734
If you have already used TRIM Enabler, you can do the following:
- Try to copy and replace the key file from another Mac running the same version.
- Attempt to copy and replace the key file from the Recovery Section (Open Disk Utility> Mount Recovery HD)
- Reinstall Lion
- Wait for the next OS update to 10.7. * And hope that the key file will be replaced during the update (which, by the way, de facto), and after that apply the normal patch.
Important:
Unfortunately, this operation will have to be done every time after a major update of OS X 10.7.1 > 10.7.2 > 10.7.3 > and so on ... because the key file is updated almost every time the OS is updated (if it is not on duty).
End of translation
Wikipedia chews further in the article that TRIM does not work on standard HDDs, that the computer is not a fool and can distinguish HDD from SSD, that SSD cannot warm more when TRIM is activated, that the patch cannot affect the system in any way, since it does not no changes to the core itself, that if you turn on TRIM, and you have a HDD, then nothing will happen and all commands will be simply ignored ... and so on. In general: since the author called himself a mushroom, I had to get into the box to the very hat and answer all. If there are similar questions in local comments - I will translate his afterwords with the “Update” prefix, in portions.
EFFICIENT EFFORTS Thanks for attention.
TRIM:
TRIM technology increases the speed of writing to the cells where any data has already been stored before. In other words, this data is stored there after its deletion. And if it is necessary to rewrite the SSD, a command is sent to release these cells and only then does the recording begin. Thus, it takes time and reduces the recording speed. TRIM technology allows the controller to write data to bypass the cell release operation. For example: the declared speed of my SSD x-25M is up to 70 Mb per second . Having tested it before activation, TRIM produced no more than 50 Mb / s, now claimed 65-70 Mb / s. Test your SSD, maybe you will also miss the 30% speed when writing data ...
Update 1.0
There was information that TRIM in some cases causes problems on those SSDs that are equipped with a SandForce 2 *** controller, as they say, the whole thing is that the SF2 *** controller processes the information that the user has removed in a special way and generally stores data on disk in the form of one large archive ... the details of his work and the resulting problems are described here .
As it turned out, the SF2 *** controller is equipped with a fairly wide range of devices, including the popular OCZ Vertex 3, so be sure to take a look at the list of SSDs equipped with the SandForce controller and watch carefully if your disk is in this list, if yes, then define the Controller column sequence number, if it starts at 2, then disable the TRIM, the instruction is above.
Update 2.0
This method stopped working after the system update to version 10.8.1.Nevertheless, TRIM Enabler works, but on the Internet there are still opinions that it can tear down the system. You can try at your own risk, problems go away, if through this same program you disable TRIM when they occur, but you understand yourself - all this is “forks on water” - if it does, then individually.
When there is a method without interfering with the core of the system, I will write about it; if any of you, dear makovods, find a way earlier, do not be lazy to inform, please.
Update 3.0 // Found a way to activate TRIM for system 10.8.2
Thank user shok , a way found on the Internet .Run the following commands in the terminal:
1. Backup original drivers.
sudo cp /System/Library/Extensions/IOAHCIFamily.kext/Contents/PlugIns/IOAHCIBlockStorage.kext/Contents /MacOS/IOAHCIBlockStorage /System/Library/Extensions/IOAHCIFamily.kext/Contents/PlugIns/IOAHCIBlockStorage.kext/Contents/MacOS/ IOAHCIBlockStorage-backup2. Change the driver.
sudo perl -pi -e 's|(\x52\x6F\x74\x61\x74\x69\x6F\x6E\x61\x6C\x00{1,20})[^\x00]{9}(\x00{1,20}\x4D)|$1\x00\x00\x00\x00\x00\x00\x00\x00\x00$2|sg' /System/Library/Extensions/IOAHCIFamily.kext/Contents/PlugIns/IOAHCIBlockStorage.kext/Contents /MacOS/IOAHCIBlockStorage3. Execute two commands to clear the OS X cache and pick up the modified driver.
sudo kextcache -system-prelinked-kernel sudo kextcache -system-caches4. Restart the Mac. Checking TRIM activation
Source: Science and Technology
Source: https://habr.com/ru/post/143659/
All Articles