We prepare expansion under Chrome, we decorate Habr
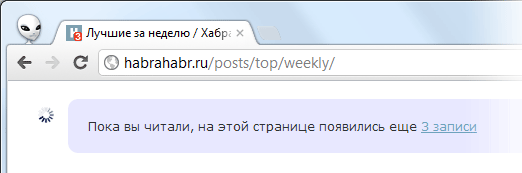
To make the extension sufficiently minimal knowledge of Javasctipt, HTML and CSS. Let's add on Habr load the next page, as well as a systematic check of new posts on the current. Something like twitter .
Fully-ready extension can be installed and tested in work through the Chrome Web Store, and here we will figure out how to write the basic code from scratch (the full one takes only 6 KB).
')
First you need to create a separate folder of our extensions and put the manifest.json file into it with the following content:
The extension will only be activated on habrahabr.ru. It will load the style.css, script.js and jQuery library from its folder. Chrome will complain about the absence of these files, so we’ll put empty style.css and script.js alongside, and also download the most recent jquery (which is always located at http://code.jquery.com/jquery.js ) and also put in folder.
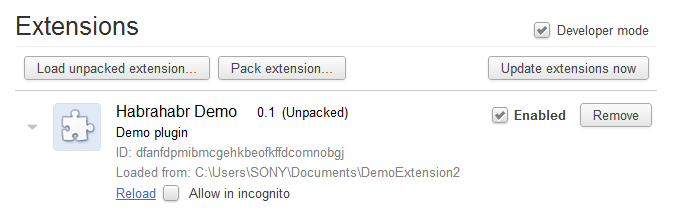
Now connect our extension. Go to the chrome extensions settings (chrome: // settings / extensions), tick the “Developer mode” box and click “Load unpacked extension ...” to specify the location of the folder with our files. Module added:
Reboot Habr, make sure that everything really works. More precisely, nothing, of course, will not change. To check, we’ll add something like this to style.css:
And in script.js, let's say:
Reload the extension by clicking on the Reload link (it opens with a triangle to the left of the extension icon). Then restart Habr and make sure that the layout has become rubber, and under the nickname added new links (if you are registered).
Get down to AJAX loading. To begin with, let's add a click handler to the “There” link:
Now when you click on the link, posts from the new page will be added to posts on the current one (again, do not forget to restart the extension and Habr). It is considered to be a good form to show the loading indicator, here we omit it, for the sake of simplicity.
Next, we do so that the link presses itself when we scroll to the bottom of the page.
And at the same time laid the beginning of the second part of the script - call checkForNewPosts () when scrolling to the top of the page. The function should check for the presence of new posts on the current page and report the badge:
There is no result yet because Tinycon.setBubble () does not exist. It should exhibit a badge on a favicon and is implemented in the Tinycon library. To connect it download tinycon.js from github , put it in the extensions folder and do not forget to connect tinycon.js to manifest.json.
To check that the badge works, let's go to http://habrahabr.ru/posts/top/daily/ (in general, it is better to train on the top pages, they seem to be cached and do not create a large load). Open the code inspect (F12), delete a couple of divs inside <div class = "posts"> ... </ div> and scroll to the top of the page. Badge should show the number of missing topics.
Let's also make this check happen regularly, once a minute:
Not so much code left, but this will finish. The aesthetic side of the issue is not covered, as well as the opportunity to reload the found new posts, to cancel the automatic reloading of the next page (by the button and by <Esc>). All this is implemented in the finished extension, and the source code is available after installation somewhere in the folder:
C: \ Users \% USERNAME% \ AppData \ Local \ Google \ Chrome \ User Data \ Default \ Extensions \ glaccbllkhielccdhfbbpilnlbemgaji
(if not there, look for the glaccbllkhielccdhfbbpilnlbemgaji folder somewhere else).
It remains to lay out the extension for public access. To do this, you need to get a private key file, it is required to upload this and new versions of your extension in the future. In the settings of extensions click the button “Pack extension”, specify the path to the folder and leave the path to the key blank:

After packing, chrome will create the file DemoExtension.crx and DemoExtension.pem, the last one you need to rename to key.pem and drop it into the extension folder (do not lose it, otherwise you will not be able to update this extension). After that, the entire extension folder needs to be archived in DemoExtension.zip and uploaded to your control panel . A CRX file is not involved at all.
After uploading the archive you will need to fill in the personal data of the extension and you can publish it. A public extension in the Chrome Web Store can be made after a one-time donation to the $ 5 corporation, but this is not necessary, you can put DemoExtension.crx (not zip) earlier, even on Dropbox, Chrome will install it after confirming security.
Here is the module that is uploaded in the Web Store:

This extension does not add buttons to the panel, neither dialog boxes, nor items in the context menu, it has no settings, but you yourself will figure out how to do it all.
Now go ahead, make websites better, more convenient, more beautiful! :)
Fully-ready extension can be installed and tested in work through the Chrome Web Store, and here we will figure out how to write the basic code from scratch (the full one takes only 6 KB).
')
First you need to create a separate folder of our extensions and put the manifest.json file into it with the following content:
{ "name":"Habrahabr Demo", "version":"0.1", "description":"Demo plugin", "content_scripts":[ { "matches":["http://habrahabr.ru/*"], "css":["style.css"], "js":["jquery.js", "script.js"] } ] } The extension will only be activated on habrahabr.ru. It will load the style.css, script.js and jQuery library from its folder. Chrome will complain about the absence of these files, so we’ll put empty style.css and script.js alongside, and also download the most recent jquery (which is always located at http://code.jquery.com/jquery.js ) and also put in folder.
Now connect our extension. Go to the chrome extensions settings (chrome: // settings / extensions), tick the “Developer mode” box and click “Load unpacked extension ...” to specify the location of the folder with our files. Module added:
Reboot Habr, make sure that everything really works. More precisely, nothing, of course, will not change. To check, we’ll add something like this to style.css:
#layout { max-width: none !important; } And in script.js, let's say:
$(function(){ var username = $("#header .username").text(); $("#header .bottom").append( '<a href="/users/' + username + '/topics/"></a>'+ '<a href="/users/' + username + '/qa/questions/"></a>'+ '<a href="/users/' + username + '/comments/"></a>' ); }); Reload the extension by clicking on the Reload link (it opens with a triangle to the left of the extension icon). Then restart Habr and make sure that the layout has become rubber, and under the nickname added new links (if you are registered).
Get down to AJAX loading. To begin with, let's add a click handler to the “There” link:
$(document).on("click", "#next_page", function () { var nextPrevBlock = $(".next-prev"); // / var href = $(this).attr("href"); // $.ajax({ url:href, success:function (response) { $(".posts").append($(response).find(".posts").html()); // $(".page-nav").html($(".page-nav", response).html()); // // stopTrackingScrollToBottom = false; // } }); return false; // }); Now when you click on the link, posts from the new page will be added to posts on the current one (again, do not forget to restart the extension and Habr). It is considered to be a good form to show the loading indicator, here we omit it, for the sake of simplicity.
Next, we do so that the link presses itself when we scroll to the bottom of the page.
var stopTrackingScrollToBottom = false; $(window).scroll(function () { if ($(window).scrollTop() + 10 >= ($(document).height() - ($(window).height()))) { // 10 if (stopTrackingScrollToBottom == false) { // stopTrackingScrollToBottom = true; // $("#next_page").click(); // :) } } if ($(window).scrollTop() == 0) { // checkForNewPosts(); } }); And at the same time laid the beginning of the second part of the script - call checkForNewPosts () when scrolling to the top of the page. The function should check for the presence of new posts on the current page and report the badge:
function checkForNewPosts(andLoadThem) { if ($(".posts").length == 0) { // , return; } $(".posts").prepend('<div class="new-posts-ajax"><img src="http://isbeauty.ru/images/icon_ajax_loader.gif"/></div>'); $.ajax({ url:window.location.href, success:function (response) { $(".new-posts-ajax").remove(); // var newPosts = getPostIds(response).diff(getPostIds()); Tinycon.setBubble(newPosts.length); } }); } Array.prototype.diff = function (a) { return this.filter(function (i) { return !(a.indexOf(i) > -1); }); }; function getPostIds(where) { var postIds = []; $(".post", where).each(function () { var postId = $(this).attr("id"); postIds.push(postId); }); return postIds; } There is no result yet because Tinycon.setBubble () does not exist. It should exhibit a badge on a favicon and is implemented in the Tinycon library. To connect it download tinycon.js from github , put it in the extensions folder and do not forget to connect tinycon.js to manifest.json.
To check that the badge works, let's go to http://habrahabr.ru/posts/top/daily/ (in general, it is better to train on the top pages, they seem to be cached and do not create a large load). Open the code inspect (F12), delete a couple of divs inside <div class = "posts"> ... </ div> and scroll to the top of the page. Badge should show the number of missing topics.
Let's also make this check happen regularly, once a minute:
var MAX_CHECKS_FOR_NEW_POSTS = 60; // , var CHECK_FOR_NEW_POSTS_EACH = 60; // $(function () { window.checkNewPostsTimer = setInterval(function () { MAX_CHECKS_FOR_NEW_POSTS--; if (MAX_CHECKS_FOR_NEW_POSTS <= 0) { // self-destroy timer clearInterval(window.checkNewPostsTimer); } else { checkForNewPosts(); } }, CHECK_FOR_NEW_POSTS_EACH * 1000); }); Not so much code left, but this will finish. The aesthetic side of the issue is not covered, as well as the opportunity to reload the found new posts, to cancel the automatic reloading of the next page (by the button and by <Esc>). All this is implemented in the finished extension, and the source code is available after installation somewhere in the folder:
C: \ Users \% USERNAME% \ AppData \ Local \ Google \ Chrome \ User Data \ Default \ Extensions \ glaccbllkhielccdhfbbpilnlbemgaji
(if not there, look for the glaccbllkhielccdhfbbpilnlbemgaji folder somewhere else).
It remains to lay out the extension for public access. To do this, you need to get a private key file, it is required to upload this and new versions of your extension in the future. In the settings of extensions click the button “Pack extension”, specify the path to the folder and leave the path to the key blank:
After packing, chrome will create the file DemoExtension.crx and DemoExtension.pem, the last one you need to rename to key.pem and drop it into the extension folder (do not lose it, otherwise you will not be able to update this extension). After that, the entire extension folder needs to be archived in DemoExtension.zip and uploaded to your control panel . A CRX file is not involved at all.
After uploading the archive you will need to fill in the personal data of the extension and you can publish it. A public extension in the Chrome Web Store can be made after a one-time donation to the $ 5 corporation, but this is not necessary, you can put DemoExtension.crx (not zip) earlier, even on Dropbox, Chrome will install it after confirming security.
Here is the module that is uploaded in the Web Store:
This extension does not add buttons to the panel, neither dialog boxes, nor items in the context menu, it has no settings, but you yourself will figure out how to do it all.
Now go ahead, make websites better, more convenient, more beautiful! :)
Source: https://habr.com/ru/post/143421/
All Articles