Writing complex interfaces with Spine.js
Introduction to Spine.js
Spine is a small framework that allows you to work on the MVC scheme, creating applications directly in the JavaScript language, which provides a logical separation of code, model inheritance through classes and extensions. Also, this tool is largely based on the Backbone.js API, so those developers who dealt with this framework will easily figure out Spine (however, there are a number of significant differences). Spine.js can work in conjunction with HTML5 and asynchronous server requests.
Every day JavaScript frameworks appear more and more. So what makes Spine.js so special?
- Simple controller implementation (based on Backbone's API)
- Ajax and HTML5 Local Storage Support
- Asynchronous communication with the server
- Works in all modern browsers (Chrome, Safari, Firefox, IE> = 7)
- Spine Mobile extension
- Simple and easy
- Good documentation
Take a look at the source code of the sample application , and decide for yourself.
Spine Classes, Models and Views
The official Spine documentation contains the most comprehensive guide I've ever seen. It includes a lot of things: work with validation, serialization and a whole bunch of chips. However, the goal of this lesson is to become familiar with the three largest features: classes , models and views .

')
Classes
At the heart of Spine, Object.create emulation is used to ensure that objects are created dynamically and can be used while the script is running. The use of such classes can be seen in the following example:
var twitterClient = Spine.Class.create(); //or var twitterClientWithArgs = Spine.Class.create({ testMessage: "If it weren't for WebMD I would have never known what symptoms to mimic so I could get all these prescriptions from my doctor." }); To initialize classes, use the init () method. Spine developers have decided not to exploit the constructor function, since using the keyword "new" can cause some problems when creating instances of a class.
var twitterClient = Spine.Class.create({ testMessage: "Hello world" }); var myclient = twitterClient.init(); All parameters that you want to use when initializing an object should be passed through the init () method. Example:
var twitterClient = Spine.Class.create({ init:function(testMessage){ this.testMessage = testMessage; } }); Models
In the Spine model are used to store application data, as well as for any other logic associated with this data. It should adhere to this idea, because It is one of the requirements in an application that builds on MVC. The data associated with the models is stored in the Model.records record, and can be created using the Spine setup () function.
The following example sets the model name and attribute set to the setup () method:
var Tweets = Spine.Model.setup("Tweet", ["username","tweet_message"]); The functionality of the models can be extended using the properties of a particular class as follows:
Tweets.include({ toTweetString: function(){ return("@" + this.username + " " + this.tweet_message); } }); Creating a model is carried out using the same simple .init () method:
var mytweets = Tweets.init({username: "addyosmani", tweet_message: "hai twitter"}); Spine and Backbone have various options for rendering templates and embedding them in the DOM model.
Controllers
Spine controllers extend Spine.Class, and also inherit all its properties. An example of creating a controller in Spine:
var TweetController = Spine.Controller.create({ init:function(){ //initial logic on instantiation } }) The initialization of the controllers is as follows:
var myTweetController = TweetController.init(); Each controller corresponds to a special element - 'el', which can be passed through an instance property. Example:
var myTweetController = TweetController.init({el: $('#tweets')}); Documentation
You can read more about classes , models and controllers in the Spine documentation.
The main differences between Spine and Backbone
Developers who have read the documentation for Backbone and Spine, in the first minutes will not be able to find fundamental differences. However, in a real project, these differences may appear by themselves.
1. Views in Backbone are more like traditional controllers in their application, and Backbone controllers are more responsible for handling URL routing. In Spine, routing support was added quite recently (because it is a very necessary element), and controllers are very similar to the views in Backbone.
2. Backbone uses constructor functions and prototypes, while Spine uses an emulated version of Object.create and a simulated class system - which allows you to achieve the same inheritance effect and is actually a very interesting technique. This is one of the fundamental differences from Backbone. Both approaches have the right to exist.
3. A lot of developers pay attention to the difference in the size of files of this or that library: in this regard, we can note the fact that Spine does not include mapping, filtering, and many other functions that are included in Backbone. If size matters to you, then you definitely need to choose Spine, because in this regard, he wins in all respects.
Spine.js in practice
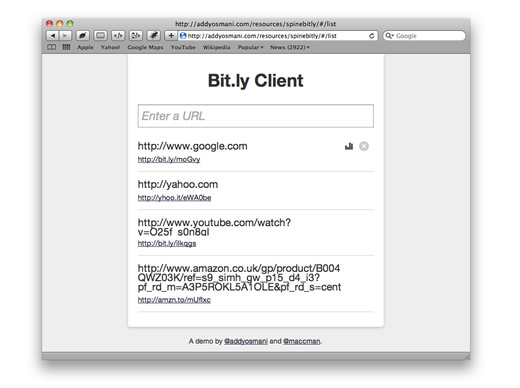
Example: Bit.ly client

When you are working on a SPA, a lot of time is spent on work and interaction with external data (this can be your own data or data obtained from some API). You would also like to use routing so that you can save the state of the application. To do this, you may have to use localStorage, as well as process ajax requests.
Considering all of the above, we are going to create a bit.ly client that will allow you to:
- create attractive URLs directly from your browser;
- archive your bit.ly URLs so that you can easily access them at any time;
- provision of click statistics (this will be implemented via an additional 'view', to demonstrate routing).
Prerequisites
Creating a bit.ly plugin
Before we begin, we need to find a good way to access bit.ly services: 1. a shortened URL and 2. click statistics. Instead of suffering with regular JavaScript, we will use jQuery to work with ajax requests in a more convenient and faster way. This approach will also allow us to write a more readable and understandable application.
Additional support store.js
By default, Spine is focused on modern browsers and it is for this reason that such things as localStorage will not work equally in all browsers, so if you need cross-browser compatibility, then you should use older tools.
However, this problem can be solved by using store.js (and what it is based on: json2.js). Below is the content of the spine.model.local.js file, which you can update to use the repository by commenting on the lines that are marked below and replacing them with your own.
Spine.Model.Local = { extended: function(){ this.sync(this.proxy(this.saveLocal)); this.fetch(this.proxy(this.loadLocal)); }, saveLocal: function(){ var result = JSON.stringify(this); //localStorage[this.name] = result; store.set(this.name, result); }, loadLocal: function(){ //var result = localStorage[this.name]; var result = store.get(this.name); if ( !result ) return; var result = JSON.parse(result); this.refresh(result); } }; JQuery template processing
Spine and Backbone frameworks can interact with several approaches (micro-pattern processing, mustache.js, and so on). Which one to use, choose you. The sample uses the jQuery tmpl plugin to present our abbreviated URL entries and click statistics using templates.
Development
A list of what needs to be implemented:
- Model to present the data that will be contained in each shortened URL (Model Url);
- The controller to represent the individual entries and actions that can be performed by the application (exports.URL);
- The controller for displaying the view responsible for entering the bit.ly entry (exports.UrlsList);
- The controller to display the view responsible for the statistics of clicks on a particular entry (exports.Stats);
- A universal controller that will handle application routing (exports. UrlApp).
The example uses jQuery because it is ideal for working with the template and the plugin, but Spine can also work with Zepto or other JavaScript libraries. Now let's look at the code for our application:
Initial caching
var exports = this; Simple jQuery plugin
$.fn.toggleDisplay = function(bool){ if ( typeof bool == "undefined" ) { bool = !$(this).filter(":first:visible")[0]; } return $(this)[bool ? "show" : "hide"](); }; Url models:
var Url = Spine.Model.setup("Url", ["short_url", "long_url", "stats"]); Url.extend(Spine.Model.Local); Url.include({ validate: function(){ if ( !this.long_url ) return "long_url required" if ( !this.long_url.match(/:\/\//)) this.long_url = "http://" + this.long_url }, fetchUrl: function(){ if ( !this.short_url ) $.bitly(this.long_url, this.proxy(function(result){ this.updateAttributes({short_url: result}); })); }, fetchStats: function(){ if ( !this.short_url ) return; $.bitly.stats(this.short_url, this.proxy(function(result){ this.updateAttributes({stats: result}); })); } }); Url.bind("create", function(rec){ rec.fetchUrl(); }); The exports.Urls controller:
exports.Urls = Spine.Controller.create({ events: { "click .destroy": "destroy", "click .toggleStats": "toggleStats" }, proxied: ["render", "remove"], template: function(items){ return $("#urlTemplate").tmpl(items); }, init: function(){ this.item.bind("update", this.render); this.item.bind("destroy", this.remove); }, render: function(){ this.el.html(this.template(this.item)); return this; }, toggleStats: function(){ this.navigate("/stats", this.item.id, true); }, remove: function(){ this.el.remove(); }, destroy: function(){ this.item.destroy(); } }); The exports.UrlsList controller:
exports.UrlsList = Spine.Controller.create({ elements: { ".items": "items", "form": "form", "input": "input" }, events: { "submit form": "create", }, proxied: ["render", "addAll", "addOne"], init: function(){ Url.bind("create", this.addOne); Url.bind("refresh", this.addAll); }, addOne: function(url){ var view = Urls.init({item: url}); this.items.append(view.render().el); }, addAll: function(){ Url.each(this.addOne); }, create: function(e){ e.preventDefault(); var value = this.input.val(); if (value) Url.create({long_url: value}); this.input.val(""); this.input.focus(); } }); The exports.Stats controller:
exports.Stats = Spine.Controller.create({ events: { "click .back": "back" }, proxied: ["change", "render"], init: function(){ Url.bind("update", this.render); }, template: function(items){ return $("#statsTemplate").tmpl(items); }, render: function(){ if ( !this.item ) return; this.el.html(this.template(this.item)); }, change: function(item){ this.item = item; this.navigate("/stats", item.id); this.item.fetchStats(); this.render(); this.active(); }, back: function(){ this.navigate("/list", true); } }); Controller exports.UrlApp:
exports.UrlApp = Spine.Controller.create({ el: $("body"), elements: { "#urls": "urlsEl", "#stats": "statsEl" }, init: function(){ this.list = UrlsList.init({el: this.urlsEl}); this.stats = Stats.init({el: this.statsEl}); this.manager = Spine.Controller.Manager.init(); this.manager.addAll(this.list, this.stats); this.routes({ "": function(){ this.list.active() }, "/list": function(){ this.list.active() }, "/stats/:id": function(id){ this.stats.change(Url.find(id)) } }); Url.fetch(); Spine.Route.setup(); } }); Finally, in order to complete the initialization of our app controller:
exports.App = UrlApp.init(); Code to shorten the URL and click statistics for Bit.ly
(function($){ var defaults = { version: "3.0", login: "legacye", apiKey: "R_32f60d09cccde1f266bcba8c242bfb5a", history: "0", format: "json" }; $.bitly = function( url, callback, params ) { if ( !url || !callback ) throw("url and callback required"); var params = $.extend( defaults, params ); params.longUrl = url; return $.getJSON("http://api.bit.ly/shorten?callback=?", params, function(data, status, xhr){ callback(data.results[params.longUrl].shortUrl, data.results[params.longUrl], data); }); }; $.bitly.stats = function( url, callback, params ) { if ( !url || !callback ) throw("url and callback required"); var params = $.extend( defaults, params ); params.shortUrl = url; return $.getJSON("http://api.bitly.com/v3/clicks?callback=?", params, function(data, status, xhr){ callback(data.data.clicks[0], data); }); }; })(jQuery); Application Index / HTML:
LABjs is used to control the application, but you can easily replace it with something you are used to working with.
<!DOCTYPE html> <html> <head> <link rel="stylesheet" href="css/application.css" type="text/css" charset="utf-8"> <script src="lib/LAB.min.js" type="text/javascript" charset="utf-8"></script> <script type="text/javascript"> $LAB .script("lib/json.js") .script("lib/jquery.js") .script("lib/jquery.tmpl.js") .script("lib/jquery.bitly.js") .script("lib/store.min.js") .script("lib/spine.js") .script("lib/spine.model.local.js") .script("lib/spine.controller.manager.js") .script("lib/spine.route.js") .script("app/models/url.js") .script("app/application.js"); </script> <script type="text/x-jquery-tmpl" id="urlTemplate"> <div class="item"> <div class="show"> <span class="short"> ${long_url} </span> <span class="long"> {{if short_url}} <a href="${short_url}">${short_url}</a> {{else}} Generating... {{/if}} </span> <a class="toggleStats"></a> <a class="destroy"></a> </div> </div> </script> <script type="text/x-jquery-tmpl" id="statsTemplate"> <div class="stats"> <a class="back">Back</a> <h1>Click Statistics</h1> <h1 class="longUrl">${long_url}</h1> <p>Short URL: {{if short_url}} <a href="${short_url}">${short_url}</a> {{else}} Generating... {{/if}} </p> {{if stats}} <p>Global clicks: ${stats.global_clicks}</p> <p>User clicks: ${stats.user_clicks}</p> {{else}} Fetching... {{/if}} </div> </script> </head> <body> <div id="views"> <div id="urls"> <h1>Bit.ly Client</h1> <form> <input type="text" placeholder="Enter a URL"> </form> <div class="items"></div> </div> <div id="stats"> </div> </div> </body> </html> Note:
- For cross-browser compatibility, this example should be run on a live or local web server. Use MAMP / WAMP if necessary;
- For checking click statistics, I recommend using the URLs of the sites that are most popular. For example, information about the site www.google.com is certainly present in the Bit.ly database;
- The demo example uses my own Bit.ly API keys that need to be replaced.
- Pie charts are generated using the Google Chart API. In order not to complicate the approach that is so new to you, I myself chose to change the image of the diagram, but you can easily switch to the Visualization API at any time;
- The application directory structure is completely up to you. Some developers prefer the general structure - model / view / controller, while others prefer to have a universal application folder, where everything is contained in a single file. The example uses the folder structure I’m used to.
- If you want to save unique “views” for content (for example, one view for # ui / dashboard, and another for # ui / stats), then you need to parse the work of spine.controller.manager.js, since In this file there is a solution to this problem.
That's all!
Result
Sources
Conclusion
Spine is a good alternative to Backbone. The documentation is pretty good to continue self-study.
Used materials:
Source: https://habr.com/ru/post/143322/
All Articles