Authentication of GNU / Linux file servers in an AD-based Windows domain. Part 2
1. Configuration files.
We will only configure access to the GNU / Linux server using Samba. User authorization will remain local, using / etc / passwd.
We will assign a static IP address to our new server. Let them be 192.168.7.9.
First you need to check which server we use as a DNS. They should be a domain controller in our network. Our server address is defined as 192.168.7.2. Edit the file /etc/resolv.conf. It should look like this:
search lab.local nameserver 192.168.7.2 Check if everything works:
#host 192.168.7.2 2.7.168.192.in-addr.arpa domain name pointer lab-dc1.lab.local. # Naturally, in your case the names will be different. Be sure to make a record in the domain lab.local in the DNS that refers to our new server. Record in DNS does not mean that our GNU / Linux server is included in the domain. Check:
linux-test:~ # host 192.168.7.9 9.7.168.192.in-addr.arpa domain name pointer test-linux.lab.local. linux-test:~ # host test-linux test-linux.lab.local has address 192.168.7.9 linux-test:~ # To work correctly in a Windows domain, several services are required: Kerberos, LDAP, and Samba. In general, only Samba configuration is required; configuration of other services is optional. But it would be better if we set them up - they may be useful in the future.
Kerberos is configured simply - through a single /etc/krb5.conf file. The main parameters are REALM, pointing to our domain and the address of the Kerberos server is the address of the domain controller. The /etc/krb5.conf file looks like this:
linux-test:~ # more /etc/krb5.conf [libdefaults] default_realm = LAB.LOCAL clockskew = 300 # default_realm = EXAMPLE.COM [realms] LAB.LOCAL = { kdc = 192.168.7.2 default_domain = lab.local admin_server = 192.168.7.2 } # EXAMPLE.COM = { # kdc = kerberos.example.com # admin_server = kerberos.example.com # } [logging] kdc = FILE:/var/log/krb5/krb5kdc.log admin_server = FILE:/var/log/krb5/kadmind.log default = SYSLOG:NOTICE:DAEMON [domain_realm] .lab.local = LAB.LOCAL [appdefaults] pam = { ticket_lifetime = 1d renew_lifetime = 1d forwardable = true proxiable = false minimum_uid = 1 external = sshd use_shmem = sshd clockskew = 300 } The [libdefaults] section indicates the default domain. We have this LAB.LOCAL. Further, in the [realms] section, the parameters for LAB.LOCAL are specified — the domain name and the address of the Kerberos server. In our case, the domain controller acts as the Kerbeors server. The [logging] section indicates the location of the log files. These files will come in handy for the troubleshooting procedure if something goes wrong.
Verify Kerberos operation:
linux-test:~ # kinit Administrator@LAB.LOCAL Password for Administrator@LAB.LOCAL: linux-test:~ # klist Ticket cache: FILE:/tmp/krb5cc_0 Default principal: Administrator@LAB.LOCAL Valid starting Expires Service principal 04/05/12 11:22:23 04/05/12 21:22:35 krbtgt/LAB.LOCAL@LAB.LOCAL renew until 04/06/12 11:22:23 linux-test:~ # The kinit command receives a ticket from the server, and the klist shows received tickets from the server. Running kinit is not mandatory, but you need to somehow check how Kerberos works?
Configuring LDAP is also optional - Samba will build the necessary files and make the necessary requests. But LDAP can come in handy later. OpenLDAP configuration is stored in the /etc/openldap/ldap.conf file. Note that there may be two ldap.conf files in the system. They have different purposes and even slightly different syntax. The directory / etc / openldap contains the ldap.conf file for OpenLDAP (and for Samba), and the configuration for name resolution through LDAP (for nss_ldap) is stored in the /etc/ldap.conf file. We will return to the /etc/ldap.conf file in other articles, now we will configure /etc/openldap/ldap.conf
linux-test:~ # cat /etc/openldap/ldap.conf # # LDAP Defaults # # See ldap.conf(5) for details # This file should be world readable but not world writable. #BASE dc=example,dc=com #URI ldap://ldap.example.com ldap://ldap-master.example.com:666 #SIZELIMIT 12 #TIMELIMIT 15 #DEREF never uri ldap://192.168.7.2 base DC=lab,DC=local linux-test:~ # As you can see, everything is very simple - you need to specify the LDAP server URI (this is our domain controller) and the base for the search.
Now we come to the most difficult - the Samba setup.
Samba includes 3 daemons - smbd, nmbd and winbind. They all take the settings from the /etc/samba/smb.conf file.
Smbd is responsible for client access to the SMB / CIFS service (this is actually the Samba server). Nmbd is a name resolution service for Netbios. Winbind is a name resolution service (for both computers and users) through Windows domain services.
In many manuals you can find mention of the fact that in addition to Samba, you need to configure and winbind - the service responsible for the relationship between GNU / Linux and the Windows domain controller. In the particular case when you need to configure only Samba, the winbind settings can be omitted. Winbind provides authorization in the Windows domain of a wide variety of services, providing an interface between PAM modules and a Windows domain controller. When winbind fails, Samba remains operational. But by setting up winbind, we make it possible to further expand our server by adding various services that log in through a domain controller.
We will make the simplest server by opening all users access to a common file directory and to the users home directory. We will talk more about setting up access to the Samba server in other articles.
In the /etc/samba/smb.conf file we have to specify the following lines:
[global] workgroup = LAB passdb backend = ldapsam:ldap://192.168.7.2 printing = cups printcap name = cups printcap cache time = 750 cups options = raw map to guest = Bad User logon path = \\%L\profiles\.msprofile logon home = \\%L\%U\.9xprofile logon drive = P: usershare allow guests = Yes Here we indicate the abbreviated name of our domain (LAB) and the place where passwords are stored - the passdb backend parameter indicating that the passwords are on the LDAP server, which is the domain controller. By the way, you can specify multiple servers by listing them separated by a space. This is useful if we have several domain controllers. The string usershare allow guests = Yes allows users to control access to their folders by opening them to guests. The remaining lines relate to print management and the registration process. In our case, they are not mandatory and migrated from the configuration file of the Samba distribution.
Continue editing the [global] section of the smb.conf file.
domain logons = No domain master = No security = ADS encrypt passwords = yes The domain logons and domain master lines allow you to use Samba as a domain controller. This is not our case and therefore, No.
The string security = ADS is key. Thus, we indicate to Samba that the server is a member of a Windows domain and AD is responsible for authorization. The string encrypt passwords = yes means that encrypted passwords are used.
Continue to edit all the same section [global].
ldap admin dn = Administrator@lab.local ldap delete dn = No ldap group suffix = ou=Groups ldap idmap suffix = ou=Idmap ldap machine suffix = ou=Computers ldap passwd sync = Yes ldap ssl = No ldap suffix = DC=lab,DC=local ldap timeout = 5 ldap user suffix = ou=Users These lines relate to managing the connection to the LDAP server. Note that the administrator DN entry form has the form user @ domain — it must match the one we specified when testing Kerberos. The remaining lines indicate the suffixes of different locations in AD.
The following lines refer to Kerberos:
realm = LAB.LOCAL template homedir = /home/%D/%U winbind refresh tickets = yes kerberos method = system keytab Here we specify the REALM and authentication method in Kerberos.
Now the lines that relate to the winbind setup:
winbind separator = / winbind enum users = yes winbind enum groups = yes winbind nested groups = yes winbind use default domain = No winbind nss info = rfc2307 winbind offline logon = yes Here are various parameters of Winbind operation - the form of separation of domain names and user, permission for winbind to list user and group names, permission for offline authentication, etc. These settings are recommended by the Samba developers.
Global Settings section is complete. Please note that we have no password server and idmap backend strings that can be found in other manuals. Samba should figure out where the passwords come from.
Moving on to setting up directories. Everything is simple here:
[homes] comment = Home Directories valid users = %S, %D%w%S browseable = No read only = No inherit acls = Yes available = Yes [profiles] comment = Network Profiles Service path = %H read only = No store dos attributes = Yes create mask = 0600 directory mask = 0700 [users] comment = All users path = /home read only = No inherit acls = Yes veto files = /aquota.user/groups/shares/ [groups] comment = All groups path = /home/groups read only = No inherit acls = Yes [SRV] comment = Common files path = /local write list = Administrator guest ok = Yes hosts allow = 192.168.7. To the standard list of shared directories distributed with the Samba distribution we have added only the [SRV] section - the public directory.
The configuration of all the necessary files is completed, and we proceed to the verification of our server.
2. Verifying performance.
Here we will check the correctness of our settings and include our new server in the Windows domain. First check the correctness of the Samba configuration:
l
inux-test:~ # testparm Load smb config files from /etc/samba/smb.conf rlimit_max: increasing rlimit_max (1024) to minimum Windows limit (16384) Processing section "[homes]" Processing section "[profiles]" Processing section "[users]" Processing section "[groups]" Processing section "[SRV]" Loaded services file OK. Server role: ROLE_DOMAIN_MEMBER Press enter to see a dump of your service definitions As you can see, we have no serious warnings or configuration errors.
Now let's start the smbd, nmbd and winbindd daemons in turn. We do this through the /etc/init.d/smb, /etc/init.d/nmb and /etc/init.d/winbind files. You can do this manually, which can be useful for various additional information. How to do this can be found in the built-in manuals (man) for smbd, nmbd and winbindd.
Check the status of our domain and our server in the domain. Domain status can be obtained with the command net ads info
linux-test:~ # net ads info LDAP server: 192.168.7.2 LDAP server name: LAB-DC1.lab.local Realm: LAB.LOCAL Bind Path: dc=LAB,dc=LOCAL LDAP port: 389 Server time: Thu, 05 Apr 2012 13:03:47 MSK KDC server: 192.168.7.2 Server time offset: 4 linux-test:~ # As you can see, everything is in order. If any parameters displayed by the team do not coincide with our plan - you should look for the cause. Now check the status of our server in the domain:
l
inux-test:~ # net ads status -U Administrator Enter Administrator's password: No machine account for 'LINUX-TEST' found linux-test:~ # It follows that our server is not included in the domain. The request to the domain controller is made on behalf of the administrator, and the password must be specified from the Windows domain administrator account.
Now we need to enable our server in the domain:
l
inux-test:~ # net ads join -U Administrator Enter Administrator's password: Using short domain name -- LAB Joined 'LINUX-TEST' to realm 'lab.local' DNS Update for linux-test.lab.local failed: ERROR_DNS_UPDATE_FAILED DNS update failed! linux-test:~ # So, our new server is included in the domain, as evidenced by the lines:
Using short domain name -- LAB Joined 'LINUX-TEST' to realm 'lab.local' Dynamic DNS change has not passed. It's not scary, because it was not planned. Now it is recommended to restart all our processes - smbd, nmbd and winbindd. Note that after a restart, a few minutes should pass to further checks.
Check the status of our server in the domain:
linux-test:~ # net ads status -U Administrator Enter Administrator's password: In response, we will receive a printout of the state of our new server in the domain. There will be various AD fields related to our server. We will also see our GNU / Linux server on the Computers tab by running the AD Administrator tool on the domain controller.
You can check the list of domain users:
l
inux-test:~ # net ads user -U Administrator Enter Administrator's password: Administrator Guest krbtgt usertest linux-test:~ # And check winbind's work:
linux-test:~ # wbinfo -t checking the trust secret for domain LAB via RPC calls succeeded linux-test:~ # And get a list of users in the domain:
l
inux-test:~ # wbinfo -u LAB/administrator LAB/guest LAB/krbtgt LAB/usertest linux-test:~ # You can check the status of the domain through wbinfo:
l
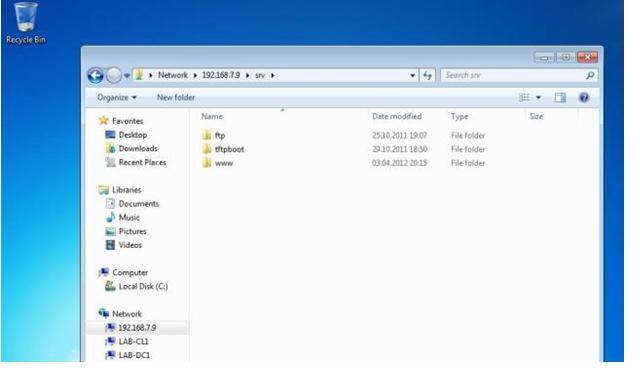
inux-test:~ # wbinfo -D LAB Name : LAB Alt_Name : lab.local SID : S-1-5-21-3914562201-450990341-53424453 Active Directory : Yes Native : Yes Primary : Yes linux-test:~ # wbinfo -P checking the NETLOGON dc connection succeeded linux-test:~ # Everything is good. Now the most important check is to try to open directories on our new server using a workstation running Windows 7. Our workstation is included in the domain. We should see our new server on the Network tab of the Windows Explorer, either by specifying the name or IP address:
')
Now you can proceed to the further procedures for setting up our server. In the future, we will look at some of the nuances of the process described, depending on the GNU / Linux distribution, and take a closer look at setting up access rights to the Samba server.
The work was performed on the basis of the Information Computing Center of the Moscow Power Engineering Institute.
Source: https://habr.com/ru/post/143190/
All Articles