Unity3d Lessons from Unity 3D Student (B04-B08)
Good day.
Previous lessons can be found in the corresponding topic.
Now in each post in parentheses (at the end) numbers of lessons will be indicated. The letter at the beginning of the number indicates the section (B-Beginner, I - Intermediate).
')
PS: If you did not pass the previous lessons, I highly recommend them to go, because Subsequent occasionally refer to them.
The lesson describes how to remove objects from the scene, using the command Destroy (destroy).
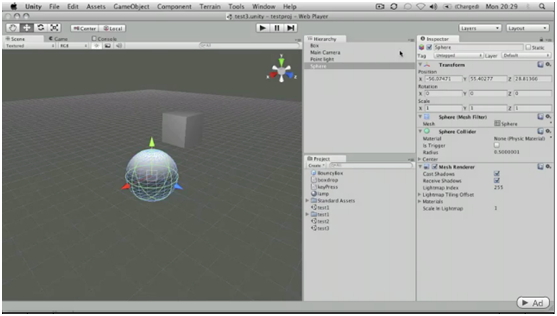
Create an empty scene and add a sphere ( GameObject-> Create Other-> Sphere ) and a cube ( GameObject-> Create Other-> Cube ) to it. The cube is called “Box” . Arrange the objects as shown in the figure below.
Add a C # Script ( Project View-> Create-> C # Script ) and name it Destroyer . As already mentioned, when creating a C # script, Unity creates a framework consisting of connected libraries and the main class (used by the script) with the Start () and Update () methods. In Basic Lesson 02 (input basics) , the Update () method was used, which is called every frame. In this case, we will use the Start () method, which runs immediately after loading the scene. We add the function Destroy () to the body of the Start () method and pass the gameObject into it, specifying in such a way that the script should destroy the object of which it is a component:
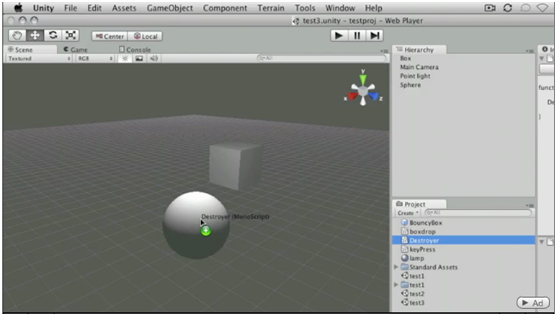
Add a script to the sphere. This can be done in several ways. Drag the script from the Project View onto the sphere in the Scene View .
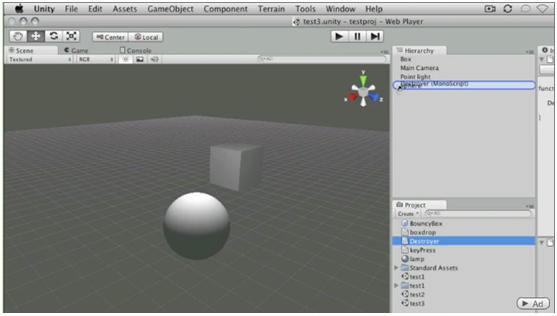
Or the name of the object in the hierarchy .
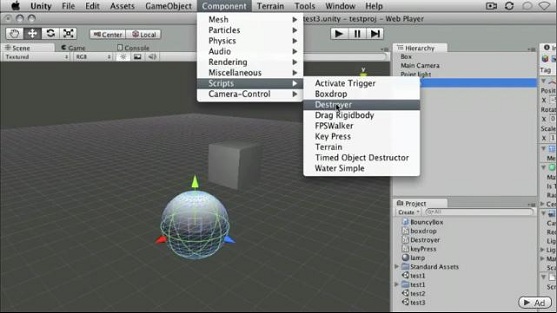
You can also select a sphere and add a script through the component menu ( Component-> Scripts-> Destroyer ) or simply by dragging the script into the Inspector View of the selected object.
Select the sphere again and make sure that your script is present among the components.

Click on Play and you will see that immediately after loading the scene the sphere disappears.

Let's now try to destroy another object. For this we need the static Find method of the GameObject class. Replace the code in the Start () method with the following:
Note from the author of translation : Please note that in the second case we pass the value by calling a static function, so we write the name of the class ( G ameObject - with a capital letter), while in the first we pass an object of this class ( g ameObject - with a small letters). Otherwise, the compiler will generate an error:
which translates as:
“The static member of UnityEngine.GameObject.Find (string) cannot be accessed by an instance (class) reference, instead define (call) it with a type name.”
Let's save the changes in the script code. The script does not need to be removed from the sphere and added to our cube, since No matter what object it is now attached to, the script will search for any object (on stage) with the name Box . Press Play and see how the sphere now remains in the scene, and the cube disappears.

What if we need to destroy the object not immediately, but after some time? This can be done by passing the value to the 2nd parameter of the Destroy function:
Click Play and make sure that the cube disappears 3 seconds after the entire scene loads.
Link to the original lesson
Help on the Destroy () function from the official Unity3d scripts reference
The lesson describes how to create objects in the scene in real time (runtime) using prefabs and the command Instantiate (instantiation)
If you want to add objects to the scene when the scene is already loaded, then you need to use scripts, or rather the command Instantiate () .
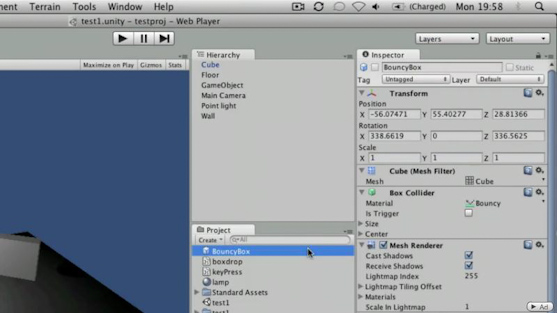
Load a scene from Basic Lesson 03 (Prefabs) or create the same new one. In our scene there is a prefab BouncyBox .
Click Play and make sure that the cube still falls and pushes off the surfaces.
Now remove the BouncyBox instance from the scene.
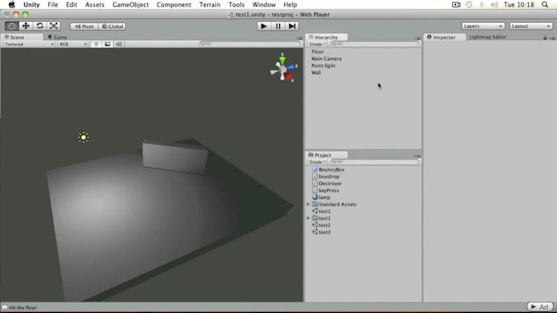
After that, add an empty object (recall GameObject-> Create Empty or Ctrl + Shift + N in Windows, Cmd + Shift + N in MacOS). Place it approximately in the place where the BouncyBox was previously used.
Create a C # Script and call it Creater . Let's start editing the script. Let's create an open ( public ) GameObject type variable and name it thePrefab . The public modifier must be specified if, for example, you want to pass the value of a variable through the Inspector View . After that, in the body of the Start () function, create another GameObject (with the name instance ) and initialize it with the value using the static function Instantiate () .
Consider the Instantiate () method in more detail.
The method clones the original object with the specified position vector ( position ) and rotation quaternion.
Type Vector3 is the usual 3-component vector (similar to the vector of R 3 ).
The Quaternion type is a quaternion that sets the rotation of an object.
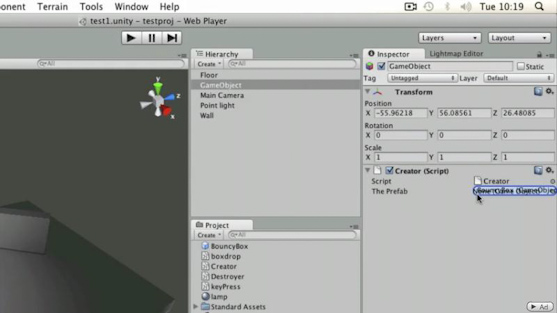
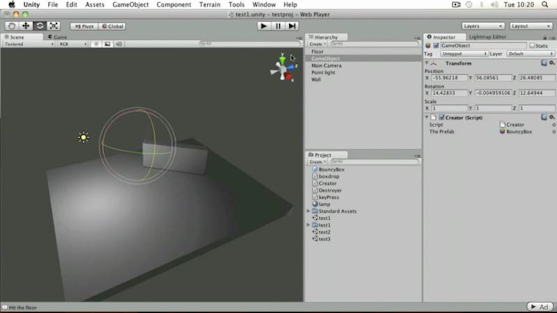
Add a script to an empty object (with the name GameObject ). I remember that since thePrefab is declared with the public modifier, you can set its initial value directly in the Inspector View (for the corresponding component, that is, in our case, this is the GameObject's Creator ). Drag our prefab to the place where you specify the value (or select it from the list by clicking the circle on the right).
Press Play and see that our jumping cube has appeared on the scene.

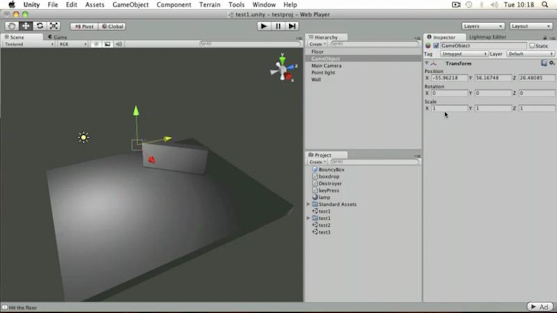
But our cube just jumps up and down, because it does not have an initial angle of rotation. Select a GameObject and rotate it at a slight angle.
Now, by pressing Play , you will see that the cube falls and repels at different angles.
Link to the original lesson
Description of the function instantiate () from the official Unity3d scripts directory
Transform class description from the official Unity3d scripts reference
This lesson describes how to use Unit in scripts.
create a simple timer using Time.deltaTime and a variable of type float.
Use the scene from the previous lesson (with an empty game object,
generating copies of the prefab, i.e. BouncyBox ).
Create a C # script and call it Timer . Add the variable myTimer , and write the following code.
Save the script and switch back to Unity. Add a script to the GameObject object.

Let me remind you, because myTimer is declared open ( public ), then in the Inspector View you can change its initial value.
Click Play . As soon as the value of myTimer drops to zero, in the status bar you will see the line GAME OVER . The value of the myTimer variable will continue to drop (this can be seen in the Inspector View ).

To prevent the myTimer variable from dropping below zero, we add one more branch to the Update () function, as a result we get the following code:
Click Play and follow the behavior of the myTimer variable. When its value is close enough to zero, it will cease to change.

Link to the original lesson
Information about Time.deltaTime from the Unity3d official scripts guide
The tutorial describes how to move objects using the transform.Translate function.
Create a scene with a cube, a camera and a light source.

Create a new C # script and call it Move .
Since the motion must be continuous in time, the main code will be located in the Update () method. Call the Translate function of the transform object and pass it the Vector3 (0, 0, 1) parameter as a parameter. We get the following code:
We will understand in more detail in the code. Here transform is an object of the Transform class associated with our object. The Translate () method moves an object along a vector a distance equal to its length (parallel transfer).
Save our script and add it to our cube. Click Play and see how the cube rapidly flies along the Oz axis.

Let's reduce the speed of movement, for example, by multiplying our vector by Time.deltaTime , that is:
Click Play and make sure that the cube starts moving noticeably slower.
You can make our script more convenient to use if the speed is set not by a fixed vector, but through a variable. Let's create a public variable of type float and call it speed . With this variable you can set the initial speed through the Inspector View (by default it will be equal to 5.0f ):
Let's save the script and make sure that in the Inspector View , the Move component has a variable Speed .

See how the speed of movement of our object will change in accordance with the given initial value of this variable. For example, when Speed = 3, the speed of the object is not very fast, but not slow.
Note : For the expression Vector3 (0.0f, 0.0f, 1.0f) there is a short (but apparently slightly slower, if not right, please correct) record Vector3.forward .
A piece of code from the wrapper:
Link to the original lesson
Information about the transform.Translate method from the official Unity3d scripts reference
Information Time.deltaTime from the official reference book on Unity3d scripts
The lesson describes how to move the physical body (Rigidbody) using the application of force.
If you have an object on the scene with the Rigidbody component, then you need to set the motion using the application of force (thus transferring all the motion calculations to the physical game engine ). Otherwise, you can start to conflict with the physics of the object. We still use the scene from Basic Lesson 03 .

Create a C # script and call it Force . In the Start () method, we will call the AddForce () method of the rigidbody component (associated with our object) and pass it the vector of the applied force Vector3 (0.0f, 0.0f, power) . In the class, we will create a variable of the type float with the name power and a value equal to 500.0f by default:
Save the script and add it to our object (or prefab). Now, if you click Play , you will see how the cube does not fall down but at an angle, due to the force applied by the Oz axis.

Link to the original lesson
Rigidbody class information from the Unity3d official scripts reference
Information about the AddForce method from the Unity3d official scripts reference book
PS: Have a good and fruitful weekend
Previous lessons can be found in the corresponding topic.
Now in each post in parentheses (at the end) numbers of lessons will be indicated. The letter at the beginning of the number indicates the section (B-Beginner, I - Intermediate).
')
PS: If you did not pass the previous lessons, I highly recommend them to go, because Subsequent occasionally refer to them.
Basic Lesson 04 - Destruction of objects
The lesson describes how to remove objects from the scene, using the command Destroy (destroy).
Create an empty scene and add a sphere ( GameObject-> Create Other-> Sphere ) and a cube ( GameObject-> Create Other-> Cube ) to it. The cube is called “Box” . Arrange the objects as shown in the figure below.
Add a C # Script ( Project View-> Create-> C # Script ) and name it Destroyer . As already mentioned, when creating a C # script, Unity creates a framework consisting of connected libraries and the main class (used by the script) with the Start () and Update () methods. In Basic Lesson 02 (input basics) , the Update () method was used, which is called every frame. In this case, we will use the Start () method, which runs immediately after loading the scene. We add the function Destroy () to the body of the Start () method and pass the gameObject into it, specifying in such a way that the script should destroy the object of which it is a component:
// Start() , Start() { // Destroy(gameObject); } Add a script to the sphere. This can be done in several ways. Drag the script from the Project View onto the sphere in the Scene View .
Or the name of the object in the hierarchy .
You can also select a sphere and add a script through the component menu ( Component-> Scripts-> Destroyer ) or simply by dragging the script into the Inspector View of the selected object.
Select the sphere again and make sure that your script is present among the components.
Click on Play and you will see that immediately after loading the scene the sphere disappears.
Let's now try to destroy another object. For this we need the static Find method of the GameObject class. Replace the code in the Start () method with the following:
// Box – Destroy(GameObject.Find(“Box”)); Note from the author of translation : Please note that in the second case we pass the value by calling a static function, so we write the name of the class ( G ameObject - with a capital letter), while in the first we pass an object of this class ( g ameObject - with a small letters). Otherwise, the compiler will generate an error:
error CS0176: Static member `UnityEngine.GameObject.Find(string)' cannot be accessed with an instance reference, qualify it with a type name insteadwhich translates as:
“The static member of UnityEngine.GameObject.Find (string) cannot be accessed by an instance (class) reference, instead define (call) it with a type name.”
Let's save the changes in the script code. The script does not need to be removed from the sphere and added to our cube, since No matter what object it is now attached to, the script will search for any object (on stage) with the name Box . Press Play and see how the sphere now remains in the scene, and the cube disappears.
What if we need to destroy the object not immediately, but after some time? This can be done by passing the value to the 2nd parameter of the Destroy function:
// Box 3 Destroy(GameObject.Find(“Box”), 3); Click Play and make sure that the cube disappears 3 seconds after the entire scene loads.
Link to the original lesson
Additional materials:
Help on the Destroy () function from the official Unity3d scripts reference
Basic Lesson 05 - Implementing Object Creation
The lesson describes how to create objects in the scene in real time (runtime) using prefabs and the command Instantiate (instantiation)
If you want to add objects to the scene when the scene is already loaded, then you need to use scripts, or rather the command Instantiate () .
Load a scene from Basic Lesson 03 (Prefabs) or create the same new one. In our scene there is a prefab BouncyBox .
Click Play and make sure that the cube still falls and pushes off the surfaces.
Now remove the BouncyBox instance from the scene.
After that, add an empty object (recall GameObject-> Create Empty or Ctrl + Shift + N in Windows, Cmd + Shift + N in MacOS). Place it approximately in the place where the BouncyBox was previously used.
Create a C # Script and call it Creater . Let's start editing the script. Let's create an open ( public ) GameObject type variable and name it thePrefab . The public modifier must be specified if, for example, you want to pass the value of a variable through the Inspector View . After that, in the body of the Start () function, create another GameObject (with the name instance ) and initialize it with the value using the static function Instantiate () .
public GameObject thePrefab; void Start () { GameObject instance = new GameObject(); instance = Instantiate(thePrefab, transform.position, transform.rotation) as GameObject; } Consider the Instantiate () method in more detail.
Instantiate(GameObject original, Vector3 position, Quaternion rotation) The method clones the original object with the specified position vector ( position ) and rotation quaternion.
Type Vector3 is the usual 3-component vector (similar to the vector of R 3 ).
The Quaternion type is a quaternion that sets the rotation of an object.
Add a script to an empty object (with the name GameObject ). I remember that since thePrefab is declared with the public modifier, you can set its initial value directly in the Inspector View (for the corresponding component, that is, in our case, this is the GameObject's Creator ). Drag our prefab to the place where you specify the value (or select it from the list by clicking the circle on the right).
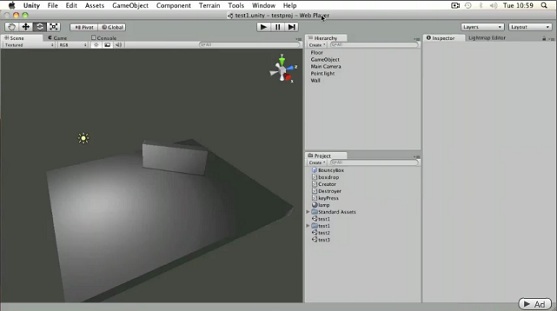
Press Play and see that our jumping cube has appeared on the scene.
But our cube just jumps up and down, because it does not have an initial angle of rotation. Select a GameObject and rotate it at a slight angle.
Now, by pressing Play , you will see that the cube falls and repels at different angles.
Link to the original lesson
Additional materials:
Description of the function instantiate () from the official Unity3d scripts directory
Transform class description from the official Unity3d scripts reference
Basic Lesson 06 - Simple Timer
This lesson describes how to use Unit in scripts.
create a simple timer using Time.deltaTime and a variable of type float.
Use the scene from the previous lesson (with an empty game object,
generating copies of the prefab, i.e. BouncyBox ).
Create a C # script and call it Timer . Add the variable myTimer , and write the following code.
public float myTimer = 5.0f; void Update() { //Time.delaTime - (), (read only) myTimer -= Time.deltaTime; if (myTimer <= 0.0f) { Debug.Log("GAME OVER"); } } Save the script and switch back to Unity. Add a script to the GameObject object.
Let me remind you, because myTimer is declared open ( public ), then in the Inspector View you can change its initial value.
Click Play . As soon as the value of myTimer drops to zero, in the status bar you will see the line GAME OVER . The value of the myTimer variable will continue to drop (this can be seen in the Inspector View ).
To prevent the myTimer variable from dropping below zero, we add one more branch to the Update () function, as a result we get the following code:
void Update () { if(myTimer > 0){ myTimer -= Time.deltaTime; }else if(myTimer <= 0){ Debug.Log("GAME OVER"); } } Click Play and follow the behavior of the myTimer variable. When its value is close enough to zero, it will cease to change.
Link to the original lesson
Additional materials:
Information about Time.deltaTime from the Unity3d official scripts guide
Basic Lesson 07 - Basics of Movement
The tutorial describes how to move objects using the transform.Translate function.
Create a scene with a cube, a camera and a light source.
Create a new C # script and call it Move .
Since the motion must be continuous in time, the main code will be located in the Update () method. Call the Translate function of the transform object and pass it the Vector3 (0, 0, 1) parameter as a parameter. We get the following code:
void Update () { transform.Translate(new Vector3(0.0f, 0.0f, 1.0f)); // Oz } We will understand in more detail in the code. Here transform is an object of the Transform class associated with our object. The Translate () method moves an object along a vector a distance equal to its length (parallel transfer).
Save our script and add it to our cube. Click Play and see how the cube rapidly flies along the Oz axis.
Let's reduce the speed of movement, for example, by multiplying our vector by Time.deltaTime , that is:
transform.Translate(new Vector3(0.0f, 0.0f, 1.0f) * Time.deltaTime); Click Play and make sure that the cube starts moving noticeably slower.
You can make our script more convenient to use if the speed is set not by a fixed vector, but through a variable. Let's create a public variable of type float and call it speed . With this variable you can set the initial speed through the Inspector View (by default it will be equal to 5.0f ):
public float speed = 5.0f; void Update () { transform.Translate(new Vector3(0.0f, 0.0f, speed) * Time.deltaTime); } Let's save the script and make sure that in the Inspector View , the Move component has a variable Speed .
See how the speed of movement of our object will change in accordance with the given initial value of this variable. For example, when Speed = 3, the speed of the object is not very fast, but not slow.
Note : For the expression Vector3 (0.0f, 0.0f, 1.0f) there is a short (but apparently slightly slower, if not right, please correct) record Vector3.forward .
A piece of code from the wrapper:
public static Vector3 forward { get { return new Vector3(0.0f, 0.0f, 1.0f); } } Link to the original lesson
Additional materials:
Information about the transform.Translate method from the official Unity3d scripts reference
Information Time.deltaTime from the official reference book on Unity3d scripts
Basic Lesson 08 - Basics of movement with the help of force.
The lesson describes how to move the physical body (Rigidbody) using the application of force.
If you have an object on the scene with the Rigidbody component, then you need to set the motion using the application of force (thus transferring all the motion calculations to the physical game engine ). Otherwise, you can start to conflict with the physics of the object. We still use the scene from Basic Lesson 03 .
Create a C # script and call it Force . In the Start () method, we will call the AddForce () method of the rigidbody component (associated with our object) and pass it the vector of the applied force Vector3 (0.0f, 0.0f, power) . In the class, we will create a variable of the type float with the name power and a value equal to 500.0f by default:
public float power = 500.0f; void Start () { rigidbody.AddForce(new Vector3(0.0f, 0.0f, power)); } Save the script and add it to our object (or prefab). Now, if you click Play , you will see how the cube does not fall down but at an angle, due to the force applied by the Oz axis.
Link to the original lesson
Additional materials:
Rigidbody class information from the Unity3d official scripts reference
Information about the AddForce method from the Unity3d official scripts reference book
PS: Have a good and fruitful weekend
Source: https://habr.com/ru/post/142845/
All Articles