User Authorization Management System on thousands of servers
 When managing a large fleet of servers (100 or more) at some point, the question arises of how to simplify routine tasks.
One of the main requirements in such conditions is to have a complete understanding of what happens when and on servers that are in the area of personal responsibility, but which are still available to at least a few dozen developers.
Today we will talk about authorization of users on Linux-servers using the MySQL database and the Puppet application.
System requirements and possible solutions
So, we were faced with the task of implementing a centralized system for controlling user access to servers.
')
Of course, we already had a similar system, and it worked perfectly acceptable, performed the tasks assigned to it and in general met our requirements. Management was also centralized.
But over time, new tasks began to appear, which in the existing conditions became problematic to solve. And more and more often we understood: it is time to change something in this scheme. In the end, it was decided to refine the current system to fit our needs.
As a result of the reflections of the IT staff, several ideas emerged:
- Using the LDAP directory in various variations.
- Creating a list of users in one place, putting this list on all servers (possible access control at the access.conf level).
- LDAP paired with Kerberos.
- Formation of packages (for example, rpm) on the basis of some kind of storage with further installation (for example, as an update package).
Each of the ideas had its own pros and cons. For example, in the case of LDAP (or LDAP plus Kerberos), we would have to study additional services, solve storage optimization issues in the LDAP directory, install additional LDAP-proxy to reduce the load on the main server (because we have really large loads). When choosing options 2 and 4, we would get the same tool, which, alas, no longer satisfy our needs.
Once on Monday (after a thorough rest and by virtue of a good mood), one interesting idea appeared: in our work we use the Puppet application, including to issue rights and privileges to users. So why not use it as a basic tool?
Here the most interesting thing began: there was no ready-made solution, but there was a list of mandatory requirements for our system:
- When choosing a user to get a list of available hosts.
- Give the user sudo-privileges, which may be different depending on the host.
- Immediate revocation of privileges and on-demand access.
- Easy to manage (add, delete, edit).
- No need to create new services and services, which later will have to learn, support and maintain.
- Do not bind the server to external sources of authorization, because Using local Unix authentication is more reliable and time tested.
And as a bonus, I would like to receive the following:
- support of keys rsa, dsa in unlimited quantities;
- change tracking;
- support for templates for the same tasks (later in the article it is described what it is for);
- support of "regular expressions" in the "Servers that can be accessed" field;
- group support;
- quota support.
As a result, it was decided to store data structures in MySQL (storage in the database seemed convenient. The structure that is in it can be stored in other ways.), Generate puppet-like manifestos by a “self-written” handler, and also “attach” to everything this simple web ui. Looking ahead, I want to say that the result exceeded our expectations, because At the writing stage, important and interesting points were added.
Implementation of the idea
Immediately, we note that we have several geographically remote sites where the equipment is located; we will denote them “Platform 1”, “Platform 2”, etc. Please note that the storage structure below is shown as an example only.
Servers (nodes) in our example will have the following notation:
- www is a web cluster that includes all nodes, for example www1, www2 ... wwwN;
- www134 is one particular node in the web cluster group;
- www [15-17] are the www15, www16, www17 nodes from the web cluster group (used to not write them in turn).
Database structure
1. The Users table is the main table containing the following information:
- username;
- Full name of the user;
- groups to which it belongs;
- command interpreter (we do not mind that users use what is convenient for them);
- the server to which the user must have access;
- public keys;
- file system quota (there is a need to use on some hosts);
- identifiers of sudo-templates attached to a user.
2. The UsersWithBigUid table is similar to the previous one, but it is used to create "users for business needs" (for example, there is a geographically remote user who should not be included anywhere, but he needs access to a specific server, node or nodes).
3. Table VpnOnlyUsers :
- username;
- hosts that the user must have access to via a VPN connection.
4. Table TmplSudoersRules with a description of each sudo rule included in a particular template.
5. Table TmplSudoers , containing the names and comments on sudo-patterns.
6. The SystemUsers table is almost the same as a table with simple users, but it is used to house users with unlimited access. In the table there is an additional field with the platform identifier in case the user is needed only on one of the bottom.
7. The sudoers table contains personalized sudo rules for users.
8. The Hostaliases table consists of server name aliases, which in certain cases are more convenient than names, for example, when several roles are assigned to one server. With the help of this functionality, we get another level of abstraction and the node name is not important to us.
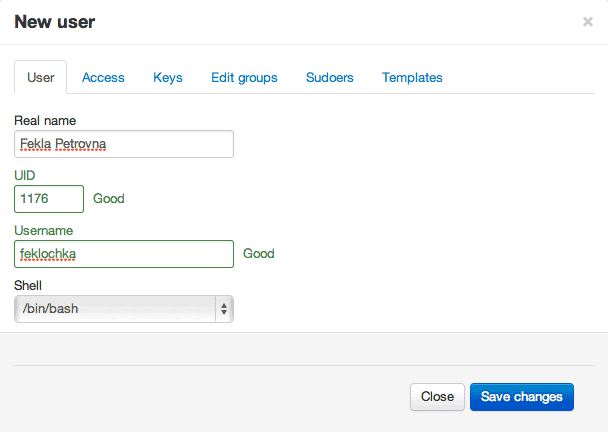
Creating a new user and his web interface
1. Fill out general information about the user.
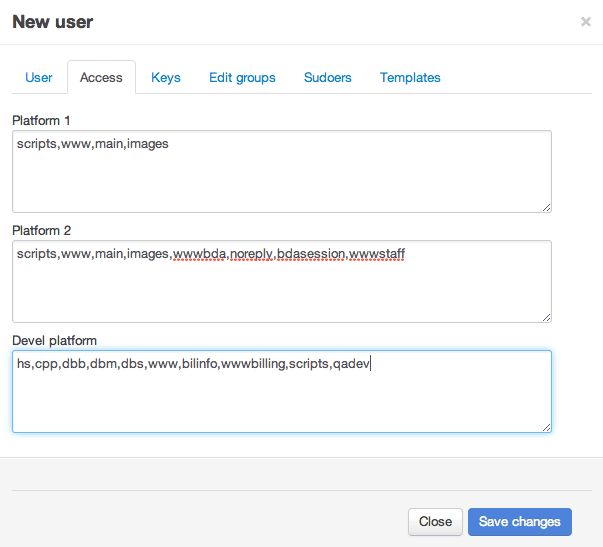
2. We give access to servers.
Note Fields * servers - a comma-separated list of server and / or group names. An example of filling these fields:
- % chars is a group, for example, “www”;
- % chars% int is a specific node, for example, “www89”;
- % chars [% int-% int] is the range of sites in a particular group, for example, “www [17-29]”.
3. Add one or more sshpub keys.

4. Add sudo-rights to the user.

After adding a user and specifying sudo-permissions, access will be updated on all servers within a few minutes. The institution of the user on the servers can be accelerated, if necessary.
Let's see what we need to do to get the VPN ACL. Everything is more than simple:
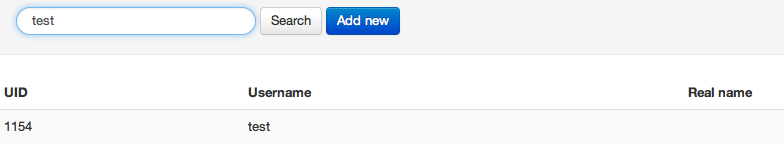
1. Choose a user.
2. Open the VPN tab, select "Generate VPN". We get the rule that you just need to add to RADIUS.
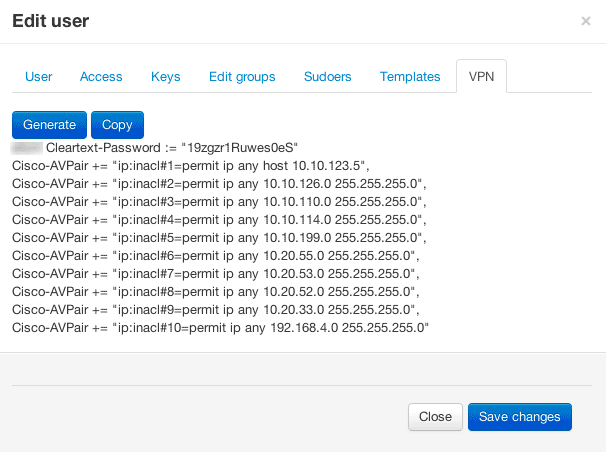
Note Of course, the data itself does not appear. In our case, the fields with the list of servers to which the user has access are processed. Based on this data, a VPN access-list is formed. It also provides for a certain flexibility, i.e. we can give access to both 1 node in the subnet and the entire subnet. Duplication is absent, i.e. if there is access to the subnet 10.11.12.0/24, then it does not make sense to add something like “ ip: inacl # N = permit ip any host 10.11.12.18 ”. In our example, the data obtained must be entered into the configuration of the VPN authorization manually (we suggest that you yourself think about how this can be done - let it be a kind of “homework”).
Some examples (Task - Solution)
Task 1: withdraw all user access.
Solution: clear the fields with the indication of servers at the user, after which it will automatically be deleted on all servers (the home directory will not be deleted).
Task 2: revoke access to a specific server.
Solution: remove this host in the general list of user’s hosts.
Task 3: provide access to a specific server (s).
Solution: add the desired host (s) to the allowed user.
Task 4: to enable the restarting of nginx on machines in the www-cluster to a group of individuals.
Decision:
a. We get a new sudoers-template, give it an adequate name and comment.
INSERT INTO `tmplsudoers` (`tmplname`, `comments`) VALUES ('suwwwrun', 'su to wwwrun user and restart nginx if needed'); b. Add rules specific to this template.
INSERT INTO `tmplsudoersrules` (`tmplid`, `hostname`, `runas`, `commands`, `nopasswd`) VALUES (26, 'www[0-9]*', 'ALL', '/bin/su - wwwrun', 1); INSERT INTO `tmplsudoersrules` (`tmplid`, `hostname`, `runas`, `commands`, `nopasswd`) VALUES (26, 'www[0-9]*', 'ALL', '/etc/init.d/nginx *', 1); c. Now we just need to add this template to the user in the interface, after which the whole set of rules will work.
Note In addition to the template rules, we can set unique rules for individual users.
Task 5: Ensure the safe addition of sudo, since in some cases a seemingly harmless sudo can be a security issue (for example, less, mount, or rsync). Allow HelpDesk to give such rights to employees.
Solution: templates are experienced system administrators, and HelpDesk employees only tick the appropriate boxes.
Allow HelpDesk employees to assign templates, but prohibit their adjustment, and also prohibit the issuance of unique rules to a specific user.
Task 6: to create sudoers in such a way as not to disrupt the operation of the server (s), because the presence of incorrect syntax and / or duplication of the HOSTALIASES directives can have bad consequences.
Decision:
a. Before adding or changing a sudoers file, the syntax is checked for the user (if there is an error, a notification is generated, the sudoers file is not changed for the user).
An example of a function in Python:
VISUDO ='/usr/sbin/visudo' def visudoCheck(filename,user): visudo_cmd = 'echo -ne "%s "; echo "%s" | %s -c -f -' % (user,filename,VISUDO) (visudo_status, visudo_output) = commands.getstatusoutput(visudo_cmd) if not visudo_status == 0: print "\n"+filename sys.stderr.write(visudo_output[:1024]) return visudo_status b. The templates are experienced system administrators, and HelpDesk employees only tick the appropriate boxes.
c. The following rules are used when forming the “Host_Alias” lines to avoid duplication:
- if this is not a template, but “specific-rule”, then the following mask is taken: “STRING% USERNAME %% USERID%”
- if this is a template, then the following mask is taken: “STRING% USERNAME %% TMPLRULEID%”, where% TMPLRULEID% is the rule entry id.
Other problems are solved as simply, we can discuss your questions in the comments.
The principle of the scheme
- Input and (or) change of data occurs through the user web interface.
- Cron runs a task that forms the Puppet manifest for the platform we need.
- If at the second stage there is a change in the rule, then commit is made to the Git repository, which stores the data and reports all changes.
- On the server with Puppet, the git repository is checked, and as soon as it becomes clear that there are updates and (or) changes, the fetch is executed with the new config.
The script is launched with only one parameter - the identifier of the platform for which the rules are formed. After performing we get a similar result:
class virtualusers { @group { "wwwaccess": gid => 1001, ensure => present } @user { "petek": ensure => $hostname ? { simplehostname1 => present, /hostgroup1(\d.*)$/ => present, / hostgroup2(\d.*)$/ => present, / hostgroup3(\d.*)$/ => present, … … default => absent, }, comment => Petek Petkovich', gid => '1001', home => '/home/petek', uid => '1018', password => '*', shell => '/bin/bash', } @virtualuser_key { "petek": group => '1001', name => 'petek', key =>"ssh-rsa dqwedqwedqwedqedqwedqwedqwedqwedqewdqwed=", require => User["petek"]; } @exec { "petek_quota": command => "/usr/sbin/setquota -u petek 5242880 5242880 0 0 -a /filesystem/", path => "/usr/sbin", onlyif => "/usr/bin/test `/usr/sbin/repquota -ua | /usr/bin/egrep '^petek\s*' | /usr/bin/awk {'print \$4'}` -ne \"5242880\"", } @file { "/etc/sudoers.d/1018_petek" : ensure => present, owner => 'root', mode => 0440, content => ''; } if $hostname =~ /^hostgroup1\d*$/ { realize (Virtualuser_key['petek','petek2'], File['/etc/sudoers.d/1018_petek', '/etc/sudoers.d/1020_petek2',]) realize (Exec['petek_quota']) } } For example, and readability left only a piece of the manifest. In truth, the readability of manifests does not interest us much, due to the fact that right after their formation a syntax check occurs. If he is in perfect order, then puppet master is able to read it, in which case we need not interfere in the process.
Here is an example of syntax checking:
PUPPET='/usr/bin/puppet' def puppetparsercheck(filename): puppet_cmd = '%s parser validate %s' % (PUPPET, filename) (puppetparser_status, puppetparser_output) = commands.getstatusoutput(puppet_cmd) print str(puppet_cmd) if not puppetparser_status == 0: sys.stderr.write(puppetparser_output[:1024]) return puppetparser_status Additional advantages of implementation
- On each individual node, only those sudo rules that correspond to it apply; you can see them by typing sudo -l.
- To delete users do not need to perform separate actions, because if the user does not have access, then he defaults to “ensure => absent” (in Puppet).
Thus, we obtained a means of controlling user access to servers that meets all our requirements. It uses the tools that existed before it was written (which is great in itself), and also saved us from the implementation and support of additional services.
And most importantly, perhaps, the fact that any employee of the “first line of support” (those who help with simple requests from users) is able to cope with such a system.
Source: https://habr.com/ru/post/142708/
All Articles