Remote control over servers. Problem solved. All DRAC!
Probably, many server owners and novice hosters think about the problem of remote control. Indeed, in most data centers there is no adequate technical support, and indeed no support. Therefore, in the event of problems, you have to wait quite a long time (sometimes more than a day), so that the server is just rebooted (!), Not to mention serious software / hardware failures. Of course, there are KVM and power sockets, but these solutions are quite expensive and often useless. DELL company invented the hardware remote access controller DRAC (Dell Remote Access Controller). It is a small but very useful fee.
This is what this thing looks like:
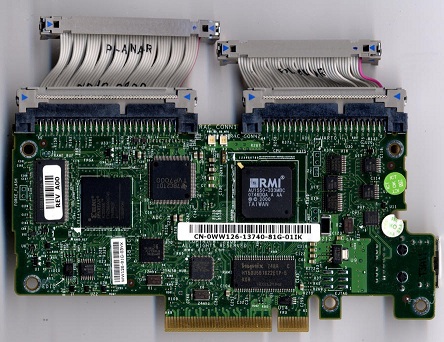
For the price on the well-known American website ebay.com this unit costs about $ 50! It only works with DELL servers and provides all the possibilities for remote administration, ranging from the banal KVM (which, by the way, is not bad implemented) and ending with the remote mounting of the ISO image and booting from it to reinstall the OS. It works through the network (the board has a separate LAN port for connecting the card to the network) in ALL browsers thanks to an applet on JAVA.
Moreover, it works on the server in any state, the main thing is that the server is connected to the power supply network and LAN on the DRAC card.
However, it was possible to mount the image only in IE, while other browsers insisted on fighting hard. Perhaps just the firmware version of the curve, well, or hands :)
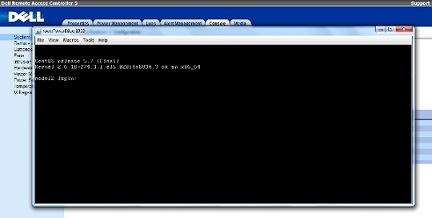
I would like to show a little interface and KVM.
Here is how it all looks:
')
Now let's look at the setting of this “pribluda”. It is, in principle, very simple, but on the Internet, it is extremely difficult to find useful information on this topic.
I recommend starting the setup with the firmware, because The firmware is being actively developed, JAVA applets are being updated, the interface and cross-browser compatibility are improved. At the moment, if I'm not mistaken, the current version of the firmware is version 1.51.
To update, you must run the following set of commands:
The update lasts about five minutes.
Now we will start setup. Setup is done by DELL utilities, or through the BIOS. Through the BIOS everything is trivial, let's look at the utility version. The easiest way to install them on CentOS is to connect the repository and install from it. Let's start:
At this stage, everything is installed, but a reboot is required for work. You can bypass this step by doing
Before re-logging in to the console to use the variable PATH.
The setting is only to register the IP address and subnet mask for the DRAC interface in order to access it over the network.
This is done as follows:
Where 192.168.1.1 is the settable IP, 255.255.255.24 is the subnet mask, 192.168.1.1 is the gateway address.
You can view the current network settings with the command:
In the case of the settings applied above, its output will look like this:
Well, that's it, then, using the browser, we go through the set IP and see the DRAC interface. Default Access Data:
Login root, calvin password.
All successful administration! ;)
Author: Roman Malinovsky, Head of Technical Support Services, Unlimits Telecom hosting project.
Original article in English published on slashdot.org
This is what this thing looks like:
For the price on the well-known American website ebay.com this unit costs about $ 50! It only works with DELL servers and provides all the possibilities for remote administration, ranging from the banal KVM (which, by the way, is not bad implemented) and ending with the remote mounting of the ISO image and booting from it to reinstall the OS. It works through the network (the board has a separate LAN port for connecting the card to the network) in ALL browsers thanks to an applet on JAVA.
Moreover, it works on the server in any state, the main thing is that the server is connected to the power supply network and LAN on the DRAC card.
However, it was possible to mount the image only in IE, while other browsers insisted on fighting hard. Perhaps just the firmware version of the curve, well, or hands :)
I would like to show a little interface and KVM.
Here is how it all looks:
')
Now let's look at the setting of this “pribluda”. It is, in principle, very simple, but on the Internet, it is extremely difficult to find useful information on this topic.
I recommend starting the setup with the firmware, because The firmware is being actively developed, JAVA applets are being updated, the interface and cross-browser compatibility are improved. At the moment, if I'm not mistaken, the current version of the firmware is version 1.51.
To update, you must run the following set of commands:
# wget http://downloads.dell.com/sysman/RAC_FRMW_LX_R253040.BIN # chmod 0755 RAC_FRMW_LX_R253040.BIN # ./RAC_FRMW_LX_R253040.BIN The update lasts about five minutes.
Now we will start setup. Setup is done by DELL utilities, or through the BIOS. Through the BIOS everything is trivial, let's look at the utility version. The easiest way to install them on CentOS is to connect the repository and install from it. Let's start:
# wget -q -O - http://linux.dell.com/repo/hardware/OMSA_6.5.3/bootstrap.cgi | bash # yum install srvadmin-all At this stage, everything is installed, but a reboot is required for work. You can bypass this step by doing
# srvadmin-services.sh start Before re-logging in to the console to use the variable PATH.
The setting is only to register the IP address and subnet mask for the DRAC interface in order to access it over the network.
This is done as follows:
# racadm setniccfg -s 192.168.1.2 255.255.255.240 192.168.1.1 Where 192.168.1.1 is the settable IP, 255.255.255.24 is the subnet mask, 192.168.1.1 is the gateway address.
You can view the current network settings with the command:
# racadm getniccfg In the case of the settings applied above, its output will look like this:
[root@node]# racadm getniccfg NIC Enabled = 1 DHCP Enabled = 0 IP Address = 192.168.1.2 Subnet Mask = 255.255.255.240 Gateway = 192.168.1.1 Well, that's it, then, using the browser, we go through the set IP and see the DRAC interface. Default Access Data:
Login root, calvin password.
All successful administration! ;)
Author: Roman Malinovsky, Head of Technical Support Services, Unlimits Telecom hosting project.
Original article in English published on slashdot.org
Source: https://habr.com/ru/post/142633/
All Articles