Single Authorization (SSO) using JASIG CAS. Part 1

This article was conceived as a practical guide to installing and configuring the server JASIG CAS. I did not set out to explain what Single Sign On (SSO) is, so if you are not familiar with this concept, then first look at Wikipedia and the Techtarget portal. It is also desirable to have experience with Spring and Maven.
The article will consist of
Why JASIG CAS
There are many implementations of the idea of a single authorization, and I cannot say that JASIG CAS is better at all than its counterparts, however, for several reasons, we stopped at it.
- JAVA technology stack. CAS is written entirely in JAVA using Spring. Maven is used for assembly.
- Open Source.
- Support for multiple LDAP implementations.
- Active community. Pleasant JASIG portal and wiki , there are many articles online.
- Clients under all popular platforms. More details can be found here.
- Support for different authentication methods.
- Frequent releases.
- Relative ease of setup. I hope that thanks to this article, it will become really simple and understandable.
If you choose a platform for SSO by the same criteria, then CAS is exactly what you are looking for.
How it works
We took as the basis of our SSO service, CAS, working under the protocol of the second version. Details on this protocol can be found on the JASIG portal . Below is a diagram of the process, successful authorization in CAS. I did not find a similar scheme on the JASIG portal, although it seems to me that it should be useful for understanding the process.
Legend
- The client is the user's browser. Not to be confused with the CAS client.
- An application is one of your applications that have a CAS client onboard and use a CAS server for authorization.
- CAS - server or cluster with SSO service deployed on it.
- ST - service ticket. Represents a string that is used as client credentials to access the service. The client receives it in response to the credentials and service identifier provided by the CAS server.
- TGT (ticket granting ticket) and TGC (ticket granting cookie). A TGT is a string that serves as an indicator of the client’s authorized state. After authorization, it replaces the client credentials. The TGT value is stored in the TGC installed by the CAS server, after successful client authorization.
- LT (login ticket). A string passed along with client credentials. Used to prevent credentials from being re-processed.
- SAML (The Security Assertion Markup Language) is an XML-based language developed by OASIS. Details can be found on the community website.
')
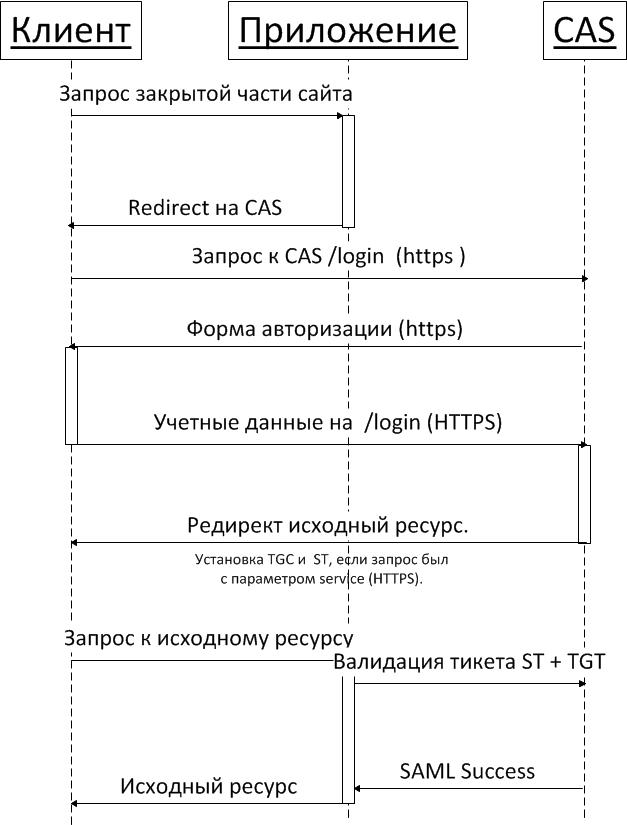
Please note that all requests to the SSO server must be via HTTPS. This is not a requirement of the protocol, however, without this, it is impossible to ensure the security of user credentials.
Another important feature of the protocol is that while checking the values of ST + TGT, the CAS client installed in the service being authorized stops the original request and creates a new one. Those. At this moment, the client for the CAS server is not the user's browser, but the service being authorized. This means that the service must be properly configured to create an HTTPS connection. How to do this I will write a little later. Processing of the original request to resume only after the verification.
Servers, keys, problems
We chose Tomcat as the servlet container. Information about users is stored in openLDAP, and as the CAS client for applications we most often use the official java client. At the time of this writing, the latest version was 3.1 .
SSO configuration begins with the configuration of servlet containers. In test and combat environments, we do it a little differently.
In the test environment using the keytool utility, you need to create a self-signed certificate. Keytool is a standard utility that is included with any JDK.
keytool -genkey -alias cas -keypass 12345678 -keystore ssoServer.jks -storepass 12345678 -dname «cn=localhost, ou=webdev, o=ourOrganisation, c=RU» -validity=365 As a result, we will create a keystore ssoServer.jks and a pair of keys, private and public. Now you can export the public key from the keystore.
keytool -export -alias cas -file casServerPublic.cer -keystore ssoServer.jks -storepass 12345678 and, import it into the truststore of trusted certificates for all services that will participate in a single authorization. On a PC, the command looks like this:
keytool -import -alias cas -file %PATH_TO%casServerPublic.cer -keypass 12345678 -keystore JAVA_HOME/jre/lib/security/cacerts cacerts -storepass changeit On a Mac like this:
# /Library/Java/Home/bin/keytool -import -alias cas -file %PATH_TO_CERTIFICATE%/casServerPublic.cer -keypass 12345678 -keystore /Library/Java/Home/lib/security/cacerts -storepass changeit The key import is needed so that the service being authorized can establish an HTTPS connection with the CAS. Before importing keys, make sure that
- You are using JAVA version you need. If you have multiple versions installed, problems may occur.
- Use the Keytool and the cascerts path of exactly the java that you will use to start the service being authorized.
- You have rights to import keys into the repository.
As a result, you should see the message:
Certificate was added to keystore. If the message looks wrong or it is followed by some text, it means that you did something wrong, and the key most likely was not imported.
In a combat environment, you will most likely use keys provided by one of the well-known CAs, such as Thawte or Verisign . In this case, the keys will be in the format pkcs # 7 or x.509 and you will need to first convert them to the format pkcs # 12.
For example, for certificates in X.509 (Base64) format, you need to perform the following sequence of steps:
- We glue all intermediate certificates into one file. It should be your certificate first, and then the entire intermediate chain in order.
- We convert it using OpenSSL to the desired format.
openssl pkcs12 -export —in your.crt —inkey your.key —out your.p12 -name «cas» - Check that the key pair is created correctly.
keytool —keystore your.p12 -storetype pkcs12 —list - And the last step is to create a keystore based on a pair of keys.
keytool -importkeystore -deststorepass 12345678 -destkeypass 12345678 -destkeystore ssoServer.jks -srckeystore your.p12 -srcstoretype PKCS12 -srcstorepass 12345678 -alias cas
The public certificate store has a default password changeit. In a combat environment, you need to change it.
It remains to configure the connector on tomcat, which will be located CAS. To do this, we add a connector description to the% TOMCAT-HOME% / conf / server.xml file, for example:
<Connector port="8443" protocol="org.apache.coyote.http11.Http11NioProtocol" SSLEnabled="true" maxThreads="150" scheme="https" secure="true" clientAuth="false" sslProtocol="TLS" keyAlias="cas" keystoreFile="%PATH_TO%.ssoServer.jks" keystorePass="12345678" /> More information about configuring connectors can be found on the documentation page .
In the HTTP combat environment, the connector from server.xml is best removed about sin further).
This time all. In the next part I will tell you how to set up and build a CAS server.
Source: https://habr.com/ru/post/142407/
All Articles