Memo to the system administrator: templates - the first step of migration to the cloud
Are you going to migrate to the cloud, but do not know where to start? Are you ready to take this crucial step or are you thinking closely about moving into a virtual environment?
Surely you have asked yourself a question like: “What if the Windows, RHEL, Suse licenses are already purchased?” Or, for example, “How to effectively test the functionality that we want to provide from the cloud environment?”
')
You must install your own operating systems yourself and prepare templates from them - reference server configurations .
Below - about the Linux-template, automatic password generation, its output to the console when the OS boots, plus how to approach the execution of other automatic actions during the deployment of a new virtual server in the cloud infrastructure. About Windows solutions, if you're interested, will be later.
For example, our cloud (CROC) is used, but the mechanics work with all Amazon-compatible clouds.
Before you install the Linux distribution you need, you need to download the installation disk .iso image into the file storage. To do this, we will use a special script c2-s3curl (http://storage.cloud.croc.ru/tools/c2-s3curl), which is designed to perform basic file operations with our S3-compatible storage.
We will demonstrate the installation process using the RedHat Enterprise Linux 6.1 distribution image downloaded to the file storage as an example. After downloading the iso file, you need to create a disk image that will be used for installation:

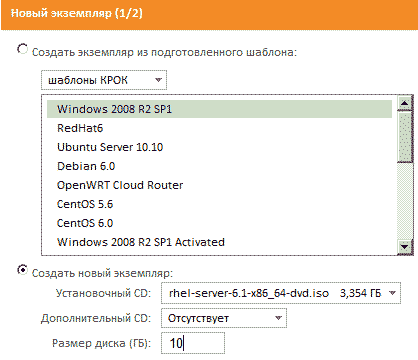
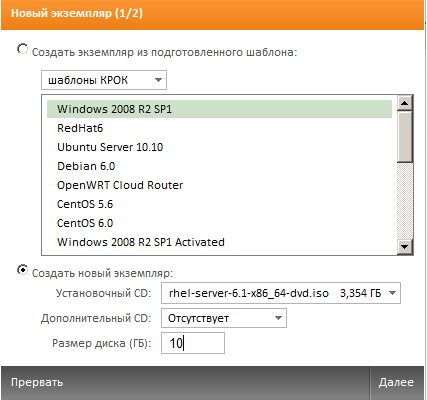
Installing a new virtual server consists of two steps: selecting the image of the installation disk and the size of the system disk, as well as selecting the parameters of the virtual server and networks. In the first step, choose to create a new instance:
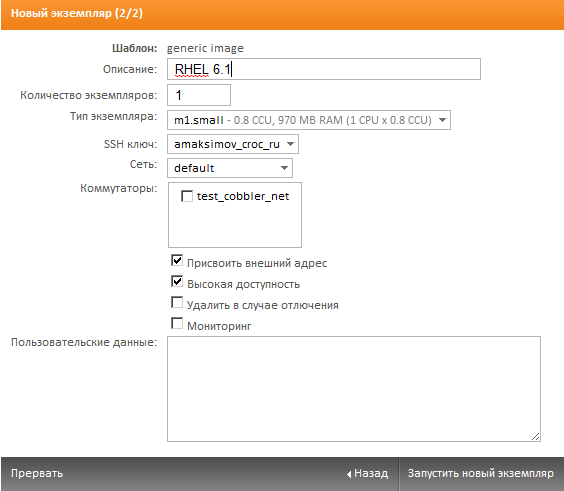
In the second step, the environment and parameters of the new virtual server are configured. Let's leave all the default settings by changing only the type of the instance, rather than adding some resources to the server to make the installation go faster.
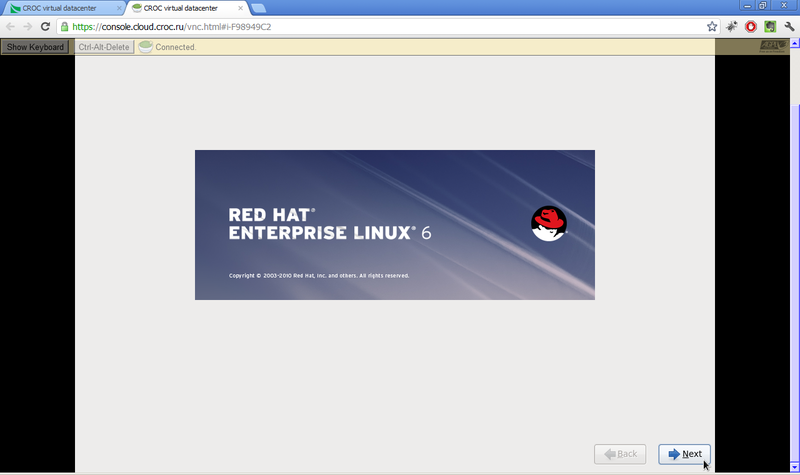
After starting a new instance, we will use the remote console to carry out the installation process (the virtual network names and IP server information are removed from the illustration):

Install the OS (we will not stop at it in detail):
After the installation is complete, you have the opportunity to log in with the login and password specified during the installation, after which it will be necessary to perform all the necessary operating system settings for the template.
We remove the rules for creating network interfaces from udev:
This step is necessary so that after the launch of the new virtual server from the template, the operating system recreates the network interfaces, receiving from the hypervisor new MAC address information.
Then you need to edit the information about the first network interface, which usually connects to the virtual network where the DHCP server is running:
Without this step, the server created from the template will not receive network settings from the cloud and it will not be possible to connect to it.
Now make sure that the SSH server will start when the operating system boots.
Then - that the firewall of the operating system misses connections to the SSH server. In some cases, it can be completely disabled, because for each virtual network in our cloud you already have a firewall that blocks absolutely all incoming traffic.
The next step is to install the automatic generation of the administrator password every time the new server starts.
Contents of the /usr/sbin/set-ssh-key.sh file
This step will allow each new server created from your template to generate a password for the root user and issue it to the server's serial console:

The “user data” field in the third figure (the stage of creating a new virtual server) is intended to transfer to your servers additional parameters, instructions or any other information at the stage of creating a new virtual server. You can get information from this field or write it there during the entire life cycle of the virtual server. To do this, you must use any utility that allows you to access the Amazon-compatible API of our cloud. In this article, we will use the boto utility and a small script to illustrate how to work with our cloud API:
An additional use of this field is the ability to change the password of an administrative account if the password was forgotten or lost for some reason, as well as installing additional software or any other setting of your template. More details can be considered separately, if interested, the topic is very large.
Clouds are comfortable. Amenities start with reference installations — templates. Templates are needed in order not to configure hands every time the server, to be able to use their distributions with their licenses, save time, defend against errors and standardize processes in general. One such template we have just created.
In the comments with pleasure I will answer questions on this part of the work in the cloud.
Surely you have asked yourself a question like: “What if the Windows, RHEL, Suse licenses are already purchased?” Or, for example, “How to effectively test the functionality that we want to provide from the cloud environment?”
')
You must install your own operating systems yourself and prepare templates from them - reference server configurations .
Benefits of preparing templates
- First, it is a quick start. You can use an unattended installation server or a centralized configuration management system, but installing a server from a template is much faster.
- Secondly, the templates provide a stable and controlled configuration. To debug or test a new functional, the unchanging server configuration and software version will be very useful. This can be especially useful for projects where they are actively developing their own software.
- Thirdly, the use of templates allows you to quickly scale, simply launching the required number of new servers of the same type.
- Fourth, templates are often used in the process of moving physical servers to a cloud environment or any other virtual environment.
Create the first template on Linux
Below - about the Linux-template, automatic password generation, its output to the console when the OS boots, plus how to approach the execution of other automatic actions during the deployment of a new virtual server in the cloud infrastructure. About Windows solutions, if you're interested, will be later.
For example, our cloud (CROC) is used, but the mechanics work with all Amazon-compatible clouds.
1. Install the operating system from its own disk.
Before you install the Linux distribution you need, you need to download the installation disk .iso image into the file storage. To do this, we will use a special script c2-s3curl (http://storage.cloud.croc.ru/tools/c2-s3curl), which is designed to perform basic file operations with our S3-compatible storage.
root@c-jenkins:~# c2-s3curl --put my-bucket/rhel-server-6.1-x86_64-dvd.iso rhel-server-6.1-x86_64-dvd.iso
Uploading object: my-bucket/rhel-server-6.1-x86_64-dvd.iso
######################################################################## 100.0%
OK
We will demonstrate the installation process using the RedHat Enterprise Linux 6.1 distribution image downloaded to the file storage as an example. After downloading the iso file, you need to create a disk image that will be used for installation:
Installing a new virtual server consists of two steps: selecting the image of the installation disk and the size of the system disk, as well as selecting the parameters of the virtual server and networks. In the first step, choose to create a new instance:
In the second step, the environment and parameters of the new virtual server are configured. Let's leave all the default settings by changing only the type of the instance, rather than adding some resources to the server to make the installation go faster.
After starting a new instance, we will use the remote console to carry out the installation process (the virtual network names and IP server information are removed from the illustration):
Install the OS (we will not stop at it in detail):
After the installation is complete, you have the opportunity to log in with the login and password specified during the installation, after which it will be necessary to perform all the necessary operating system settings for the template.
Creating your own Linux template
We remove the rules for creating network interfaces from udev:
root@localhost:~# rm -Rf /etc/udev/rules.d/70-persistent-net.rulesThis step is necessary so that after the launch of the new virtual server from the template, the operating system recreates the network interfaces, receiving from the hypervisor new MAC address information.
Then you need to edit the information about the first network interface, which usually connects to the virtual network where the DHCP server is running:
[root@ i-F98949C2 ~]# cat >> /etc/sysconfig/network-scripts/ifcfg-eth0 << EOF
DEVICE="eth0"
NM_CONTROLLED="no"
ONBOOT="yes"
TYPE=Ethernet
BOOTPROTO=dhcp
DEFROUTE=yes
PEERDNS=yes
PEERROUTES=yes
EOF
Without this step, the server created from the template will not receive network settings from the cloud and it will not be possible to connect to it.
Now make sure that the SSH server will start when the operating system boots.
[root@@ i-F98949C2~]# chkconfig --list | grep ssh
sshd 0:off 1:off 2:on 3:on 4:on 5:on 6:off
Then - that the firewall of the operating system misses connections to the SSH server. In some cases, it can be completely disabled, because for each virtual network in our cloud you already have a firewall that blocks absolutely all incoming traffic.
The next step is to install the automatic generation of the administrator password every time the new server starts.
[root@ i-F98949C2 ~]# cat >> /etc/rc.local << EOF
sh /usr/sbin/set-ssh-key.sh
EOF
Contents of the /usr/sbin/set-ssh-key.sh file
#!/bin/sh
if [ -f /etc/.ssh_done ]; then
exit 0
fi
getpw()
{
echo `pwqgen`
}
if [ $? -eq 0 ]; then
PWRES=1
while [ $PWRES -eq 1 ];
do
ROOT_PW=$(getpw)
echo $ROOT_PW | passwd root --stdin > /dev/null 2>&1
PWRES=$?
done
echo ""
echo "$ROOT_PW" > /dev/ttyS0
fi
touch /etc/.ssh_done
This step will allow each new server created from your template to generate a password for the root user and issue it to the server's serial console:
Transfer of additional parameters to the virtual server
The “user data” field in the third figure (the stage of creating a new virtual server) is intended to transfer to your servers additional parameters, instructions or any other information at the stage of creating a new virtual server. You can get information from this field or write it there during the entire life cycle of the virtual server. To do this, you must use any utility that allows you to access the Amazon-compatible API of our cloud. In this article, we will use the boto utility and a small script to illustrate how to work with our cloud API:
#!/usr/bin/env python

import sys
import os
from boto.ec2.connection import EC2Connection
import boto
import boto.ec2
from operator import attrgetter
from optparse import OptionParser
from boto.ec2.blockdevicemapping import BlockDeviceType
from boto.ec2.blockdevicemapping import BlockDeviceMapping
from pprint import pprint
import time
import base64
import logging

global region
global conn
AWS_ACCESS_KEY_ID = os.environ['EC2_ACCESS_KEY']
AWS_SECRET_ACCESS_KEY = os.environ['EC2_SECRET_KEY']
logging.basicConfig(filename="boto.log", level=logging.DEBUG)

region = boto.ec2.regioninfo.RegionInfo(name="ru-msk-vol51", endpoint="console.cloud.croc.ru")

conn = boto.connect_ec2(AWS_ACCESS_KEY_ID, AWS_SECRET_ACCESS_KEY,
is_secure=False,
region=region,
path="/services/cloud")

def getInstanceUserData(ami):
reservations = conn.get_all_instances()
instances = [i for r in reservations for i in r.instances]
for i in instances:
if (i.__dict__['id'] == ami):
return base64.b64decode(i.get_attribute('userData')['userData'])
return ''

def setInstanceUserData(ami, userData=''):
conn.modify_instance_attribute(ami, 'userData', base64.b64encode(userData))

''' '''
setInstanceUserData('i-9A4D0DDF','test!!!!')
print getInstanceUserData('i-9A4D0DDF')
An additional use of this field is the ability to change the password of an administrative account if the password was forgotten or lost for some reason, as well as installing additional software or any other setting of your template. More details can be considered separately, if interested, the topic is very large.
Summary
Clouds are comfortable. Amenities start with reference installations — templates. Templates are needed in order not to configure hands every time the server, to be able to use their distributions with their licenses, save time, defend against errors and standardize processes in general. One such template we have just created.
In the comments with pleasure I will answer questions on this part of the work in the cloud.
Source: https://habr.com/ru/post/142381/
All Articles