Playing cubes with Kinect
- Kinect for Windows SDK. Part 1. Sensor
- Kinect for Windows SDK. Part 2. Data Flows
- Kinect for Windows SDK. Part 3. Functionalities
- [Playing cubes with Kinect]
- Program, aport!
It is sometimes surprising how rapidly the development of the IT industry is going. I remember how relatively recently, at one of TechDays seminars, Evgeny Marchenkov showed the first videos about the Natal project. How many people remember this name? After all, now the project is known as Kinect!

The sensor was designed for the Xbox 360 console, and since February 2012 it is available for personal computers. Not so long ago, I had the opportunity to evaluate the sensor and write some code.
')
I think you have already read the previous articles in the series on the SDK review. It's time to try Kinect in action! In the article I will talk about how you can write a small game in cubes. And of course the cubes will move with the help of hands!
So, first of all we need the SDK for the sensor, it can be downloaded from the official site . In the SDK you will find a number of examples and documentation. I also recommend watching the Quick Starts series from Coding4Fun. And for a snack Kinect Paint on the codeplex, you can download, compile, study the code.
What exactly do not want to be distracted because it is on the physics in the game. But without her, too, somehow sad. The solution is very simple - use the ready-made library. For Silverlight and Windows Phone there is a good project Physics Helper . Unfortunately, the current version (4.0) does not support WPF (the author’s comments on this subject are here ), but the previous version supported it. Therefore, you can take the source code of the version that supported WPF, upgrade projects to .NET 4.0 and compile the builds. Links to the updated project at the end of the article.
Now in Visual Studio 2010 we create a new WPF Application project (C #). In the SDK examples, there is a Microsoft.Samples.Kinect.WpfViewers project. In it you can find ready-made controls for working with cameras and sensor microphones (viewers), as well as an element encapsulating the logic of connecting to the sensor (chooser). Add this project to our solution. Here's what happened:

Toolbox controls are available from WpfViewers.
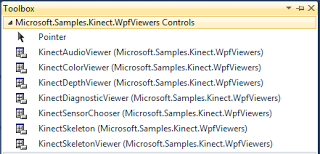
Now in MainWindows.xaml we will replace the root Grid with the Canvas, we will draw cubes on it. Place KinectSensorChooser and KinectColorViewer elements on the form in order to connect with the sensor and display the video stream from the camera.
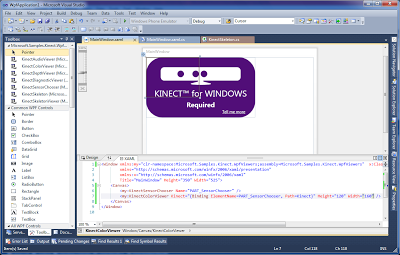
Pay attention to the binding. You must associate the Kinect property of the KinectColorViewer class with the Kinect property of the KinectSensorChooser class. So the color viewer will know which sensor we are working with at the moment. It remains only to add the initialization of the necessary threads. This can be done in the KinectSensorChanged event handler (KinectSensorChooser class), which will allow the sensor to be initialized upon connection. In general, this is done like this:
sensor.ColorStream.Enable(); // sensor.SkeletonFrameReady += SkeletonsReady; // , sensor.SkeletonStream.Enable(); // sensor.Start(); // Methods Enable threads are overloaded, you can pass them parameters that change the default behavior. So the overloaded Enable method for ColorStream takes the enumeration value (enum) of the ColorImageFormat to adjust the image format (RGB or YUV), as well as its resolutions.
Technically, this is enough to run the application and see a video of what Kinect comes into view.
To use physics in the game, first of all add links to the project to the project: FarseerPhysics, Spritehand.FarseerHelper and Spritehand.PhysicsBehaviors from the Physics Helper library. The next thing to do is to add PhysicsControllerBehavior behavior to the root Canvas element. Now draw a rectangle - it will be the floor or the ground, whatever. Add to it the behavior of the physical PhysicsObjectBehavior object and set the IsStatic property to true. I will not dwell in detail on the use of Physics Helper, you can watch the video tutorial on the library page. Cubes can be specified in xaml markup, or in C # code. The main thing is not to forget about the need for physical behavior for the newly created cube.
private void CreateCube() { var cube = new Rectangle { Name = string.Format("PART_Cube_{0}", Guid.NewGuid().ToString("N")), Width = CubeSide, Height = CubeSide, Fill = new SolidColorBrush(Colors.Red), Stroke = new SolidColorBrush(Colors.Black), StrokeThickness = 3, RadiusX = CubeCornerRadius, RadiusY = CubeCornerRadius }; var behavior = new PhysicsObjectBehavior { IsStatic = false }; behavior.Attach(cube); PART_LayoutRoot.Children.Add(cube); } Before moving on, create a cursor that will display the movement of your hand across the field. You can take some ready-made picture or draw a beautiful cursor with the Path element. I did not take a picture or draw a beautiful Path, but I went the third way and drew the Path with ugly.

The gaping red hole is not a wound at all, but simply a pointer to the center, the purpose of which I will describe a little further.
Now it only remains to process the SkeletonFrameReady event and move the “miracle arm” across the field. The general approach to handling an event is as follows: get a frame, pull data from it on all the human figures (skeleton) found in the frame, and among these figures, select the first one to be tracked. Kinect can provide data on six figures in a frame, but only two can track movement (see Player Segmentation Data ). For a simple game, we just need to get the first player to be tracked:
private Skeleton GetTrackedSkeleton(SkeletonFrameReadyEventArgs frameReadyEventArgs) { using (SkeletonFrame skeletonFrameData = frameReadyEventArgs.OpenSkeletonFrame()) { if (skeletonFrameData == null) { return null; } Skeleton[] allSkeletons = new Skeleton[skeletonFrameData.SkeletonArrayLength]; skeletonFrameData.CopySkeletonDataTo(allSkeletons); return allSkeletons.Where(s => s.TrackingState == SkeletonTrackingState.Tracked).FirstOrDefault(); } } Information about the human figure (skeleton) is a set of 20 points. The image of a Vitruvian man is best suited for their demonstration.

So, from the skeleton we can get the position of the player's body part of interest to us and update the playing field, if necessary. Take the following gesture system:
- if the player’s left hand is raised and the right hand is above the cube - the cube moves with the right hand (dragged);
- if the left hand is lowered , then the right hand can safely move over the playing field.
Very easy to check the position of the left hand. It suffices to compare the Y-coordinates of the left hand and the left shoulder:
private bool IsAcionMode(JointCollection joints) { Joint lh = joints[JointType.HandLeft]; Joint ls = joints[JointType.ShoulderLeft]; return lh.Position.Y > ls.Position.Y; } In order to determine whether the player’s right hand is above the die, you can use the HitTest function of the VisualTreeHelper class. Remember the red circle in the "miracle hand"? It is under this point that we are looking for a cube.
Gesture processing function:
private void UpdateScenaItems(Skeleton skeleton) { Point currentPos = skeleton.Joints[JointType.HandRight] .ScaleTo((int)PART_LayoutRoot.ActualWidth, (int)PART_LayoutRoot.ActualHeight, 0.50f, 0.20f) .Position .ToPoint2D(); Rectangle cube = GetCubeUnderCursor(currentPos); var isAction = IsAcionMode(skeleton.Joints); if (!isAction || (isAction && cube == null)) { UpdateCursorPosition(currentPos); return; } MoveCubeUnderCursor(cube, currentPos); } The ScaleTo extension method is used to scale the coordinates of the playing field. This method is included in the Coding4Fun Kinect Toolkit package (available for download via NuGet). ToPoint2D is my extension method used to convert SkeletonPoint to Point . It is clear that in the UpdateCursorPosition method we move only the cursor, and in the MoveCubeUnderCursor method we drag the die.
Now you can start the game and wave a little!
Below you will find the source codes and assemblies of the game.
PS From time to time the cubes stick together or get stuck in the floor - funny.
PPS In the next article I will talk about how to teach the application to understand voice commands.
Build games
Source codes of the game
PhysicsHelper library builds
PhysicsHelper source codes
Source: https://habr.com/ru/post/142236/
All Articles