We write "Snake" for Windows Phone 7
About the author: Pasi Manninen develops mobile and web applications, is a Nokia Developer Champion and Adobe Professional Professional, an Adobe-certified Adobe expert in Flex, Flash and Flash Mobile. Graduated from the University of Jyväskylä (one of the largest universities in Finland) with a degree in Applied Mathematics and Computer Science.
In this article, we will show you how to create a simple version of Snake for Windows Phone. It will be possible to move the snake in different directions with the help of gestures. The application consists of a menu screen, the game itself and the final screen with the results of the game.
')
To develop applications for devices running Windows Phone 7, you need to install the Windows Phone 7.1 SDK. You can download the latest version here .
To start developing a new Windows Phone Game, launch Microsoft Visual studio, create a new project and select the Windows Phone Game (4.0) Template. We will use SnakeIt as the project name.

In this example, we will use C # to develop our game.
To get started, let's add simple graphic elements for food and the snake itself. We will use 25x25 images that can be repeated across the surface.
Right-click on Content in the solution browser of the SnakeIt project and select Add> New Item ...
Select the Bitmap File and name it FootTile.bmp

Draw a 25x25 green rectangle to indicate food. Do not forget to save the file.

Use the same technique to draw the red square of the snake itself. Name the image SnakeTile.bmp.
We can create a font for the game in the same way we used to create images. Right-click on the project contents in the solution browser, select Add> New Item ...
Select Sprite Font and name it Segoe20.spritefont.

Double-click on the font in the project browser and set its size to 20. Do not forget to save the font.
Right-click on the project contents in the solution browser, select Add> New Item ... Select Code from the list of installed templates and create the Food class.

This class stores information about the Texture (texture, type) and Position (position). The width and height dimensions are used to define collisions in the Game1 class.
Create a Snake class just like you created a Food class.
We will use the XNA Framework and the List class from Collections to process all the tiles for our snake.
To define a snake, we will define several of its properties. We will load the snake image as a Texture texture and set the initial position of the snake in the middle of the screen (we will implement this later in the Game1 class). All cells for the snake will be stored in the list of snakeTiles. The direction of movement of the snake will be controlled in the Game1 class using gestures.
Game1 will initialize the Snake object. The snake texture will be loaded, its initial position will be set. All properties of the snake will be reset to the default properties when you first start and when the player wants to go through the game again. By default the snake moves 5 pixels to the left and its head cell is created.
The game will call a method to update the snake every new game step. In this method we find the position of the snake's head (this is the first cell contained in the snakeTiles list). If we need to add a new cell to the snake (that is, when the food has been eaten), we create a new cell for headPostion and add it to the snakeTiles list. Then we move only the head of our snake, thus increasing its size. If new snake cells are no longer foreseen, we will move only the last cell to the “head” of the snake, and move the snake itself to a new position.
Each cell of the snake is drawn in the Draw () method. This method is called from the Game1 class.
Create a nested Tile class. This class will define a snake cell. Each cell has a Position position and a Texture texture.
The Game1 class is basic for games based on Windows Phone XNA Games. Here is the initialization and loading of the contents of our game. Gestures and collision detection are used in a game method called the Update method. Draw checks the game mode by the GameMode property and draws the corresponding screen.
The usual XNA and Touch classes are used to define gestures.
We use the GraphicsDeviceManage class to get information about the current display. The SpriteBatch class is used to display information on the screen. We decided to use different game modes to control what happens through the Draw () method: to draw the menu, the game itself, or the game completion mode. This is a very simple way to handle the drawing of different modes on the screen. In addition, it is possible component-wise approach to solve this problem (see link: Game State Management ). The current game mode is stored in the Mode property, all sorts of modes are defined as the GameMode enumeration.
First we connect to the GraphicsDeviceManage class and report our directory with all the sprites and Content fonts. The frame rate is set to 30 frames per second by default. We also need to turn on Tap and Flick gestures. Different game modes are replaced with the Tap gesture, the movement of the snake is controlled by the Flick gesture.
The Initialize method allows you to perform any actions to initialize the game and all its resources before launching the game itself. Here we will set the game mode and create objects for food and the snake itself.
LoadContent is called once to load all files. First, we connect to the graphics device using SpriteBatch, so that later we can draw objects on the screen. Then we load and create textures for the food and the snake. At this point, the Initialize method is invoked for the corresponding classes Snake and Food. We also create our font and calculate the position to display the number of points.
Update implements the game update logic: collision checking, response to audio input and playback. Here we update the position of the snake and check for its collision with food, if the game is running. All gestures are checked every time you call this method, regardless of whether the game is running or not.
The position of the food and the "head" of the snake is calculated into the corresponding Rectangle objects. We can then use the built-in intersect method to determine the intersection of the rectangles. In this case, we increase the number of points and create a sprite of food in a random new position, if eating a snake is determined to eat food (we also tell the snake that it needs to be updated and add a new cell to itself). The game is considered to be over if the snake head goes off the screen.
The method below is used to move the food sprite to a new random position:
Gestures will be checked in the Update method every time. To begin with, we check whether new gestures are available, and, if available, read them. We also get the Delta value if the Flick gesture was defined. The snake will then be moved in the appropriate direction. The player cannot move the snake in the opposite direction (the game will be over). The game mode changes if the Tap gesture is detected (starts a new game from the menu or restarts the game).
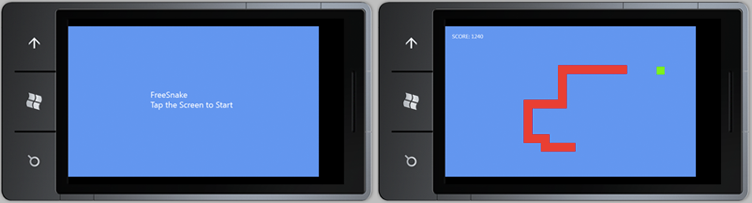
The Draw method is called when the game draws itself. This example uses only blue background. This method checks the game mode and draws the corresponding screen. The text "FreeSnake, Tap the Screen to Start" is displayed on the screen when the game is loaded for the first time. Snake, food for the snake and the number of points is displayed when the user plays the game. Information about the points earned and the offer to play again is displayed when the game ends.
In this example, we showed the basic information that is required to create gesturing games for Windows Phone.
The source code of the resulting game can be found here .
We also remind that until May 20, applications for the Best Applications Free Promotion contest from Nokia and Microsoft are being accepted. Submit your apps and games for Windows Phone 7 to get a chance to win a Nokia Lumia 800 smartphone and free promotion of your application on Nokia and Microsoft platforms.
Introduction
In this article, we will show you how to create a simple version of Snake for Windows Phone. It will be possible to move the snake in different directions with the help of gestures. The application consists of a menu screen, the game itself and the final screen with the results of the game.
')
Windows Phone 7.1 SDK
To develop applications for devices running Windows Phone 7, you need to install the Windows Phone 7.1 SDK. You can download the latest version here .
Windows phone game
To start developing a new Windows Phone Game, launch Microsoft Visual studio, create a new project and select the Windows Phone Game (4.0) Template. We will use SnakeIt as the project name.
In this example, we will use C # to develop our game.
Preparation of images for the game
To get started, let's add simple graphic elements for food and the snake itself. We will use 25x25 images that can be repeated across the surface.
Food
Right-click on Content in the solution browser of the SnakeIt project and select Add> New Item ...
Select the Bitmap File and name it FootTile.bmp
Draw a 25x25 green rectangle to indicate food. Do not forget to save the file.
Snake
Use the same technique to draw the red square of the snake itself. Name the image SnakeTile.bmp.
Game font
We can create a font for the game in the same way we used to create images. Right-click on the project contents in the solution browser, select Add> New Item ...
Select Sprite Font and name it Segoe20.spritefont.
Double-click on the font in the project browser and set its size to 20. Do not forget to save the font.
Creating a Food Class for Food
Right-click on the project contents in the solution browser, select Add> New Item ... Select Code from the list of installed templates and create the Food class.
This class stores information about the Texture (texture, type) and Position (position). The width and height dimensions are used to define collisions in the Game1 class.
using System; using Microsoft.Xna.Framework; using Microsoft.Xna.Framework.Graphics; namespace SnakeIt { class Food { // Texture representing the food public Texture2D Texture; // Position of the food relative to the upper left side of the screen public Vector2 Position; // Get the width of the food public int Width { get { return Texture.Width; } } // Get the height of the food public int Height { get { return Texture.Height; } } // Set Food Texture and Position public void Initialize(Texture2D texture, Vector2 position) { Texture = texture; Position = position; } // Draw Food to the Screen public void Draw(SpriteBatch spriteBatch) { spriteBatch.Draw(Texture, Position, null, Color.White, 0f, Vector2.Zero, 1f, SpriteEffects.None, 0f); } } } Creating a Snake Class
Create a Snake class just like you created a Food class.
Used namespaces
We will use the XNA Framework and the List class from Collections to process all the tiles for our snake.
using System; using Microsoft.Xna.Framework; using Microsoft.Xna.Framework.Graphics; using System.Collections.Generic; Properties
To define a snake, we will define several of its properties. We will load the snake image as a Texture texture and set the initial position of the snake in the middle of the screen (we will implement this later in the Game1 class). All cells for the snake will be stored in the list of snakeTiles. The direction of movement of the snake will be controlled in the Game1 class using gestures.
// public Texture2D Texture; // public Vector2 Position; // public List<Tile> snakeTiles; // public float speed; const float speedIncrement = 0.2f; // // 1==, 2==, 3==, 4== public int direction; // -> public bool newTile; Initialization
Game1 will initialize the Snake object. The snake texture will be loaded, its initial position will be set. All properties of the snake will be reset to the default properties when you first start and when the player wants to go through the game again. By default the snake moves 5 pixels to the left and its head cell is created.
// public void Initialize(Texture2D texture, Vector2 position) { Position = position; Texture = texture; Reset(); } // ( ) public void Reset() { speed = 5f; direction = 1; Tile tile = new Tile(Texture, Position); snakeTiles = new List<Tile>(); snakeTiles.Add(tile); newTile = false; } Update
The game will call a method to update the snake every new game step. In this method we find the position of the snake's head (this is the first cell contained in the snakeTiles list). If we need to add a new cell to the snake (that is, when the food has been eaten), we create a new cell for headPostion and add it to the snakeTiles list. Then we move only the head of our snake, thus increasing its size. If new snake cells are no longer foreseen, we will move only the last cell to the “head” of the snake, and move the snake itself to a new position.
public void Update() { // Vector2 headPosition = snakeTiles[0].Position; // if (newTile) { // Tile tile = new Tile(Texture, headPosition); // SnakeTiles ( HeadPosition, ) snakeTiles.Insert(1, tile); } // , "" else if (snakeTiles.Count > 1) { Tile last = snakeTiles[snakeTiles.Count - 1]; last.Position = headPosition; snakeTiles.RemoveAt(snakeTiles.Count-1); snakeTiles.Insert(0, last); } // if (newTile) { speed += speedIncrement; newTile = false; } // "" switch (direction) { case 1: snakeTiles[0].Position.X -= speed; break; case 2: snakeTiles[0].Position.Y -= speed; break; case 3: snakeTiles[0].Position.X += speed; break; case 4: snakeTiles[0].Position.Y += speed; break; } } Drawing
Each cell of the snake is drawn in the Draw () method. This method is called from the Game1 class.
public void Draw(SpriteBatch spriteBatch) { for (int i = 0; i < snakeTiles.Count; i++) { spriteBatch.Draw(snakeTiles[i].Texture, snakeTiles[i].Position, null, Color.White, 0f, Vector2.Zero, 1f, SpriteEffects.None, 0f); } } Tile class (nested class relative to Snake class)
Create a nested Tile class. This class will define a snake cell. Each cell has a Position position and a Texture texture.
class Tile { public Vector2 Position; public Texture2D Texture; public Tile(Texture2D texture, Vector2 position) { Position = position; Texture = texture; } // public int Width { get { return Texture.Width; } } // public int Height { get { return Texture.Height; } } } Class game1
The Game1 class is basic for games based on Windows Phone XNA Games. Here is the initialization and loading of the contents of our game. Gestures and collision detection are used in a game method called the Update method. Draw checks the game mode by the GameMode property and draws the corresponding screen.
Namespaces
The usual XNA and Touch classes are used to define gestures.
using System; using System.Linq; using Microsoft.Xna.Framework; using Microsoft.Xna.Framework.Graphics; using Microsoft.Xna.Framework.Input; using Microsoft.Xna.Framework.Input.Touch; Properties
We use the GraphicsDeviceManage class to get information about the current display. The SpriteBatch class is used to display information on the screen. We decided to use different game modes to control what happens through the Draw () method: to draw the menu, the game itself, or the game completion mode. This is a very simple way to handle the drawing of different modes on the screen. In addition, it is possible component-wise approach to solve this problem (see link: Game State Management ). The current game mode is stored in the Mode property, all sorts of modes are defined as the GameMode enumeration.
// private GraphicsDeviceManager graphics; // private SpriteBatch spriteBatch; // private Snake snake; // private Food food; // private SpriteFont segoe20; // private Vector2 scorePosition; // private float score; private const float FOOD_POINTS = 20; // GameMode Mode; // enum GameMode {Menu, Running, Complete} Constructor
First we connect to the GraphicsDeviceManage class and report our directory with all the sprites and Content fonts. The frame rate is set to 30 frames per second by default. We also need to turn on Tap and Flick gestures. Different game modes are replaced with the Tap gesture, the movement of the snake is controlled by the Flick gesture.
public Game1() { // graphics = new GraphicsDeviceManager(this); // Content.RootDirectory = "Content"; // 30 Windows Phone. TargetElapsedTime = TimeSpan.FromTicks(333333); // . InactiveSleepTime = TimeSpan.FromSeconds(1); // Tap Flick TouchPanel.EnabledGestures = GestureType.Tap | GestureType.Flick; } Game initialization
The Initialize method allows you to perform any actions to initialize the game and all its resources before launching the game itself. Here we will set the game mode and create objects for food and the snake itself.
protected override void Initialize() { // Menu, Menu Draw() Mode = GameMode.Menu; // snake = new Snake(); food = new Food(); // 0 score = 0f; base.Initialize(); } Download sprites and fonts
LoadContent is called once to load all files. First, we connect to the graphics device using SpriteBatch, so that later we can draw objects on the screen. Then we load and create textures for the food and the snake. At this point, the Initialize method is invoked for the corresponding classes Snake and Food. We also create our font and calculate the position to display the number of points.
protected override void LoadContent() { // SpriteBatch spriteBatch = new SpriteBatch(GraphicsDevice); // Vector2 snakePosition = new Vector2( GraphicsDevice.Viewport.TitleSafeArea.X + GraphicsDevice.Viewport.TitleSafeArea.Width / 2, GraphicsDevice.Viewport.TitleSafeArea.Y + GraphicsDevice.Viewport.TitleSafeArea.Height / 2); snake.Initialize(Content.Load<Texture2D>("SnakeTile"), snakePosition); // Vector2 foodPosition = RandPosition(); food.Initialize(Content.Load<Texture2D>("FoodTile"), foodPosition); // segoe20 = this.Content.Load<SpriteFont>("Segoe20"); // scorePosition = new Vector2(20, 20); } Game update
Update implements the game update logic: collision checking, response to audio input and playback. Here we update the position of the snake and check for its collision with food, if the game is running. All gestures are checked every time you call this method, regardless of whether the game is running or not.
protected override void Update(GameTime gameTime) { // if (GamePad.GetState(PlayerIndex.One).Buttons.Back == ButtonState.Pressed) this.Exit(); if (Mode == GameMode.Running) { snake.Update(); CheckCollision(); } CheckGestures(); base.Update(gameTime); } Check collisions
The position of the food and the "head" of the snake is calculated into the corresponding Rectangle objects. We can then use the built-in intersect method to determine the intersection of the rectangles. In this case, we increase the number of points and create a sprite of food in a random new position, if eating a snake is determined to eat food (we also tell the snake that it needs to be updated and add a new cell to itself). The game is considered to be over if the snake head goes off the screen.
private void CheckCollision() { // int snakeHeadX = (int)snake.snakeTiles[0].Position.X; int snakeHeadY = (int)snake.snakeTiles[0].Position.Y; Rectangle rectangle1 = new Rectangle(snakeHeadX, snakeHeadY, snake.snakeTiles[0].Width, snake.snakeTiles[0].Height); Rectangle rectangle2 = new Rectangle((int)food.Position.X, (int)food.Position.Y, food.Width, food.Height); // if (rectangle1.Intersects(rectangle2)) { // score += FOOD_POINTS; // food.Position = RandPosition(); // snake.newTile = true; } // if (snakeHeadX < 0 || snakeHeadY < 0 || snakeHeadX + snake.snakeTiles[0].Width > GraphicsDevice.Viewport.Width || snakeHeadY + snake.snakeTiles[0].Height > GraphicsDevice.Viewport.Height) { Mode = GameMode.Complete; } } The method below is used to move the food sprite to a new random position:
private Vector2 RandPosition() { // Random random = new Random(); Vector2 position = new Vector2( GraphicsDevice.Viewport.TitleSafeArea.X + random.Next(GraphicsDevice.Viewport.TitleSafeArea.Width - 45) + 20, GraphicsDevice.Viewport.TitleSafeArea.Y + random.Next(GraphicsDevice.Viewport.TitleSafeArea.Height - 45) + 20); return position; } Gesture check
Gestures will be checked in the Update method every time. To begin with, we check whether new gestures are available, and, if available, read them. We also get the Delta value if the Flick gesture was defined. The snake will then be moved in the appropriate direction. The player cannot move the snake in the opposite direction (the game will be over). The game mode changes if the Tap gesture is detected (starts a new game from the menu or restarts the game).
private void CheckGestures() { // ? while (TouchPanel.IsGestureAvailable) { // GestureSample gesture = TouchPanel.ReadGesture(); // Flick Tap? switch (gesture.GestureType) { case GestureType.Flick: // ? Single x = gesture.Delta.X, y = gesture.Delta.Y; // ? if (Math.Abs(x) > Math.Abs(y)) { // left or right if (x < 0) { if (snake.direction == 3 && snake.snakeTiles.Count() > 1) Mode = GameMode.Complete; else snake.direction = 1; // } else { if (snake.direction == 1 && snake.snakeTiles.Count() > 1) Mode = GameMode.Complete; else snake.direction = 3; // } } else { // ? if (y < 0) { if (snake.direction == 4 && snake.snakeTiles.Count() > 1) Mode = GameMode.Complete; else snake.direction = 2; // } else { if (snake.direction == 2 && snake.snakeTiles.Count() > 1) Mode = GameMode.Complete; else snake.direction = 4; // } } break; case GestureType.Tap: // Menu Running if (Mode == GameMode.Menu) { Mode = GameMode.Running; } // Complete Running else if (Mode == GameMode.Complete) { snake.Reset(); score = 0f; Mode = GameMode.Running; } break; } } } The output of the game on the screen
The Draw method is called when the game draws itself. This example uses only blue background. This method checks the game mode and draws the corresponding screen. The text "FreeSnake, Tap the Screen to Start" is displayed on the screen when the game is loaded for the first time. Snake, food for the snake and the number of points is displayed when the user plays the game. Information about the points earned and the offer to play again is displayed when the game ends.
protected override void Draw(GameTime gameTime) { GraphicsDevice.Clear(Color.CornflowerBlue); // spriteBatch.Begin(); if (Mode == GameMode.Menu) { string GameStart = "FreeSnake\nTap the Screen to Start"; Vector2 stringSize = segoe20.MeasureString(GameStart); spriteBatch.DrawString(segoe20, GameStart, new Vector2((GraphicsDevice.Viewport.Width - stringSize.X) / 2, (GraphicsDevice.Viewport.Height - stringSize.Y) / 2), Color.White); } else if (Mode == GameMode.Running) { // snake.Draw(spriteBatch); // food.Draw(spriteBatch); // spriteBatch.DrawString(segoe20, "Score:"+score, scorePosition, Color.White); } else if (Mode == GameMode.Complete) { snake.Draw(spriteBatch); string GameOver = "Game Over\nScore : " + score +"\nTap the Screen to Restart"; Vector2 stringSize = segoe20.MeasureString(GameOver); spriteBatch.DrawString(segoe20, GameOver, new Vector2((GraphicsDevice.Viewport.Width - stringSize.X) / 2, (GraphicsDevice.Viewport.Height - stringSize.Y) / 2), Color.White); } // spriteBatch.End(); base.Draw(gameTime); } Conclusion
In this example, we showed the basic information that is required to create gesturing games for Windows Phone.
The source code of the resulting game can be found here .
And something else
We also remind that until May 20, applications for the Best Applications Free Promotion contest from Nokia and Microsoft are being accepted. Submit your apps and games for Windows Phone 7 to get a chance to win a Nokia Lumia 800 smartphone and free promotion of your application on Nokia and Microsoft platforms.
Source: https://habr.com/ru/post/141943/
All Articles