Zyxel Keenetic 4G, arduino and ds18b20 temperature sensors
 Hi Habrahabr! I want to share with you how I connected the Arduino to my router. Go!
Modern routers are like small computers that perform a highly specialized task to distribute network traffic. On board such a small device, Linux is installed, only without a graphical interface and with a stripped-down software part. Before me was a question, why not connect the arduino to your router - Zyxel Keenetic 4G? A little googling I stumbled upon a wonderful forum , where one of the participants made a modified firmware with support for installing additional packages for Keenetic 4G.
In our case, the Arduino is managed through the php_serial.class.php library and a lightweight web server based on Lighttpd + php. Using these tools, we will submit commands to arduinka to read the readings from two temperature sensors (house, street), record the answer in the Sqlite3 database and display on our web page.
Router preparation
First of all, you need to configure our router. Zyxel Keenetic 4G has a very small internal memory, so buy a simple usb hub and a small flash drive. All the details of the settings, I will not paint, but only share the necessary links. Immediately get ready for a long and tedious procedure.
- Alternative firmware ( discussion ). The opkg system for installing additional packages. (we read attentively WIKI, everything is arranged there)
- Install Sqlite3 with the opkg install command <package name>, where <package name> is the full path to the package. All the necessary packages take here .
- Install and configure Lighttpd and php .
Sensor connection
We connect temperature sensors ds18b20 to arduino. Nominal resistors - 4.7 kOhm
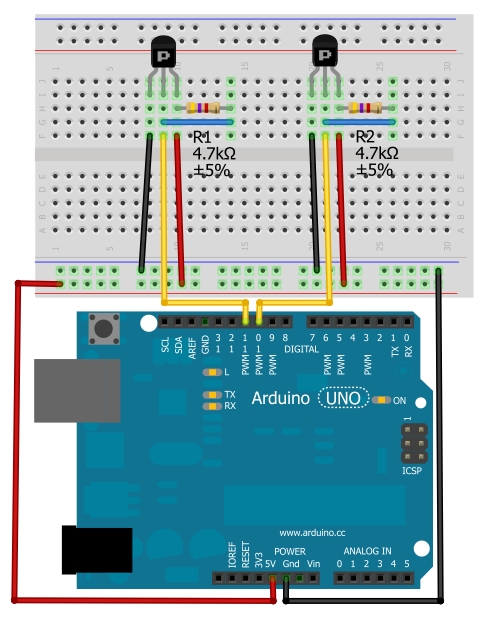
Sketch
')
Fill the sketch. The code is taken from this lesson and slightly modified for our task.
#include <OneWire.h> int nc; OneWire ds(10); // OneWire ds2(11); // byte addr[8]; byte addr2[8]; void setup(void) { Serial.begin(9600); ds.search(addr); ds2.search(addr2); } void loop(void) { byte i; byte present = 0; byte data[12]; int Temp; int znak; if (Serial.available() > 0) { nc = Serial.read(); if (nc==1) { ds.reset(); ds.select(addr); ds.write(0x44,1); present = ds.reset(); ds.select(addr); ds.write(0xBE); for ( i = 0; i < 9; i++) { data[i] = ds.read(); } Temp=(data[1]<<8)+data[0]; Temp=Temp; znak=((Temp%16)*100)/16; if (znak<0){ znak=znak*-1; } Serial.print(Temp/16); Serial.print("."); Serial.print(znak); Serial.println(); } if (nc==2) { ds2.reset(); ds2.select(addr2); ds2.write(0x44,1); present = ds2.reset(); ds2.select(addr2); ds2.write(0xBE); for ( i = 0; i < 9; i++) { data[i] = ds2.read(); } Temp=(data[1]<<8)+data[0]; Temp=Temp; znak=((Temp%16)*100)/16; if (znak<0){ znak=znak*-1; } Serial.print(Temp/16); Serial.print("."); Serial.print(znak); Serial.println(); } } } We send commands, accept answers
The sketch accepts two commands - "1" and "2". In order to send commands to Arduino, I used button processing on the java script using the well-known Jquery library. On my page there are 2 buttons and 2 tabular fields in which values from temperature sensors are displayed (see index.php). With the help of the POST method, the script accesses the arduino.php and passes the values of our commands. Here you can send commands directly to Arduino and read the response in the form of temperature, as well as write to the Sqlite3 database (see arduino.php). The readbd.php file is needed for the initial recording of temperature data in the plate. The beautiful design of the buttons was borrowed from the article “3D buttons with CSS3” .
index.php:
<?php include("readbd.php"); ?> <!DOCTYPE HTML PUBLIC "-//W3C//DTD HTML 4.01//EN" "http://www.w3.org/TR/html4/strict.dtd"> <html xmlns="http://www.w3.org/1999/xhtml" lang="ru"> <meta http-equiv="Content-Type" content="text/html; charset=windows-1251"> <head> <link href="style.css" rel="stylesheet" media="all" /> <title> </title> <link href="flot/examples/layout.css" rel="stylesheet" type="text/css"> <script type="text/javascript" src="jquery.js"></script> </head> <body class="body"> <br> <div class="container"> <header> <h1><span></span></h1> </header> </div> <div class="ul1" > <br> <table width="60px" border="0"><tr> <td><a href="#" id="led6" class="button black" onMouseDown="command(1);"></a></td> <td><a href="#" id="led6" class="button yellow" onMouseDown="command(2);"></a></td> </tr><tr> <td class="c1"><div id="content1" ><?php echo ''.$temp1.""; ?></div></td> <td class="c1"><div id="content2" ><?php echo ''.$temp2.""; ?></div></td> </tr> </table> </div> <br> <script> function command(id) { $.ajax({ type:'POST', url:'arduino.php', data:{msg:id}, cache: false, success: function(html){ $("#content"+id).html(html); } }) } </script> </center> </body> </html> arduino.php:
<?php include "php_serial.class.php"; $serial = new phpSerial; // Arduino ( ) $serial->deviceSet("/../../../../dev/ttyACM0"); // $serial->confBaudRate(9600); $serial->confParity("none"); $serial->confCharacterLength(8); $serial->confStopBits(1); $serial->confFlowControl("none"); $serial->deviceOpen(); // $serial->sendMessage(chr($_POST['msg'])); // Arduino $read = $serial->readPort(); // $serial->deviceClose(); try { // $db = new PDO('sqlite:'.dirname(__FILE__).DIRECTORY_SEPARATOR.'arduino.db'); // temp, $db->exec('CREATE TABLE IF NOT EXISTS temp ( idtemp INTEGER NOT NULL PRIMARY KEY AUTOINCREMENT, temperature VARCHAR(255) NOT NULL, datetime VARCHAR(255) NOT NULL )'); $db->exec('CREATE TABLE IF NOT EXISTS temp2 ( idtemp INTEGER NOT NULL PRIMARY KEY AUTOINCREMENT, temperature VARCHAR(255) NOT NULL, datetime VARCHAR(255) NOT NULL )'); // $d=date("dmy, G:i:s"); // //$db->exec('UPDATE temp SET temperature="'.$read.'", datetime="'.$d.'" WHERE idtemp='.$_POST['msg'].''); if ($_POST['msg']==1){ // $db->exec('INSERT INTO temp (temperature, datetime) VALUES ("'.$read.'","'.$d.'" )'); // $st = $db->query('SELECT MAX(idtemp) as id, temperature FROM temp'); $results = $st->fetchAll(); foreach ($results as $row) { echo ''.$row['temperature']."\n"; } } if ($_POST['msg']==2){ $db->exec('INSERT INTO temp2 (temperature, datetime) VALUES ("'.$read.'","'.$d.'" )'); $st = $db->query('SELECT MAX(idtemp) as id, temperature as tempe FROM temp2'); $results = $st->fetchAll(); foreach ($results as $row) { echo ''.$row['tempe']."\n"; } } } catch (PDOException $e) { die($e->getMessage()); } ?> Problems I encountered
- Arduino in the router was defined as / dev / ttyACM0, not / dev / ttyUSB0.
- After php was written, an error constantly popped up - No stty, you can’t help, unable to run. ”, E_USER_ERROR.
- When sending commands, the Arduino constantly rebooted.
Solutions
- Since I have the Web server installed on a flash drive, in my php script you need to correctly specify the path to the device. Also set 777 permissions on / dev / ttyACM0 or / dev / ttyUSB0 (depends on Arduino).
deviceSet("/../../../../dev/ttyACM0"); - In php_serial.class.php removed a piece of code:
if($this->_exec("stty --version") === 0) { register_shutdown_function(array($this, "deviceClose")); } else { trigger_error("No stty availible, unable to run.", E_USER_ERROR); } - After casting the sketch in the Arduino between the pins GND and Reset set the capacitor to 22 mF. This prevents rebooting while receiving commands.
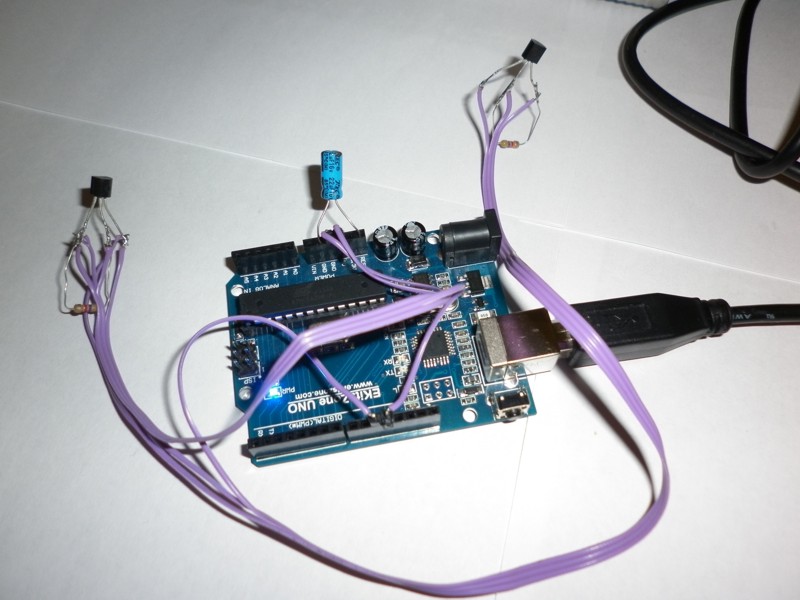
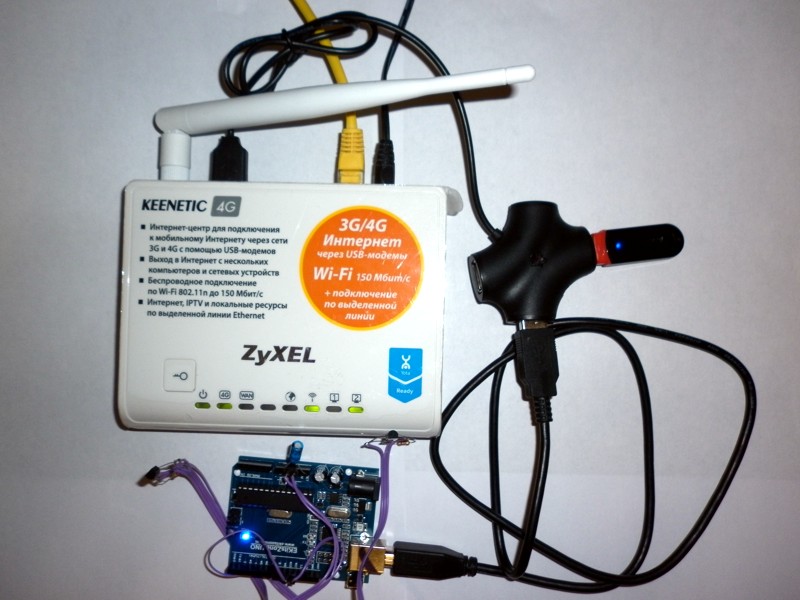
A couple of pictures
Download all the necessary files in one archive
PS
This is just a small example of how arduino can be used in conjunction with a router. You can write more serious things. Manage any devices in your home using the web interface and Arduino.
Thanks for the UFO invite!
Source: https://habr.com/ru/post/141865/
All Articles