Quadcopter for 1 day and $ 120
I have been planning a quadcopter as a platform for a flying robot for a very long time. I made the first calculations and order of parts a year ago. However, to do "just a copter" to fly, controlling with the remote control or even in FPV mode, is not an end task. Therefore, the kopter should be as flexible as possible and less expensive.
Separately, all the parts for the copter are there, but their conjugation is a simple matter only in theory. It is necessary to be both a programmer and an engineer and a modeler - a helicopter pilot. Therefore, the process moves rather slowly. And I want to fly :) Nothing is so discouraging and demotivating as the lack of visible results, especially when there is some progress, but not visual. Yes, and experimenting immediately on a large quadcopter is expensive and dangerous.
Therefore, I decided to assemble a minicopter for experiments. As always, the task is to make it inexpensive, simple and flexible.
My result is a finished copter for 1 day (for assembly and launch) and $ 120 (cost of a quadrocopter including delivery). And with the equipment - $ 145.
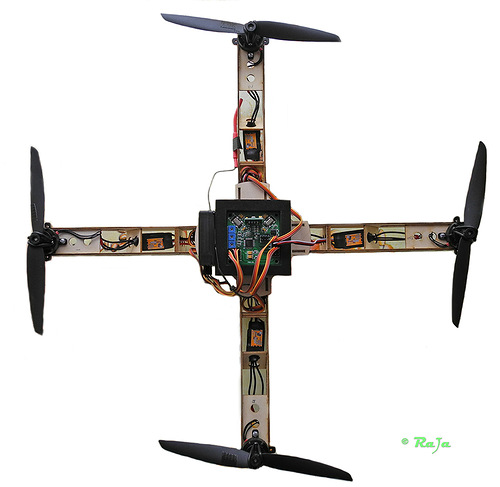
" MiniQuadroCopter "
Under the cut description and video.
Buddy order codes for HobbyKing
To whom how, and for me the main obstacle in copter industry has always been the high cost of proven sets of parts (kit) that can be bought in one place and experiment. After all, having assembled a kopter, you just get tired of flying very quickly, unless, of course, you are not an aircraft model designer, for whom this is just another fun model. The most interesting thing is to add a little to the copter (or a lot, depending on skills and inventiveness) of independence. But while you lift the copter in the air you will spend so much energy that the fuse is already beginning to fade away on the most interesting. Yes, and while you tweak the control program, you will go broke, because every mistake is almost certainly a fall, and the cheapest fall is broken propellers.
Let me show you how to overcome this.
In fact, the basic budget of the copter is even smaller, only about $ 100, including delivery.
So, the required parts :
That's the whole gentleman's set.
But we will need something extra . Perhaps you have something of this, so order something that is missing:
The radio equipment in my Turnigy 9x , which I modified for use with a LiIon battery and soldered the connector to update the firmware of the equipment (I use er9x firmware), but now it’s a very long wait because of its popularity, so I didn’t recommend it. In general, take whatever you have in stock and which you like with the number of channels from 4. I have Mode2 (throttle stick on the left), but this is not important. If you take a 6-channel Hobby King 2.4Ghz 6Ch Tx & Rx V2 , do not forget to her programming string , since there are no settings to be made on it, even to reverse channels. Configurable from PC only.
I bought at HobbyKing only because absolutely everything that we need can be ordered there, but you can take it on rctimer.com or in any other place. If you take to HK, order the necessary combo details right below - it will be cheaper than typing them separately.
SPTA:
We still need cogs M2x10 or M3x10 (they are easier to get in the store, but you have to drill holes in the motor mount slightly, it is not difficult).
Batteries take whenever possible at least a couple. If there is no charging for LiPo batteries, too
take this one-time attachment, come in handy.
Take more propellers. Do not look, that them on 5 pieces in a package. I broke 4 pieces on the first day, while setting up and finding a glitch in the firmware. :) This is a consumable item, especially in a cramped room like mine.
Spare motors, too, probably will not interfere, but this later, once you are unlikely to break them.
You will also need a soldering iron, a little solder and flux, a heat shrinkable tube with a diameter of 2 and 5 mm or electrical tape, a rubber band for money or from pants for mounting the battery :)
As soon as we have decided what we have, and what we order and in what quantity, we order and calmly wait for three weeks (well, how lucky it is with the mail).
')
1 . . 6 , .
. ( , )

«MiniQuadroCopter Frame»
- (- , , ). . . . 5 (2 :), , .
. , , .
4 ESC :
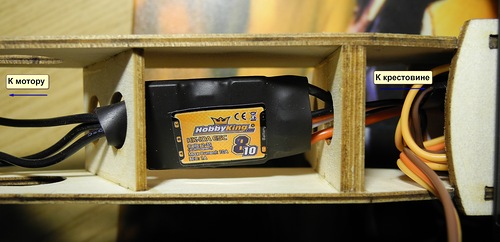
«ESC placement»
, 2 5-7. 5 5-7 . -. — . .
ESC, 1.5-2 . . .
1 , , :
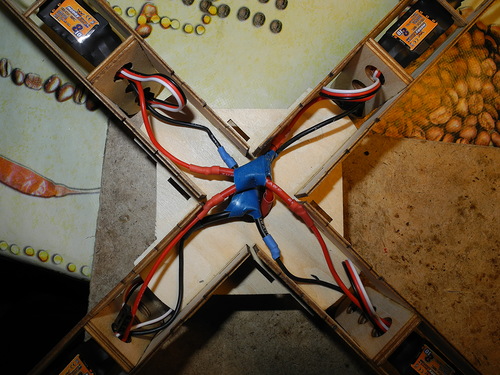
«MiniQuadroCopter electrics»
, . , , .
, - , . XT60 ( +).
310, . , ESC. , , , .
:

«ESC2Motor»
, ESC .
, 3 — Throttle 4 ( -, ), ( - bind, ). XT60. ESC , ESC .
. , .
, . , , — :

, , 2 , ESC. .
? , .
. , , , , , 1 2.
( ):
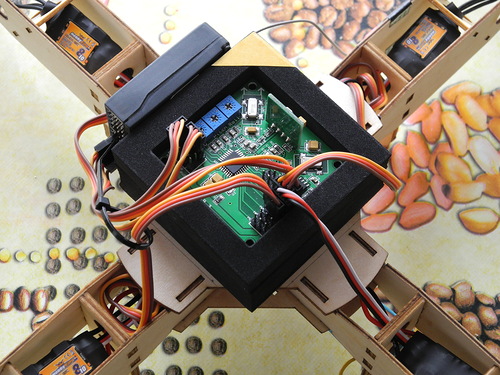
«Connections»
, .
— 2-3 4 ESC , servo extension . . 3 PLS 2.54 ( Female ).
M1-4

«HobbyKing Multi-Rotor Control Board V2.1»
, ( ).
. 4- :
1 — Aileron (, ROLL)
2 — Elevator (, PITCH)
3 — Throttle ()
4 — Rudder ( , , YAW)
, AIL, ELE, THR, RUDD.
4 , : — () , , , :
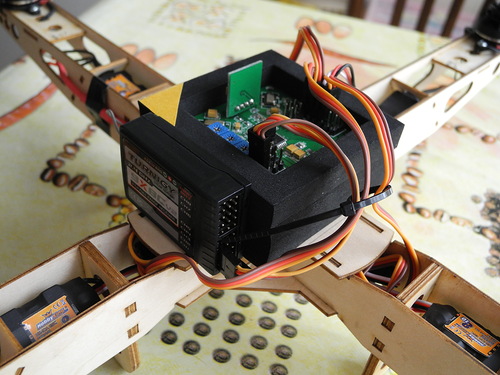
«Receiver Connection»
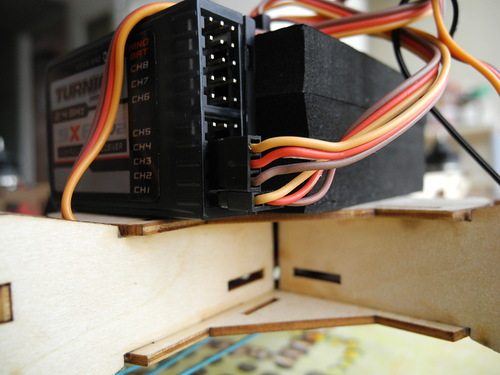
«Receiver Connection»
, . :)

« »
.

«miniQuadrocopter Weight»
.
AVR ISP . :
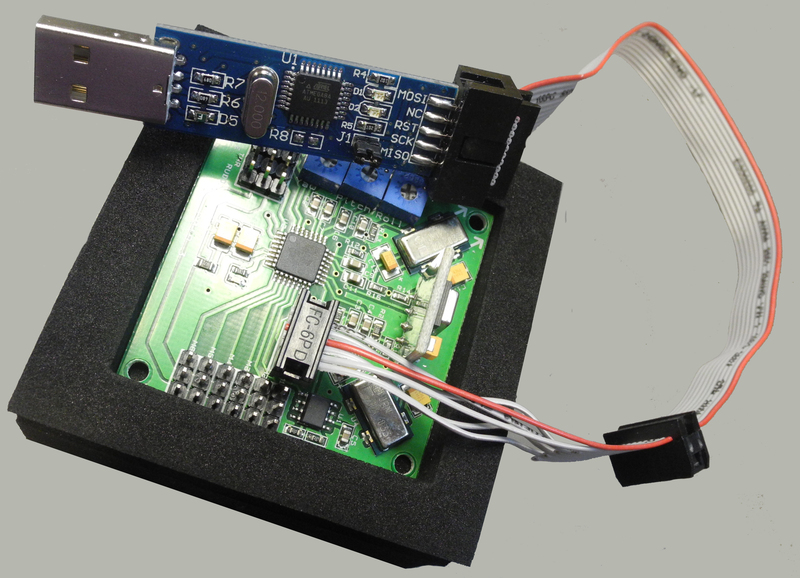
.. Kaptein Kuk quadrokopter, (KKmulticopter Flash) .
XXcontrol_KR_XCopter v2.5. avrdude:
, .
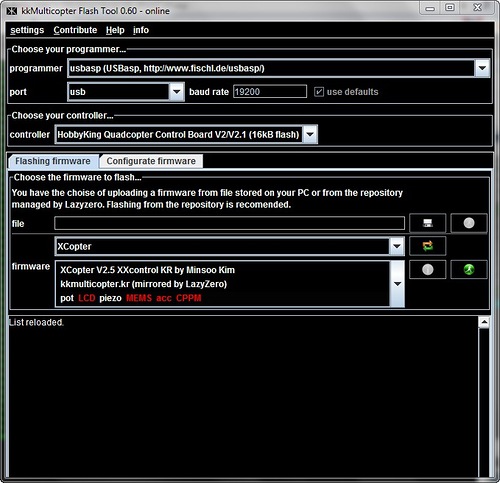
«Quadrocopter Firmware flash»
v4.7 Kaptein Kuk , .

, ( 1, 2, 4 8, ).
, :)
. , , , , ( , , , , , , , Elevator). , - , , . :) ( , 2 — v4.7, — , , ). — , , , !
, , , , , , GPS, , LPS . , , !
!
UPD: 3 /, .
:
, ,
UPD2: . .
, disarmed, ESC .
Arming ESC () .
— Disarming — , , . !
Mode1 Mode2 ( , ).
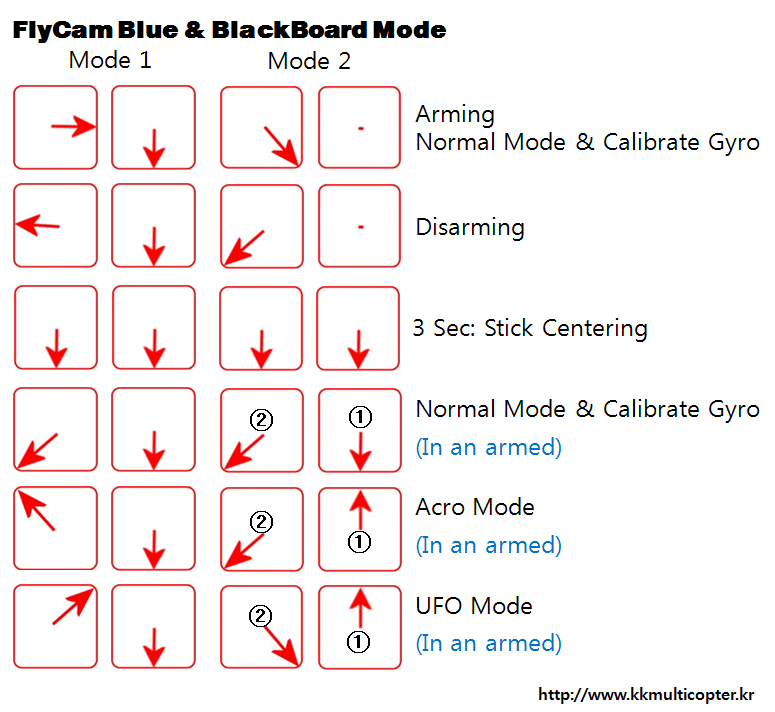
UPD 27.05.2013
, KK Multikopter .
MultiWii. Crius MultiWii SE, MultiWii Light NanoWii Hobbyking. . , , .
Separately, all the parts for the copter are there, but their conjugation is a simple matter only in theory. It is necessary to be both a programmer and an engineer and a modeler - a helicopter pilot. Therefore, the process moves rather slowly. And I want to fly :) Nothing is so discouraging and demotivating as the lack of visible results, especially when there is some progress, but not visual. Yes, and experimenting immediately on a large quadcopter is expensive and dangerous.
Therefore, I decided to assemble a minicopter for experiments. As always, the task is to make it inexpensive, simple and flexible.
My result is a finished copter for 1 day (for assembly and launch) and $ 120 (cost of a quadrocopter including delivery). And with the equipment - $ 145.

" MiniQuadroCopter "
Under the cut description and video.
Buddy order codes for HobbyKing
To whom how, and for me the main obstacle in copter industry has always been the high cost of proven sets of parts (kit) that can be bought in one place and experiment. After all, having assembled a kopter, you just get tired of flying very quickly, unless, of course, you are not an aircraft model designer, for whom this is just another fun model. The most interesting thing is to add a little to the copter (or a lot, depending on skills and inventiveness) of independence. But while you lift the copter in the air you will spend so much energy that the fuse is already beginning to fade away on the most interesting. Yes, and while you tweak the control program, you will go broke, because every mistake is almost certainly a fall, and the cheapest fall is broken propellers.
Let me show you how to overcome this.
Order parts
In fact, the basic budget of the copter is even smaller, only about $ 100, including delivery.
So, the required parts :
| Frame with 445 mm motors | $ 28.95 |
| Management board (analog KKmulticopter, but from HK) | $ 14.95 |
| ESC (stroke control) | $ 5.96 x 4 |
| Forward and reverse spin propellers | $ 1.34 + $ 1.94 |
| Rubber rings for mounting propellers | $ 1.4 |
| Prop Savers w / Band 4mm (10pcs) | $ 3.99 |
| 1300mAh battery | $ 5.96 |
That's the whole gentleman's set.
But we will need something extra . Perhaps you have something of this, so order something that is missing:
| AVR ISP Programmer for control board (suitable FTBB , USBASP, Arduino ... any) | $ 4.75 |
| Wires from the receiver to the control board | $ 4 |
| Servo extension for connecting ESC - you don’t get your own wires, take any or solder yourself - there are three wires | |
| Radio equipment - any with 4 or more channels | from $ 22,99 |
| XT60 Battery Connectors | $ 2.16 |
| Power wire or similar copper red and black (+ -) | $ 1.29 |
The radio equipment in my Turnigy 9x , which I modified for use with a LiIon battery and soldered the connector to update the firmware of the equipment (I use er9x firmware), but now it’s a very long wait because of its popularity, so I didn’t recommend it. In general, take whatever you have in stock and which you like with the number of channels from 4. I have Mode2 (throttle stick on the left), but this is not important. If you take a 6-channel Hobby King 2.4Ghz 6Ch Tx & Rx V2 , do not forget to her programming string , since there are no settings to be made on it, even to reverse channels. Configurable from PC only.
I bought at HobbyKing only because absolutely everything that we need can be ordered there, but you can take it on rctimer.com or in any other place. If you take to HK, order the necessary combo details right below - it will be cheaper than typing them separately.
SPTA:
We still need cogs M2x10 or M3x10 (they are easier to get in the store, but you have to drill holes in the motor mount slightly, it is not difficult).
Batteries take whenever possible at least a couple. If there is no charging for LiPo batteries, too
take this one-time attachment, come in handy.
Take more propellers. Do not look, that them on 5 pieces in a package. I broke 4 pieces on the first day, while setting up and finding a glitch in the firmware. :) This is a consumable item, especially in a cramped room like mine.
Spare motors, too, probably will not interfere, but this later, once you are unlikely to break them.
You will also need a soldering iron, a little solder and flux, a heat shrinkable tube with a diameter of 2 and 5 mm or electrical tape, a rubber band for money or from pants for mounting the battery :)
As soon as we have decided what we have, and what we order and in what quantity, we order and calmly wait for three weeks (well, how lucky it is with the mail).
')
Putting our quadric
1 . . 6 , .
. ( , )

«MiniQuadroCopter Frame»
- (- , , ). . . . 5 (2 :), , .
. , , .
4 ESC :

«ESC placement»
, 2 5-7. 5 5-7 . -. — . .
ESC, 1.5-2 . . .
1 , , :

«MiniQuadroCopter electrics»
, . , , .
, - , . XT60 ( +).
310, . , ESC. , , , .
:

«ESC2Motor»
, ESC .
, 3 — Throttle 4 ( -, ), ( - bind, ). XT60. ESC , ESC .
. , .
, . , , — :

, , 2 , ESC. .
? , .
. , , , , , 1 2.
( ):

«Connections»
, .
— 2-3 4 ESC , servo extension . . 3 PLS 2.54 ( Female ).
M1-4

«HobbyKing Multi-Rotor Control Board V2.1»
, ( ).
. 4- :
1 — Aileron (, ROLL)
2 — Elevator (, PITCH)
3 — Throttle ()
4 — Rudder ( , , YAW)
, AIL, ELE, THR, RUDD.
4 , : — () , , , :

«Receiver Connection»

«Receiver Connection»
, . :)

« »
.

«miniQuadrocopter Weight»
.
AVR ISP . :

.. Kaptein Kuk quadrokopter, (KKmulticopter Flash) .
XXcontrol_KR_XCopter v2.5. avrdude:
avrdude -c usbasp -p m168p -U flash:w:XXcontrol_KR_XCopter_v2_5.hex:a, .

«Quadrocopter Firmware flash»
v4.7 Kaptein Kuk , .

, ( 1, 2, 4 8, ).
, :)
. , , , , ( , , , , , , , Elevator). , - , , . :) ( , 2 — v4.7, — , , ). — , , , !
, , , , , , GPS, , LPS . , , !
!
UPD: 3 /, .
:
, ,
UPD2: . .
, disarmed, ESC .
Arming ESC () .
— Disarming — , , . !
Mode1 Mode2 ( , ).

UPD 27.05.2013
, KK Multikopter .
MultiWii. Crius MultiWii SE, MultiWii Light NanoWii Hobbyking. . , , .
Source: https://habr.com/ru/post/141761/
All Articles