EQalization: eliminating frequency conflicts
Start with the fact that
Frequently, newcomers are faced with the problem of inconsistency in their musical composition: all the instruments individually sound good, as it should, and in the mix we get a vague "mess". And the reason for this "misunderstanding" especially the structure of our hearing aid, in the so-called auditory disguise.
A few words about hearing disguise
If the instruments have similar (or intersecting) frequency spectra, the quieter timbre will be heard worse or the listener's brain will not be able to select this signal at all. Imagine how you are standing on the platform in the subway and talking sweetly, and the train rushes past with such a shriek that you cease to understand each other. The fact is that the frequency spectrum of our voice intersects with the frequency range of the rumble of a passing train - this is the effect of disguise.
There is a problem? Find a solution!
Fortunately, the solution was already found without us, so we can only reap the benefits and rejoice. The solution is EQ.
')
Equalizer (EQ)
An equalizer is a tool for adjusting the amplitude-frequency characteristic (AFC) of an audio signal, that is, it is a device that allows you to “retouch” the original timbre by changing the amplitude of its frequency component.
It is probably worth starting with the fact that the main types of equalizer 2: graphic and parametric. There is also a paragraphic (a hybrid of the first and second type) and shelf, which is used mainly in the final processing of the phonogram, that is, at the mastering stage. In the framework of this article, the last 2 equalizers will not be considered, because those are not jungles.
Graphic Equalizer

“Iron” graphic equalizer
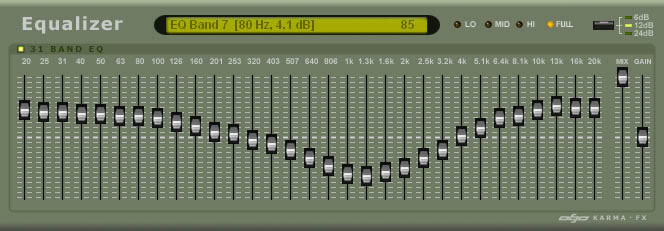
Program graphic equalizer
Similarly, the graphic equalizer looks like in hardware and software. The essence of such an equalizer is quite simple: the extreme bands, as a rule, are shelf filters
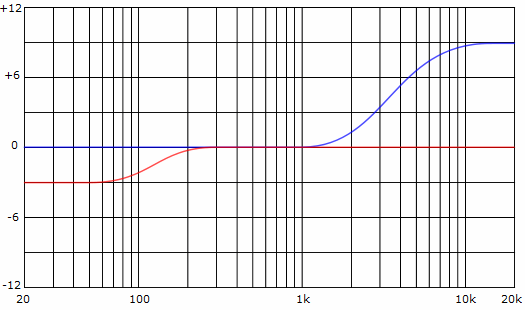
Filter Low Shelf (red line, the leftmost fader of the graphic equalizer is lowered down by -3 dB) and High Shelf (blue line, in this position, the rightmost fader is raised up by 6 dB)
and all others have a “bell-shaped” characteristic:
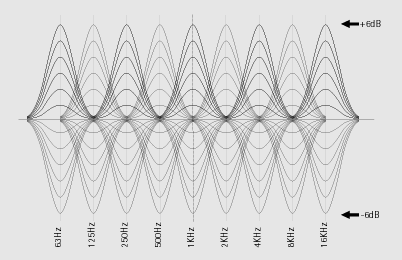
The width and frequency of each band is programmed in such an equalizer, so this type is not very flexible and it interferes with the original audio signal quite roughly. Therefore, let us leave this miracle of technology to sit quietly on the sidelines and move on to the next type of equalizer, more important for us, parametric.
Parametric equalizer

This type of equalizer has much more flexible settings for each band compared to its “brother”:
- Frequency (Freq) - frequency band
- Parameter Q - bandwidth or "quality"
- Gain - the level of amplification (attenuation) of the selected band in decibels (dB)
A parametric equalizer is a find for solving such tasks as eliminating frequency conflicts, since the ability to select a frequency for correction is simply necessary. So, first things first.
Overview of 3 parametric EQ
Have you ever dealt with an equalizer? Just in this case, I will present you a good (in my opinion) software EQ.
Note: the following equalizers are VST / RTAS / DX or AU (Mac) plug-ins that require a host (software sequencer): Cubase / Nuendo, Sonar, Ableton, Logic Pro, Pro Tools, FL Studio, etc.
Sonnox oxford eq

This is a “classic of the genre” in the world of programmatic parametric equalizers. Sonnox Oxford has 5 sections of the settings of the corresponding 5 bands, 2 of which are filters - High Pass (high pass filter) and Low Pass (low pass filter).
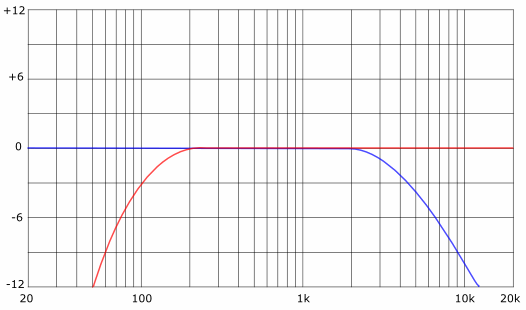
Low Pass (Red) and High Pass (Blue)
having a very good slope - 36 dB per octave (this is quite enough in most cases). There are 2 settings blocks and the “A” and “B” buttons in the center to quickly switch between the options for these settings.
From "-" I would note the following:
- No spectrum analyzer (but this is not critical for EQ)
- Both filters have limitations on cut-off frequency, low-pass filter 0-400 Hz,
High-pass filter 1000-20 000 Hz, which is not always convenient.
DMG Audio's EQality

A pretty good equalizer with three phase modes (with the phase-frequency response of the equalizers can be met if you wish), a good high-resolution direct analyzer with six bands and 2 filters with an amazing cut of 48 dB per octave. You can roll back changes (Undo, Redo), save and load presets, as well as flexible interface settings. Loads the CPU is weak, so you can safely cling it to at least every bus in the mixer.
Of the minuses, I would note that during the mixdown (rendering) in the audio file, the processing and automation of the parameters of this equalizer disappears somewhere. Perhaps only I have a problem, but I would strongly recommend checking this equalizer before use for a similar defect.
FabFilter Pro – Q

I personally use it, very satisfied. You can create up to 24 bands (including LP and HP filters), equalize the left and right channels separately, has 2 settings blocks (like Sonnox) and an excellent spectrum analyzer working in two modes: Pre-EQ (before EQ processing) and Post-EQ (after processing, respectively). Disadvantages, sorry, did not reveal. No, I lie, an honest person will have to pay 150 euros for this miracle (if this, of course, can be called a disadvantage).
Unfortunately, all these 3 EQs are paid, and as a free you can try ReaEQ, which is part of the ReaPlugs VST FX Suite from Cockos (the creator of the REAPER workstation)
Now you already have something to choose from, so let's get started!
Frequency conflict resolution
Bass and barrel
The most common case is the conflict of bass and barrels, and using this example we will analyze “what's what”. Such a conflict cannot even be partially resolved by panning (the removal of two instruments from each other in space, that is, along the left and right channels), since both of these instruments must be centered. And the solution remains 2: SideChain-compression (there are a lot of educational materials on this topic on the Internet), which allows you to mute the bass at the time of the barrel attack, and equalization, when such a “quality” (as with SideChain) is simply not needed.
You can, of course, initially pick up such a bass and a drum that will not conflict with each other. But another thing is when you like this particular bass and this particular drum, here the equalization is a breath of clean air.
To start equalization into the gap (Insert), bass and drums need to be “hung up” on the equalizer (which I hope will not cause difficulties) and turn on the spectrum analyzer (in the circuit after EQ), or ears if you trust your impeccable hearing, but rather both. If your equalizer does not have a built-in spectrum analyzer, I would advise using Voxengo SPAN - a good (and most importantly free) analyzer, which you can read here .

This picture shows the process of the analyzer operation with parallel connection. In this mode, SPAN is able to analyze two audio signals in one window, which is undoubtedly convenient. You can repeat this in your own home, it is completely safe and even useful! It says how to do it.
So, we have 2 spectra in front of us (the bass spectrum is on the left and the barrels on the right):
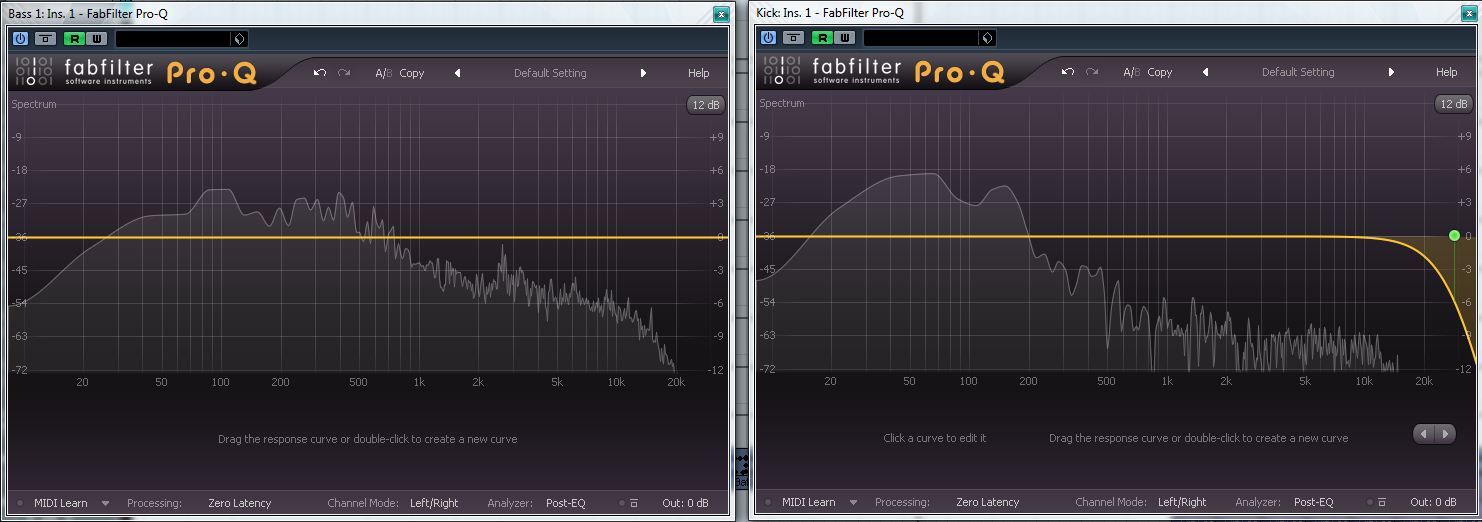
Since the barrel with a pronounced low-frequency component (the extreme big hump), having extinguished which we lose all the dynamics of it, the task becomes more difficult. If you pick a hump in the region of 150 Hz (the second small hump), you can lose the characteristic kick of the barrel and get a bubbling disc.
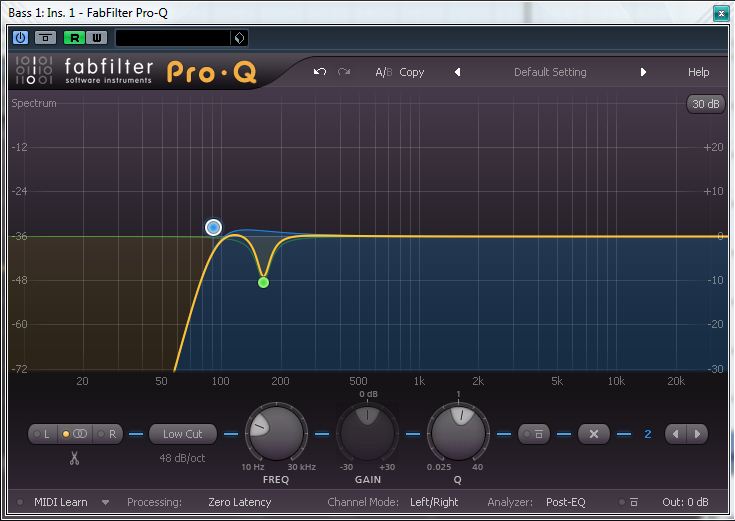
Based on the fact that the project has a sub-bass occupying a band up to 90 Hz, we will pick up all the bass below 90 Hz and narrow the bar (always cut out a narrow band!) Cut the bass 150-160 Hz (Slightly to the right of the hump). It will look something like this:
Note: the sub bass and barrel conflict in this case was resolved with the help of SideChain compression.
In the barrel, you can select a characteristic click for better readability in the mix. To understand where this click is located, you need to create a narrow band in the region of 1000 Hz, raise it by 6-9 dB and walk this band to 2000-3000 Hz (rarely a little higher), you have to hear it. Having determined the very place where the barrel click “hid”, we lower the band to 2-4 dB (the main thing is not to overdo it) and make it a little wider:

It is necessary to remember 2 very important rules:
- It is necessary to cut a narrow band, add a wide one, and, the higher the frequency, the wider the band (the smaller the Q parameter);
- When performing equalization of instruments while mixing the material, try to first cut (filter), and only then raise the frequencies.
Eliminating the conflict of bass and barrels using the equalization method is not always simple, often requiring creative approach. If the "humps" of these instruments overlap each other, it may be worth thinking about changing the barrel, in such a case, the whole mix can be spoiled.
Conflict of bass and mid range instruments
Almost all instruments are in the middle frequency range and many of them have a low-frequency component (hum and noise), which may conflict with bass. Therefore, many can cut the bottoms without affecting the sound of the party in the mix.
Create a Low Pass filter on the selected instrument, click "Play" and start cleaning up the bottoms until you feel the changes.
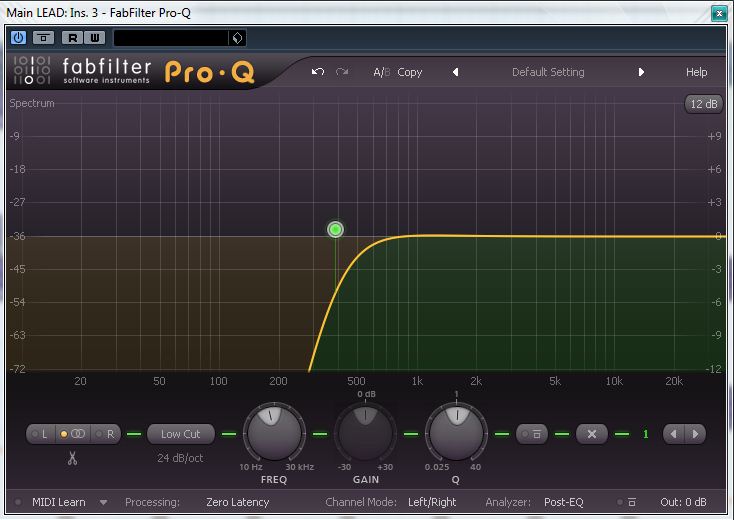
Note: in this case, do not use too much cutting edge (36 or 48 dB) to leave something like a “crossfade” of the spectra.
The main thing that the party sounded "as it should" in the mix, and not separately, which is why we cut the bottoms during playback. As soon as you feel that the timbre begins to lose density, stop and make a small pullback. Thus, you can work with many tools and eliminate most conflicts in the lower middle.
Frequency conflicts of tools
With all the other instruments, the situation is much simpler than with the bass and the barrel, if only because you can pan these instruments into different channels, using one very important rule: the higher the frequency range occupied by the instrument, the farther from the center it can be panned . After that, they can be equalized, based on their position in space.
A few words about the “niche” for vocals
If there is vocal in your composition, then it is necessary to make room for it, otherwise a conflict with the instruments of the middle frequency range is simply inevitable. Fortunately, you already know what spectrum analysis is and how to apply it at equalization. Why precisely to make room, and not to tidy up in some places the vocals? The fact is that vocal is minimally minimalized and very cautious, most often the lower parts (up to 150-200 Hz) and a small area in the region of 1000 Hz are cut in vocals to eliminate the unpleasant nasal overtone.
Summing up
- Before equalizing the instruments, perform panning using one very important rule: the higher the frequency range occupied by the instrument, the farther from the center it can be panned. It is important to know: you can pan everything except the bass, the drums and the main vocals.
- Start eliminating frequency conflicts from bass and drums, gradually moving to higher “instruments”.
- When analyzing the spectrum, select its strong parts. Visually, they appear as "humps".
- If the "humps" of bass and barrels strongly overlap each other, it may be worth thinking about changing the barrel, in such a case, the equalization can spoil the whole mix and deprive it of assertiveness.
- Cut the frequency should be a narrow band, and add - wide.
- Filtering the bottom of the instruments of the middle frequency range can eliminate most of the conflicts in the lower middle.
- When working with vocals, it is important to free up space in the mix for it, and in no case the opposite.
- Equalization - intervention in the frequency response of the instrument / timbre, be careful - know the measure.
- Do not perform all the “from and to” equalization in one session, let the ears rest, they quickly get used to the sound (including the “wrong” sound).
- If you have to apply a lot of equalization to any instrument, think, maybe this instrument has no place in the mix.
Important: in some points of this article the subjective point of view is reflected; Everything described here is not an axiom and has a cognitive character.
Friends, colleagues, success in all your creative endeavors!
Source: https://habr.com/ru/post/141730/
All Articles